Table of Contents
Advertisement
Quick Links
Ambient Weather WS-1173B Advanced Weather Station
Table of Contents
1
Introduction ..................................................................................................................................... 2
2
Product Features .............................................................................................................................. 3
3
Getting Started ................................................................................................................................ 4
3.1 Parts List ....................................................................................................................................... 4
3.2 Recommend Tools ......................................................................................................................... 4
3.3 Thermo-Hygrometer Sensor Set Up .............................................................................................. 4
3.4 Display Console Set Up ................................................................................................................ 5
3.4.1 Radio Controlled Clock (RCC) .............................................................................................. 6
3.4.2
Display Console Layout ..................................................................................................... 6
3.4.3
Sensor Operation Verification ............................................................................................ 8
4
Remote Sensor Installation ............................................................................................................. 8
4.1
Sensor Placement ................................................................................................................... 8
4.2
Wireless Reception Considerations ........................................................................................ 8
5
Console Operation........................................................................................................................... 9
5.1
Quick Display Mode .............................................................................................................. 9
5.1.1 Quick Display Mode Quick Reference Guide ........................................................................ 9
5.1.2
Quick Display Mode Operation ......................................................................................... 9
5.2
Set (Program) Mode ............................................................................................................. 10
5.2.1
Set Mode Quick Reference Guide .................................................................................... 10
5.2.2
Set Mode Operation ......................................................................................................... 10
5.2.3 Setting Barometric Pressure ................................................................................................. 13
5.2.4
Setting Calibrated Humidity............................................................................................. 14
5.2.5
Setting Calibrated Temperature ........................................................................................ 14
5.3
Alarm Mode ......................................................................................................................... 15
5.3.1 Alarm Display ...................................................................................................................... 15
5.3.2
Alarm Programming ......................................................................................................... 15
5.3.3
Cancelling the Alarm ........................................................................................................ 16
Outdoor Alarm - Temperature vs. Dew Point .................................................................. 16
5.3.4
5.4 Min/Max Mode ........................................................................................................................... 16
5.5
Other Console Features ........................................................................................................ 17
5.5.1
Weather Forecasting ......................................................................................................... 17
5.5.2
Weather Forecast Initialization ......................................................................................... 17
5.5.3
Weather Icons ................................................................................................................... 18
5.5.4
Weather tendency indicator .............................................................................................. 18
5.5.5
Storm threshold indicator ................................................................................................. 18
5.5.6
Pressure threshold setting ................................................................................................. 19
5.5.7
Pressure Graph ................................................................................................................. 19
5.5.8
Moon Phase ...................................................................................................................... 19
5.5.9
Sunrise and Sunset ........................................................................................................... 19
5.5.10
Restoring Lost Outdoor Temperature and Humidity Sensor ........................................ 20
5.5.11
Factory Reset ............................................................................................................... 20
6.
Glossary of Terms ......................................................................................................................... 21
Version 3.0
©Copyright 2015, Ambient LLC. All Rights Reserved.
User Manual
Page 1
Advertisement
Table of Contents

Subscribe to Our Youtube Channel
Related Manuals for Ambient Weather WS-1173B


Summary of Contents for Ambient Weather WS-1173B
-
Page 1: Table Of Contents
Ambient Weather WS-1173B Advanced Weather Station User Manual Table of Contents Introduction ............................. 2 Product Features ..........................3 Getting Started ..........................4 3.1 Parts List ............................4 3.2 Recommend Tools ......................... 4 3.3 Thermo-Hygrometer Sensor Set Up ....................4 3.4 Display Console Set Up ........................ 5 3.4.1 Radio Controlled Clock (RCC) .................... -
Page 2: Introduction
Warranty Information ....................... 26 1 Introduction Thank you for your purchase of the Ambient Weather WS-1173B Advanced Weather Station with Temperature, Humidity, Barometer, Advanced Forecasting, Sunrise, Sunset and Moonphase. The following user guide provides step by step instructions for installation, operation and troubleshooting. -
Page 3: Product Features
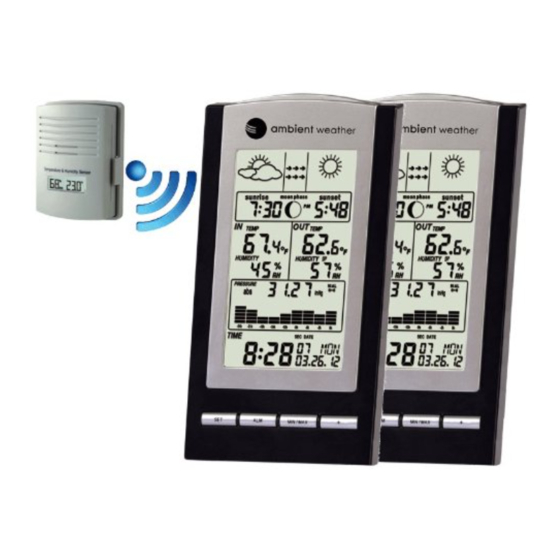
2 Product Features Figure 1 Description Description Forecast Icons Barometric Pressure Moonphase Radio Controlled Clock with Perpetual Calendar Sunrise and Sunset Indoor Humidity and Temperature Outdoor Temperature and Humidity Version 3.0 ©Copyright 2015, Ambient LLC. All Rights Reserved. Page 3... -
Page 4: Getting Started
Note: The power up sequence must be performed in the order shown in this section (remote transmitter first, Display Console second) to avoid the console synchronization time out. The WS-1173B weather station consists of a display console (receiver), and a thermo-hygrometer (remote transmitter). -
Page 5: Display Console Set Up
most climates. We do not recommend rechargeable batteries. They have lower voltages, do not operate well at wide temperature ranges, and do not last as long, resulting in poorer reception. Replace the battery door and set screw. Note that the temperature and humidity will be displayed on the LCD display. -
Page 6: Radio Controlled Clock (Rcc)
3.4.1 Radio Controlled Clock (RCC) If your console is equipped with the Radio Controlled Clock (RCC), the icon WWVB will appear above the time. WWVB is the NIST time signal radio station near Fort Collins, Colorado. The RCC is received by the wireless transmitter, and passed to the console. After the remote sensor is powered up, the sensor will transmit weather data for 30 seconds, and then the sensor will begin radio controlled clock (RCC) reception. - Page 7 Figure 4 1. Weather forecast icon 18. Outdoor humidity display 2. low battery indicator 19. Outdoor humidity low/high alarm 3. MIN/MAX information 20. Absolute or relative air pressure selection 4. Sunrise time 21. Barometer air pressure 5. Moon phase indicator 22.
-
Page 8: Sensor Operation Verification
3.4.3 Sensor Operation Verification Verify the indoor and outdoor humidity match closely with the console and sensor array in the same location (about 10’ apart). The sensors should be within 10% (the accuracy is ± 5%). Allow about 30 minutes for both sensors to stabilize. Verify the indoor and outdoor temperature match closely with the console and sensor array in the same location (about 10’... -
Page 9: Console Operation
Brick 10-40% Concrete 40-80% Metal 90-100% 5 Console Operation Note: The console has four keys for easy operation: SET key, ALARM key, MIN/MAX key and key. There are four program modes: Quick Display Mode, Set Mode, Alarm Mode and Min/Max Mode. -
Page 10: Set (Program) Mode
5.2 Set (Program) Mode 5.2.1 Set Mode Quick Reference Guide Command Mode Settings [SET] + 3 seconds Enter Set Mode, Daylight Savings Press [+] to toggle OFF and ON Time (DST) [SET] Time Zone (TZ) Press [+] to increase. [MIN/MAX] to decrease [SET] 12/24 Hour Format Press [+] to toggle between 12 hour (12h) and... - Page 11 Note: The DST should always be ON unless you live in Arizona or Hawaii, which do not observe DST. If you turn this feature ON, it will automatically adjust time after daylight savings and standard time changes.`1 Time Zone Settings. Press the SET key again to adjust the Time Zone (TZ) setting. Press the + key or MIN/MAX key to adjust the time zone from -12 to 12, based on the number of hours from Coordinated Universal Time, or Greenwich Mean Time (GMT).
- Page 12 Next, press the ALARM key to adjust the latitude whole number. Press the + key or MIN/MAX key to adjust the latitude whole number up or down. Press the ALARM key again to adjust the latitude decimal number. Press the + key or MIN/MAX key to adjust the latitude decimal number up or down.
-
Page 13: Setting Barometric Pressure
To view the uncalibrated value, press the ALARM key while the temperature is flashing. Reference Section 5.2.5 Setting Calibrated Temperature for more details on this function. 13. Indoor Humidity Calibration (default is measured indoor humidity). Press the SET key to adjust the indoor humidity. -
Page 14: Setting Calibrated Humidity
To calibrate humidity, you will need an accurate source, such as a sling psychrometer or Humidipaks One Step Calibration kit, available from Ambient Weather, which uses a salt bath. To calibrate indoor humidity, in the Set Mode with indoor humidity flashing, press the... -
Page 15: Alarm Mode
Place the sensor in a shaded, controlled environment next to the fluid thermometer, and allow the sensor to stabilize for 24 hours. Compare this temperature to the fluid thermometer and adjust the console to match the fluid thermometer. To calibrate indoor or outdoor temperature, in the Set Mode with indoor or outdoor temperature flashing, press the key or MIN/MAX key to increase or decrease the temperature setting (in increments of 0.1 degC or 0.18 degF) to match the calibrated or known temperature source. -
Page 16: Cancelling The Alarm
indicating the alarm function has been enabled). Press the SET key to confirm the setting and continue pressing the SET key to toggle through each alarm mode until it returns to the normal display mode. Press the SNOOZE key or wait 30 seconds for the programming mode to timeout, and the alarm mode will return to the normal mode. -
Page 17: Other Console Features
Press MIN/MAX key again to enter the minimum mode, and the MIN icon and minimum records will be displayed and begin flashing. Press MIN/MAX key again to return the Normal Mode. In the maximum (or minimum) reading Mode, press the key to display the specific maximum (or minimum) value you wish to reset. -
Page 18: Weather Icons
5.5.3 Weather Icons Sunny Partly Cloudy Cloudy Rainy The four weather icons are Sunny, Partly Cloudy, Cloudy and Rainy. There are also two weather tendency indicators to show the air pressure tendency between the weather icons. 5.5.4 Weather tendency indicator The weather tendency arrow is located between the weather icons to show the air pressure tendency and provide a forecast based on increasing or decreasing air pressure. -
Page 19: Pressure Threshold Setting
warning feature has been activated. 5.5.6 Pressure threshold setting The pressure threshold (the negative or positive rate of change of pressure signifying a change in the weather) can be adjusted by the user from level 2 to level 4 (default level 2 mbar/hour). The lower the level pressure threshold setting, the higher sensitivity for weather forecast changes. -
Page 20: Restoring Lost Outdoor Temperature And Humidity Sensor
Latitude = 33.30 North Longitude = 111.96 West after rounding to two significant digits. Record your longitude and latitude here for future reference: Longitude: Latitude: Figure 6 5.5.10 Restoring Lost Outdoor Temperature and Humidity Sensor If the signal is lost between the remote sensor (or transmitter) and the display console (or the receiver), to resynchronize, while in normal mode, press and hold the key for 10 seconds. -
Page 21: Glossary Of Terms
Continue to hold. The backlight will flash 12 times. 3. When the flashing is complete, let go of the buttons. The console has now been restored to factory default. 4. Wait several minutes before pressing any buttons for the remote sensor to sync to the console. 5. -
Page 22: Measurement Specifications
7.2 Measurement Specifications The following table provides specifications for the measured parameters. Measurement Range Accuracy Resolution Indoor Temperature 32 to 140 °F ± 2 °F 0.1 °F Outdoor Temperature -40 to 149 °F ± 2 °F 0.1 °F Indoor Humidity 1 to 99 % ±... - Page 23 5. If the sensor assembly is too close (less than 5-10’), move the sensor assembly away from the display console. 6. Make sure the remote sensors are not transmitting through solid metal (acts as an RF shield), or earth barrier (down a hill). 7.
-
Page 24: Accessories
Description Energizer AA Lithium Battery (2-pack) - AA lithium batteries for cold weather climates. Batteries for Long Life and Cold Climates Ambient Weather SRS100LX Solar Radiation Shield improves temperature accuracy Temperature and Humidity Solar for hot weather climates. Remove the rain guard and Radiation Shield install over thermo-hygrometer. -
Page 25: Liability Disclaimer
Added function to reacquire lost remote signal without powering down and up console. WS-1173B Moved RCC receiver from the console to the transmitter to improve RCC reception. 11. Liability Disclaimer Please help in the preservation of the environment and return used batteries to an authorized depot. -
Page 26: Warranty Information
However, there is no guarantee that interference will not occur in a particular installation. If this equipment does cause harmful interference to radio or television reception, which can be determined by turning the equipment off and on, the user is encouraged to try to correct the interference by one or more of the following measures: •...
Need help?
Do you have a question about the WS-1173B and is the answer not in the manual?
Questions and answers