Table of Contents
Advertisement
Quick Links
Ambient Weather WS-1500-IP OBSERVER Solar Powered
Wireless IP Weather Station User Manual
Table of Contents
1.
Introduction ..................................................................................................................................... 2
2.
Warnings and Cautions ................................................................................................................... 2
3.
Quick Start Guide ............................................................................................................................ 2
4.
Pre-Installation Checkout and Site Survey...................................................................................... 3
4.1
Pre Installation Checkout ....................................................................................................... 3
4.2
Site Survey ............................................................................................................................. 3
5.
Getting Started ................................................................................................................................ 4
5.1
Parts List ................................................................................................................................. 4
5.2
Recommend Tools .................................................................................................................. 4
5.3
Sensor Array Set Up ............................................................................................................... 5
5.3.1
Install Wind Vane ............................................................................................................... 5
5.3.2
Install Wind Cups ............................................................................................................... 6
5.3.3
Install U-Bolts .................................................................................................................... 6
5.3.4
Install the Rain Gauge Funnel ............................................................................................ 7
5.3.5
Install Batteries................................................................................................................... 8
5.3.6
Install Mounting Pole ......................................................................................................... 9
5.5 Best Practices for Wireless Communication ................................................................................. 9
5.6
Indoor Thermo-Hygrometer-Barometer Transmitter (Optional WH32B) ............................ 10
5.7
5.8
Mounting the WH32B and WH31B Sensors ........................................................................ 12
6.
Programming the ObserverIP Receiver ......................................................................................... 14
6.1
Hardware Requirements ....................................................................................................... 14
6.2
Software Requirements ........................................................................................................ 14
6.3
ObserverIP Physical Connections ........................................................................................ 14
6.4
Finding the ObserverIP on the Network from your Computer ............................................. 15
6.4.1
PC Users ........................................................................................................................... 15
6.4.2
Mac Users ........................................................................................................................ 17
6.4.3 Linux Users .......................................................................................................................... 18
6.5
Local Device Network Settings ............................................................................................ 18
6.6
Station Settings ..................................................................................................................... 19
6.6.1
Weather Station Settings .................................................................................................. 19
6.6.2
Time Zone Setting ............................................................................................................ 20
6.7
Live Data .............................................................................................................................. 21
6.7.1
Reset and Change Rain Totals .......................................................................................... 21
6.8
Weather Network Settings .................................................................................................... 22
6.8.1
WeatherUnderground.com ............................................................................................... 23
6.8.2
AmbientWeather.net ......................................................................................................... 27
6.9
Calibration ............................................................................................................................ 30
6.9.1
Relative Barometric Pressure Calibration Example ......................................................... 30
6.10
Adding Additional Sensors ................................................................................................... 34
7.
Updating Firmware ....................................................................................................................... 34
8.
Glossary of Terms ......................................................................................................................... 36
9.
Specifications ................................................................................................................................ 38
Version 1.1
©Copyright 2018, Ambient LLC. All Rights Reserved.
Page 1
Advertisement
Table of Contents

Related Manuals for Ambient Weather WS-1500-IP


Summary of Contents for Ambient Weather WS-1500-IP
-
Page 1: Table Of Contents
Ambient Weather WS-1500-IP OBSERVER Solar Powered Wireless IP Weather Station User Manual Table of Contents Introduction ............................. 2 Warnings and Cautions ........................2 Quick Start Guide ..........................2 Pre-Installation Checkout and Site Survey..................3 Pre Installation Checkout ....................... 3 Site Survey ..........................3 Getting Started .......................... -
Page 2: Introduction
Warranty Information ....................... 42 1. Introduction Thank you for your purchase of the Ambient Weather WS-1500 Smart Wireless Weather Station with Remote Monitoring. The following user guide provides step by step instructions for installation, operation and troubleshooting. To download the latest manual, firmware upgrades and IP Finder Tools, visit: http://www.ambientweather.com/observerip.html... -
Page 3: Pre-Installation Checkout And Site Survey
Please take this into consideration when choosing ObserverIP receiver or mounting locations. Make sure your ObserverIP receiver is at least five feet away from any electronic device to avoid interference. 6. Visit Ambient Weather Mounting Solutions for assistance and ideas for mounting your weather station: http://www.ambientweather.com/amwemoso.html Version 1.1... -
Page 4: Getting Started
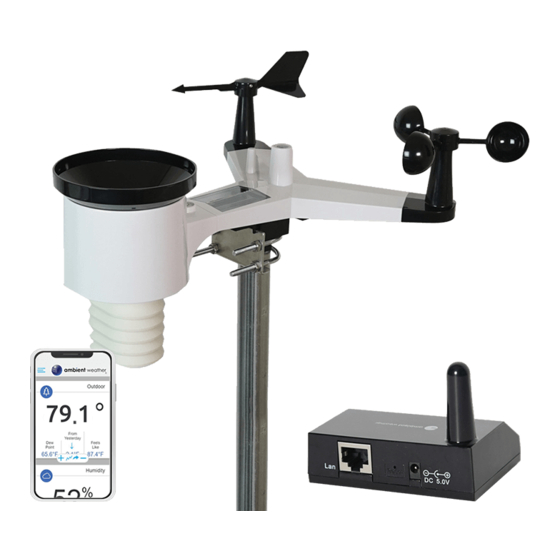
5. Getting Started The WS-1500-IP weather station consists of a ObserverIP receiver, and an all in one sensor array. 5.1 Parts List Item ObserverIP Module Sensor Array Wind Vane 5V DC Adaptor Pole mounting U-bolts Pole mounting U-bolt nuts Ethernet Cable... -
Page 5: Sensor Array Set Up
5.3 Sensor Array Set Up Figure 1 Description Description Wind Vane (measures wind direction) Solar panel Wind Speed Sensor (measures wind speed) U-Bolt UV sensor/ Light sensor Battery compartment Thermometer-hygrometer sensor (measures Reset button temperature and humidity) Rain collector LED transmitter Indicator Bubble level 5.3.1 Install Wind Vane Reference Figure 2. -
Page 6: Install Wind Cups
Figure 2 5.3.2 Install Wind Cups Reference Figure 3. (a) push the wind cups on to the shaft. (b) tighten the set screw with a precision screw driver and make sure the wind cups spin freely. Note: You may need to back out the set screw first before sliding the cups onto the shaft. Figure 3 5.3.3 Install U-Bolts Note: Your U-bolts may have come preassembled at the factory. -
Page 7: Install The Rain Gauge Funnel
Figure 4 5.3.4 Install the Rain Gauge Funnel Reference Figure 5. Install the rain gauge funnel. Rotate clockwise to attach the funnel to the sensor array. Version 1.1 ©Copyright 2018, Ambient LLC. All Rights Reserved. Page 7... -
Page 8: Install Batteries
Figure 5 5.3.5 Install Batteries Reference Figure 6. Insert 2 x AA non-rechargeable batteries (not included) into the battery compartment. The LED indicator on the back of the transmitter will turn on for four seconds, and then flash once every 16 seconds (the sensor transmission update period). Figure 6 Note: If the LED does not light up, or stays on permanently, make sure the battery polarity is correct, or the batteries are fresh. -
Page 9: Install Mounting Pole
5.3.6 Install Mounting Pole Reference Figure 7. The mounting assembly includes two U-Bolts and a bracket that tightens around a 1 to 2” diameter pole (not included) using the four U-Bolt nuts. Figure 7 Use the bubble level next to the rain sensor to make sure the sensor array is completely level. If the sensor array is not level, the rain gauge, UV and solar radiation sensors will not measure properly. -
Page 10: Indoor Thermo-Hygrometer-Barometer Transmitter (Optional Wh32B)
siding. If you have metal siding, align the remote and console through a window to get a clear line of sight. The following is a table of reception loss vs. the transmission medium. Each “wall” or obstruction decreases the transmission range by the factor shown below. Medium RF Signal Strength Reduction Glass (untreated) - Page 11 1. Remove the battery door on the back of the transmitter(s) by sliding down the battery door, as shown in Figure 8. Figure 8 2. BEFORE inserting the batteries, locate the dip switches on the inside cover of the lid of the transmitter.
-
Page 12: Mounting The Wh32B And Wh31B Sensors
Figure 9 5. Insert two AA batteries. 6. Verify the correct channel number (CH) and temperature units of measure (°F vs. °C) are on the display, as shown in Figure 10. Figure 10 (1) temperature (2) temperature units (°F vs. °C) (3) channel number (4) relative humidity 7. - Page 13 Use a small nail or screw (included) to mount to a vertical surface, as shown in Figure 11. Figure 11 The sensor can also be hung from a nylon zip tie (included) or string (not included). Figure 12 Version 1.1 ©Copyright 2018, Ambient LLC.
-
Page 14: Programming The Observerip Receiver
6. Programming the ObserverIP Receiver 6.1 Hardware Requirements 1. Broadband router 2. An “always-on” connection to the Internet. A high speed DSL or cable internet connection that maintains constant connection to the internet. 6.2 Software Requirements An IP scan tool is required to locate the ObserverIP on the network. Important Note: Download ObserverIP tools at the following location: www.AmbientWeather.com/observerip.html 6.3 ObserverIP Physical Connections... -
Page 15: Finding The Observerip On The Network From Your Computer
Ref. Description Outdoor On when outdoor sensor array received Server On when connected to Wunderground.com® internet hosting service Flashes when there is internet activity Link Connected to the Internet (or router) Power AC Power connected Figure 13 Ref. Description LAN connection (connect to router) Reset button AC Power connection Figure 14... - Page 16 Figure 15 Select the Search button to find the ObserverIP on your local area network. Figure 16 Select the ObseverIP module on your network as shown in Figure 17 (the field will be highlighted) and select the Open button (or double click this field) to view the ObserverIP module’s webpage within your browser.
-
Page 17: Mac Users
You are now communicating directly to the ObserverIP and can proceed to Section 6.4. 6.4.2 Mac Users To find the ObserverIP receiver, launch the IP Tools application downloaded here: www.AmbientWeather.com/observerip.html The file is compressed as a zip file and must be extracted to run. Select the Search button to find the ObserverIP on your local area network. -
Page 18: Linux Users
6.4.3 Linux Users If you use an Apple or Linux operating system, download any commercially available IP scan tool, such as AngryIP Scanner and find the MAC address of the ObserverIP. The MAC address is a unique identifier for internet enabled devices. The MAC address will be printed on the bottom of the ObseverIP receiver. -
Page 19: Station Settings
6.6 Station Settings Select Apply to confirm any of the changes in this section. 6.6.1 Weather Station Settings Weather Station Model Number: Enter your weather station model number WS-1500-IP: Figure 24 Version 1.1 ©Copyright 2018, Ambient LLC. All Rights Reserved. -
Page 20: Time Zone Setting
6.6.2 Time Zone Setting Enter your local time zone and daylight Savings Time. The following table provides times zones throughout the world. Locations in the eastern hemisphere are positive, and locations in the western hemisphere are negative. Hours from Time Zone Cities -12 IDLW: International Date Line West -11 NT: Nome... -
Page 21: Live Data
Figure 25 6.7 Live Data Select the Live Data tab to view your live data from the weather station. To freeze the live data updates, select the Stop Refresh button. 6.7.1 Reset and Change Rain Totals During the installation of your weather station, you may report false rain do to vibration of the tipping mechanism. -
Page 22: Weather Network Settings
Figure 26 6.8 Weather Network Settings Select the Weather Network tab to program the Weather Underground station settings and Ambient Weather Network settings (AmbientWeather.net requires firmware Version 4.0 or greater). Reference Figure 27: Version 1.1 ©Copyright 2018, Ambient LLC. All Rights Reserved. Page 22... -
Page 23: Weatherunderground.com
Figure 27 6.8.1 WeatherUnderground.com Enter the Station ID and Station Key obtained from Wunderground.com®. Select the Apply button to confirm changes. 6.8.1.1 Creating a WeatherUnderground.com Account Note: The Weather Underground website is subject to change. 1. Visit Wunderground.com, and select the Join link in the upper right and corner and create a Free Account. - Page 24 Figure 28 Note: Your station ID will have the form: KSSCCCC###, where K is for USA station (I for international), SS is your state, CCCC is your city and ### is the station number in that city. In the example above, KAZPHOEN424 is in the USA (K), State of Arizona (AZ), City of Phoenix (PHOEN) and #424.
- Page 25 Figure 29 6.8.1.2.2 WunderStation iPad App Visit: http://www.WunderStation.com to download the WunderStation iPad app. Version 1.1 ©Copyright 2018, Ambient LLC. All Rights Reserved. Page 25...
- Page 26 Figure 30 6.8.1.2.3 Mobile Apps Visit: http://www.wunderground.com/download/index.asp for a complete list of Mobile apps for iOS and Android. Alternately, you can find your data on your mobile device’s web brower. Version 1.1 ©Copyright 2018, Ambient LLC. All Rights Reserved. Page 26...
-
Page 27: Ambientweather.net
Figure 31 6.8.2 AmbientWeather.net Reference Figure 27. Enter and update schedule and select Apply. Make a note of the MAC address. It will be required when you sign up at AmbientWeather.net. 6.8.2.1 Creating an AmbientWeather.net Account Visit: www.AmbientWeather.net to create an account and select Add Device, as shown in Figure 32. Figure 32 Next, enter the MAC address found on your IP Module Weather Network Panel (Figure 27), as shown Version 1.1... - Page 28 AmbientWeather.net is a responsive design and mobile friendly, so there is no need for a mobile app. Simply open your mobile devices web browser, browse to AmbientWeather.net, and bookmark your dashboard. If you save the bookmark to your desktop, it will automatically save the Ambient Weather icon, as shown in Figure 35.
- Page 29 AmbientWeather.net. Enable the skill and get started: say "Alexa, ask Ambient Weather for a weather report.". This will provide you with your outdoor weather report, but you can ask for your indoor weather report as well by saying, "Alexa, ask Ambient Weather about the indoor conditions."...
-
Page 30: Calibration
AmbientWeather.net Link your account to get started: say 'hey google, Ambient Weather... weather report.' This will provide you with your outdoor weather report. You can ask for your indoor weather report as well by saying, ' indoor conditions'. - Page 31 Figure 36 Version 1.1 ©Copyright 2018, Ambient LLC. All Rights Reserved. Page 31...
- Page 32 Parameter Type of Default Typical Calibration Source Calibration Temperature Offset Current Value Red Spirit or Mercury Thermometer (1) Humidity Offset Current Value Sling Psychrometer (2) Offset Current Value Calibrated laboratory grade Barometer barometer REL Barometer Offset Current Value Local airport (3) Wind Direction Offset Current Value GPS, Compass (4)
- Page 33 Without a calibrated source, wind speed can be difficult to measure. We recommend using a calibrated wind meter (available from Ambient Weather) and a constant speed, high speed fan. (7) The rain collector is calibrated at the factory based on the funnel diameter. The bucket tips every 0.01”...
-
Page 34: Adding Additional Sensors
You must own a PC or Mac to update the firmware. Sorry, Linux products are currently not supported. Ambient Weather will update your ObserverIP at no cost (appropriate shipping charges will apply). 1. Download the latest version of firmware at: https://ambientweather.net/help/how-do-i-update-the-firmware-for-the-observerip-module/... - Page 35 Figure 38 4. Reference Figure 39. Select the Select File button, and browse to the location of the file you downloaded in Step 1. Figure 39 5. Select the Upgrade Firmware button. Reference Figure 40. The dialog box will display Received a Read Request from the ObserverIP module.
-
Page 36: Glossary Of Terms
Figure 40 6. Once the firmware upgrade is complete, the dialog box will display Read session is completed successfully, as shown in Figure 41. Figure 41 7. Wait about one minute for the ObserverIP module to reboot. You can now Exit the upgrade window, and access the module again, as referenced in Section 6.4. - Page 37 Term Definition Relative Barometric Pressure. Accuracy Accuracy is defined as the ability of a measurement to match the actual value of the quantity being measured. Barometer A barometer is an instrument used to measure atmospheric pressure. Calibration is a comparison between measurements – one of known Calibration magnitude or correctness of one device (standard) and another measurement made in as similar a way as possible with a second device...
-
Page 38: Specifications
Term Definition the direction from which the wind is blowing. 9. Specifications 9.1 Wireless Specifications Line of sight wireless transmission (in open air): 330 feet, 100 feet under most conditions Update Rate: Outdoor Sensor: 16 seconds, Indoor Sensor: 64 seconds ... -
Page 39: Troubleshooting Guide
Figure 42 2. Clean the solar radiation sensor and solar panel every 3 months with damp cloth. 3. Replace batteries every 1-2 years. If left in too long, the batteries may leak due to environmental challenges. In harsh environments, inspect the batteries every 3 months (when cleaning the solar panel). - Page 40 Problem Solution Replace the batteries in the outside sensor array. If the batteries were recently replaced, check the polarity. If the sensor is flashing every 16 seconds, proceed to the next step. There may be a temporary loss of communication due to reception loss related to interference or other location factors, or the batteries may have been changed in the sensor array and the console has not been reset.
-
Page 41: Accessories
The following software and hardware accessories are available for this weather station at www.AmbientWeather.com Accessory Description Ambient Weather Mounting Ambient Weather provides the most comprehensive mounting solutions Solutions for weather stations, including tripods, pole extensions, pole mounting kits, guy wires, ground stakes and more. WH31B... -
Page 42: Warranty Information
NOTE: This equipment has been tested and found to comply with the limits for a Class B digital device, pursuant to Part 15 of the FCC Rules. These limits are designed to provide reasonable protection against harmful interference in a residential installation. This equipment generates, uses and can radiate radio frequency energy and, if not installed and used in accordance with the instructions, may cause harmful interference to radio communications.
Need help?
Do you have a question about the WS-1500-IP and is the answer not in the manual?
Questions and answers