Table of Contents
Advertisement
Ambient Weather WS-1171B Advanced Weather Station
Table of Contents
1
Introduction ..................................................................................................................................... 2
2
Product Features .............................................................................................................................. 3
3
Getting Started ................................................................................................................................ 4
2.1 Parts List ....................................................................................................................................... 4
2.2 Recommend Tools ......................................................................................................................... 4
2.3 Thermo-Hygrometer Sensor Set Up .............................................................................................. 4
2.4 Display Console Set Up ................................................................................................................ 5
2.4.1 Radio Controlled Clock (RCC) .............................................................................................. 6
2.4.2
Display Console Layout ..................................................................................................... 6
2.4.3
Sensor Operation Verification ............................................................................................ 7
4
Remote Sensor Installation ............................................................................................................. 7
3.1
Sensor Placement ................................................................................................................... 7
3.2
Wireless Reception Considerations ........................................................................................ 8
5
Console Operation........................................................................................................................... 8
4.1
Quick Display Mode .............................................................................................................. 8
4.1.1 Quick Display Mode Quick Reference Guide ........................................................................ 8
4.1.2
Quick Display Mode Operation ......................................................................................... 8
4.2
Set (Program) Mode ............................................................................................................... 9
4.2.1
Set Mode Quick Reference Guide ...................................................................................... 9
4.2.2
Set Mode Operation ........................................................................................................... 9
4.2.3 Setting Barometric Pressure ................................................................................................. 12
4.2.4
Setting Calibrated Humidity............................................................................................. 12
4.2.5
Setting Calibrated Temperature ........................................................................................ 12
4.3
Alarm Mode ......................................................................................................................... 13
4.3.1 Alarm Display ...................................................................................................................... 13
4.3.2
Alarm Programming ......................................................................................................... 13
4.3.3
Cancelling the Alarm ........................................................................................................ 14
Outdoor Alarm - Temperature vs. Dew Point .................................................................. 14
4.3.4
4.4 Min/Max Mode ........................................................................................................................... 15
4.5
Other Console Features ........................................................................................................ 15
4.5.1
Weather Forecasting ......................................................................................................... 15
4.5.2
Weather Forecast Initialization ......................................................................................... 15
4.5.3
Weather Icons ................................................................................................................... 16
4.5.4
Weather tendency indicator .............................................................................................. 16
4.5.5
Storm threshold indicator ................................................................................................. 17
4.5.6
Pressure threshold setting ................................................................................................. 17
4.5.7
Pressure Graph ................................................................................................................. 17
4.5.8
Restoring Lost Outdoor Temperature and Humidity Sensor ............................................ 17
5
Glossary of Terms ......................................................................................................................... 17
6
Specifications ................................................................................................................................ 18
6.1 Wireless Specifications ............................................................................................................... 18
6.2 Measurement Specifications ....................................................................................................... 18
Version 2.1
©Copyright 2015, Ambient LLC. All Rights Reserved.
User Manual
Page 1
Advertisement
Table of Contents

Related Manuals for Ambient Weather WS-1171B


Summary of Contents for Ambient Weather WS-1171B
-
Page 1: Table Of Contents
Ambient Weather WS-1171B Advanced Weather Station User Manual Table of Contents Introduction ............................. 2 Product Features ..........................3 Getting Started ..........................4 2.1 Parts List ............................4 2.2 Recommend Tools ......................... 4 2.3 Thermo-Hygrometer Sensor Set Up ....................4 2.4 Display Console Set Up ........................ 5 2.4.1 Radio Controlled Clock (RCC) .................... -
Page 2: Introduction
Warranty Information ....................... 22 1 Introduction Thank you for your purchase of the Ambient Weather WS-1171B Advanced Weather Station with Temperature, Humidity, Barometer and Advanced Forecasting. The following user guide provides step by step instructions for installation, operation and troubleshooting. To download the latest manual and additional troubleshooting tips, please visit: http://ambientweather.wikispaces.com/ws1171b... -
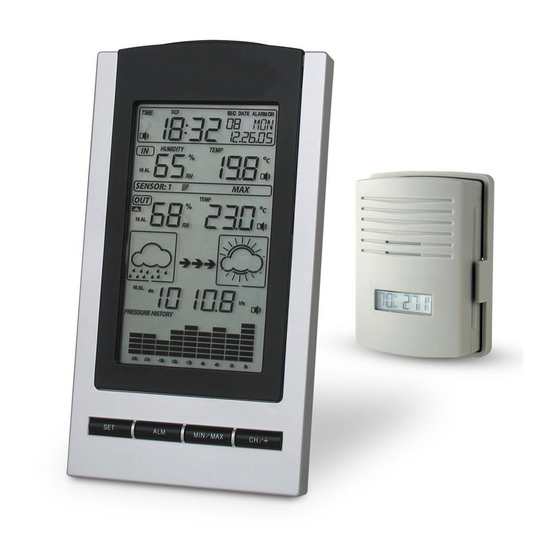
Page 3: Product Features
2 Product Features Figure 1 Description Description Radio Controlled Clock with Perpetual Forecast Icons Calendar Indoor Humidity and Temperature Barometric Pressure Outdoor Humidity and Temperature Barograph Version 2.1 ©Copyright 2015, Ambient LLC. All Rights Reserved. Page 3... -
Page 4: Getting Started
Note: The power up sequence must be performed in the order shown in this section (remote transmitter first, Display Console second) to avoid the console synchronization time out. The WS-1171B weather station consists of a display console (receiver), and a thermo-hygrometer (remote transmitter). -
Page 5: Display Console Set Up
most climates. We do not recommend rechargeable batteries. They have lower voltages, do not operate well at wide temperature ranges, and do not last as long, resulting in poorer reception. Replace the battery door and set screw. Note that the temperature and humidity will be displayed on the LCD display. -
Page 6: Radio Controlled Clock (Rcc)
2.4.1 Radio Controlled Clock (RCC) If your console is equipped with the Radio Controlled Clock (RCC), the icon WWVB will appear above the time. WWVB is the NIST time signal radio station near Fort Collins, Colorado. The RCC is received by the wireless transmitter, and passed to the console. After the remote sensor is powered up, the sensor will transmit weather data for 30 seconds, and then the sensor will begin radio controlled clock (RCC) reception. -
Page 7: Sensor Operation Verification
1. DST (daylight savings time) 16. Outdoor humidity display 2. WWVB Radio Controlled Time 17. Outdoor temperature and humidity 3. Time low alarm and high alarm 4. Radio Controlled Clock reception 18. Temperature display units icon 19. Outdoor temperature display 5. -
Page 8: Wireless Reception Considerations
Figure 4 Note: Make sure the sensor is mounted vertically and not lying down on a flat surface. This will insure optimum reception. 3.2 Wireless Reception Considerations Wireless signals are impacted by distance, interference (other weather stations, wireless phones, wireless routers, TVs and computer monitors), and transmission barriers, such as walls. In general, wireless signals will not penetrate solid metal and earth (down a hill, for example). -
Page 9: Set (Program) Mode
absolute pressure and relative pressure. 4.2 Set (Program) Mode 4.2.1 Set Mode Quick Reference Guide Command Mode Settings [SET] Enter Set Mode, Daylight Savings Press [+] to toggle OFF and ON seconds Time (DST) [SET] Time Zone (TZ) Press [+] to increase. [MIN/MAX] to decrease [SET] 12/24 Hour Format Press [+] to toggle between 12 hour (12h) and... - Page 10 Hours from Time Zone Cities -12 IDLW: International Date Line West -11 NT: Nome Nome, AK -10 AHST: Alaska-Hawaii Standard Honolulu, HI CAT: Central Alaska HST: Hawaii Standard -9 YST: Yukon Standard Yukon Territory -8 PST: Pacific Standard Los Angeles, CA, USA -7 MST: Mountain Standard Denver, CO, USA -6 CST: Central Standard...
- Page 11 Temperature Units (Celsius or Fahrenheit). Press the + key again to toggle the temperature units from Celsius to Fahrenheit. 10. Indoor Temperature Calibration (default is measured indoor temperature). Press the SET key to adjust the indoor temperature. Press the + key or MIN/MAX key to adjust the temperature up or down in 0.1 degC (0.18 degF) increments.
-
Page 12: Setting Barometric Pressure
To calibrate humidity, you will need an accurate source, such as a sling psychrometer or Humidipaks One Step Calibration kit, available from Ambient Weather, which uses a salt bath. To calibrate indoor humidity, in the Set Mode with indoor humidity flashing, press the + key or MIN/MAX key to increase or decrease the humidity setting (in increments of 1%) to match the calibrated or known humidity source. -
Page 13: Alarm Mode
Temperature errors can also occur when a sensor is placed too close to a heat source (such as a building structure, the ground or trees). To calibrate the indoor or outdoor temperature, we recommend a mercury or red spirit (fluid) thermometer. -
Page 14: Cancelling The Alarm
Outdoor humidity low alarm Outdoor temperature / dew point low alarm Pressure low alarm In the alarm mode, Press the + key or MIN/MAX key to change or scroll the alarm value. Hold the + key or MIN/MAX key for 3 seconds to change the number rapidly. Press the ALARM key to select the alarm on or off (if alarm is enabled, the speaker icon on the LCD will be turned on indicating the alarm function has been enabled). -
Page 15: Min/Max Mode
4.4 Min/Max Mode Note: The min and max settings cannot be reset at the same time. They must be reset on an individual basis. While in Normal Mode, press the MIN/MAX key to enter the maximum mode, and the MAX icon and maximum records will be displayed and begin flashing. -
Page 16: Weather Icons
icons will be displayed, as shown below. When there is a change in barometric pressure over 24 to 72 hours, the forecast icons will exit the learning mode. 4.5.3 Weather Icons Sunny Partly Cloudy Cloudy Rainy The four weather icons are Sunny, Partly Cloudy, Cloudy and Rainy. There are also two weather tendency indicators to show the air pressure tendency between the weather icons. -
Page 17: Storm Threshold Indicator
4.5.5 Storm threshold indicator The storm threshold (the negative rate of pressure change signifying a storm is expected) can be adjusted by the user from level 3 to level 9 (the default level 4 mbar/hour). When negative rate of change of pressure is exceeded for 3 hours, the storm warning indicator will be activated, and the clouds with rain icon and tendency arrows will flash for 3 hours indicating the storm warning feature has been activated. -
Page 18: Specifications
you rise in altitude, the sea-level corrected pressure (the pressure your location would be at if located at sea-level) is generally higher than your measured pressure. Accuracy Accuracy is defined as the ability of a measurement to match the actual value of the quantity being measured. - Page 19 1. Email Support: support@ambientweather.com 2. Technical Support: 480-346-3380 (M-F 8am to 3pm Arizona Time) Problem Solution Wireless remote (thermo-hygrometer) not 1. Resync the unit. Press and hold the + key for reporting in to console. 10 seconds to resynchronize. The remote sensor search icon There are dashes (--) on the display console.
-
Page 20: Accessories
Description Energizer AA Lithium Battery (2-pack) - AA lithium batteries for cold weather climates. Batteries for Long Life and Cold Climates Ambient Weather SRS100LX Solar Radiation Shield improves temperature accuracy Temperature and Humidity Solar for hot weather climates. Remove the rain guard and Radiation Shield install over thermo-hygrometer. -
Page 21: Liability Disclaimer
Revision Description console. WS-1171B Moved RCC receiver from the console to transmitter improve reception. 10 Liability Disclaimer Please help in the preservation of the environment and return used batteries to an authorized depot. The electrical and electronic wastes contain hazardous substances. Disposal of electronic waste in wild country and/or in unauthorized grounds strongly damages the environment. -
Page 22: Warranty Information
• Connect the equipment into an outlet on a circuit different from that to which the receiver is connected. • Consult the dealer or an experienced radio/TV technician for help. 12 Warranty Information Ambient, LLC provides a 1-year limited warranty on this product against manufacturing defects in materials and workmanship.
Need help?
Do you have a question about the WS-1171B and is the answer not in the manual?
Questions and answers