Table of Contents
Advertisement
Quick Links
Ambient Weather WS-1550-IP OBSERVER Solar Powered Wireless
Table of Contents
1. Introduction ..................................................................................................................................................................... 2
2. Warnings and Cautions ................................................................................................................................................... 2
3. Quick Start Guide ........................................................................................................................................................... 2
4. Pre-Installation Checkout and Site Survey ..................................................................................................................... 2
4.1 Pre Installation Checkout .......................................................................................................................................... 2
4.2 Site Survey ................................................................................................................................................................ 3
5. Getting Started ................................................................................................................................................................ 3
5.1 Parts List ................................................................................................................................................................... 3
5.2 Recommend Tools ..................................................................................................................................................... 3
5.3 Sensor Array Set Up .................................................................................................................................................. 4
5.3.1 Install Wind Vane ............................................................................................................................................... 4
5.3.2 Install Wind Cups ............................................................................................................................................... 5
5.3.3 Install U-Bolts .................................................................................................................................................... 5
5.3.4 Install the Rain Gauge Funnel ............................................................................................................................ 6
5.3.5 Install the Funnel Coil Filter .............................................................................................................................. 6
5.3.6 Install Batteries .................................................................................................................................................. 7
5.3.7 Install Mounting Pole ......................................................................................................................................... 7
5.4 Best Practices for Wireless Communication ............................................................................................................. 8
5.5 Indoor Thermo-Hygrometer-Barometer Transmitter (Optional WH32B) ................................................................. 8
5.6 Indoor / Outdoor 8-Channel Thermo-Hygrometer Transmitter (Optional WH31B) ................................................. 8
5.7 Mounting the WH32B and WH31B Sensors .......................................................................................................... 10
5.8 PM2.5 Air Quality Sensor ....................................................................................................................................... 11
6. Programming the ObserverIP Receiver......................................................................................................................... 11
6.1 Hardware Requirements .......................................................................................................................................... 11
6.2 Software Requirements ........................................................................................................................................... 11
6.3 ObserverIP Physical Connections ........................................................................................................................... 11
6.4 Finding the ObserverIP on the Network from your Computer................................................................................ 13
6.4.1 PC Users........................................................................................................................................................... 13
6.4.2 Mac Users ........................................................................................................................................................ 14
6.4.3 Linux Users ...................................................................................................................................................... 14
6.5 Local Device Network Settings .............................................................................................................................. 15
6.6 Station Settings ....................................................................................................................................................... 16
6.6.1 Weather Station Settings .................................................................................................................................. 16
6.6.2 Time Zone Setting ............................................................................................................................................ 16
6.7 Live Data ................................................................................................................................................................. 18
6.7.1 Reset and Change Rain Totals .......................................................................................................................... 18
6.8 Weather Network Settings ....................................................................................................................................... 19
6.8.1 WeatherUnderground.com ............................................................................................................................... 20
6.8.2 AmbientWeather.net ......................................................................................................................................... 23
6.9 Calibration .............................................................................................................................................................. 25
6.9.1 Relative Barometric Pressure Calibration Example ......................................................................................... 25
6.10 Adding Additional Sensors.................................................................................................................................... 28
7. Updating Firmware ....................................................................................................................................................... 29
8. Glossary of Terms ......................................................................................................................................................... 30
9. Specifications ................................................................................................................................................................ 31
9.1 Wireless Specifications ........................................................................................................................................... 31
9.2 Measurement Specifications ................................................................................................................................... 32
9.3 Power Consumption ................................................................................................................................................ 32
Version 1.4
IP Weather Station User Manual
©Copyright 2019, Ambient LLC. All Rights Reserved.
Page 1
Advertisement
Table of Contents

Related Manuals for Ambient Weather OBSERVER WS-1550-IP


Summary of Contents for Ambient Weather OBSERVER WS-1550-IP
-
Page 1: Table Of Contents
Ambient Weather WS-1550-IP OBSERVER Solar Powered Wireless IP Weather Station User Manual Table of Contents 1. Introduction ..................................2 2. Warnings and Cautions ..............................2 3. Quick Start Guide ................................2 4. Pre-Installation Checkout and Site Survey ........................2 4.1 Pre Installation Checkout ............................2 4.2 Site Survey ................................ -
Page 2: Introduction
16. California Prop 65 ............................... 36 1. Introduction Thank you for your purchase of the Ambient Weather WS-1550 Smart Wireless Weather Station with Remote Monitoring. The following user guide provides step by step instructions for installation, operation and troubleshooting. To download the latest manual, firmware upgrades and IP Finder Tools, visit: http://www.ambientweather.com/observerip.html... -
Page 3: Site Survey
Please take this into consideration when choosing ObserverIP receiver or mounting locations. Make sure your ObserverIP receiver is at least five feet away from any electronic device to avoid interference. 6. Visit Ambient Weather Mounting Solutions for assistance and ideas for mounting your weather station: http://www.ambientweather.com/amwemoso.html 5. -
Page 4: Sensor Array Set Up
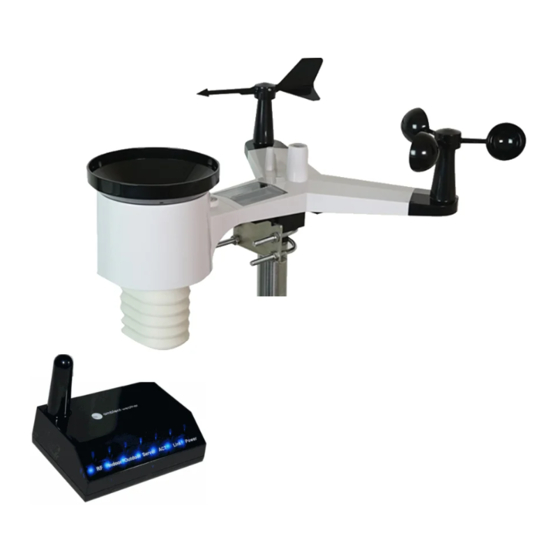
5.3 Sensor Array Set Up Figure 1 Description Description Wind Vane (measures wind direction) Solar panel Wind Speed Sensor (measures wind speed) U-Bolt UV sensor/ Light sensor Battery compartment Thermometer-hygrometer sensor (measures temperature Reset button and humidity) Rain collector LED transmitter Indicator Bubble level 5.3.1 Install Wind Vane Reference Figure 2. -
Page 5: Install Wind Cups
5.3.2 Install Wind Cups Reference Figure 3. (a) push the wind cups on to the shaft. (b) tighten the set screw with a precision screw driver and make sure the wind cups spin freely. Note: You may need to back out the set screw first before sliding the cups onto the shaft. Figure 3 5.3.3 Install U-Bolts Note: Your U-bolts may have come preassembled at the factory. -
Page 6: Install The Rain Gauge Funnel
Figure 4 5.3.4 Install the Rain Gauge Funnel Reference Figure 5. Install the rain gauge funnel. Rotate clockwise to attach the funnel to the sensor array. Figure 5 5.3.5 Install the Funnel Coil Filter To install the funnel coil filter, press the coil until the hook is inside the hole at the bottom of the funnel, and locked in place. -
Page 7: Install Batteries
5.3.6 Install Batteries Reference Figure 6. Insert 2 x AA non-rechargeable batteries (not included) into the battery compartment. The LED indicator on the back of the transmitter will turn on for four seconds, and then flash once every 16 seconds (the sensor transmission update period). -
Page 8: Best Practices For Wireless Communication
level, the rain gauge, UV and solar radiation sensors will not measure properly. Note: If you cannot read the bubble level due to mounting constraints, place straddle a line or ruler level across the top of the rain gauge for easier viewing. 5.3.7.1 Aligning the Wind Direction Locate the four wind vane compass rose indicators of N, E, S, W (representing North, East, South and West) at the base of the wind vane. - Page 9 WH31B) Note: Thee 8-channel sensors only appear on AmbientWeather.net. They are not supported on Weather Underground. Unlike other sensors, they cannot be calibrated or adjusted from the ObserverIP modules User Interface. Note: Do not use rechargeable batteries. We recommend fresh alkaline batteries for outdoor temperature ranges between -4 °F and 140 °F and fresh lithium batteries for outdoor temperature ranges between -40 °F and 140 °F.
-
Page 10: Mounting The Wh32B And Wh31B Sensors
Figure 9 5. Insert two AA batteries. 6. Verify the correct channel number (CH) and temperature units of measure (°F vs. °C) are on the display, as shown in Figure 10. Figure 10 (1) temperature (2) temperature units (°F vs. °C) (3) channel number (4) relative humidity 7. -
Page 11: Pm2.5 Air Quality Sensor
Figure 11 Figure 12 The sensor can also be hung from a nylon zip tie (included) or string (not included). 5.8 PM2.5 Air Quality Sensor The ObserverIP module supports one PM2.5 Air Quality sensor. For more information, please visit: https://ambientweather.net/product/pm25 6. - Page 12 Ref. Description On when radio frequency receiver is operating properly Indoor On when indoor sensor received Outdoor On when outdoor sensor array received Server On when connected to Wunderground.com® internet hosting service Flashes when there is internet activity Link Connected to the Internet (or router) Power AC Power connected Figure 13...
-
Page 13: Finding The Observerip On The Network From Your Computer
6.4 Finding the ObserverIP on the Network from your Computer 6.4.1 PC Users To find the ObserverIP receiver, launch the IP Tools application downloaded here: www.AmbientWeather.com/observerip.html The HostIP (your computers IP address) will be displayed. Press the OK button to continue. Figure 15 Select the Search button to find the ObserverIP on your local area network. -
Page 14: Mac Users
Figure 18 You are now communicating directly to the ObserverIP and can proceed to Section 6.4. 6.4.2 Mac Users To find the ObserverIP receiver, launch the IP Tools application downloaded here: www.AmbientWeather.com/observerip.html The file is compressed as a zip file and must be extracted to run. Select the Search button to find the ObserverIP on your local area network. -
Page 15: Local Device Network Settings
The MAC address will be printed on the bottom of the ObseverIP receiver. An example MAC address is 00:0E:C6:00:00:19. We have included links to free IP Scan Tool applications here: www.AmbientWeather.com/observerip.html Figure 21 shows typical scan results. Locate the IP address of the ObserverIP by cross referencing the Mac address. In the example below, the IP address is 192.168.0.105. -
Page 16: Station Settings
back of the module. Figure 23 6.6 Station Settings Select Apply to confirm any of the changes in this section. 6.6.1 Weather Station Settings Weather Station Model Number: Enter your weather station model number WS-1550-IP: Figure 24 6.6.2 Time Zone Setting Enter your local time zone and daylight Savings Time. - Page 17 The following table provides times zones throughout the world. Locations in the eastern hemisphere are positive, and locations in the western hemisphere are negative. Hours from Time Zone Cities -12 IDLW: International Date Line West -11 NT: Nome Nome, AK -10 AHST: Alaska-Hawaii Standard Honolulu, HI CAT: Central Alaska...
-
Page 18: Live Data
Figure 25 6.7 Live Data Select the Live Data tab to view your live data from the weather station. To freeze the live data updates, select the Stop Refresh button. 6.7.1 Reset and Change Rain Totals During the installation of your weather station, you may report false rain do to vibration of the tipping mechanism. To reset the rain to 0.00, select the Rain Reset button as shown in Figure 26. -
Page 19: Weather Network Settings
Figure 26 6.8 Weather Network Settings Select the Weather Network tab to program the Weather Underground station settings and Ambient Weather Network settings (AmbientWeather.net requires firmware Version 4.0 or greater). Reference Figure 27: Version 1.4 ©Copyright 2019, Ambient LLC. All Rights Reserved. -
Page 20: Weatherunderground.com
Figure 27 6.8.1 WeatherUnderground.com Enter the Station ID and Station Key obtained from Wunderground.com®. Select the Apply button to confirm changes. 6.8.1.1 Creating a WeatherUnderground.com Account Note: The Weather Underground website is subject to change. 1. Visit Wunderground.com, and select the Join link in the upper right and corner and create a Free Account. - Page 21 Note: Your station ID will have the form: KSSCCCC###, where K is for USA station (I for international), SS is your state, CCCC is your city and ### is the station number in that city. In the example above, KAZPHOEN424 is in the USA (K), State of Arizona (AZ), City of Phoenix (PHOEN) and #424. 6.8.1.2 Viewing your Data on Wunderground.com There are several ways to view your data on Wunderground: 6.8.1.2.1...
- Page 22 Figure 30 6.8.1.2.3 Mobile Apps Visit: http://www.wunderground.com/download/index.asp for a complete list of Mobile apps for iOS and Android. Alternately, you can find your data on your mobile device’s web brower. Figure 31 Version 1.4 ©Copyright 2019, Ambient LLC. All Rights Reserved. Page 22...
-
Page 23: Ambientweather.net
6.8.2 AmbientWeather.net Reference Figure 27. Enter and update schedule and select Apply. Make a note of the MAC address. It will be required when you sign up at AmbientWeather.net. 6.8.2.1 Creating an AmbientWeather.net Account Visit: www.AmbientWeather.net to create an account and select Add Device, as shown in Figure 32. Figure 32 Next, enter the MAC address found on your IP Module Weather Network Panel (Figure 27), as shown in Figure 33. - Page 24 AmbientWeather.net is a responsive design and mobile friendly, so there is no need for a mobile app. Simply open your mobile devices web browser, browse to AmbientWeather.net, and bookmark your dashboard. If you save the bookmark to your desktop, it will automatically save the Ambient Weather icon, as shown in Figure 35. Figure 35 6.8.2.2 IFTTT...
-
Page 25: Calibration
AmbientWeather.net. Enable the skill and get started: say "Alexa, ask Ambient Weather for a weather report.". This will provide you with your outdoor weather report, but you can ask for your indoor weather report as well by saying, "Alexa, ask Ambient Weather about the indoor conditions."... - Page 26 Figure 36 Version 1.4 ©Copyright 2019, Ambient LLC. All Rights Reserved. Page 26...
- Page 27 Parameter Type of Default Typical Calibration Source Calibration Temperature Offset Current Value Red Spirit or Mercury Thermometer (1) Humidity Offset Current Value Sling Psychrometer (2) Offset Current Value Calibrated laboratory grade barometer Barometer REL Barometer Offset Current Value Local airport (3) Wind Direction Offset Current Value GPS, Compass (4)
-
Page 28: Adding Additional Sensors
Without a calibrated source, wind speed can be difficult to measure. We recommend using a calibrated wind meter (available from Ambient Weather) and a constant speed, high speed fan. (7) The rain collector is calibrated at the factory based on the funnel diameter. The bucket tips every 0.01” of rain (referred to as resolution). -
Page 29: Updating Firmware
Figure 37 7. Updating Firmware You must own a PC or Mac to update the firmware. Sorry, Linux products are currently not supported. Ambient Weather will update your ObserverIP at no cost (appropriate shipping charges will apply). 1. Download the latest version of firmware at: https://ambientweather.net/help/how-do-i-update-the-firmware-for-the-observerip-module/ 2. -
Page 30: Glossary Of Terms
5. Select the Upgrade Firmware button. Reference Figure 40. The dialog box will display Received a Read Request from the ObserverIP module. A green progress bar will provide you with the upgrade status. DO NOT OPERATE THE MOUSE OR KEYBOARD WHEN UPGRADING to prevent interruption of the upgrade. -
Page 31: Specifications
Term Definition Absolute Barometric Absolute pressure is the measured atmospheric pressure and is a function of altitude, and Pressure to a lesser extent, changes in weather conditions. Absolute pressure is not corrected to sea-level conditions. Refer to Relative Barometric Pressure. Accuracy Accuracy is defined as the ability of a measurement to match the actual value of the quantity being measured. -
Page 32: Measurement Specifications
• Frequency: 915 MHz 9.2 Measurement Specifications The following table provides the specifications for the measured parameters. Measurement Range Accuracy Resolution Indoor Temperature 14 to 140 °F ± 2 °F 0.1 °F Outdoor Temperature -40 to 149 °F (lithium batteries) ±... - Page 33 11. Troubleshooting Guide If your question is not answered here, you can contact us as follows: 1. Email Support: support@ambientweather.com 2. Technical Support: 480-346-3398 (M-F 8am to 3pm Arizona Time) Problem Solution Outdoor sensor array The sensor array may have initiated properly and the data is registered by the console as does not communicate invalid, and the console must be reset.
- Page 34 The following software and hardware accessories are available for this weather station at www.AmbientWeather.com Accessory Description Ambient Weather Mounting Ambient Weather provides the most comprehensive mounting solutions for weather Solutions stations, including tripods, pole extensions, pole mounting kits, guy wires, ground stakes and more. WH31B...
- Page 35 NOTE: This equipment has been tested and found to comply with the limits for a Class B digital device, pursuant to Part 15 of the FCC Rules. These limits are designed to provide reasonable protection against harmful interference in a residential installation.
- Page 36 16. California Prop 65 WARNING:Use of the Ambient Weather Products can expose you to chemicals, including lead and lead compounds, which are known to the State of California to cause cancer and bisphenol A (BPA),and phthalates DINP and/or DEHP, which are known to the State of California to cause birth defects or other reproductive harm.Can I Trust that Ambient Weather Products are Safe Despite this Warning?In 1986, California voters approved the Safe DrinkingWater and Toxic Enforcement Act known as Proposition 65 orProp 65.
Need help?
Do you have a question about the OBSERVER WS-1550-IP and is the answer not in the manual?
Questions and answers