Table of Contents
Advertisement
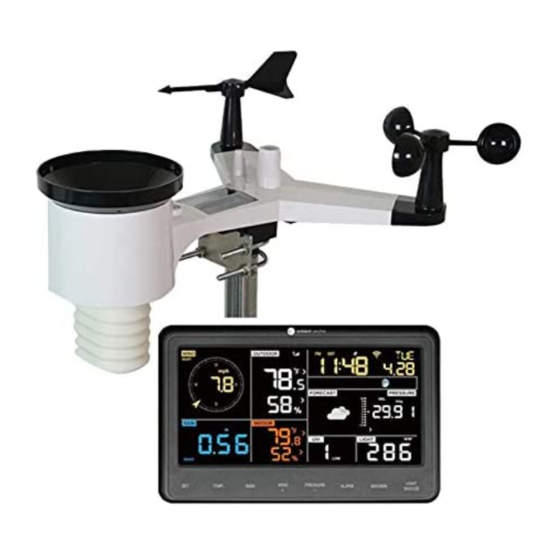
Ambient Weather WS-1900A OSPREY Solar Powered Wireless
Table of Contents
1.
Introduction ............................................................................................................................................................ 2
2.
Warnings and Cautions .......................................................................................................................................... 2
3.
Quick Start Guide .................................................................................................................................................. 3
4.
Pre-Installation Checkout and Site Survey ............................................................................................................ 3
4.1
Pre Installation Checkout .............................................................................................................................. 3
4.2
Site Survey .................................................................................................................................................... 3
5.
Getting Started ....................................................................................................................................................... 3
5.1
Parts List ....................................................................................................................................................... 4
5.2
Recommend Tools ......................................................................................................................................... 4
5.3
Sensor Array Set Up ...................................................................................................................................... 5
5.3.1
Install Wind Vane ...................................................................................................................................... 5
5.3.2
Install Wind Cups ...................................................................................................................................... 6
5.3.3
Install U-Bolts ........................................................................................................................................... 6
5.3.4
Install the Rain Gauge Funnel ................................................................................................................... 7
5.3.5
Install the Funnel Coil Filter ..................................................................................................................... 7
5.3.6
Install Batteries ......................................................................................................................................... 8
5.3.7
Install Mounting Pole ................................................................................................................................ 8
5.4
Best Practices for Wireless Communication ................................................................................................. 9
5.5
Display Console ............................................................................................................................................ 9
5.5.1
Vertical Desk Stand .................................................................................................................................. 11
6.
Display Console Operation .................................................................................................................................. 12
6.1
Screen Display ............................................................................................................................................ 12
6.2
Console Initialization .................................................................................................................................. 12
6.2.1
Button Operation ..................................................................................................................................... 13
6.3
Set Mode ..................................................................................................................................................... 14
6.4
Barometric Pressure Display ....................................................................................................................... 16
6.4.1
Viewing Absolute vs. Relative Pressure.................................................................................................. 16
6.4.2
Rate of Change of Pressure Graph .......................................................................................................... 16
6.4.3
Viewing Pressure History........................................................................................................................ 17
6.4.4
Relative Pressure Calibration Discussion ............................................................................................... 17
6.5
Rain Display ................................................................................................................................................ 17
6.5.1
Rain Increments of Measure ................................................................................................................... 17
6.5.2
Resetting Rain ......................................................................................................................................... 17
6.5.3
Increments of Rain Definitions ............................................................................................................... 18
6.6
Wind Display .............................................................................................................................................. 18
6.7
Temperature Display ................................................................................................................................... 18
6.7.1
Wind Chill, Dew Point and Heat Index Display ..................................................................................... 18
6.8
Alarms ......................................................................................................................................................... 18
6.8.1
Viewing High and Low Alarms .............................................................................................................. 18
6.8.2
Setting High and Low Alarms ................................................................................................................. 19
6.9
Max/Min Mode ........................................................................................................................................... 22
6.9.1
Viewing Max/Min Values ....................................................................................................................... 22
6.10
Calibration ................................................................................................................................................... 23
6.10.1
Calibration Settings ............................................................................................................................ 23
6.10.2
Calibration Ranges .............................................................................................................................. 24
6.10.3
Calibration Discussion ........................................................................................................................ 24
6.11
Restoring the Console to Factory Default ................................................................................................... 26
6.12
Resynchronize Wireless Sensor .................................................................................................................. 26
6.13
Backlight Operation .................................................................................................................................... 26
Version 1.2
Weather Station User Manual
©Copyright 2020, Ambient LLC. All Rights Reserved.
Page 1
Advertisement
Table of Contents

Related Manuals for Ambient Weather WS-1900A


Summary of Contents for Ambient Weather WS-1900A
-
Page 1: Table Of Contents
Ambient Weather WS-1900A OSPREY Solar Powered Wireless Weather Station User Manual Table of Contents Introduction ................................2 Warnings and Cautions ............................2 Quick Start Guide ..............................3 Pre-Installation Checkout and Site Survey ......................3 Pre Installation Checkout ..........................3 Site Survey ..............................3 Getting Started ............................... -
Page 2: Introduction
California Prop 65 ............................33 1. Introduction Thank you for your purchase of the Ambient Weather WS-1900A OSPREY Solar Powered Wireless Weather Station. The following user guide provides step by step instructions for installation, operation and troubleshooting. To download the latest manual and additional troubleshooting tips, please visit: https://help.ambientweather.net/product/ws-1900a... -
Page 3: Quick Start Guide
8. Visit Ambient Weather Mounting Solutions for assistance and ideas for mounting your weather station: http://www.ambientweather.com/amwemoso.html 5. Getting Started The Ambient Weather WS-1900A OSPREY Personal Weather Station consists of an indoor display console and an Version 1.2 ©Copyright 2020, Ambient LLC. All Rights Reserved. -
Page 4: Parts List
all-in-one outdoor weather sensor array. 5.1 Parts List Item Display Console Frame Dimensions (LxWxH): 7.50 x 4.50 x 0.75” LCD Dimensions (LxW): 3.00 x 6.75” Vertical Desk Stand Sensor Array Wind Vane 5V DC Adaptor Pole mounting U-bolts Pole mounting U-bolt nuts User manual 5.2 Recommend Tools •... -
Page 5: Sensor Array Set Up
5.3 Sensor Array Set Up Figure 1 Description Description Wind Vane (measures wind direction) Solar panel Wind Speed Sensor (measures wind speed) U-Bolt UV sensor/ Light sensor Battery compartment Thermometer-hygrometer sensor (measures temperature and humidity) Reset button Rain collector LED transmitter Indicator Bubble level 5.3.1 Install Wind Vane Reference Figure 2. -
Page 6: Install Wind Cups
5.3.2 Install Wind Cups Reference Figure 3. (a) push the wind cups on to the shaft. (b) tighten the set screw with a precision screw driver and make sure the wind cups spin freely. Note: You may need to back out the set screw first before sliding the cups onto the shaft. Figure 3 5.3.3 Install U-Bolts Note: Your U-bolts may have come preassembled at the factory. -
Page 7: Install The Rain Gauge Funnel
Figure 4 5.3.4 Install the Rain Gauge Funnel Reference Figure 5. Install the rain gauge funnel. Rotate clockwise to attach the funnel to the sensor array. Figure 5 5.3.5 Install the Funnel Coil Filter To install the funnel coil filter, press the coil until the hook is inside the hole at the bottom of the funnel, and locked in place. -
Page 8: Install Batteries
5.3.6 Install Batteries Reference Figure 6. Insert 2 x AA non-rechargeable batteries (not included) into the battery compartment. The LED indicator on the back of the transmitter will turn on for four seconds, and then flash once every 16 seconds (the sensor transmission update period). -
Page 9: Best Practices For Wireless Communication
Note: If you cannot read the bubble level due to mounting constraints, place straddle a line or ruler level across the top of the rain gauge for easier viewing. 5.3.7.1 Aligning the Wind Direction Locate the four wind vane compass rose indicators of N, E, S, W (representing North, East, South and West) at the base of the wind vane. - Page 10 Figure 9 Reference Figure 9. (1) Connect the display console power jack to AC power adapter with the included power adapter. (2) Unfold the desk stand and place 5 to 10 feet away from the sensor array. Remove the battery door on the back of the console, and insert 3xAAA batteries per Figure 10. (3) Wait several minutes for the remote sensors to synchronize with the display console.
-
Page 11: Vertical Desk Stand
5.5.1 Vertical Desk Stand The console is best viewed above from a 20 to 30 degree angle. In addition to the fold out desk stand on the back of the display, console, the console also includes a vertical desk stand to improve the viewing able on a desk, as shown in Figure 11. Figure 11 Version 1.2 ©Copyright 2020, Ambient LLC. -
Page 12: Display Console Operation
6. Display Console Operation 6.1 Screen Display The display console home screen layout is shown in Figure 12. Figure 12 Description Description Wind speed Barometric Pressure Wind direction Moon phase Rainfall Date Indoor temperature Time Indoor humidity UV index RF icon Solar Radiation Outdoor humidity Weather forecast... -
Page 13: Button Operation
conditions will immediately update, and the outdoor sensor array will register within a few minutes. Figure 14 6.2.1 Button Operation Figure 15 The console has 8 buttons at the bottom for easy operation: Description Press and hold to enter the SET mode. •... -
Page 14: Set Mode
decrease the value rapidly. ALARM Press to switch between high and low alarms MAX/MIN Press to switch between minimum and maximum values. • Press to adjust the LCD backlight brightness (high, medium and off). LIGHT/SNOOZE • Press to exit the SET mode at any time. 6.3 Set Mode Press and hold the SET button for two seconds to enter the SET Mode. - Page 15 Command Mode Settings Image [SET] + 2 Enter Set Press [WIND +] to switch OFF and ON. seconds Mode, Beep On or Off This will prevent the beep from sounding when pressing any button. [SET] Clear Max/Min Press [WIND +] to switch OFF and ON. When set to ON, the minimum and maximum values reset every day at midnight (00:00).
-
Page 16: Barometric Pressure Display
[SET] Temperature Press [WIND +] to change temperature units of Units of measure between °F and °C. Measure [SET] Wind Units of Press [WIND +] to change wind units of measure Measure between km/h, mph, knots, m/s and bft. [SET] Rain Units of Press [WIND +] to change rain units of measure Measure... -
Page 17: Viewing Pressure History
Figure 17 6.4.3 Viewing Pressure History Press the [PRESSURE -] button to view the 12 hour, 24 hour, 48 hour and 72 hour pressure average. 6.4.4 Relative Pressure Calibration Discussion To compare pressure conditions from one location to another, meteorologists correct pressure to sea-level conditions. Because the air pressure decreases as you rise in altitude, the sea-level corrected pressure (the pressure your location would be at if located at sea-level) is generally higher than your measured pressure. -
Page 18: Increments Of Rain Definitions
6.5.3 Increments of Rain Definitions • Rain rate or hourly rain is defined as the last 10 minutes of rainfall, multiplied by six (10 minutes x 6 = 1 hour). This is also referred to as instantaneous rain per hour. •... -
Page 19: Setting High And Low Alarms
6.8.2 Setting High and Low Alarms Press and hold the ALARM button for two seconds to enter the ALARM Set Mode. To save and proceed to the next alarm setting, press (do not hold) the SET button. To exit the alarm mode at any time, press the LIGHT / SNOOZE button. Figure 19 summarizes the alarm mode sequence and commands. - Page 20 Command Mode Settings [ALARM] Enter Alarm Set Mode, Alarm Press [WIND +] or [PRESSURE -] to adjust alarm hour up or Hour down. seconds Press [ALARM] to turn the time alarm on or off. When the alarm is on, the alarm time icon will appear.
- Page 21 [SET] Alarm Low Outdoor Temperature Press [WIND +] or [PRESSURE -] to adjust alarm value up or down. Press [ALARM] to turn the alarm on. The alarm icon will appear. Press [ALARM] to turn the alarm off. The alarm icon will disappear.
-
Page 22: Max/Min Mode
[SET] Alarm High Daily Rain Press [WIND +] or [PRESSURE -] to adjust alarm value up or down. Press [ALARM] to turn the alarm on. The alarm icon will appear. Press [ALARM] to turn the alarm off. The alarm icon will disappear. -
Page 23: Calibration
seconds to view the absolute pressure, and press and hold the PRESSURE button for two seconds again to return to relative pressure. While the min values are displayed as outlined in Section 6.9.1, press and hold the PRESSURE button for two seconds to view the absolute pressure, and press and hold the PRESSURE button for two seconds again to return to relative pressure. -
Page 24: Calibration Ranges
[SET] Wind Direction Press [WIND +] or [PRESSURE -] to adjust the wind direction up or down. To restore to factory default, press [ALARM]. [SET] Wind Speed Factor Press [WIND +] or [PRESSURE -] to adjust the wind speed factor up or down. - Page 25 Parameter Type of Calibration Default Typical Calibration Source Temperature Offset Current Value Red Spirit or Mercury Thermometer (1) Humidity Offset Current Value Sling Psychrometer (2) Offset Current Value Calibrated laboratory grade barometer Barometer REL Barometer Offset Current Value Local airport (3) Wind Direction Offset Current Value GPS, Compass (4)
-
Page 26: Restoring The Console To Factory Default
Without a calibrated source, wind speed can be difficult to measure. We recommend using a calibrated wind meter (available from Ambient Weather) and a constant speed, high speed fan. (6) The rain collector is calibrated at the factory based on the funnel diameter. The bucket tips every 0.01” of rain (referred to as resolution). -
Page 27: Wireless Signal Strength Indicator
Figure 25 defines the conditions for rising and falling pressure every 3 hours. Tendency indicators Condition Humidity Change per 3 Hours Temperature Change per 3 Hours Rising Rising > 3% Rising > 1º C / 2 ºF Change ≤ ± 1 º C / Change ≤... -
Page 28: Glossary Of Terms
The reason the current conditions do not match the forecast icon is because the forecast is a prediction 24-48 hours in advance. In most locations, this prediction is only 70% accurate and it is a good idea to consult the National Weather Service for more accurate weather forecasts. -
Page 29: Specifications
Term Definition HectoPascals (hPa) Pressure units in SI (international system) units of measurement. Same as millibars (1 hPa = 1 mbar) Hygrometer A hygrometer is a device that measures relative humidity. Relative humidity is a term used to describe the amount or percentage of water vapor that exists in air. Inches of Mercury Pressure in Imperial units of measure. -
Page 30: Measurement Specifications
8.2 Measurement Specifications The following table provides the specifications for the measured parameters. Measurement Range Accuracy Resolution Indoor Temperature 14 to 140 °F ± 2 °F 0.1 °F Outdoor Temperature -40 to 149 °F (lithium batteries) ± 2 °F 0.1 °F -23 to 140 °F (alkaline batteries) Indoor Humidity 10 to 99%... -
Page 31: Troubleshooting Guide
4. When replacing the batteries, apply a corrosion preventive compound on the battery terminals, available at Amazon and most hardware stores. 5. In snowy environments, spray the top of the weather station with anti-icing silicon spray to prevent snow build up. 10. -
Page 32: Accessories
The following accessories are available for this weather station at www.AmbientWeather.com . Accessory Description Ambient Weather Mounting Ambient Weather provides the most comprehensive mounting solutions for weather Solutions stations, including tripods, pole extensions, pole mounting kits, guy wires, ground stakes and more. -
Page 33: Warranty Information
15. California Prop 65 WARNING: Use of the Ambient Weather Products can expose you to chemicals, including lead and lead compounds, which are known to the State of California to cause cancer and bisphenol A (BPA), and phthalates DINP and/or DEHP, which are known to the State of California to cause birth defects or other reproductive harm. - Page 34 While using Ambient Weather Products as intended, we believe any potential exposure would be negligible or well within the "no significant risk" range. However, to ensure compliance with California law and our customers' right to know, we have elected to place the Proposition 65 warning signs on Ambient Weather Products.
Need help?
Do you have a question about the WS-1900A and is the answer not in the manual?
Questions and answers
How do I update daylight savings stime
To update daylight saving time (DST) on the Ambient Weather WS-1900A, press the [WIND +] button to switch DST ON or OFF. Set it to ON if your location observes daylight saving time, and the clock will adjust automatically twice per year. Set it to OFF if your location does not observe DST, such as Arizona and Hawaii.
This answer is automatically generated