Table of Contents
Advertisement
Ambient Weather WS-1001-WiFi OBSERVER Solar
Powered Wireless WiFi Weather Station User Manual
Table of Contents
1.
Introduction ..................................................................................................................................... 2
2.
Warnings and Cautions ................................................................................................................... 2
3.
Quick Start Guide ............................................................................................................................ 2
4.
Pre-Installation Checkout and Site Survey...................................................................................... 3
4.1
Pre Installation Checkout ....................................................................................................... 3
4.2
Site Survey ............................................................................................................................. 3
5.
Getting Started ................................................................................................................................ 3
5.1
Parts List ................................................................................................................................. 4
5.2
Recommend Tools .................................................................................................................. 5
5.3
Sensor Array Set Up ............................................................................................................... 6
5.3.1
Install Wind Vane ............................................................................................................... 7
5.3.2
Install Mounting Pole ......................................................................................................... 7
5.3.3
Install Batteries................................................................................................................... 9
5.3.4
Mount Weather Station ..................................................................................................... 11
5.3.5
Reset Button and Transmitter LED .................................................................................. 13
5.4
Indoor Thermo-Hygrometer-Barometer Transmitter ............................................................ 14
5.5 Best Practices for Wireless Communication ............................................................................... 15
5.6
Display Console ................................................................................................................... 15
6.
Display Console Operation ........................................................................................................... 16
6.1
Home Screen Display ........................................................................................................... 16
6.2
History Mode........................................................................................................................ 17
6.2.1
Archive Memory Mode .................................................................................................... 18
6.2.2
Recall / Delete Annual Archive Memory ......................................................................... 19
6.2.3
Page Selection .................................................................................................................. 20
6.2.4
Historical Graphs ............................................................................................................. 21
6.3
Set Mode .............................................................................................................................. 23
6.3.1
Set Date and Time ............................................................................................................ 23
6.3.2
Set Time Format ............................................................................................................... 25
6.3.3
Temperature Units of Measure ......................................................................................... 25
6.3.4
Barometer Units of Measure ............................................................................................ 25
6.3.5
Wind Speed Units of Measure .......................................................................................... 25
6.3.6
Rainfall Units of Measure ................................................................................................ 25
6.3.7
Solar Radiation Units of Measure .................................................................................... 25
6.3.8
Rainfall Display Increments ............................................................................................. 25
6.3.9
Graph Time ...................................................................................................................... 26
6.3.10
Backlight Display ......................................................................................................... 26
6.3.11
Longitude and Latitude ................................................................................................ 26
6.3.12
Barometer Display ....................................................................................................... 28
6.3.13
Weather Threshold ....................................................................................................... 29
6.3.14
Storm Threshold ........................................................................................................... 29
6.3.15
Current Weather ........................................................................................................... 29
6.3.16
Rainfall Season ............................................................................................................ 29
6.3.17
Archive Interval ........................................................................................................... 29
Version 1.0
©Copyright 2014, Ambient LLC. All Rights Reserved.
Page 1
Advertisement
Table of Contents

Related Manuals for Ambient Weather WS-1001-WiFi OBSERVER


Summary of Contents for Ambient Weather WS-1001-WiFi OBSERVER
-
Page 1: Table Of Contents
Ambient Weather WS-1001-WiFi OBSERVER Solar Powered Wireless WiFi Weather Station User Manual Table of Contents Introduction ............................. 2 Warnings and Cautions ........................2 Quick Start Guide ..........................2 Pre-Installation Checkout and Site Survey..................3 Pre Installation Checkout ....................... 3 Site Survey ..........................3 Getting Started .......................... -
Page 2: Introduction
Warranty Information ....................... 49 1. Introduction Thank you for your purchase of the Ambient Weather WS-1000-WiFi OBSERVER Solar Powered Wireless WiFi Weather Station. The following user guide provides step by step instructions for installation, operation and troubleshooting. To download the latest manual and additional troubleshooting tips, please visit: http://ambientweather.wikispaces.com/ws1001-wifi... -
Page 3: Pre-Installation Checkout And Site Survey
Please take this into consideration when choosing console or mounting locations. Make sure your display console is at least five feet away from any electronic device to avoid interference. 6. Visit Ambient Weather Mounting Solutions for assistance and ideas for mounting your weather station: http://www.ambientweather.com/amwemoso.html 5. -
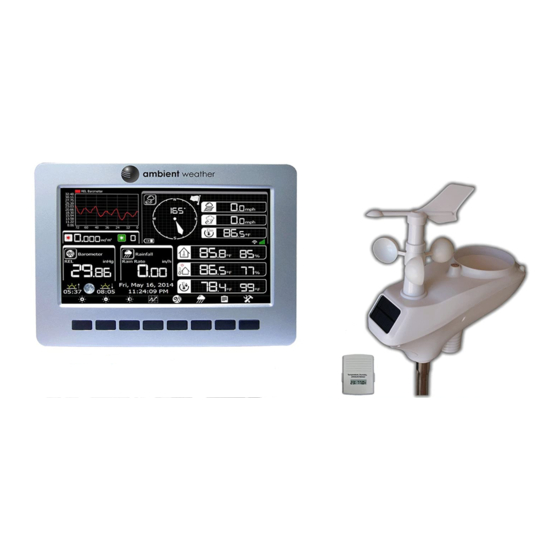
Page 4: Parts List
and wireless thermo-hygrometer-barometer. 5.1 Parts List Item Image Display Console Frame Dimensions (LxWxH): 7.75 x 5.75 x 0.75” LCD Dimensions (LxW): 6.25 x 3.5” Thermo-hygrometer-barometer transmitter Thermo-hygrometer-barometer mounting bracket plus 3 mounting screws Sensor Array Wind Vane Version 1.0 ©Copyright 2014, Ambient LLC. All Rights Reserved. Page 4... -
Page 5: Recommend Tools
Item Image 5V DC Adaptor Pole (straight and crimped) Pole mounting U-bolt Pole mounting clamps Pole mounting U-bolt nuts Allen wrench User manual 5.2 Recommend Tools Precision screwdriver (for small Phillips screw on battery cover door) Adjustable wrench (for mounting pole) ... -
Page 6: Sensor Array Set Up
5.3 Sensor Array Set Up Figure 1 Description Description Wind Vane (measures wind direction) Thermo-hygrometer Sensor (measures temperature and humidity) Wind Speed Sensor (measures wind speed) UV Sensor Solar collector Solar Radiation Sensor Rechargeable battery compartment Rain Collector (self emptying) LED transmission indicator (turns on for 4 Bubble Level seconds on power up, flashes once per 16... -
Page 7: Install Wind Vane
5.3.1 Install Wind Vane Reference Figure 2. (a) Locate and align the flat key on the wind vane shaft to the flat key on the wind vane and push the vane on to the shaft. (b) tighten the set screw with the hex wrench (included). Figure 2 5.3.2 Install Mounting Pole Reference Figure 3. - Page 8 Reference Figure 4. Locate and align the groove on the sensor array and mounting pole. Figure 4 Version 1.0 ©Copyright 2014, Ambient LLC. All Rights Reserved. Page 8...
-
Page 9: Install Batteries
Reference Figure 5. Turn the mounting pole collar to lock the pole into place by rotating clockwise. Figure 5 5.3.3 Install Batteries Reference Figure 6. Locate the battery door on the bottom of the sensor array. Turn the set screw counter clockwise to open the battery compartment. - Page 10 Figure 6 Version 1.0 ©Copyright 2014, Ambient LLC. All Rights Reserved. Page 10...
-
Page 11: Mount Weather Station
B. Option 2: Swedged Pole Mount. Insert the swedged end of the included mounting pole into the open end of any standard mounting pole solution (1 3/8” diameter) available from Ambient Weather, as shown in Figure 8. For more information on mounting solutions, visit: http://www.ambientweather.com/amwemoso.html Version 1.0... - Page 12 Figure 8 1. Reference Figure 9. Locate the four wind vane compass rose indicators of N, E, S, W (representing North, East, South and West). Align the compass rose direction upon final installation with a compass or GPS. Figure 9 Version 1.0 ©Copyright 2014, Ambient LLC.
-
Page 13: Reset Button And Transmitter Led
2. Reference Figure 10. Make sure the sensor array is completely level upon final installation. Failure to do so will result in inaccurate rain gauge readings. Figure 10 5.3.5 Reset Button and Transmitter LED In the event the sensor array is not transmitting, reset the sensor array. With an open ended paperclip, press and hold the RESET BUTTON for three seconds to completely discharge the voltage. -
Page 14: Indoor Thermo-Hygrometer-Barometer Transmitter
5.4 Indoor Thermo-Hygrometer-Barometer Transmitter The indoor thermometer, hygrometer and barometer measures and displays the indoor temperature, humidity and pressure and transmits this data to the display console. Figure 12 Note: Do not install the thermo-hygrometer-barometer transmitter outside. This will cause errors in the barometric pressure due to large variations in temperature (barometric pressure is temperature compensated for accuracy). -
Page 15: Best Practices For Wireless Communication
Figure 13 5.5 Best Practices for Wireless Communication Note: To insure proper communication, mount the remote sensor(s) upright on a vertical surface, such as a wall. Do not lay the sensor flat. Wireless communication is susceptible to interference, distance, walls and metal barriers. We recommend the following best practices for trouble free wireless communication. -
Page 16: Display Console Operation
Reset Figure 14 6. Display Console Operation Note: About This Section. The display console includes buttons at the bottom with icons signifying the menu functions. This manual includes “quick menu boxes” as shown below, signifying how to access a setting from home screen. For example, to access Recall and delete annual archive memory, from the home screen, press the History Key twice and the recall page key once: “Menu box”... -
Page 17: History Mode
Description Description Graph (barometer, temperature or humidity) Heat Index Wind Direction Rainfall Wind Speed Date and Time Wind Gust Sunset Wind Chill Moon Phase Internet Connectivity Sunrise WiFi Connectivity Barometer Indoor Temperature & Humidity Outdoor Temperature & Humidity Solar Radiation Dew Point Low Battery Indicators (only displayed when batteries are low) -
Page 18: Archive Memory Mode
Figure 16 Check Uncheck Clear scroll up scroll down View return home parameter parameter selected archive to clear to clear parameter.(1) memory (1) The popup message “Are you sure you want to clear the max/min?” Select to highlight “Yes” and to confirm. -
Page 19: Recall / Delete Annual Archive Memory
Figure 17 Recall Recall scroll left scroll scroll up scroll View graphs return home annual page right down records 6.2.2 Recall / Delete Annual Archive Memory Recall and delete annual archive memory. Version 1.0 ©Copyright 2014, Ambient LLC. All Rights Reserved. Page 19... -
Page 20: Page Selection
Figure 18 Delete annual record scroll left scroll right Recall annual record return archive memory mode 6.2.3 Page Selection While viewing the annual archive memory, press the key to view a specific page of memory. Version 1.0 ©Copyright 2014, Ambient LLC. All Rights Reserved. Page 20... -
Page 21: Historical Graphs
Figure 19 Increase Decrease Scroll digit scroll digit Toggle Toggle page page to left right cancel, then press cancel, then press number number to confirm to confirm 6.2.4 Historical Graphs Display historical graph data. Version 1.0 ©Copyright 2014, Ambient LLC. All Rights Reserved. Page 21... - Page 22 Figure 20 Zoom in Zoom scroll scroll x-axis Recall scroll Return Return home Y-axis x-axis (time) right annual parameter Max/Min Y-axis (time) left archivc pages data Version 1.0 ©Copyright 2014, Ambient LLC. All Rights Reserved. Page 22...
-
Page 23: Set Mode
6.3 Set Mode Enter the Setup Mode Figure 21 Select units Select Select Select Scroll field Scroll Enter return of measure units value value field sub-setup to home scroll measure or down mode value up scroll value down 6.3.1 Set Date and Time Set the date and time. - Page 24 to decrease the time zone. With time zone highlighted, press to set Daylight Savings Time (DST). Press to toggle ON or OFF. Note: the DST should be always checked to automatically update the time when DST changes. 4. Set Time Server. The default time server is time.nist.gov. Press to set the time server.
-
Page 25: Set Time Format
6.3.2 Set Time Format Press change time format between hour:minute:second (h:mm:ss), hour:minute:second (AM h:mm:ss) and hour:minute:second AM (h:mm:ss AM). 6.3.3 Temperature Units of Measure Press to change the temperature units of measure between °F and °C. 6.3.4 Barometer Units of Measure Press to change the temperature units of measure between inHg, mmHg and hpa. -
Page 26: Graph Time
6.3.9 Graph Time Press to change the home screen graph display between 24, 48 and 72 hours (note: the graph will clear when the graph increment of measure is changed). The default is 72 hours. 6.3.10 Backlight Display x 10 Automatically turn on and off the backlight or adjust the brightness based on the time of day. - Page 27 increase or decrease the value. Press to change the remaining latitude variables. Longitude. Press to set the Western or Eastern Hemisphere. In the USA, the hemisphere setting is WEST. To change to EAST, press the key. Press to change your longitude. The longitude x 100 will turn red. Press to increase or decrease the value.
-
Page 28: Barometer Display
3. In this example, the location entered into the display is as follows: Latitude = 33.30 North Longitude = 111.96 West after rounding to two significant digits. Record your longitude and latitude here for future reference: Longitude: Latitude: Figure 25 6.3.12 Barometer Display x 11 Press... -
Page 29: Weather Threshold
The standard sea-level pressure is 29.92 in Hg (1013 mb). This is the average sea-level pressure around the world. Relative pressure measurements greater than 29.92 inHg (1013 mb) are considered high pressure and relative pressure measurements less than 29.92 inHg are considered low pressure. - Page 30 Figure 26 scroll value up scroll value Scroll field up Scroll field down return to Setup down 1. Set Station ID. Press to highlight the Station ID. Enter your station ID obtained from Wunderground.com. Press to display the keyboard. Press to scroll to the character and press to select the character.
- Page 31 2. Join the Personal Weather Station (PWS) network. Visit: http://www.wunderground.com/weatherstation/about.asp and Get Started! to add your weather station and you will receive a Station ID. Enter the Station ID obtained and password you entered in the console’s Weather Server page. Note: If Wunderground.com is not updating, make sure the Station ID and Password are correct.
-
Page 32: Wifi Scan
6.3.19 WiFi Scan x 16 Press to select your wireless network. Press to enter the password. Press to scroll to the character and press to select the character. Press to return to the WiFi Network setup page. Leave the password blank of the WiFi network is not encrypted. Note: The WiFi signal strength icon is displayed on the home page . -
Page 33: Calibration Mode
To adjust the alarm, press to scroll to the alarm setting you wish to change. Press highlight the sign (positive vs. negative) and significant digit. Press to change the value. To set the alarm,, press to highlight the alarm symbol and press to toggle the alarm ON or OFF. - Page 34 Figure 29 Increase Decrease Select Select Scroll field Scroll Enter return calibrated calibrated value value field sub-setup to home value value down mode To adjust the parameter, press to scroll to the parameter you wish to change. Press highlight the sign (positive vs. negative, if applicable) and significant digit. Press change the calibrated value.
- Page 35 Parameter Type of Default Typical Calibration Source Calibration Temperature Offset Current Value Red Spirit or Mercury Thermometer (1) Humidity Offset Current Value Sling Psychrometer (2) Offset Current Value Calibrated laboratory grade Barometer barometer REL Barometer Offset Current Value Local airport (3) Wind Direction Offset Current Value GPS, Compass (4)
- Page 36 Without a calibrated source, wind speed can be difficult to measure. We recommend using a calibrated wind meter (available from Ambient Weather) and a constant speed, high speed fan. (7) The rain collector is calibrated at the factory based on the funnel diameter. The bucket tips every 0.01”...
-
Page 37: Factory Default
Note: The purpose of calibration is to fine tune or correct for any sensor error associated with the devices margin of error. Errors can occur due to electronic variation (example, the temperature sensor is a resistive thermal device or RTD, the humidity sensor is a capacitance device), mechanical variation, or degradation (wearing of moving parts, contamination of sensors). - Page 38 Press to select Yes or No. Press the key or key to confirm the selection. 2. Re-register Transmitter Outdoor. Re-synchronizes the wireless signal from the outdoor sensor array. Press to highlight this field. Press key to select re-register indoor transmitter. Press key to ”Are you sure you want to register the new outdoor transmitter?”...
- Page 39 Figure 31 Select Select Select year Select year Scroll field Scroll Start or return to Setting Setting history file history file field stop Factory down backup menu Figure 32 Version 1.0 ©Copyright 2014, Ambient LLC. All Rights Reserved. Page 39...
-
Page 40: Exporting Data File Format (Data Logging)
6.6.1 Exporting Data File Format (Data Logging) The format of the data is csv (comma separated value) and can be opened in a spreadsheet program such as Microsoft Excel for advanced data analysis, with the following headers: Column Parameter 1 No (data point number) 2 Time 3 Indoor Temperature (°F) 4 Indoor Humidity (%) -
Page 41: Glossary Of Terms
Figure 33 7. Glossary of Terms Term Definition Absolute Absolute pressure is the measured atmospheric pressure and is a function of altitude, Barometric and to a lesser extent, changes in weather conditions. Pressure Absolute pressure is not corrected to sea-level conditions. Refer to Relative Barometric Pressure. - Page 42 Term Definition To find the Heat Index temperature, look at the Heat Index chart below. As an example, if the air temperature is 96°F and the relative humidity is 65%, the heat index (how hot it feels) is 121°F. IMPORTANT: Since heat index values were devised for shady, light wind conditions, exposure to full sunshine can increase heat index values by up to 15°F.
-
Page 43: Specifications
Term Definition Solar A solar radiation sensor measures solar energy from the sun. Radiation Solar radiation is radiant energy emitted by the sun from a nuclear fusion reaction that creates electromagnetic energy. The spectrum of solar radiation is close to that of a black body with a temperature of about 5800 K. -
Page 44: Maintenance
9. Maintenance 1. Clean the rain gauge once every 3 months as follows. Reference Figure 34. Step 1: Make a note of the current rain totals by referencing the calibration screen (reference Section 6.5). You will need to re-enter these values after the calibration procedure it complete. Step 2: Pour water into the rain collector to moisturize the dirt inside rain bucket. - Page 45 Figure 35 Figure 36 Version 1.0 ©Copyright 2014, Ambient LLC. All Rights Reserved. Page 45...
-
Page 46: Troubleshooting Guide
10. Troubleshooting Guide If your question is not answered here, you can contact us as follows: 1. Email Support: support@ambientweather.com 2. Live Chat Support: www.ambientweather.com/chat.html (M-F 8am to 4pm Arizona Time) 3. Technical Support: 480-346-3398 (M-F 8am to 4pm Arizona Time) Problem Solution The maximum line of sight communication range is about 300’. - Page 47 Problem Solution Replace the batteries in the outside sensor array. Non-rechargeable batteries are OK for testing purposes. With the sensor array and console 10 feet away from each other, remove AC power from the display console and wait 10 seconds. Re-connect power. Temperature sensor Make certain that the sensor array is not too close to heat generating sources reads too high in the...
-
Page 48: Accessories
Solutions for weather stations, including tripods, pole extensions, pole mounting kits, guy wires, ground stakes and more. Ambient Weather Ambient Weather WS-1000-BATT 3 x AA Rechargeable Batteries for WS-1000-BATT 3 x AA WS-1000-WiFi Outdoor Sensor Array (replacement). Rechargeable Batteries for... -
Page 49: Warranty Information
Modifications not expressly approved by this company could void the user's authority to operate the equipment. Statement according to FCC part 15.105: NOTE: This equipment has been tested and found to comply with the limits for a Class B digital device, pursuant to Part 15 of the FCC Rules.
Need help?
Do you have a question about the WS-1001-WiFi OBSERVER and is the answer not in the manual?
Questions and answers