Table of Contents
Advertisement
Quick Links
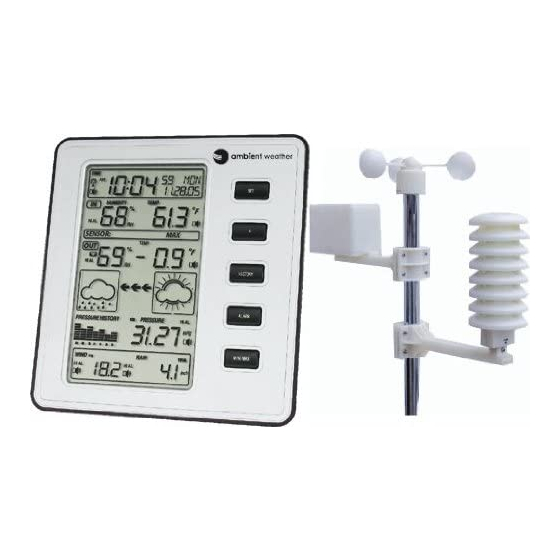
Ambient Weather WS-1050 Wireless Home Weather Station
Table of Contents
1.
Introduction ...................................................................................................................................................... 2
2.
Warnings and Cautions ..................................................................................................................................... 2
3.
Getting Started .................................................................................................................................................. 2
3.1
Parts List .................................................................................................................................................. 3
3.2
Recommend Tools ................................................................................................................................... 3
3.3
Sensor Assembly Set Up .......................................................................................................................... 4
3.4
Display Console ....................................................................................................................................... 7
3.4.1
Display Console Layout ...................................................................................................................... 7
3.4.1
Initial Display Console Set Up ............................................................................................................ 9
3.4.2
Sensor Operation Verification .............................................................................................................. 9
4.
Weather Station Installation .............................................................................................................................. 9
4.1
Pre Installation Checkout ......................................................................................................................... 9
4.2
Site Survey ............................................................................................................................................... 9
4.3
Final Installation of Sensor Array .......................................................................................................... 10
5.
Console Operation .......................................................................................................................................... 10
5.1
Set Mode ................................................................................................................................................ 10
5.1.1
Set Time ............................................................................................................................................. 10
5.1.2
Set Date .............................................................................................................................................. 11
5.1.3
Set Indoor Temperature and Outdoor Temperature Units .................................................................. 12
5.1.4
Set Barometric Pressure ..................................................................................................................... 12
5.1.5 Set Wind Units ....................................................................................................................................... 12
5.1.5
Set Rain Units .................................................................................................................................... 13
5.2
Quick Set Mode ..................................................................................................................................... 13
5.2.1
Outdoor Temperature, Wind chill and Dew Point Display ................................................................ 13
5.2.2
Relative and Absolute Pressure Display ............................................................................................ 13
5.2.3
Average Wind Speed and Wind Gust ................................................................................................. 13
5.2.4
Rain Display and Reset ...................................................................................................................... 13
5.3
History Mode ......................................................................................................................................... 13
5.4
Alarm Mode ........................................................................................................................................... 14
5.4.1
High Alarm Mode .............................................................................................................................. 14
5.4.2
Low Alarm Mode ............................................................................................................................... 16
5.4.3
Cancelling an Alarm .......................................................................................................................... 16
5.4.4
Outdoor Temperature/ Wind Chill / Dew Point Alarm ...................................................................... 16
5.5
Min/Max Mode ...................................................................................................................................... 17
5.5.1
Maximum Mode ................................................................................................................................ 17
5.5.2
Minimum Mode ................................................................................................................................. 18
User Manual
1
Advertisement
Table of Contents

Related Manuals for Ambient Weather WS-1050


Summary of Contents for Ambient Weather WS-1050
-
Page 1: Table Of Contents
Ambient Weather WS-1050 Wireless Home Weather Station User Manual Table of Contents Introduction ..............................2 Warnings and Cautions ............................. 2 Getting Started ..............................2 Parts List ..............................3 Recommend Tools ........................... 3 Sensor Assembly Set Up .......................... 4 Display Console ............................7 3.4.1... -
Page 2: Introduction
Warranty Information ..........................25 1. Introduction Thank you for your purchase of the Ambient Weather WS-1050 wireless weather station. The following user guide provides step by step instructions for installation, operation and troubleshooting. To download the latest manual and additional troubleshooting tips, please visit: http://ambientweather.wikispaces.com/ws1050... -
Page 3: Parts List
3.1 Parts List Item Display Console Frame Dimensions (LxWxH): 6.5” x 6” x 1.25” LCD Dimensions (LxW): 5” x 2.75” Thermo-hygrometer transmitter Thermo-hygrometer transmitter mounting bracket Thermo-hygrometer transmitter radiation shield Wind speed sensor Rain gauge Rain gauge mounting bracket 1” nut and bolt (long) 13/16”... -
Page 4: Sensor Assembly Set Up
3.3 Sensor Assembly Set Up Connect the wind cup assembly to the top end of the top mounting pole. Align the holes, and fasten with long bolt and nut. Tighten with precision screwdriver while securing the nut with pliers, as shown in Front Back 1. - Page 5 2. Connect the rain gauge with long set screw. Tighten with precision screwdriver, as shown in Figure 2. Note: There may be a slight “play” in the rain gauge and the screw may not be flush. Do not force the screw. Note: There are two mounting holes on the side of the rain gauge in the event you wish to mount the rain gauge in a different location than the mounting arm.
- Page 6 5. Insert two AA batteries in the thermo-hygrometer. The transmitter LED will light up momentarily (4 seconds), and then flash once every 48 seconds for each transmission update. Note: Do not install the batteries backwards. You can permanently damage the thermo-hygrometer. Do not use rechargeable batteries.
-
Page 7: Display Console
6. Fasten the lower mounting pole (which is swaged on the top end) to your mounting pole or bracket (purchased separately) with the hose clamps. Tighten the lower mounting pole to your mounting pole with the hose clamps with a flat head screw driver, as shown in Figure 5. Slide the top weather station pole (with the sensor array) into the lower pole (connected to your mounting pole) when your station is finally mounted. - Page 8 Figure 6 1. Time 15. General outdoor alarm icon 2. Alarm on indicator 16. Weather forecast icon 3. Day of week/ time zone 17. Weather tendency indicator 4. Date 18. Pressure unit (relative or absolute) 5. Indoor temperature display 19. Pressure with 24 hour history graph 6.
-
Page 9: Initial Display Console Set Up
3.4.1 Initial Display Console Set Up Note: The sensor array must be powered and updating before powering up the console, or the console will give up searching for the sensors. Perform this step last. Make certain the weather station sensor array is at least 10’ away from the console and within 300’ of the console. -
Page 10: Final Installation Of Sensor Array
5. Radio interference such as PCs, radios or TV sets can, in the worst case, entirely cut off radio communication. Please take this into consideration when choosing console or mounting locations. 6. Visit Ambient Weather Mounting Solutions for assistance and ideas for mounting your weather station: http://www.ambientweather.com/amwemoso.html 4.3 Final Installation of Sensor Array... -
Page 11: Set Date
Hours from Time Zone Cities -12 IDLW: International Date Line West -11 NT: Nome Nome, AK -10 AHST: Alaska-Hawaii Standard Honolulu, HI CAT: Central Alaska HST: Hawaii Standard -9 YST: Yukon Standard Yukon Territory -8 PST: Pacific Standard Los Angeles, CA, USA -7 MST: Mountain Standard Denver, CO, USA -6 CST: Central Standard... -
Page 12: Set Indoor Temperature And Outdoor Temperature Units
5.1.3 Set Indoor Temperature and Outdoor Temperature Units Change Indoor Temperature Units. Press the SET key to set the indoor and outdoor temperature units. The indoor and outdoor temperature will begin flashing. Press the + .to alternate the display unit between °C and °F. -
Page 13: Set Rain Units
5.1.5 Set Rain Units Rain Units. Press the key to set the rain units. The rain will begin flashing. Press the + key to alternate the display unit between in and mm. 5.2 Quick Set Mode While in the Normal mode, press the key to enter the Quick Set Mode. -
Page 14: Alarm Mode
5.4 Alarm Mode Note: After initially pressing the key, the display will show the current high and low ALARM alarm values. The alarm value will be displayed only for those already activated, otherwise, inactive alarms will show dashes (--). The Alarm mode can be exited at any time by either pressing the key or waiting for the ALARM 10-second time-out to take effect. - Page 15 will be turned on and the HI AL icon will be displayed). 6. Wind Chill High Alarm. Press the key to set the wind chill high alarm. The WIND CHILL icon will be displayed and the outdoor temperature (wind chill) will begin flashing. Press the + key (increase) or MIN/MAX key (decrease) to change the wind chill alarm value.
-
Page 16: Low Alarm Mode
5.4.2 Low Alarm Mode While in the Normal mode, press the key twice to enter the Low Alarm mode. The LOAL ALARM icon will be displayed in the TIME section. 1. Time of Day Alarm. Reference Section 5.4.1. 2. Indoor Humidity Low Alarm. Reference Section 5.4.1. The low alarm is similar to the high alarm setting. -
Page 17: Min/Max Mode
Figure 7 5.5 Min/Max Mode While in the Normal mode, press the key to enter the Maximum mode. The maximum MIN/MAX values will begin flashing. Press the key again to enter the Minimum mode. The minimum values will begin flashing. MIN/MAX The Min/Max mode can be exited at any time by either pressing the key or waiting for the... -
Page 18: Minimum Mode
Press the SET key to reset the maximum wind chill to the current value, date and time. 6. Maximum Dew Point. Press the + key to display the maximum dew point with the associated time and date stamp. Press the SET key to reset the maximum dew point to the current value, date and time. 7. -
Page 19: Weather Icons
when the pressure decreases, the weather degrades (cloudy to rain). The weather forecast is an estimation or generalization of weather changes in the next 24 to 48 hours, and varies from location to location. The tendency is simply a tool for projecting weather conditions and is never to be relied upon as an accurate method to predict the weather. -
Page 20: Storm Threshold Indicator
5.6.4 Storm threshold indicator The storm threshold (the negative rate of pressure change signifying a storm is expected) can be adjusted by the user from level 3 to level 9 (the default level 4). When negative rate of change of pressure is exceeded for 3 hours, the storm warning indicator will be activated, and the clouds with rain icon and tendency arrows will flash for 3 hours indicating the storm warning feature has been activated. -
Page 21: Specifications
Term Definition 1 inch of mercury = 33.86 millibars Range Range is defined as the amount or extent a value can be measured. Relative Barometric Measured barometric pressure relative to your location or ambient Pressure conditions. Resolution Resolution is defined as the number of significant digits (decimal places) to which a value is being reliably measured. - Page 22 Problem Solution Wireless remote (thermo-hygrometer) not The maximum line of sight communication range is 300’. Move the sensor assembly closer to the display reporting in to console. console. There are dashes on the display console. If the sensor assembly is too close (less than 10’), move the sensor assembly away from the display console.
-
Page 23: Accessories
Weather Station Mounting Pole mounting solutions, tripods, mast to mast Solutions mounting kits. The WS-1050 pole mount can be attached to a pole mounting solution with the included hose clamps. Energizer AA Lithium AA lithium batteries for cold weather Battery (2-pack) - Batteries climates. -
Page 24: Liability Disclaimer
Ambient Weather P2P2 The P2P2 mast to mast reduction kit is used Mast to Mast Mounting Kit with any of Ambient Weather's mounting pole kits, and allows you to mount smaller diameter poles to larger diameter poles, providing a solid mounting solution. -
Page 25: Warranty Information
by turning the equipment off and on, the user is encouraged to try to correct the interference by one or more of the following measures: • Reorient or relocate the receiving antenna. • Increase the separation between the equipment and receiver. •...
Need help?
Do you have a question about the WS-1050 and is the answer not in the manual?
Questions and answers