
Related Manuals for ZyXEL Communications GS1200 SERIES


Summary of Contents for ZyXEL Communications GS1200 SERIES
- Page 1 GS1200 Series Web Managed GbE PoE Switch Version 1 Edition 1, 6/2016 User’s Guide Default Login Details LAN IP Address http://192.168.1.3 Password 1234 www.zyxel.com Copyright © 2016 ZyXEL Communications Corporation...
- Page 2 Related Documentation • Quick Start Guide The Quick Start Guide shows how to connect the Switch and access the Web Configurator. • More Information Go to support.zyxel.com to find other information on the Switch. GS1200 Series User’s Guide...
-
Page 3: Table Of Contents
Hardware Installation ..........................11 Hardware Panels .............................12 The Web Configurator ..........................14 Initial Setup Example ..........................18 Technical Reference ..........................21 System ..............................22 Switch Management ..........................25 VLAN ...............................27 QoS .................................32 Storm Control ............................36 IGMP Snooping ............................38 PoE .................................40 Troubleshooting ............................43 GS1200 Series User’s Guide... -
Page 4: Table Of Contents
4.2 System Login ...........................14 4.3 The Web Configurator Layout ......................15 4.3.1 Change Your Password ......................16 4.4 Switch Lockout ..........................16 4.5 Resetting the Switch ........................17 4.6 Logging Out of the Web Configurator ....................17 Chapter 5 Initial Setup Example..........................18 GS1200 Series User’s Guide... - Page 5 9.2.2 IEEE 802.1p QoS ........................33 9.2.3 Weighted Round Robin Scheduling (WRR) ................33 9.3 Port-Based QoS Screen ........................34 9.4 IEEE 802.1P QoS Screen .........................35 Chapter 10 Storm Control............................36 10.1 Overview ............................36 10.2 Storm Control Screen ........................36 Chapter 11 IGMP Snooping ...........................38 GS1200 Series User’s Guide...
- Page 6 12.2.1 PoE Global Settings ......................40 12.2.2 PoE Status ..........................41 Chapter 13 Troubleshooting..........................43 13.1 Power, Hardware Connections, and LEDs ..................43 13.2 Switch Access and Login ........................44 Appendix A Customer Support ......................46 Appendix B Legal Information......................52 Index ..............................57 GS1200 Series User’s Guide...
-
Page 7: User's Guide
User’s Guide... -
Page 8: Getting To Know Your Switch
H A PT ER Getting to Know Your Switch 1.1 Introduction This chapter introduces the main features and applications of the Switch. The GS1200 Series consists of the following models: • GS1200-5HP • GS1200-8HP Referring to Switch in this User's Guide applies to both models, GS1200-5HP and GS1200-8HP. -
Page 9: Bridging Application
Shared resources such as a server can be used by all ports in the same VLAN as the server. In the following figure only ports that need access to the server need to be part of VLAN1. Ports can belong to other VLAN groups too. GS1200 Series User’s Guide... -
Page 10: Ways To Manage The Switch
Switch to its factory default settings. If you backed up an earlier configuration file, you would not have to totally re-configure the Switch. You could simply restore your last configuration. GS1200 Series User’s Guide... -
Page 11: Hardware Installation
Set the Switch on a smooth, level surface strong enough to support the weight of the Switch and the connected cables. Make sure there is a power outlet nearby. Make sure there is enough clearance around the Switch to allow air circulation and the attachment of cables and the power cord. GS1200 Series User’s Guide... -
Page 12: Hardware Panels
To connect power to the Switch, insert the female end of the power cord to the AC power receptacle on the rear panel. Connect the other end of the supplied power cord to a power outlet. Make sure that no objects obstruct the airflow of the fans (located on the side of the unit). GS1200 Series User’s Guide... -
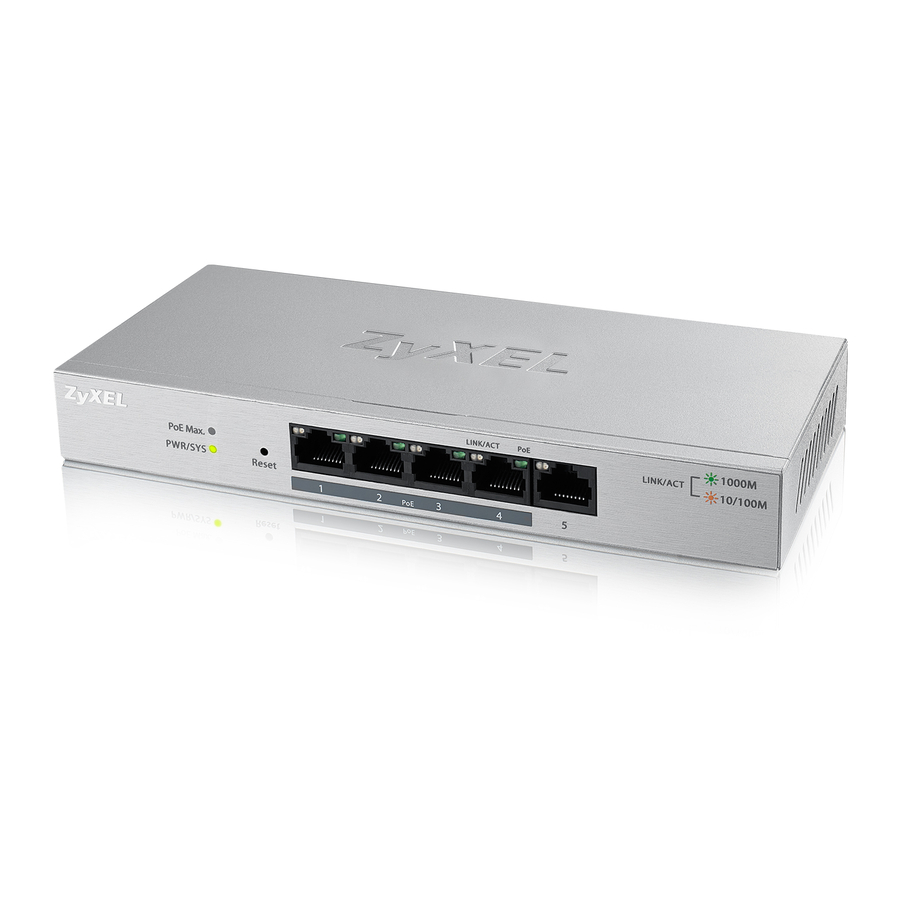
Page 13: Leds
PoE is enabled and power is supplied to the connected PoE device. PoE is disabled or power is not being supplied. PoE Max Green PoE power output is over 90% of the power budget. PoE power output is under 90% of the power budget. GS1200 Series User’s Guide... -
Page 14: The Web Configurator
192.168.1.3) in the Location or Address field. Press [ENTER]. Your computer must be in the same subnet in order to access this website address. The login screen appears. The default password is 1234. Figure 7 Web Configurator: Login Click SIGN IN to view the first web configurator screen. GS1200 Series User’s Guide... -
Page 15: The Web Configurator Layout
The following figure shows the navigating components of a web configurator screen. Figure 8 Web Configurator Layout A - Click the menu items to open the screen in the main window. B - Click this link to log out of the web configurator. GS1200 Series User’s Guide... -
Page 16: Change Your Password
Figure 9 Change Administrator Login Password 4.4 Switch Lockout You could block yourself (and all others) from managing the Switch if you do one of the following: Remove all ports from the management VLAN (default is VLAN 1). GS1200 Series User’s Guide... -
Page 17: Resetting The Switch
Click the Logout icon in a screen to exit the web configurator. You have to log in with your password again after you log out. This is recommended after you finish a management session for security reasons. GS1200 Series User’s Guide... -
Page 18: Initial Setup Example
In this example, you want to configure port 1 as a member of VLAN 2. Figure 10 Initial Setup Network Example: VLAN Click VLAN in the navigation panel and select the IEEE 802.1Q VLAN option. Click the Create New VLAN button. GS1200 Series User’s Guide... - Page 19 VLAN. To ensure that VLAN-unaware devices (such as computers and hubs) can receive frames properly, set the port’s box color to green to set the Switch to remove VLAN tags before sending. Change the box color of other ports to gray. Click Apply to save the settings. GS1200 Series User’s Guide...
-
Page 20: Setting Port Vid
VLAN 2. Figure 11 Initial Setup Network Example: Port VID Click VLAN in the navigation panel. Enter 2 in the PVID field for port 2 and click Apply to save your changes back to the Switch. GS1200 Series User’s Guide... -
Page 21: Technical Reference
Technical Reference... -
Page 22: System
The System screen displays when you log into the Switch or click System at the top of the web configurator. The System screen displays the Switch’s general device information, system status, IP address and the port statistics. Figure 12 System GS1200 Series User’s Guide... - Page 23 255.255.255.0. This field displays the Switch’s subnet mask. The subnet mask is a link that you can click to open a screen where you can change the IP address and subnet mask. Per Port Status GS1200 Series User’s Guide...
- Page 24 Select this option and click Apply to enable the port. Refresh Click this button to update the information in this screen. Clear Counters Click this button to return the screen to its last-saved settings. Apply Click this button to save your changes to the Switch. GS1200 Series User’s Guide...
-
Page 25: Switch Management
An administrator is someone who can both view and configure Switch changes. The default administrator password is 1234. Note: It is highly recommended that you change the default administrator password (1234). Click Switch MGMT in the navigation panel to open the following screen. Figure 13 Switch Management GS1200 Series User’s Guide... - Page 26 Type the existing system password (1234 is the default password when shipped). New Password Enter your new system password. Confirm Retype your new system password for confirmation Password Confirm Click this button to save your new password. GS1200 Series User’s Guide...
-
Page 27: Vlan
802.1Q VLAN-aware switch, the Switch first decides where to forward the frame, and then inserts a VLAN tag reflecting the ingress port's default VID. The default PVID is VLAN 1 for all ports, but this can be changed. GS1200 Series User’s Guide... -
Page 28: Vlan Screen
Note: You could block yourself (and all others) from managing the Switch if you remove all ports from the management VLAN (VLAN 1 by default). Make sure the port through which you connect your computer and access the Switch’s web configurator is in VLAN 1. GS1200 Series User’s Guide... -
Page 29: Ieee 802.1Q Vlan
By default, all ports on the Switch are in VLAN 1. If you want to have a port belong to another VLAN as well, say VLAN 123, you need to create a VLAN first, and then add the port to the VLAN. GS1200 Series User’s Guide... -
Page 30: Port-Based Vlan
Click Delete to remove the VLAN group. You cannot delete the default VLAN. Add VLAN Click this button to configure a new port-based VLAN for the Switch. Apply Click this button to save your changes to the Switch. GS1200 Series User’s Guide... - Page 31 VLAN starts at 2 and increases by 1. Click the port’s check box to add it to the VLAN group. A port-based VLAN must contain at least two ports. Click Apply to save your changes. GS1200 Series User’s Guide...
-
Page 32: Qos
Figure 16 QoS Default Screen 9.2 What You Need to Know The Switch can put packets into the queues according to the port on which the packet is received or the priority tag in the packet. GS1200 Series User’s Guide... -
Page 33: Port-Based Qos
Queues with larger weights get more service than queues with smaller weights. This queueing mechanism is highly efficient in that it divides any available bandwidth across the different traffic queues and returns to queues that have not yet emptied. GS1200 Series User’s Guide... -
Page 34: Port-Based Qos Screen
High Priority To apply Port-Based QoS to the Switch, follow these steps: Choose which ports will carry the sensitive data, using the priority queuing levels given. Click on each port’s radio button to assign a priority queue. GS1200 Series User’s Guide... -
Page 35: Ieee 802.1P Qos Screen
Queues with larger weights get more service than queues with smaller weights. Click the Apply button after you are finished assigning priorities to the priority tags. GS1200 Series User’s Guide... -
Page 36: Storm Control
Switch. Note: At the time of writing, the GS1200-5HP doesn’t support loop detection/prevention. 10.2 Storm Control Screen Click Storm Control in the navigation panel to display the screen as shown next. Figure 20 Storm Control GS1200 Series User’s Guide... - Page 37 After resolving the loop problem on your network, you need to enable the port manually in the System screen. Select Off to disable this feature. Apply Click Apply to save your changes to the Switch. GS1200 Series User’s Guide...
-
Page 38: Igmp Snooping
Switch. 11.2 IGMP Snooping Screen Click IGMP Snooping in the navigation panel to display the screen as shown next. Figure 21 IGMP Snooping GS1200 Series User’s Guide... - Page 39 The Switch treats an IGMP query port as being connected to an IGMP multicast router (or server). The Switch forwards IGMP join or leave packets to an IGMP query port. Apply Click Apply to save your changes to the Switch. GS1200 Series User’s Guide...
-
Page 40: Poe
Click PoE in the navigation panel to display the PoE screen. 12.2.1 PoE Global Settings You can use this screen to view the amount of power that PDs can receive from the Switch and the temperature of the PoE IC, click PoE > PoE Global Settings. GS1200 Series User’s Guide... -
Page 41: Poe Status
This field displays the PoE IC (Internal Circuit) current temperature. The maximum temperature is 158°C. 12.2.2 PoE Status You can use this screen to enable or disable PoE on a port. Figure 24 PoE > PoE Status GS1200 Series User’s Guide... - Page 42 This field displays the current consumption that the PoE-enabled device connected to this port draws from the Switch. Turned On This field displays the number of ports through which the connected devices can receive power using PoE. Apply Click Apply to save your changes to the Switch. GS1200 Series User’s Guide...
-
Page 43: Troubleshooting
Check the hardware connections. See Section 13.1 on page Inspect your cables for damage. Contact the vendor to replace any damaged cables. Disconnect and re-connect the power adaptor or cord to the Switch. If the problem continues, contact the vendor. GS1200 Series User’s Guide... -
Page 44: Switch Access And Login
Reset the device to its factory defaults, and try to access the Switch with the default IP address. Section 4.5 on page If the problem continues, contact the vendor, or try one of the advanced suggestions. I can see the Login screen, but I cannot log in to the Switch. GS1200 Series User’s Guide... - Page 45 Pop-up Windows, JavaScripts and Java Permissions In order to use the web configurator you need to allow: • Web browser pop-up windows from your device. • JavaScripts (enabled by default). • Java permissions (enabled by default). GS1200 Series User’s Guide...
-
Page 46: Appendix A Customer Support
• Brief description of the problem and the steps you took to solve it. Corporate Headquarters (Worldwide) Taiwan • ZyXEL Communications Corporation • http://www.zyxel.com Asia China • ZyXEL Communications (Shanghai) Corp. ZyXEL Communications (Beijing) Corp. ZyXEL Communications (Tianjin) Corp. • http://www.zyxel.cn India • ZyXEL Technology India Pvt Ltd • http://www.zyxel.in Kazakhstan •... - Page 47 • ZyXEL Singapore Pte Ltd. • http://www.zyxel.com.sg Taiwan • ZyXEL Communications Corporation • http://www.zyxel.com/tw/zh/ Thailand • ZyXEL Thailand Co., Ltd • http://www.zyxel.co.th Vietnam • ZyXEL Communications Corporation-Vietnam Office • http://www.zyxel.com/vn/vi Europe Austria • ZyXEL Deutschland GmbH • http://www.zyxel.de Belarus • ZyXEL BY • http://www.zyxel.by...
- Page 48 Appendix A Customer Support Belgium • ZyXEL Communications B.V. • http://www.zyxel.com/be/nl/ • http://www.zyxel.com/be/fr/ Bulgaria • ZyXEL България • http://www.zyxel.com/bg/bg/ Czech Republic • ZyXEL Communications Czech s.r.o • http://www.zyxel.cz Denmark • ZyXEL Communications A/S • http://www.zyxel.dk Estonia • ZyXEL Estonia • http://www.zyxel.com/ee/et/ Finland •...
- Page 49 • ZyXEL Communications Poland • http://www.zyxel.pl Romania • ZyXEL Romania • http://www.zyxel.com/ro/ro Russia • ZyXEL Russia • http://www.zyxel.ru Slovakia • ZyXEL Communications Czech s.r.o. organizacna zlozka • http://www.zyxel.sk Spain • ZyXEL Communications ES Ltd • http://www.zyxel.es Sweden • ZyXEL Communications • http://www.zyxel.se Switzerland •...
- Page 50 Appendix A Customer Support • http://www.zyxel.ch/ Turkey • ZyXEL Turkey A.S. • http://www.zyxel.com.tr • ZyXEL Communications UK Ltd. • http://www.zyxel.co.uk Ukraine • ZyXEL Ukraine • http://www.ua.zyxel.com Latin America Argentina • ZyXEL Communication Corporation • http://www.zyxel.com/ec/es/ Brazil • ZyXEL Communications Brasil Ltda.
- Page 51 Appendix A Customer Support North America • ZyXEL Communications, Inc. - North America Headquarters • http://www.zyxel.com/us/en/ Oceania Australia • ZyXEL Communications Corporation • http://www.zyxel.com/au/en/ Africa South Africa • Nology (Pty) Ltd. • http://www.zyxel.co.za GS1200 Series User’s Guide...
-
Page 52: Appendix B Legal Information
The contents of this publication may not be reproduced in any part or as a whole, transcribed, stored in a retrieval system, translated into any language, or transmitted in any form or by any means, electronic, mechanical, magnetic, optical, chemical, photocopying, manual, or otherwise, without the prior written permission of ZyXEL Communications Corporation. Published by ZyXEL Communications Corporation. All rights reserved. -
Page 53: Safety Warnings
- Install the power supply before connecting the power cable to the power supply. - Unplug the power cable before removing the power supply. - If the system has multiple sources of power, disconnect power from the system by unplugging all power cables from the power supply. GS1200 Series User’s Guide... - Page 54 återvinningsstation. Vid tiden för kasseringen bidrar du till en bättre miljö och mänsklig hälsa genom att göra dig av med den på ett återvinningsställe. GS1200 Series User’s Guide...
- Page 55 Appendix B Legal Information Environmental Product Declaration GS1200 Series User’s Guide...
-
Page 56: Zyxel Limited Warranty
North American products. Trademarks ZyNOS (ZyXEL Network Operating System) and ZON (ZyXEL One Network)are registered trademarks of ZyXEL Communications, Inc. Other trademarks mentioned in this publication are used for identification purposes only and may be properties of their respective owners. -
Page 57: Index
Administrator customer support loop loop detection loop prevention default IP disclaimer managing the device good habits FCC interference statement flow control back pressure IEEE802.3x network applications front panel GS1200 Series User’s Guide... - Page 58 Power over Ethernet web configurator product registration home PVID login logout rear panel connections registration product resetting restoring configuration status switch reset tagged VLAN trademarks number of possible VIDs priority frame VID (VLAN Identifier) GS1200 Series User’s Guide...
Need help?
Do you have a question about the GS1200 SERIES and is the answer not in the manual?
Questions and answers