Table of Contents
Advertisement
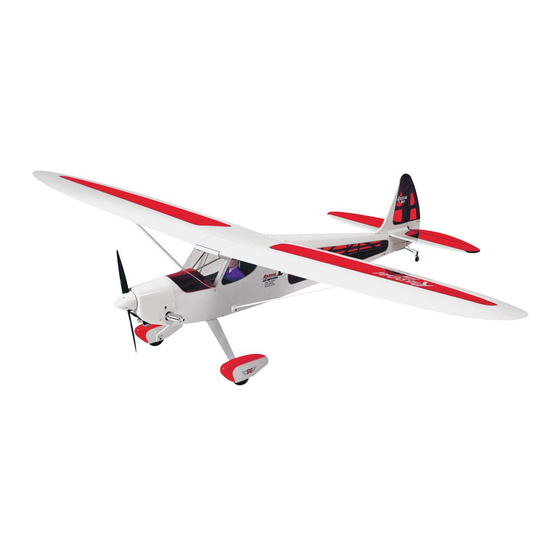
RASCAL 110 ARF ASSEMBLY MANUAL
INTRODUCTION:
SIG's RASCAL 110 ARF represents one of the largest, best built
R/C model aircraft ever offered to modelers. The distinctive and
classic lines of the Rascal are reminiscent of the beautiful personal
aircraft designs of the thirties and post WWII periods. The elegant
good looks of the Rascal design seem to bridge the gap between
modern small aircraft and airplanes from the golden age of flight.
Designed specifically for modelers who have always wanted a
large, giant-scale airplane without all of the large airplane hassles,
the Rascal 110 ARF kit offers a perfect balance of size,
performance, looks, and versatility. From experience, we can tell
you that the Rascal 110 ARF will almost always draw a crowd of
admiring onlookers. But when the airplane takes to the air, the
smooth flight characteristics and sheer size make it even more
impressive.
You will have never flown an easier to handle airplane than the
Rascal 110 ARF. Take-offs and landings are spectacular in their
smoothness and when it comes to what goes on in the air, the
Rascal 110 is positively elegant. Despite it's large size, the Rascal
110 can be easily flown at most typical R/C flying sites, either
grass or asphalt fields. Landings can be very slow and predictable
and the take-off runs are usually less than many .40-size trainers.
Powered with typical 1.20 4-stroke engines, the Rascal 110 is
capable of mild aerobatics, such as loops, lazy rolls, inverted flight,
etc. Power the airplane with larger engines and things can get a
bit more interesting. Our Rascal 110 models, powered with 1.50
or 1.80 4-stroke engines and 1.50 2-stroke engines, turned into
very capable aerobatic airplanes! Of course, the Rascal 110 ARF
is not a pure aerobatic machine and was never intended for IMAC
competition.
None-the-less, with practice, it will deliver an
amazingly nice flight routine.
The Rascal 110 ARF is very well built, with attention paid to every
detail of its construction and finish. Even the functional aluminum
wing struts have been expertly built and factory painted, providing
just the right "look" to the model. The fiberglass cowl and wheel
pants are equally impressive, giving the airplane that "finished"
look, truly setting it apart from anything else available.
airframe has been expertly covered with AeroKote
trim scheme that is highly visible in flight and very attractive on the
ground. The kit includes all of the detailed decals seen on the box
R
The
™
, employing a
1
art, allowing you to make the model very realistic. SIG has even
included a beautiful scale-like tailwheel assembly that fits the look
of this airplane almost perfectly!
Because of its size and lifting ability, the Rascal 110 ARF is a great
choice for use as a camera ship, either still or video. Properly
powered, it would also make a good glider tug and is also certainly
capable of towing banners. Properly modified, it could also be
used to drop candy or parachutes. Another potential use for this
versatile model is night flying. Because the trim scheme employs
the use of transparent covering material in the open areas of the
structure, lighting systems - such as those made and sold by Ram
Products - would be very effective!
Assembly of the Rascal 110 is easy, quick, and straightforward.
This assembly manual is fully illustrated and includes all detailed
instructions in the correct sequence. This allows you to get the
airplane from the box to the flying field in a very short amount of
time. We strongly suggest that you read through this manual first
to get familiar with the various parts and their assembly
sequences. The proper assembly and flying of this aircraft is your
responsibility. If you are new to the sport/hobby of radio control
model airplanes, we urge you to seek the assistance of a qualified
person to help you assemble this R/C model aircraft correctly. If
you do not understand a particular assembly step or sequence,
DO NOT guess - find qualified help and use it.
RADIO EQUIPMENT:
The Rascal 110 ARF requires a 4-channel radio system, with five
servos. Because of its size and the wide variety of engines that
can be used in this airplane, we highly recommend that you use
servos with at least 60 in/ounces of torque. Such servos are more
appropriate for a model of this size.
We use and can highly recommend either the Airtronics™
RD-6000 Sport system or the Hitec™ Flash 4X system for this
airplane. Both of these affordable and reliable computer radio
systems offer all the features you'll need for this and the many
other R/C aircraft in your future. For reference, this assembly
manual shows the installation of Hitec™ #HS-545BB servos for
aileron, rudder, and elevator controls.
standard servo is used for throttle control. We used a Hitec™
#23873 RCD 3800 Supreme Shift Select receiver and a Hitec™
#57215 Standard Switch Harness. We also used one Hitec™
#54606 36" servo extension for the elevator servo and two Hitec™
#57346 24" servo extensions for the aileron servos. A Hitec™
#57350 Y-Harness to connect the aileron servo leads to the
receiver. All of these items are available separately as after-
market equipment at very affordable prices. See your local hobby
shop for more information.
We like to use Du-Bro after-market servo output arms. These are
exceptionally strong and always seem to be the right shape and
geometry for most of our applications. Du-Bro makes their output
arms to fit any available servos, just use the right part number for
your particular brand of servos. Because our assembly manual
model is using Hitec™ servos, we chose the Du-Bro #675 set.
With an R/C model as large as the Rascal 110 - especially when
using five servos - we always suggest using airborne battery packs
with larger capacity than the typical battery packs supplied with
most radio systems.
For example, we used an after-market
1400mAh four-cell battery pack in the model shown in this
assembly manual. Be sure you have a charger capable of properly
charging these larger battery packs.
A Hitec™ #HS-300
Advertisement
Table of Contents

Related Manuals for SIG Rascal 110


Summary of Contents for SIG Rascal 110
- Page 1 Because of its size and lifting ability, the Rascal 110 ARF is a great choice for use as a camera ship, either still or video. Properly powered, it would also make a good glider tug and is also certainly capable of towing banners.
-
Page 2: Engine Selection
Re-heating seams may cause them to The Rascal 110 can be powered by a wide range of engine sizes "creep", making them unsightly. This is especially true with the and types - 2-stroke, 4-stroke (both single and twin cylinder types), Rascal 110 inset trim scheme. - Page 3 A selection of glues - SIG Thin and Thick CA and 4 each M4 Washers SIG Kwik-Set 5-Minute Epoxy 4 each M4 Split Ring Lock Washers Threadlock Compound, Such as Loctite ® Non-Permanent Blue 4 each M4 Blind Mounting Nuts...
- Page 4 1/8” Lite-Ply Die-Cut Rear Fuel Tank the white covering. This was easy to do and gives a very nice Former finished look to the overall model. Because the Rascal 110 is such 1 bag Main Wing Joiner Parts: a large model, we found that it was much easier to apply the 1 each 5mm x 26.9mm x 318mm Aluminum...
- Page 5 10 minutes before flexing the aileron. Clean-up any excess glue drops, runs, or smears on the covering with SIG CA Debonder and a paper towel. After sufficient time has passed, flex the hinged aileron firmly up and down on the wing panel to create free and easy movement.
- Page 6 string tied to it - this is the other end of the string in the aileron servo bay. Leave the string in place for now. 3) From the kit contents, locate the bag containing the two factory covered aileron servo hatches, the aileron servo mounting blocks, and the mounting screw hardware.
- Page 7 If you are using a computer radio, you can easily center the two servos through the radio's program for that function. While the radio is still on, determine if the servos are moving the correct direction to provide "left" and "right" aileron movements when installed in the wing panels.
-
Page 8: Fuel Tank Assembly
good solder joints is using the soldering iron to completely heat the aileron servo into one of the leads in the Y-harness and turn on both parts before applying the solder. Apply a little flux to the end the radio system. Make sure the aileron trim lever is set at neutral of the pushrod and insert it into the barrel of the R/C solder link on the transmitter. -
Page 9: Engine And Fuel Tank Installation
In the Rascal 110, the most ideal choice for an engine/muffler set-up would be an inverted engine with a Pitts- If you plan to use a gasoline engine in your Rascal 110, then you style muffler system. This keeps the nose "clean" with only the must assemble your fuel tank, using gas compatible parts. -
Page 10: Important Notes
Photo #3 upright engine installation would be preferable. For this reason, the Rascal 110 fuselage comes with a clean firewall, without any pre-drilled motor-mount holes. This allows you to choose the best engine and muffler installation for your airplane. - Page 11 relationship to each other and the engine, when it is eventually required mounting holes onto the firewall. Hold the pattern against mounted in place to the firewall. the firewall and line-up its horizontal and vertical centerlines with those on the firewall. Hold the pattern in place and use a 3/16" dia. Prepare the scrap piece of plywood with accurate horizontal and bit, twisting it a few times, marking the four hole locations onto the vertical centerlines, using a pencil and a triangle.
- Page 12 first in order to avoid "dimpling" the face of the firewall with the bolt 6) From the kit contents, locate the bag containing the head). Fiberglass Cowl and mounting screws. The cowl is now prepared to fit in place over the engine and onto the cowl. In the case of our If desired, the blind mounting nuts can be permanently adhered to inverted engine, this requires that the bottom of the cowl be the backside of the firewall by using a little 5-minute epoxy on your...
- Page 13 Follow this by using a drum-sanding bit to smooth the edges and contour the corner radiuses. Be careful to keep the edges as smooth and uniform as possible, using the lines as a guide. Use a sanding block with 220-grit paper to sand the straight edges smooth.
- Page 14 10) A music wire needle valve extension is now made to allow adjustment of the high-end needle from outside the cowl. Most engines come with needle valves that have set screws, used for this purpose. The Saito has such a setscrew, with a center hole diameter for the extension that's just about 1/16".
- Page 15 The installation and use of a fueling valve 1/16" striping tape to create the panel lines and 1/4" wide completely solves all these issues. To do this on our Rascal 110 striping tape to fashion the four "latches". We mixed some...
- Page 16 firewall. Visually line-up the throttle arm, at the point where it will an electric drill. Lightly chuck the stud about halfway into the drill be driven by the throttle pushrod, straight back to the firewall. Use and holding the nylon pushrod firmly, thread the stud in place with a pencil to mark this location on the firewall.
-
Page 17: Gasoline Engines
The ideal gas engine set-up would be an inverted installation with a Pitts-style muffler contained within the cowl. The gas engine we used for our Rascal 110 is the new F.P.E. 1.3 with electronic ignition. This engine fulfilled all of our installation and mounting criteria, as well as having a nice Pitts-style muffler. - Page 18 its propeller backplate at a distance of 5-15/16" from the front face We cut the exhaust end of each piece of tubing a slight angle to of the firewall. This distance is required to mount the cowl and still vector the exhaust towards the rear of the fuselage. To hold these have about 1/8"...
- Page 19 Attach the wiring leads to the engine. The most convenient location for this module in our Rascal 110 8) The inner nylon throttle pushrod is now prepared. Use a installation was at the lower right corner of the fuselage, just carbide cut-off wheel to remove the 2-56 x 3/8”...
- Page 20 switch inside the fuselage, on the floor, just ahead of the landing place at the fuselage stabilizer saddle, one on each side. These gear block placing it far forward, away from the radio system. To fairings add additional gluing area and support to the stabilizer activate the switch, we used a piece of music wire with an "L"...
- Page 21 these small openings on each side of the fuselage, puncture them the front. You will need an output arm that is long enough on each with a pin. These two openings can be cleared using a hobby knife side to properly operate the pull-pull linkage to the rudder. As or a sharply pointed tool.
- Page 22 servo compartment, avoiding the stringers or the rudder cable extension. These cables must be unobstructed, with a straight run to the servo. Reach into the fuselage and pull the cable into the servo compartment. Use a piece of tape at the rear of the fuselage, to hold the cable end in place.
- Page 23 With the radio system still on, adjust the R/C link at the throttle With the stab firmly and correctly in position on the fuselage, use servo until it easily fits onto the output arm when the servo is a pencil to draw light lines on each side of its bottom surface, along positioned at the full rear (usually "low throttle") position.
- Page 24 6) The two-arm rudder steering plate is now attached to the The hinging method is exactly the same used with the aileron hinges. After installing and gluing the hinges, use a little SIG CA bottom leading edge of the rudder, as shown, using two Debonder to clean up any excess glue.
- Page 25 from front to rear. Use the three mounting holes in the bracket as ELEVATOR PUSHROD AND RUDDER INSTALLATION: a pattern. Drill three 1/16" dia. guide holes for each mounting screw. Mount the secondary spring strut (first) and the main strut From the kit contents, locate the following hardware: arm to the bottom of the fuselage, using the three #3 x 15mm PWA screws provided.
-
Page 26: Radio Installation
the control horn from the R/C link. Drill two 5/64" dia. holes position. Bending the spring ends precisely and neatly is a lot through the elevators, at the two marks just made - take care to easier using small needle nose or round nose pliers. make these two holes at 90 to the elevator surface and parallel with each other. -
Page 27: Decal Application
Use a small squeegee to now set the decal in place, removing all excess liquid and any trapped air bubbles from beneath the decal. The SIG 4" Epoxy Spreader - #SIGSH678 - is perfect for this job. Remove any excess fluid with a dry paper towel and allow the decals to set overnight. -
Page 28: Spinner Assembly
It is dangerous to attempt to hand-start these large engines. Therefore, if you have powered your Rascal 110 with such an engine, it would be wise to replace the included plastic spinner with a metal spinner of the same 3"... - Page 29 110 is no exception and looks even more believable with a nice looking pilot figure installed in the cockpit! The "scale" of the Rascal 110 lends itself to the use of 1/4 scale pilot figures. Our preference was for the really nice looking 1/4 scale civilian pilot figure made by Cajun R/C Specialties.
-
Page 30: Center Of Gravity
High Rate settings that we use with our Rascal 110 models. Again, these can be adjusted to suit your style of Because of its large size, balancing the Rascal 110 using a typical flying. balancing fixture may not be practical. However, you can get... -
Page 31: Maintaining Your Model
If you've carefully followed these assembly instructions, test flying your new Rascal 110 should be a lot of fun! We repeat this in all The Rascal 110 was never intended to be an IMAC capable model of our assembly manuals and we'll do it again now;... - Page 32 We use and suggest fresh, good quality paper towels and a silicon- free cleaner for degreasing and polishing. SIG makes one of the best cleaners for this purpose - Pure Magic Model Airplane Cleaner.
-
Page 33: Product Reference
After-Market Receivers, Servos, Servo Extensions & Switches Saito Engines Distributed Exclusively in the U.S. by Horizon Hobby, Inc., Champaign, Il. SIG Products Available At All Good Hobby Shops Quality Kits, Balsawood, Fuel, Adhesives, Hardware, Accessories, F.P.E. Gas Engines, Irvine Engines... -
Page 34: Academy Of Model Aeronautics
SIG MANUFACTURING COMPANY, INC. is totally committed to your success in both assembling and flying the RASCAL 110 ARF kit. Should you encounter any problem building this kit or discover any missing or damaged parts, please feel free to contact us by mail or telephone.
Need help?
Do you have a question about the Rascal 110 and is the answer not in the manual?
Questions and answers