
Related Manuals for ESAB Fabricator 252i


Summary of Contents for ESAB Fabricator 252i
- Page 1 ESAB Fabricator 252i ® 3-IN-1 Multi Process Welding Systems Operating Manual A-12925 3163339 Révision : AA Issue Date: September 1, 2015 Manual No.: 0-5423 esab.com...
- Page 2 WE APPRECIATE YOUR BUSINESS! Congratulations on your new ESAB product. We are proud to have you as our customer and will strive to provide you with the best service and reliability in the industry. This product is backed by our extensive warranty and world-wide service network.
- Page 3 ESAB 2800 Airport Rd. Denton, TX 76208 www.esab.com Copyright 2015 by ESAB All rights reserved. Reproduction of this work, in whole or in part, without written permission of the publisher is prohibited. The publisher does not assume and hereby disclaims any liability to any party for any loss or damage caused by any error or omission in this Manual, whether such error results from negligence, accident, or any other cause.
- Page 4 Be sure this information reaches the operator. You can get extra copies through your supplier. CAUTION These INSTRUCTIONS are for experienced operators. If you are not fully familiar with the principles of operation and safe practices for arc welding and cutting equip- ment, we urge you to read our booklet, “Precautions and Safe Practices for Arc Welding, Cutting, and Gouging,”...
-
Page 5: Table Of Contents
Power Source Controls, Indicators and Features ..........3-3 3.07 Advanced Features Details ................3-6 3.08 Attaching the ESAB Fusion 250A MIG Gun ........... 3-13 3.09 Installing a 12.5 lb spool (8" diameter) ............3-13 3.10 Installing a Standard Spool (12" diameter) ........... 3-14 3.11... - Page 6 Fabricator 252 Power Supply Replacement Panels ........6-1 6.02 ESAB Fusion 250A MIG Gun ................6-4 APPENDIX 1: OPTIONS AND ACCESSORIES ............A-1 APPENDIX 2: FABRICATOR 252i CIRCUIT DIAGRAM ..........A-2 REVISION HISTORY ..................A-4 INTERNATIONAL CONTACT INFORMATION ..........REAR COVER...
-
Page 7: Section 1: Safety
SECTION 1: SAFETY Safety Precautions Users of ESAB welding and plasma cutting equipment have the ultimate responsibility for ensuring that anyone who works on or near the equipment observes all the relevant safety precautions. Safety precautions must meet the requirements that apply to this type of welding or plasma cutting equipment. - Page 8 ESAB FABRICATOR 252i Arc welding and cutting can be injurious to yourself and others. WARNING Take precautions when welding and cutting. Ask for your employer's safety practices which should be based on manufacturers' hazard data. ELECTRIC SHOCK - Can kill.
-
Page 9: System Introduction
Additional copies of this manual may be purchased by contact- recommended that such repairs be carried out by appropriately ing ESAB at the address and phone number in your area listed on qualified persons approved by ESAB. Advice in this regard can be back cover of this manual. -
Page 10: Transportation Methods
• .045" (1.2 mm) - Victor® Argon Regulator / Gauge & 10 ft. (3M) Hose -ESAB WeldSkill 200 Amp electrode holder with 13 ft. (4 M) lead -ESAB WeldSkill 200 Amp ground clamp with 10 ft. (3 M) lead -Drive Rolls: •... -
Page 11: Duty Cycle
With Factory Fitted Supply Cord and Plug TIG (GTAW) MIG (GMAW) Safe Operating Region STICK (SMAW) Welding Current Max (amps) Art # A-10666 Figure 2-3: Fabricator 252i Duty Cycle with Upgraded Supply Lead and Plug Manual 0-5423 INTRODUCTION... -
Page 12: Specifications
250A @ 40%,20V 200A @ 60%, 18V 150A @ 100%, 16V Table 2-1: Fabricator 252i Specification NOTE! Due to variations that can occur in manufactured products, claimed performance, voltages, ratings, all capacities, measurements, dimensions and weights quoted are approximate only. Achievable capacities and ratings in use and operation will depend upon correct installation, use, applications, maintenance and service. -
Page 13: Section 3: Installation Operation And Setup
WARNING ries. The Fabricator 252i must be electrically Environments with increased hazard of electric shock connected by a qualified electrical trades- do not include places where electrically conductive parts in the near vicinity of the operator, which can cause increased hazard, person. -
Page 14: Electromagnetic Compatibility
10 AWG 208-230/50A 40% @ 250A 40% @ 250A 40% @ 230A Table 3-1: Input Power Source Leads for Fabricator 252i 3.05 Electromagnetic Compatibility 7. The time of day that welding or other activities are to be carried out. WARNING 8. -
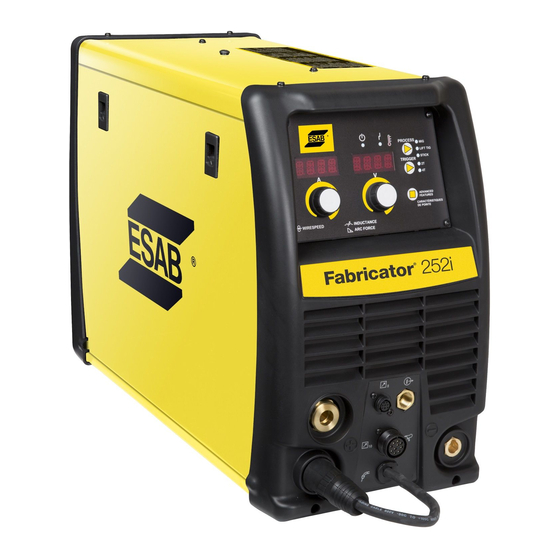
Page 15: Power Source Controls, Indicators And Features
ESAB FABRICATOR 252i 5. Earthing/grounding of the Work Piece Where the work piece is not bonded to earth for electrical safety, nor connected to earth because of its size and position, e.g. ship’s hull or building steelwork, a connection bonding the work piece to earth may reduce emissions in some, but not all instances. - Page 16 ESAB FABRICATOR 252i Advanced Features Button WARNING Advanced DO NOT TOUCH the electrode wire while it is Features being fed through the system. The electrode wire will be at welding voltage potential. Press and release the Advanced Features button to enter or exit from the advanced programming mode.
- Page 17 ESAB FABRICATOR 252i 7. Right Knob: Multifunction Control - MIG Voltage / Arc Left Digital Display Control (Inductance) & STICK Arc Force MIG Mode This digital meter is used to display the pre-set (preview) Wirefeed Speed in Inches Per Minute (IPM) in MIG mode and Right Knob actual welding amperage of the power source when welding.
-
Page 18: Advanced Features Details
ESAB FABRICATOR 252i Weld Modes Arc Control Function Left Display Right Display Limits Inductance INDU 25% (default) 0 – 100 % STICK Arc Force ARC- / FRCE 50% (default) 0 – 100% Table 3-2 13. Positive Welding Output Terminal 3.07 Advanced Features Details... - Page 19 10. MIG Gun Adaptor The MIG Gun Adapter is the connection point for the ESAB Fusion 250A MIG Gun. Refer to section 3.08 for the correct procedure for attaching the ESAB Fusion 250A MIG Gun.
- Page 20 ESAB FABRICATOR 252i 12. 10 Pin Accessories Socket The 10 pin Accessories Socket is used to connect remote devices such as a spool gun to the welding power source. To make con- nections, align keyway, insert plug, and rotate threaded collar fully clockwise.
- Page 21 ESAB FABRICATOR 252i Right Knob Right Knob ARC CONTROL If the welder is in Advanced Features mode and the right knob (Control No 7) is pressed for one (1) second (to enter Arc Control Function) the welder will exit Advanced Features mode, saving any change made, and enter the Arc Control Function for the currently selected weld process.
- Page 22 ESAB FABRICATOR 252i Right Display Function Left Display (Factory Default Limits Comments Values) LOCL = Local control of the Wirespeed and Voltage with MIG Operator the machines controls. MIG/CNTL LOCL LOCL - REMT Controls REMT = Remote control of the Wirespeed and Voltage with an accessory device.
- Page 23 ESAB FABRICATOR 252i LIFT TIG Mode Advanced Features Menu Map Process Left Display Right Display Advanced Menu - LIFT Advanced Menu - STICK TIG Options or Range LIFT TIG Mode TIG / CNTL LOCL REMT PRE- / FLOW 0.0 - 5.0 S POST / FLOW 0.0 - 30.0 S...
- Page 24 ESAB FABRICATOR 252i STICK Mode Advanced Features Left Display Right Display Process Advanced Menu - STICK Advanced Menu - STICK Options or Range Mode STICK STCK / CNTL LOCL REMT HOT- / START ON OFF HS / TIME 0.0 - 2.0 S...
-
Page 25: Attaching The Esab Fusion 250A Mig Gun
2. Push the ESAB Fusion 250A MIG Gun into MIG Gun Adaptor firmly using a twisting action. 3. Lock the ESAB Fusion 250A MIG Gun into the MIG Gun Adaptor by turning the Locking Screw clockwise in the MIG Gun Adapter within the Wire Feed Compartment to secure the ESAB Fusion 250A MIG Gun in position. -
Page 26: Installing A Standard Spool (12" Diameter)
ESAB FABRICATOR 252i Fibre Washer Retaining Clip 12.5lb / 8” Use inner holes on Wire Spool Spool Hub Flat Washer Wire Spool Large Hole Hub Nut Spool Hub Keyed Washer Flat Washer Spring Small Hole A-10670 Figure 3-9: 12.5 lb 8" Spool Installation 3.10 Installing a Standard Spool (12"... -
Page 27: Inserting Wire Into The Feed Mechanism
ESAB FABRICATOR 252i 3.11 Inserting Wire into the Feed Mechanism WARNING ELECTRIC SHOCK CAN KILL! Make certain the input power is disconnected from the power source before proceeding. DO NOT reattach the input power until told to do so in these instructions. -
Page 28: Feed Roller Pressure Adjustment
NOTE! Genuine ESAB Velocity contact tips and liners should be used. Many non-genuine liners use inferior materi- als which can cause wire feed problems. 3.13 Feed Roller Alignment The bottom Feed Roll is adjustable in and out to provide for best alignment of wire as it feeds into the outlet guide. -
Page 29: Changing The Feed Roll
NOTE! Installation of all styles of feed rolls for the Fabricator 252i are identical.. WARNING The welding wire is electrically Hot if it is fed by depressing Fusion 250A MIG Gun switch. Electrode contact to work piece will cause an arc with MIG Gun switch depressed.. -
Page 30: Input And Output Wire Guide Installation
Output Wire Guide - With the Fusion 250A MIG Gun removed, loosen the MIG Adapter Lock Nut. This will aid with alignment. Then loosen Output Guide Lock Screw. Install the Output Wire Guide (the longer one) by inserting the conical end part way into the ESAB Adapter from the front of the machine. -
Page 31: Wire Reel Brake
ESAB FABRICATOR 252i 3.16 Wire Reel Brake The wire reel hub incorporates a friction brake which is adjusted during manufacture for optimum braking. If it is considered neces- sary, adjustment can be made by turning the tri-lobe nut inside the open end of the wire reel hub. Clockwise rotation will Tighten the brake. - Page 32 ESAB FABRICATOR 252i 4. Do NOT use the regulator as a control valve. When downstream equipment is not in use for extended periods of time, shut OFF the gas at the cylinder valve and release the gas from the equipment.
- Page 33 ESAB FABRICATOR 252i Ensure that the gas cylinder is secured to a building pillar, wall bracket or otherwise securely fixed in an upright position. Art # A-10549 Figure 3-18: Attach gas line to proper inlet 5. To protect sensitive down-stream equipment a separate safety device may be necessary if the regulator is not fitted with a pressure relief device.
-
Page 34: Set-Up Mig (Gmaw) Welding With Gas Shielded Mig Wire
3.18 Set-up MIG (GMAW) Welding with Gas Shielded MIG Wire The Fabricator 252i is supplied with a ESAB Fusion 250 AMP air-cooled MIG Gun. The ESAB Fusion 250A MIG Gun is designed with an ergonomic handle and fewer parts to cause performance problems. The Fusion MIG Gun uses standard readily available ESAB Velocity consumable parts. - Page 35 ESAB FABRICATOR 252i 5. Connect the work lead to the negative welding terminal (-). If in doubt, consult the MIG electrode wire manufacturer. Weld- ing current flows from the Power Source via heavy duty bayonet type terminals. It is essential, however, that the male plug is inserted and turned securely to achieve a sound electrical connection.
-
Page 36: Set-Up For Mig (Fcaw) Welding With Gasless Mig Wire
3.19 Set-up for MIG (FCAW) Welding with Gasless MIG Wire The Fabricator 252i is supplied with a ESAB Fusion 250 AMP air-cooled MIG Gun. The ESAB Fusion 250A MIG Gun is designed with an ergonomic handle and fewer parts to cause performance problems. The Fusion MIG Gun uses standard readily available ESAB Velocity consumable parts. -
Page 37: Set-Up For Lift Tig (Gtaw) Welding
ESAB FABRICATOR 252i CAUTION Loose welding terminal connections can cause overheating and result in the male plug being fused in the terminal. Remove any packaging material prior to use. DO NOT block the air vents at the front or rear of the Welding Power Source. -
Page 38: Set-Up For Stick Metal Arc Welding (Smaw)
ESAB FABRICATOR 252i Art # A-10580 Ensure that the gas cylinder is secured to a building pillar, wall bracket or otherwise securely fixed in an upright position. Negative Output Terminal (Dinse ® type 50) Figure 3-23: Setup for LIFT TIG (GTAW) Welding 12. -
Page 39: Basic Welding Guide
ESAB FABRICATOR 252i SECTION 4: Position of MIG Gun The angle of MIG Gun to the weld has an effect on the width of BASIC WELDING GUIDE the weld. 4.01 MIG (GMAW/FCAW) Basic Welding Technique Two different welding processes are covered in this section... - Page 40 ESAB FABRICATOR 252i Primary Adjustable Variables 10° to 20° Longitudinal Angle 10° These control the process after preselected variables have been Longitudinal Angle found. They control the penetration, bead width, bead height, arc 30° to 60° 30° to 60° stability, deposition rate and weld soundness. They are:...
- Page 41 ESAB FABRICATOR 252i Electrode Wire Size Selection Direction of Gun Travel The choice of Electrode wire size and shielding gas used de- pends on the following: • Thickness of the metal to be welded • Type of joint • Capacity of the wire feed unit and Power Source 90°...
- Page 42 ESAB FABRICATOR 252i ESAB MIG, Lift TIG, Stick Wire Selection Chart Figure 4-11 BASIC WELDING Manual 0-5423...
-
Page 43: Mig (Gmaw/Fcaw) Welding Troubleshooting
ESAB FABRICATOR 252i 4.02 MIG (GMAW/FCAW) Welding Troubleshooting Solving Problems Beyond the Welding Terminals The general approach to fix MIG (GMAW/FCAW) welding problems is to start at the wire spool then work through to the MIG Gun. There are two main areas where problems occur with GMAW; Porosity and Inconsistent wire feed. - Page 44 ESAB FABRICATOR 252i Wire feeding problems can be reduced by checking the following points. FAULT CAUSE Feed roller driven by motor in the Wire spool brake is too tight. cabinet slipped. Wire spool unwound and tangled. Wire spool brake is too loose.
- Page 45 A Loose welding cable connection. A Check all welding cable connections. B Low primary voltage B Contact supply authority. C Fault in power source C Have an Accredited ESAB Service Provider test then replace the faulty component. 8 Arc does not have The MIG Gun has been...
-
Page 46: Stick (Smaw) Basic Welding Technique
ESAB FABRICATOR 252i 4.03 STICK (SMAW) Basic Welding Arc Welding Practice Technique The techniques used for arc welding are almost identical regard- less of what types of metals are being joined. Naturally enough, Size of Electrode different types of electrodes would be used for different metals as described in the preceding section. - Page 47 ESAB FABRICATOR 252i Art # A-07692 Figure 4-17: Vertical Position, Fillet Weld Art# A-07693 Figure 4-18: Overhead Position, Butt Weld Art # A-07694 Figure 4-19: Overhead Position, Fillet Weld Joint Preparations In many cases, it will be possible to weld steel sections without any special preparation. For heavier sections and for repair work on castings, etc., it will be necessary to cut or grind an angle between the pieces being joined to ensure proper penetration of the weld...
-
Page 48: Lap Joint
ESAB FABRICATOR 252i Open Square Butt Single Vee Butt Joint Not less than 70° Joint 1/16” (1.6mm) max Gap varies from 1/16” (1.6mm) to 3/16” (4.8mm) depending on plate thickness 1/16” (1.6mm) Not less than Single Vee Butt Joint Double Vee Butt Joint Not less than 45°... - Page 49 ESAB FABRICATOR 252i Striking the Arc A. Butt Welds Practice this on a piece of scrap plate before going on to more Set up two plates with their edges parallel, as shown in Figure exacting work. You may at first experience difficulty due to the tip 4-22, allowing 1/16"...
- Page 50 ESAB FABRICATOR 252i B. Fillet Welds each side motion, pause for a moment to allow weld metal to build up at the edges, otherwise undercut will These are welds of approximately triangular cross-section form and too much metal will accumulate in the centre made by depositing metal in the corner of two faces meeting of the weld.
- Page 51 ESAB FABRICATOR 252i 3. Overhead Welds B. Expansion and Contraction of Parent Metal in the Fusion Zone: Apart from the rather awkward position necessary, overhead welding is not much more difficult that down- While welding is proceeding, a relatively small volume of the hand welding.
- Page 52 ESAB FABRICATOR 252i C. Restraint of Parts Forcible restraint of the components being welded is often used to prevent distortion. Jigs, positions, and tack welds are methods employed with this in view. Art # A-07710_AB D. Presetting Block Sequence. The spaces between the welds are filled in when the welds are cool.
-
Page 53: Stick (Smaw) Welding Troubleshooting
Cast Iron ENi-Cl Suitable for joining all cast irons except white cast iron. Stainless Steel E318L-16 High corrosion resistances. Ideal for dairy work etc. Table 4-4: ESAB Electrode Selection Chart 4.04 STICK (SMAW) Welding Troubleshooting FAULT CAUSE REMEDY 1 Welding current... - Page 54 ESAB FABRICATOR 252i Incorrect sequence Insufficient Art # A-04273 Figure 4-39: Example of insufficient gap or incorrect sequence Table 4-5a: FAULT CAUSE REMEDY 4 A groove has been A Welding current is too high. A Reduce welding current. formed in the base metal adjacent to B Welding arc is too long.
-
Page 55: Tig (Gtaw) Basic Welding Technique
ESAB FABRICATOR 252i 4.05 TIG (GTAW) Basic Welding Technique Gas Tungsten Arc Welding (GTAW) or TIG (Tungsten Inert Gas) as it is commonly referred to, is a welding process in which fusion is produced by an electric arc that is established between a single tungsten (non-consumable) electrode and the work piece. Shielding is obtained from a welding grade shielding gas or welding grade shielding gas mixture which is generally Argon based. - Page 56 Narrower more magnesium and their concentrated arc. alloys Table 4-8 NOTE! The Fabricator 252i Inverter is not suited for AC TIG welding. TIG Welding Filler Rods Base Metal DC Current DC Current Tungsten Filler Rod Argon Gas...
-
Page 57: Tig (Gtaw) Welding Problems
ESAB FABRICATOR 252i 4.06 TIG (GTAW) Welding Problems FAULT CAUSE REMEDY 1 Excessive beard build up Welding current is too Increase weld current and/or faulty joint or poor penetration or poor preparation. fusion at edges of weld. 2 Weld bead too wide and Welding current is too Decrease weld current. - Page 58 9 Arc start is not smooth. A Tungsten electrode A Select the right size electrode. Refer to is too large for the Table 4-6 ESAB Electrode Selection Chart. welding current. B The wrong electrode B Select the right electrode type. Refer to is being used for the Table 4-8 ESAB Electrode Selection Chart.
-
Page 59: Section 5: Power Source Problems And Routine Service Requirements
A. Decrease duty cycle of welding activity indicates Over temperature fault B. Ensure that air vents are not blocked/obstructed condition of power components C. Consult an Accredited ESAB Service Provider. ERR 02 Input Power Fault Signal from Power board indicates A. -
Page 60: Routine Service And Calibration Requirements
B. Insulation Resistance Minimum insulation resistance for in-service ESAB Inverter Power Sources shall be measured at a voltage of 500V between the parts referred to in Table 5-2 below. Power sources that do not meet the insulation resistance requirements set out below shall be withdrawn from service and not returned until repairs have been performed such that the requirements outlined below are met. - Page 61 2. The earth terminal of the associated plug of a transportable power source Note that due to the dangers of stray output currents damaging fixed wiring, the integrity of fixed wiring supplying ESAB welding power sources should be inspected by a licensed electrical worker in accordance with the requirements below - 1.
- Page 62 ESAB FABRICATOR 252i B. Calibration Requirements Where applicable, the tests outlined in Table 5-4 below shall be conducted by an accredited ESAB service agent. Testing Requirements Output current (A) to be checked to ensure it falls within applicable ESAB power source specifications...
-
Page 63: Cleaning The Welding Power Source
ESAB FABRICATOR 252i 5.03 Cleaning the Welding Power Source Warning! Disconnect input power before maintaining. Maintain more often if used under severe conditions Each Use Visual check of torch Visual check of Consumable parts regulator and pressure Weekly Visually inspect the torch... -
Page 64: Cleaning The Feed Rolls
ESAB FABRICATOR 252i 5.04 Cleaning the Feed Rolls Clean the grooves in the drive rolls frequently. This can be done by using a small wire brush. Also wipe off, or clean the grooves on the upper feed roll. After cleaning, tighten the feed roll retaining knobs. -
Page 65: Section 6: Key Spare Parts
ESAB FABRICATOR 252i SECTION 6: KEY SPARE PARTS 6.01 Fabricator 252 Power Supply Replacement Panels Art # A-10784_AB Figure 6-1 FABRICATOR 252i POWER SOURCE SPARE PARTS (Panels/Sheet Metal) ITEM PART NUMBER DESCRIPTION W7005323 Latch, Slide W7005438 Door, 252i W7005385 Panel, Rear, 252i... - Page 66 ESAB FABRICATOR 252i Art # 10332_AD Figure 6-2 FABRICATOR 252i POWER SOURCE SPARE PARTS (LEFT SIDE) ITEM PART NUMBER DESCRIPTION W7005311 Spool Hub Assembly W7005353 Wire Drive Assembly, 250i. (Does not include motor) 375838-002 Guide, Inlet 0.6-1.6mm See Appendix 1...
- Page 67 ESAB FABRICATOR 252i Art # A-10668_AB Figure 6-3: Right side and Front Replacement Parts FABRICATOR 252i POWER SOURCE SPARE PARTS (RIGHT SIDE AND FRONT) ITEM PART NUMBER DESCRIPTION W7005330 PCB, 252i Main Power W7005318 Circuit Breaker, 50A (On Off Switch)
-
Page 68: Esab Fusion 250A Mig Gun
ESAB FABRICATOR 252i 6.02 ESAB Fusion 250A MIG Gun Torch Part No: FV215TA-3545 Art# A-11673_AB Figure 6-4: ESAB Fusion 250 A MIG Gun REPLACEMENT PARTS Manual 0-5423... - Page 69 MILLER is a registered trademark of Miller Electric Mfg. Co.; ESAB is a regis- tered trademark of ESAB AB; LINCOLN is a registered trademark of LINCOLN Electric Co.; The aforementioned registered trademarks are no way affiliated with ESAB Products, Inc. or Victor Technologies. ESAB is a registered trademark of Victor Technologies.
- Page 70 ESAB FABRICATOR 252i This Page Intentionally Blank REPLACEMENT PARTS Manual 0-5423...
-
Page 71: Appendix 1: Options And Accessories
ESAB FABRICATOR 252i APPENDIX 1: OPTIONS AND ACCESSORIES Description Part Number ESAB Fusion 250A MIG Gun, 15ft 1023-1097 26 TIG torch 12.5ft (3.8m); accessory kit with 1/16”, 3/32”, 1/8” thoriated tungstens with collets, collet bodies No.5,6,7 Alumina W4013600 Nozzle - Gas Hose 9” (230mm) long with 5/8” 18 UNF male fitting, Torch switch &... -
Page 72: Appendix 2: Fabricator 252I Circuit Diagram
ESAB FABRICATOR 252i APPENDIX 2: FABRICATOR 252i CIRCUIT DIAGRAM NOTE 1 LINE BREAKER FERRITE EMI BOARD LOAD FRONT PANEL VIDENT SOL+ POT_RETURN TRIG_SOL_RTN WFSPOT2 VBIAS TRIG2 MOTOR+ MOTOR- VPOT2 AUX TRIG VPOT1 WFSPOT1 POT_RETURN VBIAS TRIG_RETURN TRIG1 FRONT PANEL CONTROL BOARD... - Page 73 ESAB FABRICATOR 252i CHASSIS GND NOTE 1 BRIDGE + BRIDGE - COMMON MODE CHOKE BRIDGE / MOV BOARD GND PRI HI-POT TEMP SW HI-POT TRANSFORMER Art # A-10334_AB Revision Date Victor Technologies, Inc. PROTOTYPE 07/12/2011 16052 Swingley Ridge Road, Suite 300...
-
Page 74: Revision History
ESAB FABRICATOR 252i REVISION HISTORY Date Rev Description 09/01/2015 Manual release APPENDIX Manual 0-5423... - Page 76 ESAB Asia/Pacific Pte Ltd ESAB Nederland B.V. Singapore Amersfoort Tel: +65 6861 43 22 Tel: +31 33 422 35 55 Fax: +65 6861 31 95 Fax: +31 33 422 35 44 www.esab.eu ©2015 ESAB Welding and Cutting Products Printed in China...
Need help?
Do you have a question about the Fabricator 252i and is the answer not in the manual?
Questions and answers