Table of Contents
Advertisement
Quick Links
Advertisement
Table of Contents

Related Manuals for York Fitness Diamond R301Plus


Summary of Contents for York Fitness Diamond R301Plus
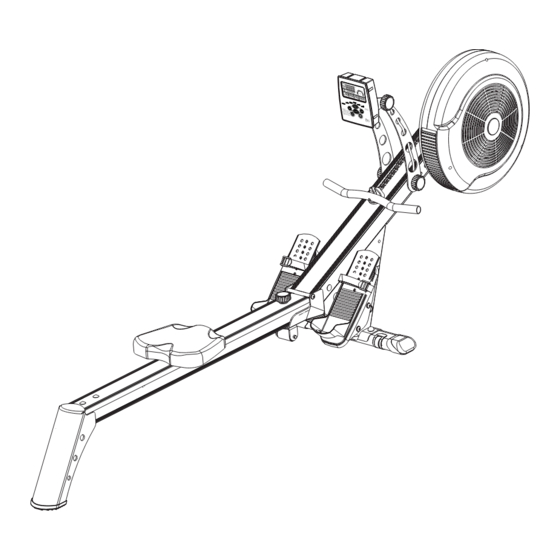
- Page 1 Diamond R301Plus Rower owner’s manual 13April2010...
- Page 2 Congratulations on purchasing a rower from York Fitness. You have chosen a high quality, safe and innovative piece of equipment as your training partner and we are certain it will keep you motivated on the way to Please take the time to read this owner’s manual as it will help you to get the most out of your new rower.
-
Page 3: Table Of Contents
contents safety information customer support assembly instructions user instructions - quick start - console display and feedback - button functions - using workout programs exercising with your rower rower features explained how to take care of your rower your warranty exploded diagrams and parts list... -
Page 4: Safety Information
safety information PLEASE READ THIS INSTRUCTION MANUAL BEFORE YOU BEGIN ASSEMBLY. GREAT CARE HAS BEEN TAKEN TO DESIGN THESE INSTRUCTIONS AND FOLLOWING THEM WILL HELP YOU WITH QUICKER ASSEMBLY AND MINIMISE THE RISK OF INJURY YOU ARE RESPONSIBLE FOR YOUR OWN SAFETY - THIS LIST IS NOT EXHAUSTIVE. exercise program. -
Page 5: Customer Support
Care & Maintenance • Always place the equipment in a dry environment. • Use a warm, damp cloth to keep the product clean. • No wet cleaning of electrical components, unplug before any care and maintenance • The safety level of the equipment can be maintained only if it is regularly examined for damage and wear. This includes any ropes, pulleys, nuts, bolts, moving parts, bushes, chains, wheels, bearings &... -
Page 6: Assembly Instructions
assembly instructions 1. Before you start 1. Prepare your work area - 2. Work with a friend - 3. Open the carton - 4. Unpack the carton it is important you assemble we recommend you have checking any warnings on Make sure you have the product in a clean and someone assist you with... - Page 7 2. Attach the stabilisers FIXINGS: FIXINGS: 1. Keep the polyfoam block as packed on the front end of Check the bolts are fully tightened by making main frame when you remove it from the carton. sure they penetrate Part through the top of the nut - This polyfoam block will keep the front air fan covers stable and avoid damage during the assembly proce- dure.
- Page 8 4. Attach the seat track FIXINGS: FIXINGS: 1. Ask someone to help you hold the seat carriage out Take care to ensure the computer of the way, and connect the computer wires as shown wires do not get trapped when you - make sure it is fully connected.
- Page 9 6. Attach the rear stabilizer FIXINGS: FIXINGS: 1. Ask someone to help you hold the seat track still. 2. Slide the rear stabiliser onto the seat track carefully Part them in the same order as the diagram. Make sure the bolts are fully tightened with the nut driver tool.
- Page 10 8. Attach the pedals FIXINGS: FIXINGS: Make sure the bolts are fully 1. Slide the pedal pivot rods through the main frame holes until tightened with two allen keys. an equal amount of the rods protrude from each side. Part 2.
- Page 11 10. Locate the handle bar 1. Pull and slide the handlebar and pass through the 2. Rotate the handlebar and rest onto the handlebar holder in position. Recheck that all of the bolts and nuts are tightened securely for your safety and comfort ! Final Checks •...
-
Page 12: User Instructions
user instructions Quick Start 1. Press the ‘display mode’ button to activate the computer console 2. Begin rowing 3. Adjust the resistance level with the ‘+’ / ‘-’ key 4. The values of time, distance, calories, count, will start counting upwards Console Display and Feedback COUNT from zero, but counts down if a target has... -
Page 13: Using Workout Programs
Using Workout Programs When you turn the rower on it will enter the main display mode, waiting for you to select a program and begin your workout. Target Program H.R.C. (Heart Rate Control) Manual You can choose to workout by setting a target based on pulse rate, calories burned, HRC program works by automatically In manual mode, the user is free to adjust the... -
Page 14: Exercising With Your Rower
exercising with your rower Always consult your doctor If you experience nausea, dizziness or other abnormal before undertaking a new symptoms during exercise, stop at once and consult exercise regime your doctor Rowing is an extremely effective form of exercise. It strengthens the heart, improves circulation, as well as exercising all the major muscle groups - back, waist, arms, shoulders, hips &... -
Page 15: Rower Features Explained
rower features explained Adjusting the resistance This rower features a speed independent braking (resistance) system. The resistance is controlled by a magnet, which is moved closer or further away from the fanwheel – the closer the magnet is to the fanwheel the higher the resistance. The magnet is computer controlled, to adjust simply press ‘+’... -
Page 16: How To Take Care Of Your Rower
how to take care of your rower Storage Keep the equipment in a dry place with as little temperature variation as possible. Try to protect from dust and always unplug when not in use (if applicable). Cleaning Use a warm, damp cloth to wipe the surfaces. Mild detergent may be used if necessary. -
Page 17: Your Warranty
your warranty This product is supplied with a standard warranty as follows: • 12 month parts • 12 months labour This product is warranted for use in a home, personal, family or household environment Please Note: Warranty details may vary from one market area to another Warranty Terms York Barbell Ltd. -
Page 18: Exploded Diagrams And Parts List
exploded diagram... -
Page 20: Parts List
parts list 56013 56013 56013 56013 56013 56013 56013 56013 56013 56013 56013 56013 56013 56013 56013 56013 56013 56013 56013 56013 56013 56013 56013 56013 56013 56013 56013 56013 56013 56013 56013 56013 56013 56013 56013 56013 56013 56013 56013 56013 56013...
Need help?
Do you have a question about the Diamond R301Plus and is the answer not in the manual?
Questions and answers