Table of Contents
Advertisement
SERVICE
Mono Laser MFP
Refer to the service manual in the GSPN (see the rear cover) for more information.
Mono Laser MFP
MultiXpress M537x / M437x series
SL-M5370LX, SL-M4370LX
(Ver.1.01)
MANUAL
1. Precautions
2. Product Specifications and Description
3. Disassembly and Reassembly
4. Troubleshooting
5. System Diagram
6. Reference Information
Contents
Advertisement
Chapters
Table of Contents
Troubleshooting

Related Manuals for Samsung MultiXpress M537x series


Summary of Contents for Samsung MultiXpress M537x series
- Page 1 Mono Laser MFP MultiXpress M537x / M437x series SL-M5370LX, SL-M4370LX (Ver.1.01) SERVICE MANUAL Mono Laser MFP Contents 1. Precautions 2. Product Specifications and Description 3. Disassembly and Reassembly 4. Troubleshooting 5. System Diagram 6. Reference Information Refer to the service manual in the GSPN (see the rear cover) for more information.
-
Page 2: Table Of Contents
Imaging Unit ......................2 − 34 2.5.3.1. Developer Unit ..................... 2 − 35 2.5.4. Drum drive......................... 2 − 37 2.6. Fuser unit ..........................2 − 38 2.6.1. Fuser unit overview ..................... 2 − 38 Copyright© 1995-2013 SAMSUNG. All rights reserved. - Page 3 2.11.16. Fuser CRUM PBA....................... 2 − 74 Disassembly and Reassembly ........................3 − 1 3.1. Precautions when replacing parts ....................3 − 1 3.1.1. Precautions when assembling and disassembling ..............3 − 1 3.1.2. Precautions when handling PBA..................3 − 1 Copyright© 1995-2013 SAMSUNG. All rights reserved.
- Page 4 3.3.16.1. DSDF Hinge ....................3 − 35 3.3.16.2. DSDF Cover ....................3 − 36 3.3.16.3. DSDF board ....................3 − 37 3.3.16.4. DSDF Stacker ....................3 − 37 3.3.16.5. DSDF COVER-OPEN ................... 3 − 38 Copyright© 1995-2013 SAMSUNG. All rights reserved.
- Page 5 Service Hours ....................4 − 44 4.5.3.5. Fault Log..................... 4 − 44 4.5.3.6. Print Reports ....................4 − 44 4.5.3.7. Export Reports....................4 − 44 4.5.4. Maintenance Counts..................... 4 − 45 4.5.4.1. Fault Count ....................4 − 45 Copyright© 1995-2013 SAMSUNG. All rights reserved.
- Page 6 U3-xxxx type(DSDF) error code .................. 4 − 182 4.7. Image quality problem ......................4 − 193 System Diagram..........................5 − 1 Reference Information..........................6 − 1 6.1. Tools for Troubleshooting......................6 − 1 6.2. Glossary...........................6 − 3 Copyright© 1995-2013 SAMSUNG. All rights reserved.
- Page 7 Contents 6.3. The Sample Pattern for the Test ....................6 − 9 6.4. Model Name and Code ......................6 − 10 6.5. Document Revision List......................6 − 11 Copyright© 1995-2013 SAMSUNG. All rights reserved.
-
Page 8: Precautions
High voltages and lasers inside this product are dangerous. This product should only be serviced by a factory trained service technician. 2) Use only Samsung replacement parts. There are no user serviceable parts inside the product. Do not make any unauthorized changes or additions to the product as these could cause the product to malfunctions and create an electric shocks or fire hazards. -
Page 9: Caution For Safety
Exposed cables could cause an electric shock. Replace the damaged power cable immediately, do not reuse or repair the damaged cable. Some chemicals can attack the coating on the power cable, weakening the cover or exposing cables causing fire and shock risks. Copyright© 1995-2013 SAMSUNG. All rights reserved. - Page 10 Take care not to cut or damage the power cable or plugs when moving the machine. 9) Use caution during thunder or lightning storms. Samsung recommends that this machine be disconnected from the power source when such weather conditions are expected. Do not touch the machine or the power cord if it is still connected to the wall socket in these weather conditions.
-
Page 11: Handling Precautions
1.2.4. Assembly and Disassembly precautions 1) Replace parts carefully and always use Samsung parts. Take care to note the exact location of parts and also cable routing before dismantling any part of the machine. Ensure all parts and cables are replaced correctly. Please carry out the following procedures before dismantling the product or replacing any parts. -
Page 12: Disregarding This Warning May Cause Bodily Injury
5) Do not install the printer on a sloping or unstable surface. After installation, double check that the printer is stable. Copyright© 1995-2013 SAMSUNG. All rights reserved. -
Page 13: Esd Precautions
9) Minimize bodily motions when handling unpackaged replacement ESDs. Normal motions, such as the brushing together of clothing fabric and lifting one’s foot from a carpeted floor, can generate static electricity sufficient to damage an ESD. Copyright© 1995-2013 SAMSUNG. All rights reserved. -
Page 14: Caution For Data Loss
1. Precautions 1.4. Caution for Data Loss To prevent loss of customers data the SVC engineer provides end-user with relevant information in advance. Copyright© 1995-2013 SAMSUNG. All rights reserved. -
Page 15: Product Specifications And Description
M4370 series : Up to 43 ppm in A4 (45 ppm in Letter) • Processor • Dual Core 1GHz Memory (Std. / Max) • 2GB / 2GB DDR3 SDRAM • 320 GB HDD • Copyright© 1995-2013 SAMSUNG. All rights reserved. -
Page 16: Specifications
M4370 series : Less than 3.4 kWh Default 1 min Sleep Delay Time Range 1 - 120 min Korea 220~240V / 50/60Hz / 4.5A Power 100~127V / 60Hz / 9A Europe 220~240V / 50Hz / 4.5A Copyright© 1995-2013 SAMSUNG. All rights reserved. - Page 17 M4370 series : 250,000 Images • Operating 10 to 32 °C (50 to 90 °F) Temperature Storage -20 to 40 °C (-4 to 104 °F) Operating 20 to 80% RH Humidity Storage 10 to 90% RH Copyright© 1995-2013 SAMSUNG. All rights reserved.
-
Page 18: Print Specifications
/ IPSec / DNS / WINS / SLP / Bonjour / SSDP /DDNS / DHCP/BOOTP / IPv6 / NetBIOS over TCP/IP Duplex Print Built-in Direct Print Proof Print / ECO Print / Auto Continue / Skip Blank Pages / Air Print / Google Print Features Cloud Print Copyright© 1995-2013 SAMSUNG. All rights reserved. -
Page 19: Scan Specification
SMTP / MIME(Base 64) / SMB / FTP / WebDAV Max. 216 x 356 mm (8.5" x 14") Scan Size Platen Max. 216 x 356 mm (8.5" x 14") Scan Original Types Text , Text/Photo , Photo Copyright© 1995-2013 SAMSUNG. All rights reserved. -
Page 20: Copy Specification
Form Copy / Watermark Copy / Page Numbering / Time & Date Stamp / ID Stamp / Job Program / Erase Background (Auto / Erase 7 Levels / Enhance 3 Levels) / Erase Backside Image (10 Levels) / Sharpness (11 Levels) / Negative Image (On/Off) / Job Build / Mirror Copyright© 1995-2013 SAMSUNG. All rights reserved. -
Page 21: Fax Specification
External Phone Interface Fax Forward to E-Mail Fax to PC Broadcasting 500 Locations Delayed Fax Color Fax Tx/Rx Journal Confirmation 1 Type (without Image TCR) Report & List Print Auto Dial List System Data List Copyright© 1995-2013 SAMSUNG. All rights reserved. -
Page 22: Paper Handling Specification
Plain Paper / Thin Paper / Bond / Punched / Pre-Printed / Recycled / Envelope / Media type Label / Cotton / CardStock / Letterhead / Thick / Colored / Archive Media weight 60 - 163 g/m² (16 - 43 lb) Copyright© 1995-2013 SAMSUNG. All rights reserved. - Page 23 Punched: 60 - 90 g/m² (16 - 24 lb) • Pre-Printed: 75 - 85 g/m² (20 - 23 lb) Recycled: 60 - 85 g/m² (16 - 23 lb) • Letterhead: 90 g/m² cotton paper (24 lb) • Copyright© 1995-2013 SAMSUNG. All rights reserved.
-
Page 24: Software And Solution Specification
(Network) IP Address Yes (IPv4 Filtering / IPv6 Filtering / MAC Filtering) Filtering Security HDD Overwrite Yes (MIO only) * Manual Image Ovewrite (Standard) HDD Overwrite (Max. Overwrites) Secure Print Encrypted Secure Print 2-10 Copyright© 1995-2013 SAMSUNG. All rights reserved. - Page 25 2. Product Specifications and Description Item Specification Encrypted PDF Mode (Encrypted Scanning) IP Sec Smart Card Authentication Copyright© 1995-2013 SAMSUNG. All rights reserved. 2-11...
-
Page 26: Supplies
Imaging Unit MLT-R358 Approx. 100,000 pages NOTE • Declared yield value in accordance with ISO/IEC 19752. The number of pages may be affected by operating environment, printing interval, graphics, media type and media size. 2-12 Copyright© 1995-2013 SAMSUNG. All rights reserved. -
Page 27: Maintenance Parts
MP friction pad JC93-00937A 50,000 pages DSDF Pick-Up roller Assy JC97-04428A 150,000 pages DSDF Reverse roller JC97-04135A 100,000 pages NOTE Depending on the print patterns and job mode used, the lifespan may differ. Copyright© 1995-2013 SAMSUNG. All rights reserved. 2-13... -
Page 28: Option
Paper Empty & Low Level Detect: Yes • Sensing Paper Type Detect: N/A • Paper Size Detect: Yes • Dimension 554 x 454 x 138 mm (21.8" x 17.9" x 5.4") Weight 11.84 kg (26.1 lb) 2-14 Copyright© 1995-2013 SAMSUNG. All rights reserved. - Page 29 1-bin Finisher 500 Sheets @ 75 g/m² (20 lb) Tray Stapling Max. Number 50 Sheets @ 75 g/m² (20 lb) of Sheets Stapling Positions 1 Position Stapling Tray Offline Stapling Offset at Non Staple Copyright© 1995-2013 SAMSUNG. All rights reserved. 2-15...
- Page 30 360 x 110 x 368 mm (14.2" x 4.3" x 14.5") Weight 4.44 kg (9.79 lb) Model Name CLX-WKT000 Working Table Dimension 55 x 205 x 145 mm (2.2” x 8.1” x 5.7”) Weight 0.17 kg (0.37 lb) 2-16 Copyright© 1995-2013 SAMSUNG. All rights reserved.
- Page 31 Auto Redial, Caller ID, Fax Forward to Fax/Email/SMB/Box, Job Build Model Name SL-NWE001X Connectivity IEEE 802.11 b/g/n + NFC Active Type Wireless LAN Host Interface High-Speed USB 2.0 Security Parallel (IEEE 1284) Interface Copyright© 1995-2013 SAMSUNG. All rights reserved. 2-17...
-
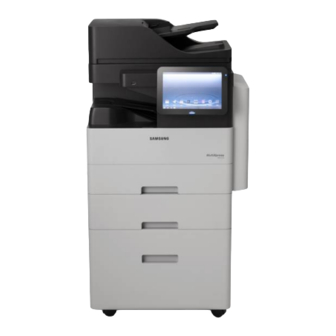
Page 32: System Configuration
Multi-purpose tray paper width guide Second Cassette Feeder tray handle Multi-purpose tray support High Capacity Feeder handle High Capacity Feeder door Second Cassette Feeser door High Capacity Feeder Standard tray (Tray 1) Front door 2-18 Copyright© 1995-2013 SAMSUNG. All rights reserved. - Page 33 Front cover door Imaging unit 3) Rear View Dual scan document feeder cable Network port USB port 2Bin Finisher Port USB port Power switch USB printer port Power receptacle FDI (Foreign Device Interface) Copyright© 1995-2013 SAMSUNG. All rights reserved. 2-19...
- Page 34 2. Product Specifications and Description Standard 2 Bin Finisher view(optional) Standard 2Bin Finisher front door Finishing tray Top tray Standard 2Bin Finisher front door handle Staple 2-20 Copyright© 1995-2013 SAMSUNG. All rights reserved.
-
Page 35: System Layout
Transfer roller unit Laser scanning unit MP tray Toner cartridge Fuser unit Imaging unit Platen unit Tray 1 Document output tray Optional tray (Tray 2 / Tray 3 / Tray 4) Document input tray Copyright© 1995-2013 SAMSUNG. All rights reserved. 2-21... -
Page 36: Paper Path
2. Product Specifications and Description Paper Path 2-22 Copyright© 1995-2013 SAMSUNG. All rights reserved. -
Page 37: Feeding System
The feeding system picks up a paper from the cassette or MP tray and transports it to the machine inside. It Mainly consists of the cassette, pick up unit, registration unit, transfer roller unit, Exit unit. Copyright© 1995-2013 SAMSUNG. All rights reserved. 2-23... - Page 38 2. Product Specifications and Description [ Feeding System Component ] 2-24 Copyright© 1995-2013 SAMSUNG. All rights reserved.
- Page 39 Tray1 Lift Motor Knock up plate control CN19@ Main board, 2Pin Tray2 Lift Motor Knock up plate control CN5@ SCF board, 7Pin~8Pin Tray3 Lift Motor Knock up plate control CN5@ HCF board, 7Pin~8Pin Copyright© 1995-2013 SAMSUNG. All rights reserved. 2-25...
- Page 40 Tray 3 pick up / retard / forward rollers (Option) 1st Exit roller MP Tray pick up / retard / forward rollers 2nd Exit roller Registration roller Duplex roller Tray 2 feed roller (Option) Duplex Gate Tray 3 feed roller (Option) 2-26 Copyright© 1995-2013 SAMSUNG. All rights reserved.
- Page 41 This roller transports the paper sent from the forward/reverse roller to the registration roller. • Registration roller This roller aligns the leading edge of the paper and transports the paper to the transfer roller Assy. Copyright© 1995-2013 SAMSUNG. All rights reserved. 2-27...
-
Page 42: Cassette
Plain paper : A5, A4, Executive, Statement, B5, Letter, Oficio, Folio, Legal Special Paper : Transparency, Label, Envelope 4) Weight : plain paper 60 ~ 163 g/m² 5) Plate knock up lift type : Lift Motor + Up Limit Sensor 2-28 Copyright© 1995-2013 SAMSUNG. All rights reserved. -
Page 43: Pick-Up Unit
Copyright© 1995-2013 SAMSUNG. All rights reserved. 2-29... -
Page 44: Registration Unit
Duplex Top Margin : 12.7 ± 2.0 mm ( Tray3, 4, HCF : 12.7 ± 2.5 mm ) • Duplex Side Margin : 12.7 ± 2.5 mm ( Tray3, 4, HCF : 12.7 ± 3.0 mm ) 2-30 Copyright© 1995-2013 SAMSUNG. All rights reserved. -
Page 45: Mpf(Multi-Purpose Feeder) Unit
MP tray. This machine uses an friction pad system for feeding paper. The friction between the reverse roller[E] and friction pad [D] separates a top sheet of paper from the stack. Copyright© 1995-2013 SAMSUNG. All rights reserved. 2-31... -
Page 46: Image Creation
5) Cleaning for OPC drum : The cleaning blade remove remaining toner on the OPC drum surface after image transfer to the paper. 6) Quenching for OPC drum : Quenching is done by illuminating the whole area of the OPC drum with the laser at the end of every job. 2-32 Copyright© 1995-2013 SAMSUNG. All rights reserved. -
Page 47: Toner Cartridge
The illustration below shows the toner movement. The toner moves from Agitator-C to Agitator-B, from Agitator-B to Agitator-A sequentially. Toner arrived to Agitator-A moves the developer unit of the imaging unit by the mixing auger. Copyright© 1995-2013 SAMSUNG. All rights reserved. 2-33... -
Page 48: Imaging Unit
The imaging unit has the CRUM that stores the information for corresponding the drum unit and developer unit. The OPC drum diameter is 30 mm (circumference: about 94.2 mm). The developing gap between a OPC drum and the magnetic roller can not be adjusted. 2-34 Copyright© 1995-2013 SAMSUNG. All rights reserved. -
Page 49: Developer Unit
The developer unit contains 330g of developer(Carrier+Toner) that is supplied to the magnetic roller[A] by the mixing augers[B] and the supply mixer[C]. The developer unit has a TC(Toner Concentration) sensor[D]that is used for controlling the operating range of toner density. Copyright© 1995-2013 SAMSUNG. All rights reserved. 2-35... - Page 50 The mixing auger[A] and supply mixer[B] make toner is mixed evenly. And they circulate the developer forward and backward to charge the toner negatively. This occurs at the following times : • During warming-up • During toner supply job • During printing job (development job) 2-36 Copyright© 1995-2013 SAMSUNG. All rights reserved.
-
Page 51: Drum Drive
The OPC drum and magnetic roller are driven by 2 BLDC motors. The OPC drum is supplied with power from the coupling OPC. The magnetic roller is supplied with power from the coupling mixer. Copyright© 1995-2013 SAMSUNG. All rights reserved. 2-37... -
Page 52: Fuser Unit
NC sensor malfunction. These thermostats are used to prevent abnormal operation. When the thermostat is triggered, it must be replaced (as well as the other damaged parts in the fuser unit). 2-38 Copyright© 1995-2013 SAMSUNG. All rights reserved. -
Page 53: Fuser Unit Drive
2. Product Specifications and Description 2.6.2. Fuser unit drive The fuser motor[A] drives the heat roller[C] through the gear train. The pressure roller[B] pressurized by the heat roller[C] is rotated by driving it. Copyright© 1995-2013 SAMSUNG. All rights reserved. 2-39... -
Page 54: Fuser Unit Temperature Control
If one of the thermostat temperatures becomes higher than 195°C, it opens and cuts power to the fusing lamp. If the other thermostat temperature becomes higher than 195°C, it also opens and cuts power to the fusing lamp. 2-40 Copyright© 1995-2013 SAMSUNG. All rights reserved. -
Page 55: Laser Scanning Unit (Lsu)
F-Theta Lens on optical path. Also, LSU has the cover glass device to protect the LSU from the contamination. For interface with set, LSU has the LD PBA inside. [ M5370 ] Copyright© 1995-2013 SAMSUNG. All rights reserved. 2-41... - Page 56 2. Product Specifications and Description [ M4370 ] 2-42 Copyright© 1995-2013 SAMSUNG. All rights reserved.
-
Page 57: Laser Scanning Optical Path
Driving IC for Quad LD • • P/Motor speed 33,598.8 rpm 20,532.9 rpm Process Speed 284.47 mm/sec 347.69 mm/sec H/W interface Harness : 20 Pin (Interface with set) Harness : 32 Pin (Interface with set) Copyright© 1995-2013 SAMSUNG. All rights reserved. 2-43... -
Page 58: Laser Synchronizing Detectors
• Main Scan Start Detection A beam is detected by the PD PBA at the scanning start point and creates the horizontal sync signal (Hsync). The picture above shows the data scanning direction. 2-44 Copyright© 1995-2013 SAMSUNG. All rights reserved. - Page 59 • Main Scan Start Detection A beam is detected by the photo sensor at the scanning start point and creates the horizontal sync signal (Hsync). The picture above shows the data scanning direction. Copyright© 1995-2013 SAMSUNG. All rights reserved. 2-45...
-
Page 60: Drive System
(Reverse driving @ duplex job) Fuser STEP Fuser driving Exit STEP Exit driving (Reverse driving @ duplex job) BLDC OPC driving Regi driving Pickup driving MP driving Duplex driving DEVE BLDC DEVEAgitaitor driving Toner Toner Supply driving 2-46 Copyright© 1995-2013 SAMSUNG. All rights reserved. -
Page 61: Main Drive Unit
2. Product Specifications and Description 2.8.2. Main Drive Unit Front View Rear View Copyright© 1995-2013 SAMSUNG. All rights reserved. 2-47... -
Page 62: Main Drive (Opc_Regi._Pick-Up_Mp_Duplex)
1 → 3 → 4 → 5 → 6 Clutch/Gear (Regi. Input) → 7 → 8 Clutch/Gear (Pick-up Input) • 1 → 3 → 4 → 5 → 6 Clutch/Gear (Regi. Input) → 9 → 10 Gear(MP Input) → 11 Gear/Clutch (Duplex Input) 2-48 Copyright© 1995-2013 SAMSUNG. All rights reserved. -
Page 63: Main Drive (Deve_Agitaitor_Toner Supply)
Toner Supply : Driving by DC motor • < BLDC > 1 → 2 → 3 (Agitaitor driving) → 4 → 5 (Mag. roller driving) • < DC > • 1 → 2 → 3 (Toner supply driving) Copyright© 1995-2013 SAMSUNG. All rights reserved. 2-49... -
Page 64: Fuser_Exit Drive
Fuser / Exit1 : Driving by STEP motor Power Train Exit : Driving by STEP motor • <STEP1> 1 → 2 (Fuser driving) → 3 (Exit1 driving) • <STEP2> • 1 → 2 (Exit driving) 2-50 Copyright© 1995-2013 SAMSUNG. All rights reserved. -
Page 65: Scanner System
The analog signal is generated to the digital signal and then the image process starts. Finally, the digital signal is processed by the algorithm and moves to the data writing section. This machine uses the reduction-type CCD for color processing. Copyright© 1995-2013 SAMSUNG. All rights reserved. 2-51... -
Page 66: Scanning System Components
The drive unit consists of the step motor, pulley, and belt. The CCDM movement by driving the belt scans the document on the glass. 3) Auto Paper Sensor The APS sensor detects the original size. 2-52 Copyright© 1995-2013 SAMSUNG. All rights reserved. -
Page 67: Dual Scan Document Feeder(Dsdf)
Feeds an original before simplex scanning. White-Bar Supports a stable scanning. Duplex Scan roller Feeds an original before duplex scanning. Duplex CCDM Scans a back page of original. Feed-Out roller Transfers a scanned original to the exit tray. Copyright© 1995-2013 SAMSUNG. All rights reserved. 2-53... -
Page 68: Electrical Parts Location
2. Product Specifications and Description 2.10.2. Electrical parts location Ref. Description Part Code Controller board ADF-PBA JC92-02509A STEP-MOTOR(PICK-UP) JC31-00163A ADF-PBA STEP-MOTOR(FEED) JC31-00163A ADF-PBA PHOTO-INTERRUPTER(COVER-OPEN) 0604-001415 ADF-PBA CLUTCH-ELECTRIC JC47-00033A ADF-PBA PHOTO-INTERRUPTER(PAPER-WIDTH) 0604-001415 ADF-PBA 2-54 Copyright© 1995-2013 SAMSUNG. All rights reserved. - Page 69 Controller board PHOTO-INTERRUPTER(PICK-UP) 0604-001415 ADF-PBA PHOTO-INTERRUPTER(PAPER-DETECT) 0604-001415 ADF-PBA PHOTO-INTERRUPTER(PAPER-FEED) 0604-001415 ADF-PBA PHOTO-INTERRUPTER(REGI) 0604-001415 ADF-PBA PHOTO-INTERRUPTER(SIMPLEX SCAN) 0604-001381 ADF-PBA PHOTO-INTERRUPTER(DUPLEX SCAN) 0604-001381 ADF-PBA PHOTO-INTERRUPTER(FEED-OUT) 0604-001415 ADF-PBA PHOTO-INTERRUPTER(PAPER-LENGTH) 0604-001415 ADF-PBA DUAL-CCDM PBA JC92-02537A SET-Main Board Copyright© 1995-2013 SAMSUNG. All rights reserved. 2-55...
-
Page 70: Dsdf Drive System
1) Checks a paper detection. 2) Checks the original width size. 3) Holds the original not to be moved in paper path before pick up driving. 4) Starts pick up driving. 5) Separates an original. 2-56 Copyright© 1995-2013 SAMSUNG. All rights reserved. - Page 71 2) When original passes the simplex scan actuator, simplex scan starts. White-Bar functions to prevent the wrinkle. 3) When original passes the duplex scan actuator, duplex scan starts. 4) Original is transferred to exit tray. Copyright© 1995-2013 SAMSUNG. All rights reserved. 2-57...
-
Page 72: Hardware Configuration
I2C to check their life. The main board adopted the dual core CPU 1GHz, DDR3 2GB memory, Flash NAND 128MB, 320GB SATA HDD to control the engine driving, video signal processing, interface, etc. successfully. 2-58 Copyright© 1995-2013 SAMSUNG. All rights reserved. - Page 73 2. Product Specifications and Description A MICOM of the main board controls the fuser lamp on/off and system power according to an optimized energy-saving algorithm for optimal efficiency. Copyright© 1995-2013 SAMSUNG. All rights reserved. 2-59...
- Page 74 2. Product Specifications and Description Circuit Board Locations The following diagrams show the locations of the printer circuit boards: 2-60 Copyright© 1995-2013 SAMSUNG. All rights reserved.
-
Page 75: Main Board
The main processor controls video, engine, UI display and communicates with various devices. The HDD is connected to the main board by SATA2 and to the other device (DSDF, SCF, finisher, and fax modem) by UART. 1) Main Board Diagram Copyright© 1995-2013 SAMSUNG. All rights reserved. 2-61... - Page 76 USB Host Jack SMPS Toner / OPC Motor USB Device Jack Duplex / CTD HVPS / FDB Engine Debug Speaker LSU (55PPM) Video Debug Paper JTAG Tray Set Giga RJ45 Regi Sensor • Information 2-62 Copyright© 1995-2013 SAMSUNG. All rights reserved.
-
Page 77: Msok
The fax joint PBA is used for interfacing between the main board and modem PBA(fax card). It uses UART for interface. • Information Part Code : JC92-02439A Part Name : PBA-FAX JOINT • Connection Main Board Interface Connector Modem (Fax) Card Interface Connector Copyright© 1995-2013 SAMSUNG. All rights reserved. 2-63... -
Page 78: Fax Card (Optional)
The FDI(Foreign Device Interface) module as a option is used to track machine usage such as the number of print or copy pages for some special users. This module interfaces to the main board. • Information Part Code : JC92-01616A PBA name : PBA-SUB FDI • Connection Connector to Main board 2-64 Copyright© 1995-2013 SAMSUNG. All rights reserved. -
Page 79: Ope Hub Pba
Part Code : JC92–02721A Part Name : PBA-OPE HUB • Connection Main Board Interface Connector Power Input Connector Power Output Connector Card Reader External USB Connector UI Interface Connector NFC + Wifi Connector Copyright© 1995-2013 SAMSUNG. All rights reserved. 2-65... -
Page 80: Smps Board
• Information 110V 220V Part Code JC44-00093C JC44-00100C Part Name SMPS Type 5 V1 SMPS Type 5 V2 • Connection Input_AC Output_24V1/2/3/4 (to DC Power PBA) 24V Enable Output_5V1/2 (to DC Power PBA) 2-66 Copyright© 1995-2013 SAMSUNG. All rights reserved. - Page 81 PIN ASSIGN Power +24V1 24V Ground Power +24V2 24V Ground Power +24V3 24V Ground Power +24V4 24V Ground Signal Connector (CN4) Description PIN NAME PIN ASSIGN Signal Ground On/Off signal 24V_ON/OFF Signal Ground Copyright© 1995-2013 SAMSUNG. All rights reserved. 2-67...
-
Page 82: Fuser Drive Board (Fdb)
Main Board. It also supplies 110V/220V power to the SMPS board. • Information 110V 220V Part Code JC44-00159B JC44-00160B Part Name M5370-FDB-V1 M5370-FDB-V2 • Connection AC inlet SMPS(TYPE5) Control signal(FDB I/F) Fuser AC 2-68 Copyright© 1995-2013 SAMSUNG. All rights reserved. -
Page 83: Hvps Board
• Information Part Code : JC44–00234A Part Name : HVPS • Connection Description PIN NAME PIN ASSIGN Input Voltage Input Voltage PWM signal PWM DTS PWM signal PWM MHV Output voltage MHV Read Copyright© 1995-2013 SAMSUNG. All rights reserved. 2-69... - Page 84 PWM signal PWM FUSER Description PIN NAME PIN ASSIGN Output Voltage FUSER Output Voltage ZENER Description PIN NAME PIN ASSIGN Output Voltage Output Voltage Output Voltage Description PIN NAME PIN ASSIGN Output Voltage 2-70 Copyright© 1995-2013 SAMSUNG. All rights reserved.
-
Page 85: Finisher Pba
Finisher PBA controls the finisher operation. it consists of a controller(STM32F101VCT6), Two motor drive IC. It interfaces with man board through UART. • Information Part Code : JC81-07242A (2–Bin finisher) / JC81-07242C (1–Bin finisher) PBA Name : PBA-FINISHER Copyright© 1995-2013 SAMSUNG. All rights reserved. 2-71... -
Page 86: Scf_Hcf Board
IF_Upper 2.11.12. CRUM Joint PBA The CRUM Joint PBA is the interface board between the main board and toner cartridge. Information • Part Code : JC92-01963A • Part Name : PBA-TCRUM IF • 2-72 Copyright© 1995-2013 SAMSUNG. All rights reserved. -
Page 87: Sub-Cassette Pba
Part Name : PBA SUB-CASSETTE 2.11.14. CRUM PBA CRUM PBA includes CRU memory for imaging unit, toner cartridge life cycle counting. • Information Part Code : JC92-02456A • Part Name : PBA-CRUM • Copyright© 1995-2013 SAMSUNG. All rights reserved. 2-73... -
Page 88: Eraser Pba
2.11.16. Fuser CRUM PBA This board has the fuse. The main board detects that the fuser unit is new or not depending on fuse status. • Information Part Code : JC92-02008A Part Name : PBA-FUSER CRUM 2-74 Copyright© 1995-2013 SAMSUNG. All rights reserved. -
Page 89: Disassembly And Reassembly
3.1.1. Precautions when assembling and disassembling • Use only approved Samsung spare parts. Ensure that part number, product name, any voltage, current or temperature rating are correct. Failure to do so could result in damage to the machine, circuit overload, fire or electric shock. -
Page 90: Releasing Plastic Latches
Many of the parts are held in place with plastic latches. The latches break easily; release them carefully. To remove such parts, press the hook end of the latch away from the part to which it is latched. Copyright© 1995-2013 SAMSUNG. All rights reserved. -
Page 91: Maintenance
3.2.1.1. Cleaning the DSDF white bar 1. Open the DSDF unit. 3. Open the guide-exit. Clean the duplex white bar by using a soft cloth. 2. Clean the simplex white bar by using a soft cloth. Copyright© 1995-2013 SAMSUNG. All rights reserved. -
Page 92: Replacing The Maintenance Part
When removing these screws, use a short screwdriver. 4. Remove the fuser unit. CAUTION The fuser area is hot. Take care when removing paper from the machine. 5. Install new fuser unit. 6. Turn the machine on. Copyright© 1995-2013 SAMSUNG. All rights reserved. -
Page 93: Transfer Roller
3. Release the transfer roller Assy while pushing the both side holder to the direction of arrow. 2. Open the side cover. 4. Install the new transfer roller Assy. 5. Close the side cover. 6. Turn the machine on. Copyright© 1995-2013 SAMSUNG. All rights reserved. -
Page 94: Pick-Up_Reverse_Forward Roller
1. Remove the cassette. 2. Lift small tap, remove the pick up / reverse/ forward roller. NOTE When replacing these rollers, it is recommended that you replace all three rollers at the same time. Copyright© 1995-2013 SAMSUNG. All rights reserved. -
Page 95: Mp Pad And Mp Unit
3.2.2.4. MP pad and MP Unit 1. Open the side cover. 4. Remove the MP clutch. 5. Remove 2 screws. 2. Remove the rear cover after removing 6 screws. 3. Unplug the side unit connector from the main board. Copyright© 1995-2013 SAMSUNG. All rights reserved. - Page 96 6. Release both stoppers. 9. Remove the MP pad. 10. Remove the regi sensor cover after removing 2 screws. 7. Lift up and release the side unit. 11. Remove 6 screws. 8. Remove 1 screw. Copyright© 1995-2013 SAMSUNG. All rights reserved.
- Page 97 1) Clutch gear color : White 2) Harness color : Black / Gray • Pick-up Clutch 1) Clutch gear color : Black 2) Harness color : Gray / Gray 16. Remove the main drive unit after removing 7 screws. Copyright© 1995-2013 SAMSUNG. All rights reserved.
- Page 98 3. Disassembly and Reassembly 17. Remove 1 screw. Remove the E-ring and bush. 18. Remove the MP unit after releasing 2 hooks. 3-10 Copyright© 1995-2013 SAMSUNG. All rights reserved.
-
Page 99: Dsdf Pick Up Roller Assy
3.2.2.5. DSDF pick up roller Assy 1. Open the DSDF cover-open. 3. Release the DADF pick-up roller Assy by pulling the shaft to the direction of arrow. 2. Pull up and release the holder pick-up. Copyright© 1995-2013 SAMSUNG. All rights reserved. 3-11... -
Page 100: Dsdf Reverse Roller Assy
3.2.2.6. DSDF Reverse roller Assy 1. Remove the DSDF pick up roller Assy. (Refer to 3. Release the DSDF reverse roller Assy. 3.2.2.5) 2. Release the reverse roller cover[A] by pushing both hooks. 3-12 Copyright© 1995-2013 SAMSUNG. All rights reserved. -
Page 101: Scf Pick-Up_Reverse_Forward Roller
3. Disassembly and Reassembly 3.2.2.7. SCF Pick-Up_Reverse_Forward roller 1. Remove the SCF cassette. 2. Lift small tap, remove the pick up / reverse/ forward roller. Copyright© 1995-2013 SAMSUNG. All rights reserved. 3-13... -
Page 102: Hcf Pick-Up_Reverse_Forward Roller
3. Release the HCF cassette while pushing the lever of the right rail. 2. Move the lever down to the left of the HCF cassette. 4. Lift small tap, remove the pick up / reverse/ forward roller. 3-14 Copyright© 1995-2013 SAMSUNG. All rights reserved. -
Page 103: Replacing The Main Svc Part
1. Remove 2 screw cap stickers. Then remove 2 screws. 2. Open the front cover. Then remove the left cover and exit tray. 3.3.2. Rear Cover 1. Remove the rear cover after removing 6 screws. Copyright© 1995-2013 SAMSUNG. All rights reserved. 3-15... -
Page 104: Front Cover
1. Remove the toner cartridge, imaging unit, and cassette. 4. Remove 3 screws. 2. Open the side cover. 5. Remove the front cover after removing 3 screws. 3. Remove the front cover after removing 2 screws. 3-16 Copyright© 1995-2013 SAMSUNG. All rights reserved. -
Page 105: Fuser Drive Board (Fdb)
1. Remove the left and front cover. (Refer to 3.3.1, 3.3.3.) 4. Release the FDB after removing 4 screws. 2. Unplug all harness from the FDB. 3. Release the FDB with shield after removing 1 screw. Copyright© 1995-2013 SAMSUNG. All rights reserved. 3-17... -
Page 106: Hvps Board
2. Unplug all harness from the HVPS board. Remove 1 screw. And pull the power unit. 5. Remove the HVPS board with its holder after removing 4 screws. 3. Release the power unit from the left rail. 3-18 Copyright© 1995-2013 SAMSUNG. All rights reserved. -
Page 107: Smps Board
And pull the power unit. 3. Release the power unit from the left rail. 6. Unplug all harness. Remove 4 screws. And release the SMPS board. 4. Unplug the harness from the SMPS board. Copyright© 1995-2013 SAMSUNG. All rights reserved. 3-19... -
Page 108: Main Board
1. Remove the rear cover after removing 6 screws. 2. Unplug all harness. Remove 6 screws. And release the main board. NOTE When installing the new main board, remove the MSOK from old board and insert it to new one. 3-20 Copyright© 1995-2013 SAMSUNG. All rights reserved. -
Page 109: Hard Disk Drive(Hdd)
1. Remove the rear cover after removing 6 screws. 3. Remove 4 screws. Then release the HDD from its holder. 2. Unplug 2 cables. Remove 4 screws. And release the HDD with holder. Copyright© 1995-2013 SAMSUNG. All rights reserved. 3-21... -
Page 110: Main Drive Unit
1) Clutch gear color : Black 4. Remove the fixer for MP and Pick up clutch. 2) Harness color : Gray / Gray 6. Remove the main drive unit after removing 7 screws. 3-22 Copyright© 1995-2013 SAMSUNG. All rights reserved. -
Page 111: Fuser_Exit Drive Unit
1. Remove the rear cover after removing 6 screws. 3. Unplug 3 motor connector. Remove 4 screws. And release the fuser/exit drive unit. 2. Pull the fuser fan to the direction of arrow. Copyright© 1995-2013 SAMSUNG. All rights reserved. 3-23... -
Page 112: Side Unit
1. Open the side cover. 4. Remove the MP clutch. 5. Remove 2 screws. 2. Remove the rear cover after removing 6 screws. 3. Unplug the side unit connector from the main board. 3-24 Copyright© 1995-2013 SAMSUNG. All rights reserved. - Page 113 3. Disassembly and Reassembly 6. Release both stoppers. 7. Lift up and release the side unit. Copyright© 1995-2013 SAMSUNG. All rights reserved. 3-25...
-
Page 114: Duplex Fan
2. Remove 4 screws. Then release the exit guide. 3.3.11.2. Duplex Clutch 1. Remove the side unit. (Refer to 3.3.11.) 3. Remove the E-ring. Then release the duplex clutch. 2. Remove the harness cover after removing 4 screws. 3-26 Copyright© 1995-2013 SAMSUNG. All rights reserved. -
Page 115: Ctd Sensor
1. Open the side cover. 3. Pull up and release the guide-feed from the guide-duplex. 2. Release the hooks of the guide-feed. 4. Unplug the connector. 5. Remove the CTD sensor after removing 2 screws. Copyright© 1995-2013 SAMSUNG. All rights reserved. 3-27... -
Page 116: Scanner
5. Remove the rear cover after removing 6 screws. 2. Open the side cover. 6. Unplug all cables for scanner. 3. Remove the front-top cover after removing 2 screws. 7. Remove 3 screws. 4. Remove 4 screws. 3-28 Copyright© 1995-2013 SAMSUNG. All rights reserved. - Page 117 3. Disassembly and Reassembly 8. Pull the scanner unit back and lift it up. Copyright© 1995-2013 SAMSUNG. All rights reserved. 3-29...
-
Page 118: Exit Unit
1. Remove the scanner. (Refer to 3.3.12.) 4. Unplug the exit unit connector from the main board. 2. Remove the exit-top cover after removing 5 screws. 5. Lift up and release the exit unit. 3. Remove 4 screws. 3-30 Copyright© 1995-2013 SAMSUNG. All rights reserved. -
Page 119: Exit Sensor 1
1. Remove the exit unit. (Refer to 3.3.13.) 2. Release the sensor after unplugging the connector. 3.3.13.2. Exit Sensor 2 1. Remove the exit unit. (Refer to 3.3.13.) 3. Release the sensor after unplugging the connector. 2. Remove 2 screws. Copyright© 1995-2013 SAMSUNG. All rights reserved. 3-31... -
Page 120: Lsu (Laser Scanning Unit)
3. Disassembly and Reassembly 3.3.14. LSU (Laser Scanning Unit) 1. Remove the exit unit. (Refer to 3.3.13.) 2. Unplug the LSU harness. Remove 5 screws. And release the LSU. 3-32 Copyright© 1995-2013 SAMSUNG. All rights reserved. -
Page 121: Regi_Feed_Ready Sensor
3. Remove the sensor after unplugging the connector. • [A] : Regi. sensor • [B] : Feed sensor • [C] : Ready sensor 2. Remove the regi sensor cover after removing 2 screws. Copyright© 1995-2013 SAMSUNG. All rights reserved. 3-33... -
Page 122: Dsdf (Dual Scan Document Feeder)
4. Unplug the DSDF cable from the scan joint board. 2. Remove the rear cover after removing 6 screws. 5. Lift up and release the DSDF unit. 3. Unplug the DSDF cable from the main board. 3-34 Copyright© 1995-2013 SAMSUNG. All rights reserved. -
Page 123: Dsdf Hinge
3. Disassembly and Reassembly 3.3.16.1. DSDF Hinge 1. Remove 8 screws. 2. Remove the 2 hinge units from the DSDF Assy. Copyright© 1995-2013 SAMSUNG. All rights reserved. 3-35... -
Page 124: Dsdf Cover
3. Disassembly and Reassembly 3.3.16.2. DSDF Cover 1. Remove 5 screws. 3. Release the COVER-SIDE F and COVER-SIDE R. 2. Open the COVER-OPEN and release the left side of the Stacker. 3-36 Copyright© 1995-2013 SAMSUNG. All rights reserved. -
Page 125: Dsdf Board
1. Unplug all connectors on DSDF board. 2. Remove the DSDF board after removing 4 screws. 3.3.16.4. DSDF Stacker 1. Unplug the connectors on DSDF board. 3. Remove the Stacker. 2. Remove the Legal Harness after removing the Saddle. Copyright© 1995-2013 SAMSUNG. All rights reserved. 3-37... -
Page 126: Dsdf Cover-Open
3. Disassembly and Reassembly 3.3.16.5. DSDF COVER-OPEN 1. Release the harness from the saddle. 2. Remove the HINGE-R after removing 1 screw. 3. Release the COVER-OPEN while pushing it to the direction of arrow. 3-38 Copyright© 1995-2013 SAMSUNG. All rights reserved. -
Page 127: Dsdf Guide-Pick Up Assy
3. Disassembly and Reassembly 3.3.16.6. DSDF GUIDE-PICK UP ASSY 1. Remove the GUIDE-PICK UP Assy after removing 4 screws. Copyright© 1995-2013 SAMSUNG. All rights reserved. 3-39... -
Page 128: Dsdf-Exit Up
3. Disassembly and Reassembly 3.3.16.7. DSDF-EXIT UP 1. Remove the DSDF-EXIT UP after removing 4 screws. 3.3.16.8. HOLDER-HARNESS 1. Remove the HOLDER-HARNESS after removing 2 screws. 3-40 Copyright© 1995-2013 SAMSUNG. All rights reserved. -
Page 129: Dsdf-Ccdm
3. Disassembly and Reassembly 3.3.16.9. DSDF-CCDM 1. Remove 3 screws and E-Ring. 2. Release the DSDF-CCDM. Copyright© 1995-2013 SAMSUNG. All rights reserved. 3-41... -
Page 130: Dsdf Drive
5. Remove the E-Ring. Remove the gear and pulley. And release the driving belt. 2. Remove the Pick-Up motor after removing 3 screws. 6. Remove the E-ring and Idle-Gear. Release the driving belt. 3. Remove the Feed motor after removing 3 screws. 3-42 Copyright© 1995-2013 SAMSUNG. All rights reserved. -
Page 131: Ope Unit
1. Remove 2 screw stickers. Then remove 2 screws. 3. Unplug the cable from the OPE sub board and remove the hinge cover. 4. Release the OPE Assy after removing 2 screws. 2. Release the OPE cover. Copyright© 1995-2013 SAMSUNG. All rights reserved. 3-43... -
Page 132: Platen Unit
3. Disassembly and Reassembly 3.3.18. Platen Unit 3.3.18.1. Scan Upper 1. Remove 2 screw stickers. Then remove 2 screws. 3. Remove 5 screws. 4. Lift up and release the scan upper. 2. Release the OPE cover. 3-44 Copyright© 1995-2013 SAMSUNG. All rights reserved. -
Page 133: Scan Motor
2. Unplug the motor connector. Remove 3 screws. And release the scan motor. 3.3.18.3. Scan Joint Board 1. Remove the scan upper. (Refer to 3.3.18.1.) 2. Unplug all harness. Remove 3 screws. And release the scan joint board. Copyright© 1995-2013 SAMSUNG. All rights reserved. 3-45... -
Page 134: Cover Open Sensor
3.3.18.5. APS Sensor 1. Remove the scan upper. (Refer to 3.3.18.1.) 3. Remove 2 screws. Unplug the connector. And release the APS sensor. 2. Release the APS sensor cover. 3-46 Copyright© 1995-2013 SAMSUNG. All rights reserved. -
Page 135: Card Reader Or Nfc Kit Installation
1. Remove 2 screw-caps and 2 screws securing the 3. Attach the double-sided tape to bottom of Card Reader Cover-Scan Hinge. or NFC Kit. 4. Attach the Card Reader or NFC Kit on the holder. 2. Remove the Cover-Scan Hinge. Copyright© 1995-2013 SAMSUNG. All rights reserved. 3-47... - Page 136 3. Disassembly and Reassembly 5. Connect the cable between OPE-HUB PBA and Card 6. Reassemble the Cover-Scan Hinge. Then attach the Reader(or NFC Kit). tag label on it. 3-48 Copyright© 1995-2013 SAMSUNG. All rights reserved.
-
Page 137: Troubleshooting
If you turn the machine off, press this button for more than two seconds. Then, confirmation window appears. CAUTION When you use the display screen, use your finger only. The screen may be damaged with a sharpen pen or anything else. Copyright© 1995-2013 SAMSUNG. All rights reserved. -
Page 138: Display Screen And Useful Buttons
To pan, touch and hold a selected icon, then move the device to the left or right to reposition it to another page. For example: Move icons on your home screens or application menus to another page. Main Screen Copyright© 1995-2013 SAMSUNG. All rights reserved. -
Page 139: Home Screen Overview
This machine initially has four application menus available in main home screen. If you want to using all application menus and widgets, tap icon. Then sweep the screen left or right to access the other menus and widgets. Copyright© 1995-2013 SAMSUNG. All rights reserved. -
Page 140: Customizing Your Home Screen
5) Drag the shortcut to a desired position on the screen and release it. To move to a different page, drag the shortcut to the edge of the screen until the screen scrolls to the desired page. [ Deleting a shortcut ] 1) Touch and hold a shortcut until it becomes movable. Copyright© 1995-2013 SAMSUNG. All rights reserved. - Page 141 • Home Screen : Set the wallpaper for the Home Screen. • Login Screen : Set the wallpaper for the Login Screen. • Home and Login Screen : Set the wallpaper for both screens. Copyright© 1995-2013 SAMSUNG. All rights reserved.
-
Page 142: Notification Bar
In addition to notifications, this panel also provides quick and ready access to separate device functions. These can be quickly activated or deactivated by toggling them on or off. The following functions can either be activated (green) or deactivated (gray): ECO, Wi-Fi, NFC, Log in, Setup and darkness setting. Copyright© 1995-2013 SAMSUNG. All rights reserved. -
Page 143: Understanding The Leds
The machine is off-line. Blue The machine is on-line and can be used. Blinking The machine is in power save mode. When data is received, or any button is pressed, it switches to on-line automatically. Copyright© 1995-2013 SAMSUNG. All rights reserved. -
Page 144: Updating Firmware
6) The installation window will list the files on the USB drive. Touch the name of the firmware file to select it. 7) Press the “OK” button after selecting the file. 8) Once the installation is complete, “OK” button will be activated. Press “OK” button. Copyright© 1995-2013 SAMSUNG. All rights reserved. -
Page 145: Updating From The Network
1) Go to the SyncThruWeb Service (SWS) main home page. Login as Admin in Sync Thru Web Service. NOTE Login using the Administrator ID and Password established during initial machine setup. 2) Click on Maintenance > Application Management > Application > Add. Copyright© 1995-2013 SAMSUNG. All rights reserved. - Page 146 5) After uploading the f/w file on MFP, validation information will appear. Check the [Overwrite] check-box if you want to force the firmware update even if the firmware version to be installed is lower or same with the currently installed firmware in the device. Press [OK] to start the firmware upgrade. 4-10 Copyright© 1995-2013 SAMSUNG. All rights reserved.
- Page 147 4. Troubleshooting 6) The firmware update will start. 7) Once the installation is complete, the machine power-off and power-on automatically. Copyright© 1995-2013 SAMSUNG. All rights reserved. 4-11...
-
Page 148: Jam Removal
Original paper jam in front of scanner 1) Remove any remaining pages from the DSDF. 3) Gently remove the jammed paper from the DSDF. 2) Open the DSDF cover. 4) Close the DSDF cover. 4-12 Copyright© 1995-2013 SAMSUNG. All rights reserved. - Page 149 2) Open the DSDF cover. 5) Open the DSDF jam cover. 3) Gently remove the jammed paper from the DSDF. If you do not see paper in this area, go to the next step. Copyright© 1995-2013 SAMSUNG. All rights reserved. 4-13...
- Page 150 DSDF. Original paper jam while reversing paper in scanner 1) Remove any remaining pages from the DSDF. 3) Open the DSDF input tray. 2) Open the DSDF cover. 4-14 Copyright© 1995-2013 SAMSUNG. All rights reserved.
- Page 151 2) Open the DSDF cover. Close the duplex jam cover and the DSDF cover. Load the removed pages back into the DSDF. If you do not see paper in this area, go to the next step. Copyright© 1995-2013 SAMSUNG. All rights reserved. 4-15...
- Page 152 7) Close the DSDF jam cover and the DSDF. Load the removed pages back into the DSDF. Original paper jam in exit area of scanner 1) Remove any remaining pages from the DSDF. 4-16 Copyright© 1995-2013 SAMSUNG. All rights reserved.
- Page 153 5) Close the DSDF input tray and the DSDF cover. Load 3) Open the DSDF input tray. the removed originals back into the DSDF. Original paper jam in duplex exit area of scanner 1) Remove any remaining pages from the DSDF. Copyright© 1995-2013 SAMSUNG. All rights reserved. 4-17...
- Page 154 3) Open the DSDF input tray. 5) Pull the jammed paper gently out of the DSDF. 6) Close the DSDF input tray and the DSDF cover. Load the removed originals back into the DSDF. 4-18 Copyright© 1995-2013 SAMSUNG. All rights reserved.
-
Page 155: Clearing Paper Jams
If you do not see paper in this area, go to the next step. 5) Insert tray 1 back into the machine until it locks into place. If you do not see paper in this area, go to the next step. Copyright© 1995-2013 SAMSUNG. All rights reserved. 4-19... - Page 156 4. Troubleshooting 6) Open the right door. Remove the jammed paper by 7) Close the right door. gently pulling it straight out. 4-20 Copyright© 1995-2013 SAMSUNG. All rights reserved.
- Page 157 3) Insert tray 2 back into the machine until it locks into place. 4) Open the right bottom door. 2) Remove the jammed paper from the machine. 5) Remove the jammed paper by gently pulling it straight out. Copyright© 1995-2013 SAMSUNG. All rights reserved. 4-21...
- Page 158 4. Troubleshooting 6) Close the right bottom door. 4-22 Copyright© 1995-2013 SAMSUNG. All rights reserved.
- Page 159 2) Remove the jammed paper from the machine. 5) Remove the jammed paper by gently pulling it straight out. 6) Close the right bottom door. If you do not see paper in this area, go to the next step. Copyright© 1995-2013 SAMSUNG. All rights reserved. 4-23...
- Page 160 4. Troubleshooting Paper jam in the multi-purpose tray 1) If the paper is not feeding properly, pull the paper out 2) Open and close the right door to resume printing. of the machine. 4-24 Copyright© 1995-2013 SAMSUNG. All rights reserved.
- Page 161 2) Remove the jammed paper by gently pulling it straight CAUTION out. The fuser area is hot. Take care when removing paper from the machine. 1) Open the right door. 3) Close the right door. Copyright© 1995-2013 SAMSUNG. All rights reserved. 4-25...
- Page 162 4. Troubleshooting Paper jam inside the machine (Jam feed 2) 1) Open the right bottom door. 2) Remove the jammed paper by gently pulling it straight out. 3) Close the right bottom door. 4-26 Copyright© 1995-2013 SAMSUNG. All rights reserved.
- Page 163 Paper jam inside the machine (Jam feed 3) 1) Open the right bottom door of the high capacity feeder. 2) Remove the jammed paper by gently pulling it straight out. 3) Close the high capacity feeder right bottom door. Copyright© 1995-2013 SAMSUNG. All rights reserved. 4-27...
- Page 164 2) Remove the jammed paper by gently pulling it straight CAUTION out. The fuser area is hot. Take care when removing paper from the machine. 1) Open the right door. 3) Close the right door. 4-28 Copyright© 1995-2013 SAMSUNG. All rights reserved.
- Page 165 2) Remove the jammed paper by gently pulling it straight CAUTION out. The fuser area is hot. Take care when removing paper from the machine. 1) Open the right door. 3) Close the right door. Copyright© 1995-2013 SAMSUNG. All rights reserved. 4-29...
- Page 166 2) Remove the jammed paper by gently pulling it straight CAUTION out. The fuser area is hot. Take care when removing paper from the machine. 1) Open the right door. 3) Close the right door. 4-30 Copyright© 1995-2013 SAMSUNG. All rights reserved.
- Page 167 2) Remove the jammed paper by gently pulling it straight CAUTION out. The fuser area is hot. Take care when removing paper from the machine. 1) Open the right door. 3) Close the right door. Copyright© 1995-2013 SAMSUNG. All rights reserved. 4-31...
- Page 168 2) Remove the jammed paper by gently pulling it straight CAUTION out. The fuser area is hot. Take care when removing paper from the machine. 1) Open the right door. 3) Close the right door. 4-32 Copyright© 1995-2013 SAMSUNG. All rights reserved.
- Page 169 4. Troubleshooting Paper jam in exit area (Jam Exit Face down) 1) Gently pull the paper out of the output tray. Copyright© 1995-2013 SAMSUNG. All rights reserved. 4-33...
- Page 170 4. Troubleshooting Paper jam front of 2 Bin Finisher 1) Open the Finisher Front Door. 2) Lower Finisher Paper Guide 1a and 1b. 3) Remove the jammed paper. 4) Close the Finisher Front Door. 4-34 Copyright© 1995-2013 SAMSUNG. All rights reserved.
- Page 171 Paper jam inside at 2 Bin Finisher, Paper jam inside 2 Bin Finisher’s duplex 1) Open the Front Door. 3) Remove the jammed paper. 2) Lower Finisher Paper Guide 1a and 1b. 4) Return Finisher Paper Guide 1a and 1b to their up position. Copyright© 1995-2013 SAMSUNG. All rights reserved. 4-35...
- Page 172 4. Troubleshooting Paper jam at exit of 2 Bin Finisher 1) Gently pull the paper out through the exit area. 2) Open and close the 2Bin Finisher front door. Printing automatically resumes. 4-36 Copyright© 1995-2013 SAMSUNG. All rights reserved.
-
Page 173: Service Mode
1) Press "Power button“ until the pop up will be displayed. 2) Press pop-up area except “Cancel” and “Turn Off” button until the password window will be displayed. 3) Enter “1934” and press the “Done” button. Copyright© 1995-2013 SAMSUNG. All rights reserved. 4-37... -
Page 174: Service Mode Menu Tree
Fault Log P. 4–44 Supplies Information Usage Counter Error Information Fax Protocol Dump Print Reports P. 4–44 Fax Diagnostics Job Duty Maintenance Toner Event RTF Format Export Reports XML Format P. 4–44 PDF Format 4-38 Copyright© 1995-2013 SAMSUNG. All rights reserved. - Page 175 Jam Count P. 4–45 Feed Jam Regi Jam Maintenance Scan Jam Scan Jam Counts Exit Jam Duplex Scan Jam Toner Cartridge Imaging Unit Part Transfer Replacement P. 4–45 Fuser Count Roller ADF Roller Copyright© 1995-2013 SAMSUNG. All rights reserved. 4-39...
- Page 176 Print Test Patterns P. 4–58 Copy Adjustment Image Position P. 4–59 Adjustment Automatic Adjustment P. 4–60 Scan Area Adjustment Manual Adjustment P. 4–61 Automatic Adjustment P. 4–62 ADF Adjustment Manual Adjustment P. 4–63 4-40 Copyright© 1995-2013 SAMSUNG. All rights reserved.
- Page 177 P. 4–69 Message Part Imaging Unit Off / On Replacement P. 4–69 Fuser Off / On Alert Type A Type B P. 4–69 Type C EIUL P. 4–69 SFE Code List P. 4–70 Export Copyright© 1995-2013 SAMSUNG. All rights reserved. 4-41...
- Page 178 4. Troubleshooting Level 1 Level 2 Level 3 Level 4 Page Import Print Continent Dealer ID P. 4–71 Branch Dealer ID Envelope Rotate 90 degrees P. 4–71 180 degrees 4-42 Copyright© 1995-2013 SAMSUNG. All rights reserved.
-
Page 179: Information
Selecting some items will enable the reset button to reset the current count to 0 after replacing the unit. 4.5.3.3. Software Version • Information > Software Version This menu displays all the version of the software installed in the system in detail. Copyright© 1995-2013 SAMSUNG. All rights reserved. 4-43... -
Page 180: Service Hours
Toner Event 4.5.3.7. Export Reports • Information > Export Reports This menu exports report to usb stick. Configuration, Error Information, Supplies Information, Usage Counter Reports are exported as the form of selected format. 4-44 Copyright© 1995-2013 SAMSUNG. All rights reserved. -
Page 181: Maintenance Counts
This menu displays the replacement Counts for the system parts. Users can select one part group and press “OK” to see the exact name of the part along with the occurrence of the replacement. Copyright© 1995-2013 SAMSUNG. All rights reserved. 4-45... - Page 182 Count Clear Tray 2 Roller Count Clear Roller Tray 3 Roller Count Clear Tray 4 Roller Count Clear MP Roller Count Clear ADF Roller Count Clear ADF Roller ADF Retard Roller Count Clear 4-46 Copyright© 1995-2013 SAMSUNG. All rights reserved.
-
Page 183: Diagnostics
T3 Pick-Up Clutch Engages drive to pick up a paper from tray3. (Optional) 101-0040 T4 Pick-Up Clutch Engages drive to pick up a paper from tray4. (Optional) 101-0050 Registration Clutch Engages drive to registartion rolls. Copyright© 1995-2013 SAMSUNG. All rights reserved. 4-47... - Page 184 T3 Paper Low Sensor Detects when the stack height of tray3 is less than 25%. 102-0210 Tray4 Home Position Detect when tray4 is closed. 102-0220 T4 Paper Empty Sensor Detect when paper is in tray4. 4-48 Copyright© 1995-2013 SAMSUNG. All rights reserved.
- Page 185 TC sensor in developer tank. 111-0080 ID Sensor Start ID sensor sensing On/Off 111-0090 ID Sensor Check Display ID sensor reading value 113-0010 Entrance Motor Entrance Motor run as IOT Speed <about 5 sec> Copyright© 1995-2013 SAMSUNG. All rights reserved. 4-49...
- Page 186 Low Staple Sensor Detect Staple Low 113-0270 Paper Detector Sensor Detect paper in stapler area 113-0280 Finisher Door Switch Detect Finsher Door Open or Close 113-0300 Duplex Paper Sensor Deetct Duplex Paper feeding from IOT. 4-50 Copyright© 1995-2013 SAMSUNG. All rights reserved.
-
Page 187: Fax Diagnostics
Adjust TCF duration (ms) 1500 20-800 Modem Speed Select Modem Start Speed 20-810 Fax Transmission Level Adjust Fax Transmission Level (dBm) Country Value 20-830 Auto Dial Timeout Adjust Auto Dial Timeout (second) Country Value Copyright© 1995-2013 SAMSUNG. All rights reserved. 4-51... - Page 188 This option is needed to guide Caller ID off Country for user environment. Value 20-940 Ext. Phone Ext. Phone Detection Enable/Disable (Default : Enable 1) If disabled, Ext. Phone cannot be detected by the device. 4-52 Copyright© 1995-2013 SAMSUNG. All rights reserved.
- Page 189 Emits V.34 4800 bps Line1 On / Off 20-051 V.34 7200 bps Line1 Emits V.34 7200 bps Line1 On / Off 20-052 V.34 9600 bps Line1 Emits V.34 9600 bps Line1 On / Off Copyright© 1995-2013 SAMSUNG. All rights reserved. 4-53...
- Page 190 Emits V.34 28800 bps Line1 On / Off 20-061 V.34 31200 bps Line1 Emits V.34 31200 bps Line1 On / Off 20-062 V.34 33600 bps Line1 Emits V.34 33600 bps Line1 On / Off 4-54 Copyright© 1995-2013 SAMSUNG. All rights reserved.
-
Page 191: Scanner Diagnostics
Mono, red, green, blue gray shading values will be shown on the printed report. When the previous shading value is needed, press “Print Last Shade Report(ADF)”. Verification Check the result on the shading report. If the result is not OK, clean the CCDM glass. Copyright© 1995-2013 SAMSUNG. All rights reserved. 4-55... - Page 192 05-0040 Document Detect Sensor High/Low 05-0050 Document Feed Sensor High/Low 05-0060 Document Simplex Registration Sensor High/Low 05-0070 Document Scan Read Sensor1 High/Low 05-0071 Document Scan Read Sensor2 High/Low 05-0080 Document Exit Sensor High/Low 4-56 Copyright© 1995-2013 SAMSUNG. All rights reserved.
-
Page 193: Adjustment
7) Press “OK” button. Automatic scanning will occur . 8) The system will automatically calculate the proper value based on scanning result of the test pattern. 9) The new values are set to the system. Copyright© 1995-2013 SAMSUNG. All rights reserved. 4-57... - Page 194 3) Print out the test pattern and check if the image is moved as you want. If not, repeat stpe2. • Diagnostics > Adjustment > Print Adjustment > Print Test Patterns This menu is to print out the test pattern manually. 4-58 Copyright© 1995-2013 SAMSUNG. All rights reserved.
-
Page 195: Copy Adjustment
Simplex Leading Edge • Simplex Side Edge • Duplex Leading Edge • Duplex Side Edge 3) Print out the test pattern and check if the image is moved as you want. If not, repeat stpe2. Copyright© 1995-2013 SAMSUNG. All rights reserved. 4-59... - Page 196 6) To check the magnification, compare the length of line “c” of the chart to the scanned image. NOTE Specification • a,b : 10, ± 1.5 mm • c: 190, ± 1.5 mm 4-60 Copyright© 1995-2013 SAMSUNG. All rights reserved.
- Page 197 9) To check the magnification, compare the length of line “c” of the chart to the scanned image. NOTE Specification • a,b : 10, ± 1.5 mm • c: 190, ± 1.5 mm Copyright© 1995-2013 SAMSUNG. All rights reserved. 4-61...
-
Page 198: Adf Adjustment
6) To check the magnification, compare the length of line “c” of the chart to the copy. NOTE Specification • a,b : 10, ± 1.5 mm • c: 190, ± 1.5 mm 4-62 Copyright© 1995-2013 SAMSUNG. All rights reserved. - Page 199 9) To check the magnification, compare the length of line “c” of the chart to the copy. NOTE Specification • a,b : 10, ± 1.5 mm • c: 190, ± 1.5 mm Copyright© 1995-2013 SAMSUNG. All rights reserved. 4-63...
-
Page 200: Service Functions
Service Functions > Hard Disk Maintenance > Hard Disk Check This function checks a bad sector in the hard disk. If a bad sector is found, the system will display an error message and send an email notification to the system administrator. 4-64 Copyright© 1995-2013 SAMSUNG. All rights reserved. -
Page 201: Network Port
7) Once it is completed, the message will be displayed. Then restore the debug log level to ”JOB STATUS”. NOTE If the system log size become considerably huge, it will take longer time to copy to the plugged memory. 8) Check is the Log file is created in the USB memory. Copyright© 1995-2013 SAMSUNG. All rights reserved. 4-65... -
Page 202: Network Packet Capture
Show the file size captured 2) Export Capture File • Export button Export network packet capture file to USB memory stick 3) Delete Capture File • Delete button Clear network packet capture file in a device 4-66 Copyright© 1995-2013 SAMSUNG. All rights reserved. -
Page 203: System Recovery
In case of selecting Network option : This page contains two sections : Configure device IP address a) Device IP: IP address for the device b) Gateway IP: Gateway IP address for the device Copyright© 1995-2013 SAMSUNG. All rights reserved. 4-67... - Page 204 If the system initialization is not executed, enter the svc mode and execute “Full memory clear”. If not, the machine may not work normally. 9) Execute the firmware update using the one ROM FW file after system initialization. This work is a must for all FW module level. 4-68 Copyright© 1995-2013 SAMSUNG. All rights reserved.
-
Page 205: Clear System Cache
The function is to set the machine hard stop when the drum life is expired. • Off : No machine stop @ end of drum life • On : Machine stop @ end of drum life Copyright© 1995-2013 SAMSUNG. All rights reserved. 4-69... -
Page 206: Sfe (Special Feature Enablement)
Supports Image Appearance to be printed with fit to report page. This SFE option will be applied to "Send Confirmation" or "Fax Send Confirmation" reports. Enable : Image Apprearance fit to report page • Disable(default) : Image Apearance reduced on the half page. • 4-70 Copyright© 1995-2013 SAMSUNG. All rights reserved. -
Page 207: Dealer Id
2) If the length of envelope is over max size of custom width, the device shall not rotate image and just determine the direction of envelope is SEF. For example, the A4 model support custom size like W 98-216 ~ L148-356. This model doesn't support C5 Env.(162x229) DL Env.(110x220), No9 Env.(98x225), No10 Env.(105x241) rotation. Copyright© 1995-2013 SAMSUNG. All rights reserved. 4-71... -
Page 208: Error Code And Troubleshooting
A3-3410 Sensor Failure: #A3-3410. Turn off then on. Call for service if the problem P.4–87 persists A3-3411 Sensor Failure: #A3-3411. Turn off then on. Call for service if the problem P.4–87 persists 4-72 Copyright© 1995-2013 SAMSUNG. All rights reserved. - Page 209 Replace with new Tray4 pickup roller P.4–98 C9-1162 Replace with new MP pickup roller P.4–99 C9-2120 Replace with new Transfer roller P.4–100 C9-2220 TR Failure: #C9-2220. Install transfer roller again P.4–101 H1-1211 Paper jam in Tray 2 P.4–102 Copyright© 1995-2013 SAMSUNG. All rights reserved. 4-73...
- Page 210 Paper jam in HCF 2 P.4–114 H1-2218 Paper jam in HCF 2 P.4–114 H1-2219 Paper jam in tray 2 or tray door is open P.4–114 H1-2220 HCF 2 door is open. Close it P.4–115 4-74 Copyright© 1995-2013 SAMSUNG. All rights reserved.
- Page 211 Paper Jam in front of mailbox. Remove paper: #H2-5080 P.4–140 H2-5081 Paper Jam inside of mailbox. Remove paper: #H2-5081 P.4–140 H2-5082 Paper Jam inside of mailbox. Remove paper: #H2-5082 P.4–140 H2-5083 Paper Jam at mailbox bin 1. Remove paper: #H2-5083 P.4–140 Copyright© 1995-2013 SAMSUNG. All rights reserved. 4-75...
- Page 212 P.4–152 problem persists M1-5111 Paper is low in tray 1. Load paper P.4–153 M1-5112 Paper is empty in tray 1. Load paper P.4–153 M1-5120 Paper is empty in all tray. Load paper P.4–153 4-76 Copyright© 1995-2013 SAMSUNG. All rights reserved.
- Page 213 Wait delay time for lower fixing temperature… P.4–166 S2-3321 Supplying and mixing toner to developer unit. Please wait... P.4–166 S2-3421 Calibrating image density. Please wait... P.4–166 S2-4120 Door is open. Close it P.4–166 Copyright© 1995-2013 SAMSUNG. All rights reserved. 4-77...
- Page 214 LSU Failure: #U2-1112. Turn off then on. Call for service if the problem P.4–180 persists U2-1113 LSU Failure: #U2-1113.Turn off then on. Call for service if the problem P.4–181 persists U3-3211 Original paper jam inside of scanner P.4–182 4-78 Copyright© 1995-2013 SAMSUNG. All rights reserved.
- Page 215 U3-3614 Original paper jam in the exit area of scanner P.4–191 U3-3713 Original paper jam in the exit area of scanner P.4–191 U3-3714 Original paper jam in the exit area of scanner P.4–191 Copyright© 1995-2013 SAMSUNG. All rights reserved. 4-79...
-
Page 216: Ax-Xxxx Type Error Code
Booting Failure: #61-1111. Turn off then on. Call for service if the problem persists ► Symptom Hibernation image creation is failed. ► Troubleshooting method 1) Turn the machine on with a normal booting. 2) Enter the SVC mode. Select “Hibernation On” again. 4-80 Copyright© 1995-2013 SAMSUNG. All rights reserved. - Page 217 4) If the connection is OK, turn the machine on. Enter SVC mode. Select the main motor test. (Diagnostics > Engine Diagnostics > Engine Test Routines) Check the motor operation. a) If the motor is not operational, Copyright© 1995-2013 SAMSUNG. All rights reserved. 4-81...
- Page 218 If the control signal is abnormal, replace the main board(JC92–02661A) b) If the motor is operational, • Check the Pin No 8. If the value is abnormal, replace the main board. If the value is normal, replace the harness. 4-82 Copyright© 1995-2013 SAMSUNG. All rights reserved.
- Page 219 4) If the connection is OK, turn the machine on. Enter SVC mode. Select the Dev motor test. (Diagnostics > Engine Diagnostics > Engine Test Routines) Check the motor operation. a) If the motor is not operational, Copyright© 1995-2013 SAMSUNG. All rights reserved. 4-83...
- Page 220 If the control signal is abnormal, replace the main board(JC92–02661A) b) If the motor is operational, • Check the Pin No 8. If the value is abnormal, replace the main board. If the value is normal, replace the harness. 4-84 Copyright© 1995-2013 SAMSUNG. All rights reserved.
- Page 221 3) Check if the CTD sensor window is contaminated. If yes, clean the window with soft cloth. 4) Close the side cover. 5) Turn the machine on. 6) If the problem persists, replace the CTD sensor (JC32-00014A). (Refer to 3.3.11.3. CTD sensor.) Copyright© 1995-2013 SAMSUNG. All rights reserved. 4-85...
- Page 222 2) Open the side cover. Measure the resistance value of the connector at both ends. If the values is not in 10KΩ ± 1% (@ 25 ℃), replace the inner temperature sensor • 3) If the sensor is normal, replace the main board(JC92–02661A). 4-86 Copyright© 1995-2013 SAMSUNG. All rights reserved.
-
Page 223: Error Message
Measure the resistance value of the connector at both ends. If the value is not in 47.5KΩ ~ 52.5KΩ (@ 25 ℃), replace the outer temperature/humidity sensor(JC32–00015A). 3) If the harness and sensor are normal, replace the main board(JC92–02661A). Copyright© 1995-2013 SAMSUNG. All rights reserved. 4-87... -
Page 224: Lamp Failure: #A4-1110. Open The Door, Then Close It. Call For Service If The Problem Persists
► Troubleshooting method 1) Enter SVC mode. Execute the erase lamp test. (Diagnostics > Engine Diagnostics > Engine Test Routines > Erase Lamp) 2) If the erase lamp does not turn on, replace it(JC92-01959B). 4-88 Copyright© 1995-2013 SAMSUNG. All rights reserved. -
Page 225: Cx-Xxxx Type Error Code
3) Check if the toner cartridge seal is removed. If not, remove it. 4) Shake the toner cartridge horizontally to distribute the toner evenly inside the cartridge. 5) Reinstall the toner cartridge. 6) If the problem persists, replace the toner cartridge. Copyright© 1995-2013 SAMSUNG. All rights reserved. 4-89... -
Page 226: End Of Life, Replace With New Toner Cartridge
Toner cartridge is at the end of its life. ► Troubleshooting method 1) Open the front cover and side cover. 2) Remove the toner cartridge. 3) Install the new toner cartridge. 4) Close the front cover. 4-90 Copyright© 1995-2013 SAMSUNG. All rights reserved. -
Page 227: Install Toner Cartridge
1) Open the front cover and side cover. Check if the toner cartridge is installed. 2) Remove and reinstall the toner cartridge. 3) If the problem persists, check if the toner cartridge modular jack is contaminated or deformed. 4) Replace the toner cartridge with new one. Copyright© 1995-2013 SAMSUNG. All rights reserved. 4-91... -
Page 228: Toner Cartridge Is Not Compatible. Check Users Guide
2) Check if the label information of the toner cartridge is same with the machine’s one. (ex. /SEE) 3) If label information is different from the machine or the toner cartridge is not a samsung genuine, replace it with a new one. -
Page 229: Toner Cartridge Failure: #C1-1710. Call For Service
1) Open the front cover and side cover. Check if the toner cartridge is installed. 2) Remove and reinstall the toner cartridge. 3) If the problem persists, check if the toner cartridge modular jack is contaminated or deformed. 4) Replace the toner cartridge with new one. Copyright© 1995-2013 SAMSUNG. All rights reserved. 4-93... -
Page 230: Prepare New Imaging Unit
2) Remove the toner cartridge. 3) Remove and reinstall the imaging unit. 4) Install the toner cartridge. 5) Close the side cover and front cover. 6) If the problem persists, replace the imaging unit. 4-94 Copyright© 1995-2013 SAMSUNG. All rights reserved. -
Page 231: Imaging Unit Failure: #C3-1314. Install Imaging Unit Again
5) Close the side cover and front cover. 6) If the problem persists, replace the imaging unit. 7) Check if the motor related to toner supply is working normally. If not, replace the motor. Copyright© 1995-2013 SAMSUNG. All rights reserved. 4-95... -
Page 232: Imaging Unit Is Not Installed. Install The Unit
1) Open the front cover and side cover. 2) Remove the imaging unit check that its modular jack is contaminated or deformed. 3) If it is defective, replace it with new one. 4) Close the side cover and front cover. 4-96 Copyright© 1995-2013 SAMSUNG. All rights reserved. -
Page 233: Replace With New Fuser Unit
3) Close the front cover. CAUTION The temperature gets high in the vicinity of the fuser unit. When replacing it, you may get burned. Before replacing it, make sure that fuser unit has cooled. Copyright© 1995-2013 SAMSUNG. All rights reserved. 4-97... -
Page 234: Replace With New Tray1 Pickup Roller
6) Select “Roller” (INFORMATION > Supply Status > Field Replacement Unit > Roller) 7) Select “P/up roller Kit-tray1~4”. The “RESET” button will be activated. Click “RESET” to clear the corresponding pick up roller. 8) Exit SVC mode by pushing the home button. 4-98 Copyright© 1995-2013 SAMSUNG. All rights reserved. -
Page 235: Replace With New Mp Pickup Roller
6) Select “Roller” (INFORMATION > Supply Status > Field Replacement Unit > Roller) 7) Select “P/up roller MP”. The “RESET” button will be activated. Click “RESET” to clear the MP pick up roller. 8) Exit SVC mode by pushing the home button. Copyright© 1995-2013 SAMSUNG. All rights reserved. 4-99... -
Page 236: Replace With New Transfer Roller
5) Select “TRNASFER” (INFORMATION > Supply Status > Field Replacement Unit > TRNASFER) 6) Select “T2 Roller”. The “RESET” button will be activated. Click “RESET” to clear the T2 roller. 7) Exit SVC mode by pushing the home button. 4-100 Copyright© 1995-2013 SAMSUNG. All rights reserved. -
Page 237: Tr Failure: #C9-2220. Install Transfer Roller Again
5) Select “TRNASFER” (INFORMATION > Supply Status > Field Replacement Unit > TRNASFER) 6) Select “T2 Roller”. The “RESET” button will be activated. Click “RESET” to clear the T2 roller. 7) Exit SVC mode by pushing the home button. Copyright© 1995-2013 SAMSUNG. All rights reserved. 4-101... -
Page 238: H1-Xxxx Type (Optional Cassette) Error Code
6) Check if the tray 2 pick up motor connector is connected correctly. 7) If the pick up motor is defective, replace it. 8) Check if the tray 2 pick up clutch connector is connected correctly. 4-102 Copyright© 1995-2013 SAMSUNG. All rights reserved. -
Page 239: Tray 2 Door Is Open. Close It
The communication error between the tray 2 and the main machine has occurred. ► Troubleshooting method 1) Check if the SCF unit connector is connected to the machine correctly. Reconnect it. 2) If the drawer connector is deformed, replace it. Copyright© 1995-2013 SAMSUNG. All rights reserved. 4-103... -
Page 240: Paper Is Low In Tray 2. Load Paper
Remove the tray 2 pick up unit. b) Check if the paper empty sensor is contaminated. If so, clean it. c) If the paper empty sensor is defective, replace it. d) If the empty actuator is defective, replace it. 4-104 Copyright© 1995-2013 SAMSUNG. All rights reserved. -
Page 241: Input System Failure #H1-1253 : Pull Tray 2 Out And Insert It
5) If the problem persists, check the following. a) Remove the tray 2 pick up unit. b) Check if the pick up sensor is contaminated, clean it. c) If the pick up sensor is defective, replace it. Copyright© 1995-2013 SAMSUNG. All rights reserved. 4-105... -
Page 242: Paper Jam In Tray 3
6) Check the tray 3 pick up motor. • Check if the tray 3 pick up motor cable is connected correctly. • If the connection is OK, replace the tray 3 pick up drive unit. 4-106 Copyright© 1995-2013 SAMSUNG. All rights reserved. -
Page 243: Tray 3 Door Is Open. Close It
The communication error between the tray 3 and the main machine has occurred. ► Troubleshooting method 1) Check if the SCF unit connector is connected to the machine correctly. Reconnect it. 2) If the drawer connector is deformed, replace it. Copyright© 1995-2013 SAMSUNG. All rights reserved. 4-107... -
Page 244: Paper Is Low In Tray 3. Load Paper
Remove the tray 3 pick up unit. b) Check if the paper empty sensor is contaminated. If so, clean it. c) If the paper empty sensor is defective, replace it. d) If the empty actuator is defective, replace it. 4-108 Copyright© 1995-2013 SAMSUNG. All rights reserved. -
Page 245: Input System Failure: #H1-1353. Pull Tray 3 Out And Insert It
5) If the problem persists, check the following. a) Remove the tray 3 pick up unit. b) Check if the pick up sensor is contaminated, clean it. c) If the pick up sensor is defective, replace it. Copyright© 1995-2013 SAMSUNG. All rights reserved. 4-109... -
Page 246: Paper Jam In Tray 4
6) Check the tray 4 pick up motor. • Check if the tray 4 pick up motor cable is connected correctly. • If the connection is OK, replace the tray 4 pick up drive unit. 4-110 Copyright© 1995-2013 SAMSUNG. All rights reserved. -
Page 247: Tray 4 Door Is Open. Close It
The communication error between the tray 4 and the main machine has occurred. ► Troubleshooting method 1) Check if the SCF unit connector is connected to the machine correctly. Reconnect it. 2) If the drawer connector is deformed, replace it. Copyright© 1995-2013 SAMSUNG. All rights reserved. 4-111... -
Page 248: Paper Is Low In Tray 4. Load Paper
Remove the tray 4 pick up unit. b) Check if the paper empty sensor is contaminated. If so, clean it. c) If the paper empty sensor is defective, replace it. d) If the empty actuator is defective, replace it. 4-112 Copyright© 1995-2013 SAMSUNG. All rights reserved. -
Page 249: Input System Failure: #H1-1453. Pull Tray 4 Out And Insert It
5) If the problem persists, check the following. a) Remove the tray 4 pick up unit. b) Check if the pick up sensor is contaminated, clean it. c) If the pick up sensor is defective, replace it. Copyright© 1995-2013 SAMSUNG. All rights reserved. 4-113... -
Page 250: Paper Jam In Hcf 2
6) Check the 1st HCF pick up motor. • Check if the 1st HCF pick up motor cable is connected correctly. • If the connection is OK, replace the 1st HCF pick up drive unit. 4-114 Copyright© 1995-2013 SAMSUNG. All rights reserved. -
Page 251: Hcf 2 Door Is Open. Close It
The communication error between the 1st HCF and the main machine has occurred. ► Troubleshooting method 1) Check if the HCF unit connector is connected to the machine correctly. Reconnect it. 2) If the drawer connector is deformed, replace it. Copyright© 1995-2013 SAMSUNG. All rights reserved. 4-115... -
Page 252: Paper Is Low In Hcf 2. Load Paper
Remove the 1st HCF pick up unit. b) Check if the paper empty sensor is contaminated. If so, clean it. c) If the paper empty sensor is defective, replace it. d) If the empty actuator is defective, replace it. 4-116 Copyright© 1995-2013 SAMSUNG. All rights reserved. -
Page 253: Input System Failure #H1-2253 : Pull Hcf 2 Out And Insert It
5) If the problem persists, check the following. a) Remove the 1st HCF pick up unit. b) Check if the pick up sensor is contaminated, clean it. c) If the pick up sensor is defective, replace it. Copyright© 1995-2013 SAMSUNG. All rights reserved. 4-117... -
Page 254: H2-Xxxx Type (Finisher) Error Code
EXIT JAM SENSOR 0604-001415 TOP EMPTY SENSOR 0604-001415 TOP EXIT SENSOR 0604-001415 SET SENSOR 0604-001415 JAN GUIDE DETECTOR SENSOR 0604-001415 STACKER FULL SENSOR 0604-001415 ENCODER SENSOR 0604-001415 ENTRANCE MOTOR JC81-03479A EXIT MOTOR JC81-03479A 4-118 Copyright© 1995-2013 SAMSUNG. All rights reserved. - Page 255 Description Code PADDLE MOTOR JC81-07280A REAR JOGGER MOTOR JC81-03486A FRONT JOGGER MOTOR JC81-03486A SUPPORT FINGER MOTOR JC81-07280A EJECTOR MOTOR JC81-03484AC STACKER MOTOR JC81-03484AC FRONT DOOR JC81-03469A LOWER LIMITE JC81-03469A MAIN CONTROL BOARD JC81-07242AB Copyright© 1995-2013 SAMSUNG. All rights reserved. 4-119...
-
Page 256: Finisher Failure #H2-5001. Turn Off Then On, After Checking Finisher
Replace the Finisher main board(JC81–07242A). 3) Check if the gears(SJ10 3308) of Paddle motor(M3) are assembled correctly. 4) Check if the tooth of gears(SJ10 3308) are broken. If it is defective, replace the broken gears(SJ10 3308). 4-120 Copyright© 1995-2013 SAMSUNG. All rights reserved. - Page 257 5) Check if the Paper Path Diverter gears(cam) (JR10 3302) are assembled correctly or operated well. 6) Check if the gears(cam) (JR10 3302) are broken. If it is defective, replace the broken gears(cam). 7) Replace the Paddle Unit(JR10 3130). Copyright© 1995-2013 SAMSUNG. All rights reserved. 4-121...
-
Page 258: Finisher Failure #H2-5003. Turn Off Then On, After Checking Finisher
Check if the Front Jogger driving belt(JC81-03509A) is broken. Replace the belt if it does. c) Check if the Front Jogger motor bracket(SJ10 3206) is fasten on tamper base(JR10 3304) by screw. 4-122 Copyright© 1995-2013 SAMSUNG. All rights reserved. - Page 259 Check if the tooth of gear(SJ10 3308) is broken. Replace the gear if it does. e) Check if the Front Jogger shaft(JR10 3304) became pollution. Remove if it does. 4) Replace the Front Jogger Unit(JC81-03511C). Copyright© 1995-2013 SAMSUNG. All rights reserved. 4-123...
-
Page 260: Finisher Failure #H2-5005. Turn Off Then On, After Checking Finisher
Check if the Rear Jogger driving belt(JC81-03509A) is broken. Replace the belt if it does. c) Check if the Rear Jogger motor bracket(SJ10 3206) is fasten on tamper base(JR10 3306) by screw. 4-124 Copyright© 1995-2013 SAMSUNG. All rights reserved. - Page 261 Check if any of the teeth on gear (SJ10 3308) are broken. Replace the gear if necessary. e) Check if the Front Jogger shaft (JR10 3304) is contaminated. Clean as is necessary. 4) Replace the Rear Jogger Unit(JC81-03507C). Copyright© 1995-2013 SAMSUNG. All rights reserved. 4-125...
-
Page 262: Finisher Failure #H2-5007. Turn Off Then On, After Checking Finisher
Replace the Extension Tray motor(M6). e) Replace the Finisher main board(JC81–07242A). 3) Check if the gears(SJ10 5342) are assembled correctly. 4) Check if the tooth of gears(SJ10 5342) are broken. Replace the broken gears. 4-126 Copyright© 1995-2013 SAMSUNG. All rights reserved. - Page 263 4. Troubleshooting 5) Check if the Extension Tray Home sensor bracket(SJ10 5120) is deformed.(make a right angle) Replace the bracket. 6) Replace the Extension Tray Unit(SJ10 5000). Copyright© 1995-2013 SAMSUNG. All rights reserved. 4-127...
-
Page 264: Finisher Failure #H2-5009. Turn Off Then On, After Checking Finisher
Check if there is continuity in the harness, and if not replace the harness (SJ10-8310), replace as is necessary. e) Replace the ejector encoder sensor(S17). f) Replace the Finisher main board(JC81–07242A). 3) Is the ejector motor (M7) working? 4-128 Copyright© 1995-2013 SAMSUNG. All rights reserved. - Page 265 Check if the ejector motor bracket(SJ10 4204) assembly is fasten on compiler bottom frame by screw. 5) Check if the tooth of gears(SJ10 4304) are broken. Replace the broken gears. 6) Replace the ejector unit(JC81-03773C). Copyright© 1995-2013 SAMSUNG. All rights reserved. 4-129...
-
Page 266: Finisher Failure #H2-5012. Turn Off Then On, After Checking Finisher
Check if there is continuity in the harness, and if not replace the harness (SJ10-8310), replace as is necessary. e) Replace the stapler unit(SJ10 3140). f) Replace the Finisher main board(JC81–07242A). 2) Replace the stapler unit(SJ10 3140). 4-130 Copyright© 1995-2013 SAMSUNG. All rights reserved. -
Page 267: Finisher Failure #H2-5014. Turn Off Then On, After Checking Finisher
Replace the Finisher main board(JC81–07242A). 3) Is the stacker Lower Limit Switch (SW2) working? a) Check if the sensor actuator(JR10 6310) is abnormality. b) Check if the connector(JR10 8360) of stacker Lower switch is disconnected. Copyright© 1995-2013 SAMSUNG. All rights reserved. 4-131... - Page 268 Check if there is continuity in the harness, and if not replace the harness (JR10 8360), replace as is necessary. d) Replace the stacker motor(M8). e) Replace the Finisher main board(JC81–07242A). 5) Replace the stacker motor gear box(SJ10 6110). 4-132 Copyright© 1995-2013 SAMSUNG. All rights reserved.
-
Page 269: Paper Jam In Front Of Finisher: #H2-5032
Check if the connector(JR10 8320) J7 on the Finisher main board(JC81–07242A) is disconnected. d) Check if there is continuity in the harness, and if not replace the harness (SJ10 8350, SJ10 8320), as is necessary. e) Replace the Finisher input sensor(S2). Copyright© 1995-2013 SAMSUNG. All rights reserved. 4-133... - Page 270 Check if there is continuity in the harness, and if not replace the harness (JR10 8320), replace as is necessary. d) Replace the Feed entrance motor(M1). e) Replace the Finisher main control board(JC81–07242A). 5) Check if there is any object on finisher paper path. Remove it if there is. 4-134 Copyright© 1995-2013 SAMSUNG. All rights reserved.
-
Page 271: Paper Jam Inside Of Finisher: #H2-5033
Check if there is continuity in the harness, and if not replace the harness (JR10 8320), replace as is necessary. d) Replace the Feed entrance motor(M1). e) Replace the Finisher main control board(JC81–07242A). 3) Is the Finisher Exit Sensor (S3,S11) working? a) Check if the Exit sensor actuator (SJ10 2384) is abnormality. Copyright© 1995-2013 SAMSUNG. All rights reserved. 4-135... - Page 272 Check if there is continuity in the harness, and if not replace the harness (JR10 8320), replace as is necessary. d) Replace the Feed exit motor(M2). e) Replace the Finisher main control board(JC81–07242A). 5) Check if there is any object on finisher paper path. Remove it if there is. 4-136 Copyright© 1995-2013 SAMSUNG. All rights reserved.
- Page 273 Check if there is continuity in the harness, and if not replace the harness (JR10 8320), replace as is necessary. d) Replace the Feed exit motor(M2). e) Replace the Finisher main control board(JC81 07242A). 3) Check if there is any object on finisher paper path. Remove it if there is. Copyright© 1995-2013 SAMSUNG. All rights reserved. 4-137...
-
Page 274: Finisher Door Is Open. Close It
Check if the connector(JR10 8360) J2 on the main control board(JC81–07242A) is disconnected. d) Check continuity and if the harness is damaged, replace as is necessary. e) Replace the Door switch(SW1). f) Replace the Finisher main control board(JC81–07242A). 4-138 Copyright© 1995-2013 SAMSUNG. All rights reserved. - Page 275 Check if the connector(JC81–07242A) J1,J3 on the main control board (JC81–07242A) is disconnected. b) Check continuity and if the harness is damaged(JC81-03470A), replace as is necessary. c) Replace the Finisher main control board(JC81–07242A). 4) Replace the Finisher main control board(JC81–07242A). Copyright© 1995-2013 SAMSUNG. All rights reserved. 4-139...
- Page 276 2) Check the connection between door open sensor and mailbox main board. Reconnect the harness. 3) If the harness is defective, replace it. 4) If the connection is OK, replace the door open sensor. 4-140 Copyright© 1995-2013 SAMSUNG. All rights reserved.
-
Page 277: H2-5A21
Check continuity and if the harness is damaged , replace as is necessary. e) Replace the Finisher top Door sensor(S16). f) Replace the Finisher main control board(JC81–07242A). 3) Replace the Finisher main control board(JC81–07242A). Copyright© 1995-2013 SAMSUNG. All rights reserved. 4-141... -
Page 278: H2-5A31
Check if the connector(JR10 8320) J18 on the main control board(JC81–07242A) is disconnected. d) Check continuity and if the harness is damaged, replace as is necessary. e) Replace the finisher stack full sensor(S10). 4-142 Copyright© 1995-2013 SAMSUNG. All rights reserved. - Page 279 Check if the connector(SJ10 8360) J14 on the finisher main board(JC81–07242A) is disconnected. c) Check continuity and if the harness is damaged, replace as is necessary. d) Replace the stack motor(M8). 4) Replace the Finisher main control board(JC81–07242A). Copyright© 1995-2013 SAMSUNG. All rights reserved. 4-143...
-
Page 280: Paper In Mailbox Bin 3 Is Full. Remove Printed Paper
Finisher Failure #H2-5A50. Check finisher ► Symptom Communication error between finisher and copier. ► Troubleshooting method 1) Check the connection between finisher and copier. Reconnect the cable. 2) If the connection is OK, replace the finisher board. 4-144 Copyright© 1995-2013 SAMSUNG. All rights reserved. -
Page 281: H2-5A62
Check continuity and if the harness is damaged, replace as is necessary. e) Replace staple unit(SJ10 3140). f) Replace the Finisher main control board(JC81–07242A). 2) Mount the stapler cartridge(JC81-03481A). 3) Replace the stapler Unit(SJ10 3140) Copyright© 1995-2013 SAMSUNG. All rights reserved. 4-145... -
Page 282: H2-5A90
Replace the Finisher main control board(JC81–07242A). 2) Is the Paddle Unit(Paper path diverter) working? a) Refer to the troubleshooting for “H2–5001” error. 3) Check if there is any object on finisher paper path. Remove it if there is. 4-146 Copyright© 1995-2013 SAMSUNG. All rights reserved. -
Page 283: Mx-Xxxx Type Error Code
6) Check the connection between the registration sensor and on the main board. If necessary, install a new registration sensor. 7) Check that the feed sensor actuator moves freely and is not damaged. If necessary, install a new feed sensor actuator assembly. Copyright© 1995-2013 SAMSUNG. All rights reserved. 4-147... - Page 284 8) Check the connection between the feed sensor and on the main board. If necessary, install a new feed sensor. 9) Check if the pick up motor runs normally. If necessary, replace the pick up motor. 10)Check the pick up clutch. If necessary, replace the pick up clutch. 4-148 Copyright© 1995-2013 SAMSUNG. All rights reserved.
-
Page 285: Paper Jam In Mp Tray
7) Check the connection between the feed sensor and on the main board. If necessary, install a new feed sensor. 8) Check if the pick up motor runs normally. If necessary, replace the pick up motor. Copyright© 1995-2013 SAMSUNG. All rights reserved. 4-149... - Page 286 4. Troubleshooting 9) Check the MP clutch. If necessary, replace the MP clutch. 4-150 Copyright© 1995-2013 SAMSUNG. All rights reserved.
-
Page 287: Tray 1 Cassette Is Pulled Out. Insert It Properly
3) Check the connection between the tray1 detection sensor and on the main board. 4) Check if the tray1 detection sensor is damaged. If necessary, replace the sensor. 5) If necessary, replace the main board. Copyright© 1995-2013 SAMSUNG. All rights reserved. 4-151... -
Page 288: Tray Failure: #M1-4111. Pull Tray 1 Out And Insert It. Call For Service If The Problem Persists
3) Check the connection between the tray1 lift motor and on the main board. 4) Check the tray1 lift motor operation. If necessary, replace the motor. 5) If necessary, replace the main board. 4-152 Copyright© 1995-2013 SAMSUNG. All rights reserved. -
Page 289: Paper Is Low In Tray 1. Load Paper
5) Check the connection between the tray1 lift motor and on the main board. 6) Check the tray1 lift motor operation. If necessary, replace the motor. 7) If necessary, replace the main board. Copyright© 1995-2013 SAMSUNG. All rights reserved. 4-153... -
Page 290: Paper Is Empty In Mp Tray. Load Paper
1) Check the connection between the MP empty sensor and on the main board. If necessary, install a new MP empty sensor. 2) Check that the MP empty sensor actuator moves freely and is not damaged. If necessary, install a new MP empty sensor actuator assembly. 3) If necessary, replace the main board. 4-154 Copyright© 1995-2013 SAMSUNG. All rights reserved. -
Page 291: Paper Jam Inside Of Machine
7) Check that the feed sensor actuator moves freely and is not damaged. If necessary, install a new feed sensor actuator assembly. 8) Check the connection between the feed sensor and on the main board. If necessary, install a new feed sensor. Copyright© 1995-2013 SAMSUNG. All rights reserved. 4-155... - Page 292 4. Troubleshooting 9) Check if the pick up motor runs normally. If necessary, replace the pick up motor. 10)Check the pick up clutch. If necessary, replace the pick up clutch. 4-156 Copyright© 1995-2013 SAMSUNG. All rights reserved.
-
Page 293: Paper Jam At The Bottom Of Duplex Path
5) Check the connection between the duplex jam sensor and on the main board. If necessary, install a new duplex jam sensor. 6) Check if the pick up motor runs normally. If necessary, replace the pick up motor. Copyright© 1995-2013 SAMSUNG. All rights reserved. 4-157... - Page 294 4. Troubleshooting 7) Check the duplex motor. If necessary, replace the duplex motor. 8) Check the duplex clutch. If necessary, replace the duplex clutch. 4-158 Copyright© 1995-2013 SAMSUNG. All rights reserved.
-
Page 295: Paper Jam In Exit Area
Remove the fuser unit. Check if fuser unit has any defective part. Replace the fuser unit d) Remove the exit unit. Check if the exit sensor is assembled correctly. If it is defective, replace it. Copyright© 1995-2013 SAMSUNG. All rights reserved. 4-159... -
Page 296: Paper In Output Bin Is Full. Remove Printed Paper
1) Remove the paper on exit tray. 2) If this error occurs continually, check the following. a) Check if the bin-full sensor and actuator is assembled correctly. b) Check if the bin-full sensor is defective. 4-160 Copyright© 1995-2013 SAMSUNG. All rights reserved. -
Page 297: Sx-Xxxx Type Error Code
► Troubleshooting method 1) Check if the HDD is installed correctly. a) Remove the rear cover. b) Check if the HDD cable is connected correctly. 2) If the problem persists, replace the HDD. Copyright© 1995-2013 SAMSUNG. All rights reserved. 4-161... -
Page 298: System Failure: #S1-2433 . Call For Service
System memory is corrupted. / Unexpected S/W error has occurred. ► Troubleshooting method 1) Enter the SVC(tech) mode. Select “System Recovery” in Service Function menu. 2) Execute the hard disk format and firmware re-installation. 3) If the problem persists, replace the HDD. 4-162 Copyright© 1995-2013 SAMSUNG. All rights reserved. -
Page 299: Hdd Error #S1-2434. Check Users Guide
S1-2438/2439 : Printing Error / No Paper in Tray 1) Enter SVC mode. Select “Hard Disk Maintenance” in Service Function menu. 2) Execute hard disk format. 3) If the problem persists, replace the HDD. Copyright© 1995-2013 SAMSUNG. All rights reserved. 4-163... -
Page 300: Msok Failure: #S1-2510. Call For Service & Change Msok
2) If the problem persists, turn the machine off again. 3) Remove the rear cover. 4) Check if the MSOK is inserted correctly. Remove and reinstall it. 5) If the problem persists, contact the tech support team. 4-164 Copyright© 1995-2013 SAMSUNG. All rights reserved. - Page 301 1) Turn the machine off and on. 2) If the problem persists, turn the machine off again. 3) Remove the rear cover. 4) Replace the main board. 5) Assemble the rear cover. Turn the machine on. Copyright© 1995-2013 SAMSUNG. All rights reserved. 4-165...
-
Page 302: S2-331D
If there is any defective part, replace it. ► Error Code S2–4120 ► Error message Right door is open. Close it ► Symptom Side cover is opened. ► Troubleshooting method 1) Close the side cover correctly. 4-166 Copyright© 1995-2013 SAMSUNG. All rights reserved. - Page 303 4. Troubleshooting 2) Check if the cover open sensor connector is connected properly. Reconnect it. 3) If the sensor is defective, replace it. Copyright© 1995-2013 SAMSUNG. All rights reserved. 4-167...
- Page 304 3) Remove the rear cover. Check if the connector on the main board is connected correctly. 4) Remove the scan glass. 5) Check if the home position sensor cable is connected correctly. 6) If the problem persists, replace the main board. 4-168 Copyright© 1995-2013 SAMSUNG. All rights reserved.
- Page 305 5) Remove the DSDF rear cover. Check if the connector on DSDF board is connected correctly. 6) If the connection is OK, replace the DSDF board. 7) If the problem persists after replacing the DSDF board, replace the main board. Copyright© 1995-2013 SAMSUNG. All rights reserved. 4-169...
- Page 306 2) Check if the OPE Assy cable is connected to the OPE hub board correctly. 3) If the connection is OK, replace the OPE Assy. 4) If the OPE Assy is OK, replace the OPE hub board. 4-170 Copyright© 1995-2013 SAMSUNG. All rights reserved.
- Page 307 3) If not, unplug and reconnect the network cable. 4) Check if the network is normal. Connect the network cable to another network device. 5) If the network is OK, replace the main board. Copyright© 1995-2013 SAMSUNG. All rights reserved. 4-171...
- Page 308 2) Select “Networking Setting”. 3) “Log-In”. 4) Select “TCP/IP”. 5) Select the proper item for your machine. 6) Select “IP Setting”. 7) Select the proper item for your machine. 8) Change the IP address. 4-172 Copyright© 1995-2013 SAMSUNG. All rights reserved.
- Page 309 BOOTP or DHCP server has a problem or IP address assignment is abnormal. ► Troubleshooting method • Check the BOOTP or DHCP server. • If the server is normal, check the network setting. Copyright© 1995-2013 SAMSUNG. All rights reserved. 4-173...
- Page 310 24V power for main board is less than 1.5V. ► Troubleshooting method 1) Turn the machine off. 2) Unplug the power cable. 3) Remove the rear cover. 4) Replace the SMPS board. 5) Assemble the rear cover. Turn the machine on. 4-174 Copyright© 1995-2013 SAMSUNG. All rights reserved.
- Page 311 5V power for main board is less than 0.88V. ► Troubleshooting method 1) Turn the machine off. 2) Unplug the power cable. 3) Remove the rear cover. 4) Replace the SMPS board. 5) Assemble the rear cover. Turn the machine on. Copyright© 1995-2013 SAMSUNG. All rights reserved. 4-175...
- Page 312 1) Turn the machine off. Re-install the fuser unit, then turn the machine on. 2) If the problem persists, turn the machine off. 3) Replace the fuser drive board. 4) If the problem persists, replace the main board. 4-176 Copyright© 1995-2013 SAMSUNG. All rights reserved.
-
Page 313: U1-Xxxx Type (Fuser) Error Code
5) Check the pressure control unit of the fuser. 6) If the problem persists, replace the fuser unit. 7) If the problem persists, replace the fuser pressure motor. 8) If the problem persists, replace the main board. Copyright© 1995-2013 SAMSUNG. All rights reserved. 4-177... - Page 314 5) If there are any defective parts in step5, replace the fuser unit. 6) If the problem persists, replace these parts in regular sequence. • Fuser Drive Board • Main board • SMPS board 4-178 Copyright© 1995-2013 SAMSUNG. All rights reserved.
- Page 315 5) If there are any defective parts in step5, replace the fuser unit. 6) If the problem persists, replace these parts in regular sequence. • Fuser Drive Board • Main board • SMPS board Copyright© 1995-2013 SAMSUNG. All rights reserved. 4-179...
-
Page 316: U2-Xxxx Type (Lsu) Error Code
Check that the LSU motor make a sound after turning the machine on. b) If the LSU Cable is defective, replace it. Check that the LSU motor make a sound after turning the machine on. c) If the problem persists, replace the LSU. 4-180 Copyright© 1995-2013 SAMSUNG. All rights reserved. - Page 317 If the status has not changed, LSU Hsync signal is abnormal. e) Turn the machine off. Unplug and reconnect the LSU cable. Check LSU Hsync signal once again. f) If the problem persists, replace the LSU. Copyright© 1995-2013 SAMSUNG. All rights reserved. 4-181...
-
Page 318: U3-Xxxx Type(Dsdf) Error Code
2) Open the DSDF cover. Remove the paper on Guide-Pick up Assy. 3) Check if the actuator and pick up assy operate normally. a) Check the operation of the regi sensor. b) If the regi sensor operation is OK, check the followings. 4-182 Copyright© 1995-2013 SAMSUNG. All rights reserved. - Page 319 4. Troubleshooting i) Remove 1 screw and push the hook. ii) Release the Stacker by pulling it to the direction of arrow. iii) Release the rear cover. iv) Remove the Bracket Hinge. Copyright© 1995-2013 SAMSUNG. All rights reserved. 4-183...
- Page 320 4) Check if there are any obstacles or contamination on the paper path. Remove it. 5) Close the DSDF cover. 6) Open the DSDF unit. Check if the reflection film is contaminated. Clean it. 7) Close the DSDF unit. 4-184 Copyright© 1995-2013 SAMSUNG. All rights reserved.
-
Page 321: Original Paper Jam Inside The Scanner
3) Check if the actuator and pick up assy operate normally. a) Check the operation of the regi sensor actuator and feed out sensor actuator. b) If the regi sensor operation is OK, check the followings. Copyright© 1995-2013 SAMSUNG. All rights reserved. 4-185... - Page 322 4. Troubleshooting i) Remove 1 screw and push the hook. ii) Release the Stacker by pulling it to the direction of arrow. iii) Release the rear cover. iv) Remove the Bracket Hinge. 4-186 Copyright© 1995-2013 SAMSUNG. All rights reserved.
- Page 323 5) Close the DSDF cover. 6) Open the DSDF unit. a) Check if the reflection film is contaminated. Clean it. b) If the problem persists, check the followings. i) Open the DSDF cover. Copyright© 1995-2013 SAMSUNG. All rights reserved. 4-187...
- Page 324 Remove the Guide Pick Up Upper after removing 4 screws. v) Check if the sensor is assembled correctly. If the sensor is defective, replace it. 7) Check if the simplex scan sensor connector is connected correctly. 8) Close the DSDF unit. 4-188 Copyright© 1995-2013 SAMSUNG. All rights reserved.
-
Page 325: Original Paper Jam Inside The Scanner
4) Check if there are any obstacles or contamination on the paper path. Remove it. 5) If the problem persists, check the followings. a) Remove the DSDF Unit and white sponge. b) Open the Guide Exit Lower Assy. Copyright© 1995-2013 SAMSUNG. All rights reserved. 4-189... - Page 326 Remove the screw. Check the sensor connection, If the connection is OK, replace the sensor. 6) Push the white bar. Check if it returns in original condition. 7) Close the DSDF unit. 4-190 Copyright© 1995-2013 SAMSUNG. All rights reserved.
-
Page 327: Original Paper Jam In The Exit Area Of Scanner
4) Check if there are any obstacles or contamination on the paper path. Remove it. 5) If the problem persists, check the exit sensor and connection. a) Remove the DSDF Unit and white sponge. Copyright© 1995-2013 SAMSUNG. All rights reserved. 4-191... - Page 328 Remove the Exit Lower after removing 4 screws. c) Check if the sensor and actuator are assembled correctly. 6) Push the white bar. Check if it returns in original condition. 7) Close the DSDF unit. 4-192 Copyright© 1995-2013 SAMSUNG. All rights reserved.
-
Page 329: Image Quality Problem
The first step is to generate prints using printable pages embedded in the printer on laser paper. The paper should be from an unopened ream that has been acclimated to room temperature and you should ensure that genuine Samsung Toner is installed in the printer. - Page 330 The pressure roller or heat roller in fuser unit defective. 1) Turn the machine off. 2) Remove and replace the fuser unit. 3) Turn the machine on. WARNING Do not touch the fuser unit while it is hot. 4-194 Copyright© 1995-2013 SAMSUNG. All rights reserved.
- Page 331 The LSU window is contaminated. 1) Clean the LSU window. 2) Replace the LSU The connection between the LSU and main board is defective. 1) Disconnect and reconnect the harness. 2) Replace the harness. Copyright© 1995-2013 SAMSUNG. All rights reserved. 4-195...
- Page 332 Period Replacement Unit OPC drum 94.4 mm Imaging Unit Charge roller 50.2 mm Developing roller 43.6 mm Transfer roller 58.4 mm Transfer Roller Heat roller 125.6 mm Fuser Unit Pressure roller 157 mm 4-196 Copyright© 1995-2013 SAMSUNG. All rights reserved.
- Page 333 The pressure roller or heat roller in fuser unit defective. 1) Turn the machine off. 2) Remove and replace the fuser unit. 3) Turn the machine on. WARNING Do not touch the fuser unit while it is hot. Copyright© 1995-2013 SAMSUNG. All rights reserved. 4-197...
- Page 334 The surface of transfer roller is contaminated or worn out. Replace the transfer roller. HVPS terminal is contaminated. Clean the contaminated terminal. The output from the HVPS is abnormal. Replace the HVPS board. 4-198 Copyright© 1995-2013 SAMSUNG. All rights reserved.
- Page 335 Replace the imaging unit. The HVPS contact terminal is contaminated. Clean the HVPS contact terminal. The output from the HVPS is abnormal. Replace the HVPS board. The LSU is defective. Replace the LSU. Copyright© 1995-2013 SAMSUNG. All rights reserved. 4-199...
- Page 336 3) Replace the transfer roller Assy. The transfer roller is improperly installed. • The toner level is not even on the imaging unit roller due to Replace the imaging unit. the bad blade. 4-200 Copyright© 1995-2013 SAMSUNG. All rights reserved.
- Page 337 Does recycle paper be used? Use the proper papers. The life of the imaging unit has been expired Replace the imaging unit. The output from the HVPS is abnormal. Replace the HVPS board. Copyright© 1995-2013 SAMSUNG. All rights reserved. 4-201...
- Page 338 WARNING Do not touch the fuser unit while it is hot. The HVPS contact terminal is contaminated. Clean the HVPS contact terminal. The output from the HVPS is abnormal. Replace the HVPS board. 4-202 Copyright© 1995-2013 SAMSUNG. All rights reserved.
- Page 339 The pressure roller or heat roller in fuser unit defective. 1) Turn the machine off. 2) Remove and replace the fuser unit. 3) Turn the machine on. WARNING Do not touch the fuser unit while it is hot. Copyright© 1995-2013 SAMSUNG. All rights reserved. 4-203...
- Page 340 1) Disconnect and reconnect the harness. 2) Replace the harness. The connection between the main board and HVPS board is Reconnect the harness. If the main board or HVPS board is bad. defective, replace it. 4-204 Copyright© 1995-2013 SAMSUNG. All rights reserved.
- Page 341 Reinstall the imaging unit. Print 10 sample pages for test. 2) If the problem persists, replace the imaging unit. The contact between imaging unit and transfer roller is bad. Check if the imaging unit and transfer roller are installed properly. Copyright© 1995-2013 SAMSUNG. All rights reserved. 4-205...
-
Page 342: Troubleshooting
Check the connection between the fuser unit and main board. The fuser unit defective. 1) Turn the machine off. 2) Remove and replace the fuser unit. 3) Turn the machine on. WARNING Do not touch the fuser unit while it is hot. 4-206 Copyright© 1995-2013 SAMSUNG. All rights reserved. -
Page 343: System Diagram
5. System Diagram 5. System Diagram Copyright© 1995-2013 SAMSUNG. All rights reserved. -
Page 344: Reference Information
To clean the frame and scan glass Black soft cloth To cover the OPC drum Service Install guide, User guide, When installing the machine. Installation Admin guide Software CD When installing the machine. Installation Copyright© 1995-2013 SAMSUNG. All rights reserved. - Page 345 To fix the unit or parts Service Screw, E-Ring • Clamp To form the harness Service Grease To remove the noise by gear. Service G-8050 : JC81–08663A (200g) • SPY272 : JC81–08664A (100g) • Copyright© 1995-2013 SAMSUNG. All rights reserved.
-
Page 346: Glossary
IP addresses to client hosts. Dual Inline Memory Module (DIMM), a small circuit board that holds memory. DIMM stores all DIMM the data within the machine like printing data, received fax data. Copyright© 1995-2013 SAMSUNG. All rights reserved. - Page 347 Hard Disk Drive (HDD), commonly referred to as a hard drive or hard disk, is a non-volatile storage device which stores digitally-encoded data on rapidly rotating platters with magnetic surfaces. Copyright© 1995-2013 SAMSUNG. All rights reserved.
- Page 348 As most faxes consist mostly of white space, this minimizes the transmission time of most faxes. Modified Modified READ (MMR) is a compression method recommended by ITU-T T.6. Copyright© 1995-2013 SAMSUNG. All rights reserved.
- Page 349 You just need NFC supported cell phone. In order to use this feature, Samsung Mobile Print app needs to be installed on your cell phone. Organic Photo Conductor (OPC) is a mechanism that makes a virtual image for print using a laser beam emitted from a laser printer, and it is usually green or rust colored and has a cylinder shape.
- Page 350 Windows Me and Windows XP. A scan can be initiated from within these operating systems by using a WIAcompliant scanner. Wi-Fi is a popular technology that allows an electronic device to exchange data wirelessly over a Wi-Fi computer network, including high-speed Internet connections. Copyright© 1995-2013 SAMSUNG. All rights reserved.
- Page 351 XML Paper Specification (XPS) is a specification for a Page Description Language (PDL) and a new document format, which has benefits for portable document and electronic document, developed by Microsoft. It is an XML-based specification, based on a new print path and a vector-based device-independent document format. Copyright© 1995-2013 SAMSUNG. All rights reserved.
-
Page 352: The Sample Pattern For The Test
6. Reference Information 6.3. The Sample Pattern for the Test The life of the toner cartridge and the printing speed are measured using the pattern shown below. Copyright© 1995-2013 SAMSUNG. All rights reserved. -
Page 353: Model Name And Code
- Applying Independent sub brand name by Segment : Xpress / ProXpress / MultiXpress 2) Model code Information • Basic Structure : [SL-●○○■□◆◆] ◆◆ : Function Information • Function Network Wireless Network Duplex Printing Reverse Type ADF XOA (eXtensible Open Architecture) Handset Auto Document Feeder Copyright© 1995-2013 SAMSUNG. All rights reserved. 6-10... -
Page 354: Document Revision List
6. Reference Information 6.5. Document Revision List Version Date Page Description 1.00 30/Jun/2014 Release 1.01 15/Jul/2014 P.135 Add card reader installation (Ch 3.3.19) 6-11 Copyright© 1995-2013 SAMSUNG. All rights reserved. - Page 355 CIS, Africa E.Asia, W.Asia, https://gspn2.samsungcsportal.com China, Japan N.America, S.America https://gspn3.samsungcsportal.com This Service Manual is a property of Samsung Electronics © 2013 Samsung Electronics Co.,Ltd. Co.,Ltd. All rights reserved. Any unauthorized use of Manual can be punished under Printed in Korea applicable International and/or domestic law.
Need help?
Do you have a question about the MultiXpress M537x series and is the answer not in the manual?
Questions and answers