Table of Contents
Advertisement
Quick Links
Advertisement
Table of Contents

Related Manuals for Craftex CX112


Summary of Contents for Craftex CX112
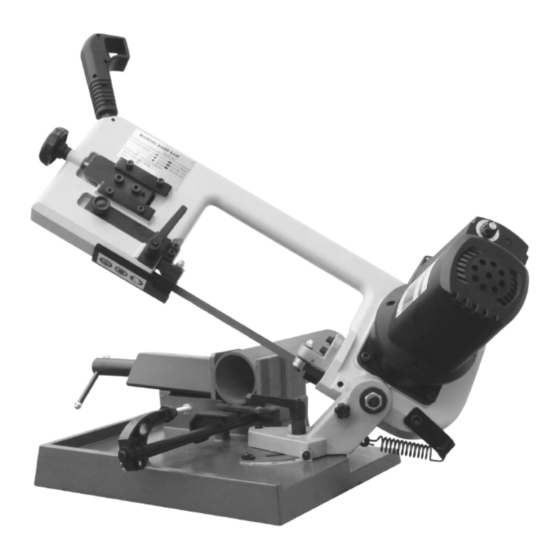
- Page 1 CX112 PORTABLE METAL BAND SAW User Manual Version 1.0...
-
Page 2: Table Of Contents
Table of Contents 1. General Safety Rules ........................1 Grounding Instructions ........................2 Electrical Schematic........................3 Before Cutting and Pump Grease ....................4 2. The Vise and Work Set Up......................4 Usage of the Vise.......................... 4 Work Set Up..........................4 3. -
Page 3: General Safety Rules
1. General Safety Rules WARNING FOR YOUR OWN SAFETY READ INSTRUCTION MANUAL BEFORE OPERATING BAND SAW Always wear approved safely glasses /face shields when using the machine. KEEP GUARDS IN PLACE and in working order. REMOVE ADJUSTING KEYS AND WRENCHES. Form habit of checking to see that keys and adjusting wrenches are removed from tool before turning it on. -
Page 4: Grounding Instructions
Table A Ampere Rating Volts Total length of cord in feet More Than Not More Than Minimum gage for cord 6 10 10 12 12 16 Not Recommended Grounding Instructions - In the event of a malfunction or breakdown, grounding provides a path of least resistance for electric current to reduce the risk of electric shock. -
Page 5: Electrical Schematic
Electrical Schematic - 3 -... -
Page 6: Before Cutting And Pump Grease
2. The Vise and Work Set Up Usage of the Vise BEFORE CUTTING Release the lock pin (A) in Fig.1 to release the saw. After service, must relock the saw The vise is mounted on the machine base. properly for your safety and carry. Failure to Follow the following steps to open or close the vise. -
Page 7: Special Safety Rules For Metal Saw
3. Special Safety Rules for Metal stainless steel, steel, iron, brass, aluminum and so on. ․ Make sure the direction of rotation arrow on the blade matches the direction arrow on the saw. The WARNING: Make sure not to operate blade teeth should always point the band saw until it is completely downward at the front of the saw. -
Page 8: Whenever Saw Is Running
To avoid injury from accidental starting, always unplug saw before DANGER disconnecting the guard, installing or ․ Keep hands out of saw blade path. removing any blade, accessory or ․ Never cut anything freehand. attachment, or making any adjustment. ․ Never reach behind or beneath blade. To avoid an electrical shock, make ․... -
Page 9: Power Supply
If the motor does not start, press the stop 4. Power Supply button down immediately. UNPLUG THE TOOL. Check the saw blade to make sure Motor Specifications it turns freely. If the blade is free, try to start the motor again. If the motor still does not start that have to The DC motor used with this saw features the check the motor’s carbon brushes which... -
Page 10: Description And Characteristics
Be sure the blade isn’t in contact with the work when the motor is started. This CX112 portable band saw is made as light as 23 kg by weight allowing easy Run the motor allow the saw to come to full transport to any worksites. -
Page 11: Manual Cutting
Manual Cutting Changing Blade Feed Rate by Handle with Trigger Raise the saw arm up, to proper position Switch as shpown in Fig. 8. Push down the handle of trigger switch in for cutting material by hand. Angle Cutting The machine uses a swivel miter base for angle cutting from 0 ~ 60 degree. -
Page 12: Magnetic Switch
Turn the blade tension knob (W) in Fig.11, CAUTION: Make sure that the machine is Counter-clockwise and loosen the tension. disconnected from the power source before attempting to service the machine or installing and uninstalling any parts. Magnetic Switch The band saw is equipped with magnetic switch. (see Fig.13) designed for safe operation. -
Page 13: Adjusting Poor Cutting
Changing the Motor Carbon Brushes WARNING Do not make any adjustments, or load, unload work from vise when machine is running! If the motor is making an unusual noise then the carbon brushes may need to be replaced. Disconnect machine from power supply. Adjusting Poor Cutting Remove two tap screws connected with on/off switch box, and three Phillips head... -
Page 14: Adjust Assistant Plate
Adjust Assistant Plate The assistant plate offers support while cutting.It can move depending on the material length. If the working piece is longer than vise, adjust the assistant plate (Fig. 23, A) location to support the work piece. This plate makes cutting more stable and easy. -
Page 15: Part List & Explosion Drawings
- 13 -... - Page 16 - 14 -...
- Page 17 - 15 -...
- Page 18 This warranty shall not apply to consumable products such as blades, bits, belts, cutters, chisels, punches etceteras. Craftex shall in no event be liable for injuries, accidental or otherwise, death to persons or damage to property or for incidental contingent, special or consequential damages arising from the use of our products.
Need help?
Do you have a question about the CX112 and is the answer not in the manual?
Questions and answers