Danfoss ECL COMFORT User Manual
Hide thumbs
Also See for ECL COMFORT:
- User's manual and installation instructions (21 pages) ,
- User manual (47 pages) ,
- User manual (82 pages)
Table of Contents
Advertisement
Advertisement
Table of Contents

Subscribe to Our Youtube Channel
Related Manuals for Danfoss ECL COMFORT


Summary of Contents for Danfoss ECL COMFORT
- Page 1 ECL Comfort User's Guide *087R8073* *VI7CQ202* Installer's Guide...
- Page 2 If the system you are about to install differs from the shown diagram of a standard heating system, feel free to sketch an outline for comparison. Adaptation of systems, see section 10. List of components: ECL Comfort 300 Outdoor temperature sensor Flow temperature sensor, circuit I Return temperature sensor, circuit I...
-
Page 3: Table Of Contents
Table of Contents Sections in the Installer’s Guide The documentation for the ECL Comfort controller is composed of numbered sections. Only sections relevant to your ECL Comfort controller are included here. Before you start Installation Identifying the system type Mounting the ECL Comfort controller Electrical connections 230 V a.c. -
Page 5: Before You Start
Before you start Sketch your application The ECL Comfort controller series is designed for a wide range of heating, hot-water and cooling systems with different configurations and capacities. If your system differs from the diagrams shown in section 10, you may want to make a sketch of the system about to be installed. -
Page 6: Identifying The System Type
find the diagram which has the best resemblance with your system and make your own combinations. The functions can only be realized with ECL Comfort 300 and as of controller version 1.08. 10.1... - Page 7 10.2 Indirectly connected heating system and primarily connected storage charging system System settings Circuit Line Description Recomm. setting Closed valve / normal operation Pump P2 in DHW circuit, primary side 10.2a Indirectly connected heating system and primarily connected storage charging system System settings Circuit Line Description...
- Page 8 10.3 Indirectly connected heating system and primarily connected storage tank with built- in heating coil System settings Circuit Line Description Recomm. setting Closed valve / normal operation Pump P2 in DHW circuit, primary side...
- Page 9 The following heating systems are only applicable with relay module ECA 80 10.4 Indirectly connected heating system with mixing loop and secondarily connected storage charging system System settings Circuit Line Description Recomm. setting Influence on desired flow temperature Closed valve / normal operation Internal relationship between circuit I and II Pump P2 in DHW circuit, primary...
- Page 10 10.5 Indirectly connected heating system and secondarily connected storage charging system with mixing loop System settings Circuit Line Description Recomm. setting Influence on desired flow temperature Parallel operation of DHW and heating circuits Closed valve / normal operation Internal relationship between circuit I and II Pump P2 in DHW circuit, primary side...
- Page 11 10.6 Indirectly connected heating system and primarily connected storage charging system with pre-controlled circuit System settings Circuit Line Description Recomm. setting Closed valve / normal operation Pump P2 in DHW circuit, primary side 10.6a Indirectly connected heating system and primarily connected storage charging system with pre-controlled circuit System settings Circuit Line Description...
-
Page 12: Mounting The Ecl Comfort Controller
Mounting the ECL Comfort controller For easy access, you should mount the ECL Comfort controller near the system. Select one of the three following methods: • Mounting on a wall • Mounting on a DIN rail • Mounting in a panel Screws and rawlplugs are not supplied. - Page 14 If an ECA 80 module is to be applied, the jumpers 14-26-29 must be established additionally. 230 V a.c. connections - with safety thermostat Optional This circuit diagram is only valid if Danfoss actuators are used Establish these jumpers: 1-10-12-14 Safety thermostat: 4, 5 and 10 with ST- (safety thermostat) and jumper 2 to common N-terminal.
- Page 15 Terminal Description Max. load 1 (L) Supply voltage 230 V a.c. 2 (N) Supply voltage 230 V a.c. 3 M1 Actuator - open, circuit I 0.2 A / 230 V a.c. Actuator - close, circuit I 4 M1 0.2 A / 230 V a.c. alt.
- Page 16 If an ECA 80 module is to be applied, the jumpers 14-26-29 must be established additionally. 24 V a.c. connections - with safety thermostat Optional This circuit diagram is only valid if Danfoss actuators are used Establish these jumpers: 1-10-12-14 Safety thermostat: 4, 5 and 10 with ST- (safety thermostat) and jumper 2 to common N-terminal.
- Page 17 Terminal Description Max. load 1 (L) Supply voltage 24 V a.c. 2 (N) Supply voltage 24 V a.c. 3 M1 Actuator - open, circuit I 1.0 A / 24 V a.c. Actuator - close, circuit I 4 M1 1.0 A / 24 V a.c. alt.
-
Page 18: Connecting And Placing The Temperature Sensors
Connecting and placing the temperature sensors Connecting the temperature sensors and the bus Terminal Description Type (recomm.) 15 and 16 System device bus*, connections for room panel** / remote control** / ECA 60 / 62 (relay module) ECA 61 / 63 17 and 16 S1 Outdoor temperature ESMT sensor... - Page 19 It is important that the sensors are mounted in the correct position in your system. The temperature sensor mentioned below are sensors used for the ECL Comfort 200 and 300 series which not all will be needed for your application! Outdoor temperature sensor (ESMT)
- Page 20 Connecting the room panel / remote control The ECA 60 / 61 / 62 / 63 is activated by the setting in line 10 (section 32). The ECA 60 / 61 / 62 / 63 is powered by the system device bus which means that the bus must be active.
-
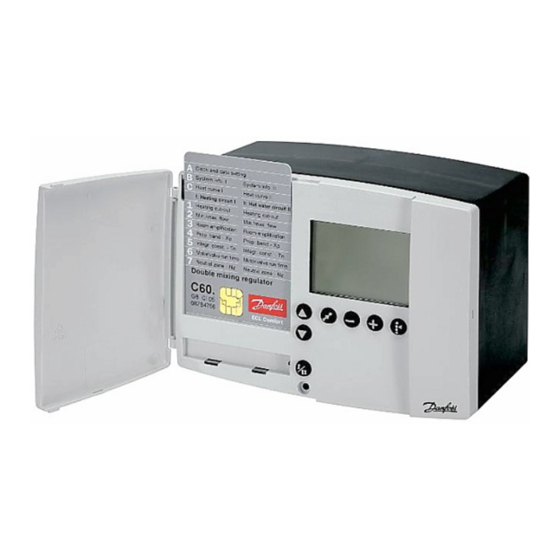
Page 22: Inserting The Ecl Card
Inserting the ECL Card How to insert your ECL Card the first time After the power has been switched on, open the lid on the front side of the controller. Place the ECL Card with the yellow side facing you. This enables the controller to read the ECL Card data. - Page 23 Understanding the ECL Card The ECL Card contains factory settings for a standard system. If the actual system differs from the standard system, the controller must be adjusted accordingly. After the adjustment, the new settings should be stored on the ECL Card.
-
Page 24: Adjusting The Ecl Card Settings
Adjusting the ECL Card settings General principles When the controller is connected and operating you can check and adjust all or some of the basic settings. Turn the ECL Card so that the grey side is facing you (see the example below). -
Page 25: Setting The Time And Date - Line A
Setting the time and date - line A Actual time Year Month, day Use the shift button to switch between minutes, hours, years, months and days. Set the correct time and date. In case of a power break, which lasts longer than 12 hours, the time and the date have to be set again. -
Page 26: Monitoring Temperatures And System Units - Line B
Monitoring temperatures and system units - line B Controlled units Flow Return temp. temp. Push and hold the shift button to see: - the calculated flow temperature - the desired return temperature limitations. This display can also show the actual and desired flow and return temperatures during DHW charging. -
Page 27: Manual Control - Line B
Manual control - line B Shift to manual mode. Controlled units Controller mode Choose the unit you want to control. The selected unit symbol will blink. Controlled units are switched OFF or ON when the relevant button is pushed. The motorized actuator (gear motor / damper) closes or opens... - Page 28 Setting the heat curve (circuit I), storage temperature (circuit II) - line C Slope Displacement Slope Circuit Setting range Factory setting 0.2 ... 3.4 The symbol for the slope of the heat curve will blink. Adjust the slope of the heat curve, if required.
- Page 29 Parallel displacement Circuit Setting range Factory setting -9 ... 9 K If you want to adjust the parallel displacement of the heat curve, push the shift button. The symbol for the parallel displacement will blink. Make your adjustments. Choose circuit II for the readout of the storage temperature.
-
Page 30: Heating Cut-Out - Line 1
Heating cut-out - line 1 Limit for heating cut-out Circuit Setting range Factory setting 10 ... 30 °C 20 °C Set the outdoor temperature limit at which you want the heating system to stop. The valve closes and after about 3 min. the heating circulation pump stops. -
Page 31: Flow Temperature Limits - Line 2
Flow temperature limits - line 2 Min. flow Max. flow temp. temp. Setting range Flow temperature limits, min. and max. Circuit Setting range Factory setting I / (II) 10 ... 150 °C min. 10 / (10), max. 90 / (90) °C The mentioned setting range and factory settings may vary from the settings on your ECL Card. -
Page 32: Room Temperature Influence - Line 3
Room temperature influence - line 3 This section is only relevant if you have installed a room sensor or ECA 60 / ECA 61 / ECA 62 / ECA 63. Min. Max. influence influence Room temperature influence Circuit Setting range Factory setting I / (II) 0 ... - Page 33 B: Reference room temperature control Used if your heating system is not equipped with radiator thermostats and you select the room with room sensor as a temperature reference for the rest of the rooms. (However, should you have a few radiator thermostats installed, make sure that they are fully open).
- Page 34 Control parameters - lines 4-7 Proportional band, Xp Circuit Setting range Factory setting I / (II) 1 ... 250 K 80 / (80) K Set the proportional band. A higher value will result in a stable but slow control of the flow temperature. Integration time constant, Tn Circuit Setting range...
- Page 35 Neutral zone, Nz Circuit Setting range Factory setting I / (II) 0 ... 9 K 3 / (3) K Set the neutral zone to a high value if you can accept a high variation in flow temperature. When the actual flow temperature is within the neutral zone, the controller does not activate the motorized valve.
-
Page 36: Cut-In And Cut-Out Temperature At Dhw Charging
Cut-in and cut-out temperature at DHW charging - lines 1-2, circuit II The controller can control the DHW temperature with either one or two tank temperature sensor(s). The controller will automatically register the number of sensors. Cut-out temperature difference - (lower sensor)* Circuit Setting range Factory setting... - Page 37 One sensor (S6) Temp. Cut-out difference - line 1 Cut-in difference - line 2 Cut-in Cut-out Charging temperature Time P2 / P3 If you only have one sensor installed (S6), this sensor will measure the cut-out temperature as well as the cut-in temperature. Two sensors (S5 + S6) Temp.
-
Page 38: Check List
Check list ✓ Is the ECL Comfort controller ready for use? Make sure that the correct power supply is connected to terminals 1 (Live) and 2 (Neutral). See section 12 or 13. Check that the required actuators, pumps, fans, dampers and burners are connected to the correct terminals. - Page 39 ✓ Adapting the ECL Comfort controller to the system Turn the ECL Card so that the grey side faces you and push , if necessary. Set the time and the date (line A). See section 17. Check that all settings in the controller (sections 30 and 31) are set or that the factory settings comply with your requirements.
-
Page 40: Ecl Card Settings
ECL Card settings (circuit I) Time and date Section 17 System information Sections 18 & 19 Heat curve Section 20 Setting ranges Factory settings Your settings Slope 0.2 ... 3.4 See section 20 Parallel displacement -9 ... 9 K See section 20 Limit for heating cut-out 10 ... -
Page 41: Time And Date
ECL Card settings (circuit II) Time and date Section 17 System information Sections 18 & 19 Storage tank sensor(s) Section 20 Setting ranges Factory settings Your settings Cut-out temperature difference 1 ... 99 K 15 K See section 27 Cut-in temperature difference 1 ... -
Page 42: Service Parameters
Service parameters (10-199) Circuit I (Heating) Lines Setting ranges Factory settings Your settings 10 Choice of room panel / remote control 1 ... 8 11 Setback temperature dependent on outdoor temperature OFF / -29 ... 10 °C -15 °C °C 12 Boost 0 ... - Page 43 Service parameters (10-199) Circuit I (Heating) Lines Setting ranges Factory settings Your settings 147 Acceptable temperature deviation below desired flow temperature (ΔT1 ALARM OFF / 1 ... 30 K 148 Acceptable temperature deviation above the desired flow temperature (ΔT2 ALARM 1 ...
- Page 44 Service parameters (10-199) Circuit II (DHW) Lines Setting ranges Factory settings Your settings 24 Gear motor / thermo actuator ON / OFF 30 Return temperature limitation 10 ... 110 °C 60 °C °C 35 Return temperature influence - max. limitation -9.9 ...
-
Page 46: Adjusting The Service Parameters
I - and circuit II, if available. If you want to copy the new settings to the ECL Card (recommended by Danfoss), see section 34. Make a note of your new settings in the parameter list in section When you have entered all your personal settings, turn the ECL Card over so that the yellow side faces you. - Page 47 Service parameter(s) 10-11 10 Choice of room panel / remote control Circuit Setting range Factory setting 1 ... 8 Decides the communication with the room panel or remote control. Please note that the room panel / remote control is only active if the system device bus is active.
- Page 48 Service parameter(s) 12-13 12 Boost Circuit Setting range Factory setting (I) / (II) 0 ... 99% (0) / (0)% Shortens the heating-up period by increasing the desired flow temperature by the percentage you set. Set the percentage at which you want the desired flow temperature increased temporarily.
- Page 49 Service parameter(s) 14-15 14 Optimizing time constant Circuit Setting range Factory setting (I) / (II) OFF / 10 ... 59 (OFF) / (OFF) Optimizes the start and stop times for the comfort temperature period to obtain the best comfort at the lowest energy consumption.
- Page 50 Service parameter(s) 17 17 Influence on desired flow temperature (T flow.ref(I) Circuit Setting range Factory setting OFF / 1 ... 20 K The desired flow temperature in heating circuit I can be influenced by an external reference. OFF: The desired flow temperature in circuit I is not influenced by any other controller (slave or circuit II).
- Page 51 Service parameter(s) 20-21 20 Optimization based on room / outdoor temperature Circuit Setting range Factory setting (I) / (II) ON / OFF (OFF) / (OFF) The optimized start and stop time can be based on either room or outdoor temperature. ON: Optimization based on room temperature, if measured.
- Page 52 Service parameter(s) 22-24 22 Pump exercise Circuit Setting range Factory setting I / (II) ON / OFF ON / (ON) Exercises the pump to avoid blocking in periods without heat demand. ON: The pump is switched ON for 1 minute every third day around noon.
- Page 53 Service parameter(s) 30-34 30 Return temperature limitation Circuit Setting range Factory setting 10 ... 110 °C 60 °C Set the return temperature you accept for the heating / DHW circuit. Set the acceptable return temperature limit. When the return temperature falls below or gets higher than the set value, the controller automatically changes the desired flow temperature to obtain an acceptable return temperature.
- Page 54 Service parameter(s) 31-34 31 Return temperature limitation - upper limit (X-axis) Circuit Setting range Factory setting (I) / (II) -60 ... 20 °C (15) / (15) °C Set the outdoor temperature value (see drawing). Set the outdoor temperature value (X coordinate) for the upper limit.
- Page 55 Service parameter(s) 35 35 Return temperature influence - max. limitation Circuit Setting range Factory setting (I) / (II) -9.9 ... 0 ... 9.9 (-2.0) / (-2.0) Set the influence from the return temperature on the desired flow temperature. Set the influence of the max. return temperature limitation (set in line 30 or lines 31-34).
- Page 56 Service parameter(s) 36 36 Return temperature influence - min. limitation Circuit Setting range Factory setting (I) / (II) -9.9 ... 0 ... 9.9 (0.0) / (0.0) Set the influence from the return temperature on the desired flow temperature. Set the influence of the min. return temperature limitation (set in line 30 or lines 31-34).
- Page 57 Service parameter(s) 37-41 37 Time constant for return temperature limitation Circuit Setting range Factory setting (I) / (II) OFF / 1 ... 50 (25) / (25) Controls how fast the actual return temperature adapts to the desired return temperature limitation. Adjust the time constant for the return limitation.
- Page 58 Service parameter(s) 43 43 Parallel operation of DHW and heating circuits Circuit Setting range Factory setting OFF / 1 ... 99 K Choose whether the heating circuit is to operate in dependence of the DHW circuit. OFF: Independent parallel operation, i.e. the DHW and the heating circuits operate independently of each other.
- Page 59 Service parameter(s) 44-52(I) 44 Max. DHW charging time Circuit Setting range Factory setting OFF / 1 ... 100 min. When the set max. DHW charging time expires, the charging is deactivated. OFF: If the DHW temperature is lower than the DHW charging cut-in temperature, the DHW charging remains active for unlimited time.If the DHW temperature is higher than...
- Page 60 Service parameter(s) 52(II)-55 52 Compensation of heat loss in circulation circuit Circuit Setting range Factory setting ON / OFF In primarily connected storage charging systems (system types 2, 2a, 6 and 6a, section 10), you can choose to compensate for the heat loss of the circulation circuit.
- Page 61 Service parameter(s) 78-83 78 Desired temperature for anti-bacteria function Circuit Setting range Factory setting OFF / 1 ... 100 °C Set the desired temperature for the anti-bacteria function. The DHW will be charged once a week at the set temperature to protect against bacteria.
- Page 62 Service parameter(s) 84 84 Pump P2 in DHW circuit, primary side Circuit Setting range Factory setting ON / OFF This setting is only used for system type 6a in connection with line 52-II = OFF. Choose whether DHW pump P2 is to be used as circulation pump in the primary side or as DHW charging pump.
- Page 63 Service parameter(s) 85 85 Assignment (number) of heat meters Circuit Setting range Factory setting ON / OFF If the flow or heating supply has to be limited, the number of heat meters and their position must be determined. Two heat meters are used. This setting only applies to heating system types 2, 2a, 3, 6, and 6a with primarily connected DHW.
- Page 64 Service parameter(s) 140 140 Function of temperature sensor S5 Circuit Setting range Factory setting ON / OFF For heating system types 2, 2a, 3 and 6a, sensor S5 can be used optionally as lower DHW tank temperature sensor (cut- out temperature) or as return temperature sensor in circuit II (limitation of the return temperature).
- Page 65 Service parameter(s) 141 141 Override input selection Circuit Setting range Factory setting (I) / (II) OFF / 1 ... 6 (OFF) / (OFF) Choose an unused temperature sensor input for overriding the schedule for circuit I and / or circuit II. The override can be activated for comfort or setback mode.
- Page 66 Service parameter(s) 147 147 Acceptable temperature deviation below desired flow temperature (ΔT1 ALARM Circuit Setting range Factory setting (I) / (II) OFF / 1 ... 30 K (OFF) / (OFF) The alarm is activated if the actual flow temperature drops too much below the desired flow temperature.
- Page 67 Service parameter(s) 148 148 Acceptable temperature deviation above the desired flow temperature (ΔT2 ALARM Circuit Setting range Factory setting (I) / (II) 1 ... 30 K (5) / (5) K The alarm is activated if the actual flow temperature rises too much above the desired flow temperature.
- Page 68 Service parameter(s) Service parameter(s) 149 149 Time interval Δt before activation ALARM of alarm function Circuit Setting range Factory setting (I) / (II) 1 ... 99 min. (10) / (10) min. If an alarm condition from either line 147 or 148 is present for a longer time than the time interval Δt , the alarm function is ALARM...
- Page 69 Service parameter(s) 174-198 174 Motor protection Circuit Setting range Factory setting (I) / (II) OFF / 10 ... 59 min. (OFF) / (OFF) Prevents the controller from unstable temperature control (and resulting actuator oscillations). This can occur when there is no DHW tapping, i.e.
- Page 70 1 ... 9. The bus is active and connected ECAs are powered. The ECL Comfort controllers can be connected via the bus to perform a larger system. The controller, which is physically connected with the outdoor temperature sensor, is the master of the entire system and automatically gets the address 15.
- Page 71 The grey side of the ECL Card...
-
Page 72: Copying With The Ecl Card
Copying with the ECL Card Check the ECL Card and the software generations (see following example). Insert the ECL Card with the yellow side facing you. Go to line 8 (is not displayed), which is the first line below line 7. Application type Software Software version,... - Page 73 Copy personal settings to additional controller(s) in identical systems Ensure that the other controller(s) use(s) the same ECL Card type. (If this is not the case, please read section 15). Insert the ECL Card, which contains the personal settings, with the yellow side facing you. Go to line 9 (is not displayed), which is the second line below line 7 Select the copying direction (from the card to the...
-
Page 74: Factory Settings
Desired room temperature Temperature which is set as the desired room temperature. The temperature can only be controlled by the ECL Comfort controller if a room temperature sensor is installed. If a sensor is not installed, the set desired room temperature however still influences the flow temperature. - Page 75 Flow temperature control based on the outdoor temperature. The control is related to a user-defined heat curve. The definitions apply to the Comfort 200 as well as ECL Comfort 300 series. Consequently, you might come across expressions that are not mentioned in your guide.
- Page 76 Switch the power off and on again to see the system type and the software generation of the controller. Order a replacement from your Danfoss representative. Insert the new ECL Card with the yellow side facing you and make sure that you copy your personal settings from the controller to the ECL Card.
- Page 77 Push the + button to copy. See section 5. This is a collection of frequently asked questions for the ECL Comfort 200 as well as ECL Comfort 300 series. Consequently, you might come across some questions that do not apply to your application.
- Page 78 One of the primary advantages of the controller is the setting security. If you remove the ECL Card, and the ECL Comfort controller is not operated during the next 25 minutes (approx.): - the controller returns to display line C (section 1)
- Page 79 Restore ECL Card data After establishing your favorite temperatures, comfort periods etc., and after copying these to the ECL Card, you can set alternative settings. Insert the ECL Card and make the temporary settings, e.g. for holidays, but do not copy these. To restore your favorite settings, copy these from the ECL Card to the controller.
- Page 80 Set your personal schedule Monitor the current schedules Select between lines 1-7 (Monday, Tuesday ..Sunday) to see your individual schedules. Changeover time Line Circuit Time line Periods with comfort temp. are shown as black bars Change the schedules Select appropriate day. The changeover point blinks Adjust the first blinking changeover point, if required.
- Page 81 Add an extra comfort period Push the shift and + button simultaneously for 2 seconds. The new period appears Adjust the new period. Remove a comfort period Select the period to be removed (blinking changeover point) Push shift and - buttons simultaneously for 2 seconds.
- Page 82 Select circuit mode During scheduled operation (clock), the state indicator (a white arrow) will show you the control mode of the selected circuit. The white arrow will blink when this is a heating circuit and it is in the optimizing period. The mode can be set differently for each circuit by means of the function selector.
- Page 83 Set your room and DHW charging temperature Go to display C. Circuit I: Setting the desired room temperature Desired room Desired room temp. in comfort temp. in setback mode mode Select the constant comfort mode. Set the desired room temperature for the comfort mode.
-
Page 84: Choose Your Favorite Display
Choose your favorite display (circuit I) Choose the display - A, B, or C - for daily operations. Room temperature - display A Room temp. (ECA 60 / 61) Line Circuit Outdoor Desired room temp. temp. The display will only show a value if an ECA 60 / 61 is connected. If not, two bars will be shown. - Page 85 Choose your favorite display (circuit II) Choose the display - A, B, or C - for daily operations. DHW temperature - display A Upper tank temp. (S6) Line Circuit Desired charging temp. (S4) System information - display B State of controlled units Line Circuit Charging...
- Page 86 Schedule, DHW circulation pump (P3) Choose the schedule of the circulation pump by pushing the button until there is no circuit indication (display / lights). Go to display C. Schedule of the circulation pump (P3) - display C Start / end time Line Circulation pump schedule There is one common schedule for all days of the week.
- Page 87 The ECL Comfort controller is designed by Danfoss for the automatic temperature control of heating, hot-water, ventilation and cooling systems. Some of the advantages of the ECL Comfort controller system are: • Secure control and the optimum use of energy resources.
-
Page 88: Select Circuit Mode
9 12 15 18 21 24 1 Monday 2 Tuesday 3 Wednesday 4 Thursday 5 Friday 6 Saturday 7 Sunday 8-23 Factory settings are grey. The functions can only be realized with ECL Comfort 300 and as of controller version 1.08.
Need help?
Do you have a question about the ECL COMFORT and is the answer not in the manual?
Questions and answers