Table of Contents
Advertisement
FCC and IC Compliance Statement
Xi5 ASM‑FT PEDAL, INC, WRLS FCC ID ‑ MVU09291
Xi5 ASM‑KEY FOB, TROLLING MOTR FCC ID ‑ MVU09305
ACMA: N2523
IC: 6094A‑09291, 6094A‑09305
This device complies with part 15 of the FCC Rules. Operation is subject to the following two conditions:
1.
This device may not cause harmful interference.
2.
This device must accept any interference received including interference that may cause undesired operation.
This device complies with FCC Rules. Changes or modifications not expressly approved by MotorGuide could void the
user's authority to operate the equipment.
Thank You
Thank you for purchasing a MotorGuide Xi5 Wireless Trolling Motor.
The Xi5 is designed and engineered to deliver the performance that anglers expect: quiet operation, reliability, and
precise control. We're confident that the Xi5 will enhance your fishing experience and we appreciate that you chose
MotorGuide.
Please take a moment to register your new Xi5 at motorguide.com—or complete and mail the enclosed Warranty
Registration Card.
Warranty Message
The product you have purchased comes with a Limited Warranty from MotorGuide. The terms of the policy are set
forth in the Warranty Information section of this manual. The policy statement contains a description of the duration of
coverage, important disclaimers and limitations of damages, and other related information. Please review this
important information.
The description and specifications contained herein were in effect at the time this manual was approved for printing.
MotorGuide, whose policy is one of continued improvement, reserves the right to discontinue models at any time, to
change specifications, designs, methods, or procedures without notice and without incurring obligation.
MotorGuide, Lowell, Michigan U.S.A.
© 2013, Mercury Marine
Cradle Lock is a trademark of Brunswick Corporation.
Mercury, Mercury Marine, and MotorGuide are registered trademarks of Brunswick Corporation. Mercury Product
Protection logo is a registered service mark of Brunswick Corporation.
Eagle and Lowrance are registered trademarks of Navico Inc. Garmin is a registered trademark of Garmin Ltd.
Humminbird is a registered trademark of Johnson Outdoors Marine Electronics, Inc. Vexilar is a registered trademark of
Vexilar, Inc.
Advertisement
Table of Contents
Troubleshooting

Related Manuals for MotorGuide Xi5


Summary of Contents for MotorGuide Xi5
- Page 1 Thank you for purchasing a MotorGuide Xi5 Wireless Trolling Motor. The Xi5 is designed and engineered to deliver the performance that anglers expect: quiet operation, reliability, and precise control. We’re confident that the Xi5 will enhance your fishing experience and we appreciate that you chose MotorGuide.
-
Page 3: Table Of Contents
TABLE OF CONTENTS Section 1 - Warranty Information MotorGuide Two Year Limited Warranty........2 Section 2 - General Information and Component Identification Component Identification............6 While You Are Trolling............7 Recording the Serial Number............. 6 While the Boat Is Stationary..........7 Product Registration.............. - Page 4 Service Assistance..............33 Mercury Marine Service Offices..........34 Page ii 90-8M0082949 JULY 2013...
- Page 5 Section 1 - Warranty Information Section 1 - Warranty Information Table of Contents MotorGuide Two Year Limited Warranty........ 2 90-8M0082949 JULY 2013 Page 1...
-
Page 6: Motorguide Two Year Limited Warranty
MotorGuide Composite Shaft Limited Lifetime Warranty. MotorGuide composite shafts are warranted to the original retail purchaser to be free of defects in material or workmanship for the lifetime of the original purchaser. MotorGuide will provide a new composite shaft at no cost for any composite shaft which contains a defect in material or workmanship. The installation costs are the sole responsibility of the purchaser. - Page 7 Section 1 - Warranty Information 12. ALL INCIDENTAL OR CONSEQUENTIAL DAMAGES ARE EXCLUDED FROM THIS WARRANTY, WARRANTIES OF MERCHANTABILITY AND FITNESS ARE EXCLUDED FROM THIS WARRANTY, IMPLIED WARRANTIES ARE LIMITED TO THE LIFE OF THIS WARRANTY. SOME STATES DO NOT ALLOW LIMITATIONS ON HOW LONG AN IMPLIED WARRANTY LASTS OR THE EXCLUSION OR LIMITATION OF INCIDENTAL OR CONSEQUENTIAL DAMAGES, SO THE ABOVE LIMITATIONS OR EXCLUSIONS MAY NOT APPLY TO YOU.
- Page 8 Section 1 - Warranty Information Notes: Page 4 90-8M0082949 JULY 2013...
-
Page 9: Section 2 - General Information And Component Identification
Section 2 - General Information and Component Identification Section 2 - General Information and Component Identification Table of Contents Component Identification............6 While You Are Trolling ............ 7 Recording the Serial Number..........6 While the Boat Is Stationary ........... 7 Product Registration............... -
Page 10: Component Identification
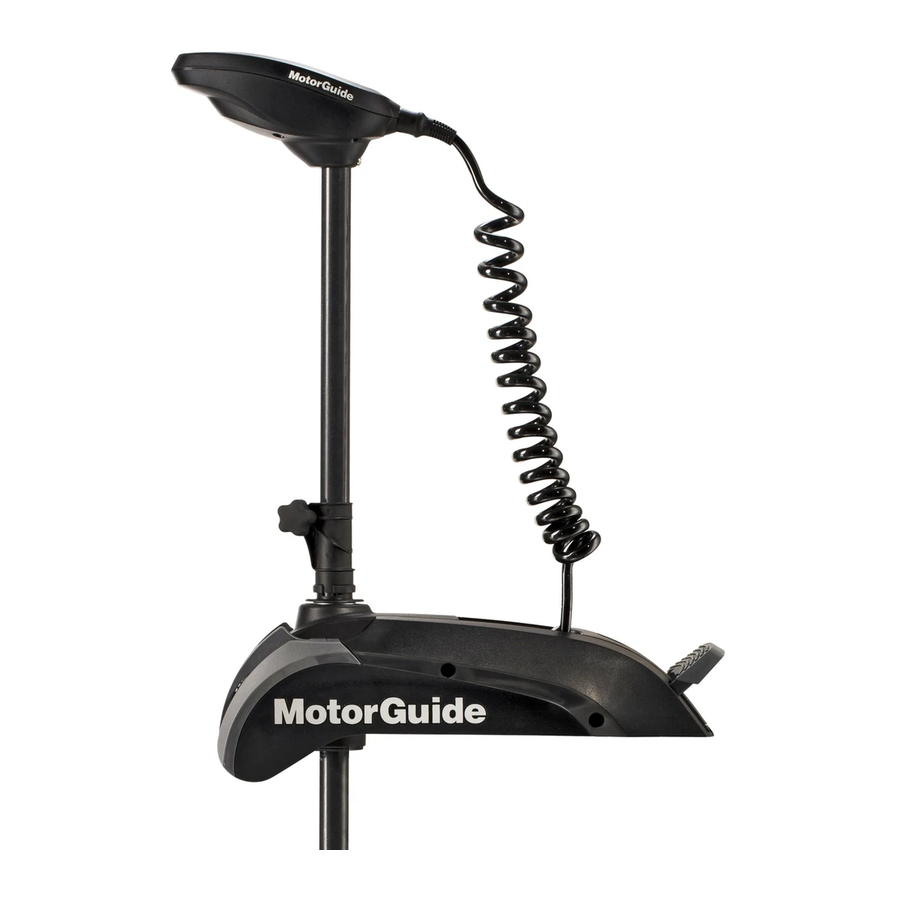
Section 2 - General Information and Component Identification Component Identification Head Curly cable Stow/deploy release lever Battery cables (hidden) Wireless foot pedal Handheld wireless remote Deck mount Propeller Skeg Lower unit (motor) Depth collar Depth collar knob Composite column Steering transmission 53443 Recording the Serial Number It is important to record the serial number and model number for future reference. -
Page 11: Product Registration
Section 2 - General Information and Component Identification Product Registration For warranty purposes, please register your MotorGuide trolling motor by completing the enclosed warranty card or by visiting www.motorguide.com. Boater's Responsibilities The operator (driver) is responsible for the correct and safe operation of the boat and safety of its occupants and general public. - Page 12 Section 2 - General Information and Component Identification Report accidents. Boat operators are required by law to file a Boating Accident Report with their state boating law enforcement agency when their boat is involved in certain boating accidents. A boating accident must be reported if 1) there is loss of life or probable loss of life, 2) there is personal injury requiring medical treatment beyond first aid, 3) there is damage to boats or other property where the damage value exceeds $500.00 or 4) there is complete loss of the boat.
-
Page 13: Section 3 - Product Installation, Wiring, And Battery Information
Section 3 - Product Installation, Wiring, and Battery Information Section 3 - Product Installation, Wiring, and Battery Information Table of Contents Installing the Trolling Motor..........10 Battery Connection............... 13 Recommended Practice and Procedures......12 12‑Volt Battery Connection ........... 13 Battery Recommendations........... 12 24‑Volt Battery Connection ........... -
Page 14: Installing The Trolling Motor
53446 If you are replacing an existing MotorGuide or competitive brand trolling motor on your current boat, check if the existing mounting holes align with the new deck mount before drilling new holes. Ensure that the mounting location meets the requirements listed in Step 4. - Page 15 Section 3 - Product Installation, Wiring, and Battery Information IMPORTANT: To help prevent cracking on fiberglass decks, use a countersink bit or a larger drill bit to countersink the mounting holes. Align the deck mounting bracket to the holes in the deck. On fiberglass boats with no carpet where the motor is being installed, install the rubber isolators between the boat deck and the deck mounting bracket.
-
Page 16: Recommended Practice And Procedures
• Install a manual reset circuit breaker in line with the trolling motor positive leads within 180 cm (72 in.) of the batteries. These can be purchased from your local MotorGuide retailer or from www.motorguide.com. • Do not extend the included 10‑gauge battery cables more than 1.8 m (6 ft) for a total of 3 m (10 ft). If longer battery cables are required, MotorGuide offers accessory 13 mm (6‑gauge) battery cables. -
Page 17: Electrolysis
Section 3 - Product Installation, Wiring, and Battery Information Electrolysis Using the main engine battery as a power source for the trolling motor may cause electrolysis on metallic parts. If the motor and battery wiring are installed correctly and electrolysis issues continue, separate the trolling motor from any other boat electronics. -
Page 18: 24-Volt Battery Connection
Section 3 - Product Installation, Wiring, and Battery Information Starting with the positive (+) lead, reconnect the battery cables to the engine starting battery. 12-volt battery connection with common ground bond Power cables to trolling motor Manual reset circuit breaker Trolling motor battery Engine starting battery Power cables to engine... -
Page 19: Activating The Wireless Foot Pedal
Section 3 - Product Installation, Wiring, and Battery Information Starting with the positive (+) lead, reconnect the battery cables to the engine starting battery. 36-volt battery connection Power cables to trolling motor Manual reset circuit breaker Jumper wire (not supplied) Negative (–) battery terminal Battery A Battery B... -
Page 20: Connecting The Sonar Display To The Trolling Motor
Eagle, Garmin, Humminbird, Lowrance, and Vexilar brand sonar displays. For compatibility with other sonar units, refer to www.motorguide.com. The trolling motor is equipped with a Lowrance 6‑pin plug. Adapters are available to connect other brands of sonar displays to the trolling motor. - Page 21 Section 4 - Trolling Motor Operation Section 4 - Trolling Motor Operation Table of Contents Status Indicator Light Identification........18 Direction Control ............21 Stowing and Deploying the Trolling Motor......18 Speed Control ............... 22 Stowing the Trolling Motor ..........18 Handheld Remote Operation..........
-
Page 22: Status Indicator Light Identification
Section 4 - Trolling Motor Operation Status Indicator Light Identification This trolling motor is equipped with a multifunction status indicator light panel. It can display the status of the motor, propeller, battery charge, and GPS status for quick and easy reference during operation. Power on/off indicator light Propeller on/off indicator light GPS navigation indicator light... -
Page 23: Deploying The Trolling Motor
Steering transmission Depth collar Depth collar knob 51780 NOTE: Optional mounts are available for supporting the trolling motor in extremely rough boating conditions. Recommended MotorGuide Accessory Description Part Number ® 8M4000977 Standard Ram mount stabilizer ®... -
Page 24: Adjusting The Motor Depth
Section 4 - Trolling Motor Operation Tilt the motor out of the stowed position and lower the trolling motor until the depth collar rests on top of the steering housing collar. Rotate the trolling motor so the depth collar locks into position on the steering housing collar and release the stow/deploy release lever. -
Page 25: Foot Pedal Operation
Section 4 - Trolling Motor Operation Foot Pedal Operation WARNING Rotating propellers can cause serious injury or death. Never start or operate the motor out of water. WARNING Avoid possible serious injury from unexpected acceleration and boat movement when activating the trolling motor. When using the foot‑pedal, the motor will start up at the last selected speed and course settings. -
Page 26: Speed Control
Section 4 - Trolling Motor Operation Speed Control WARNING Avoid possible serious injury from unexpected acceleration and boat movement when activating the trolling motor. When using the foot‑pedal, the motor will start up at the last selected speed and course settings. Before pressing the foot‑pedal, hold on to a seat or handhold, and advise passengers to do the same. -
Page 27: Steering
Section 4 - Trolling Motor Operation Steering • To turn left, press the left turn button on the handheld remote. • To turn right, press the right turn button. • The available steering range allows the trolling motor to turn beyond 360° for operation in reverse. Speed Control •... - Page 28 Section 4 - Trolling Motor Operation Notes: Page 24 90-8M0082949 JULY 2013...
- Page 29 Section 5 - Maintenance and Storage Section 5 - Maintenance and Storage Table of Contents Trolling Motor Care............... 26 Storage Preparation............. 27 Selecting Replacement Parts ........26 Battery Inspection..............27 Inspection and Maintenance Schedule......... 26 Propeller Replacement............27 Before Each Use ............26 Removing the Propeller ..........
-
Page 30: Trolling Motor Care
Every 100 Hours of Use or Annually (Whichever Occurs First) Apply 2‑4‑C with PTFE to the depth collar knob screw threads. NOTE: 2‑4‑C with PTFE is a marine grease available at marine supply stores and your MotorGuide dealer. Tube Ref No. -
Page 31: Storage Preparation
Section 5 - Maintenance and Storage Apply 2‑4‑C with PTFE to the slot on the foot release lever linkage on each side of the deck mount. Press the foot release lever and apply more 2‑4‑C with PTFE to the slot, equally distributing the grease along the length of the slot. Slot 53466 IMPORTANT: Never use an aerosol lubricant or solvent‑based lubricant to grease or oil any part of the trolling motor. -
Page 32: Installing The Propeller
Section 5 - Maintenance and Storage IMPORTANT: Remove the propeller nut with a wrench or a ratchet and socket. Using another tool may damage the propeller nut or shaft. If the propeller cannot be removed easily, use a rubber mallet to lightly tap the back side of the opposite blade. -
Page 33: Section 6 - Owner Service Assistance
Section 6 - Owner Service Assistance Section 6 - Owner Service Assistance Table of Contents Troubleshooting..............30 Foot Pedal Battery Replacement ........31 Troubleshooting the Foot Pedal and Handheld Remote..31 Handheld Remote Battery Replacement ...... 32 Erasing the Receiver's Memory ........31 Service Assistance............... -
Page 34: Troubleshooting
Section 6 - Owner Service Assistance Troubleshooting NOTE: For service information, contact any certified MotorGuide service center. For a full listing of MotorGuide service centers, go to www.motorguide.com or contact any Mercury Marine service office. Symptom Possible Cause Resolution Weak trolling motor Check the battery charge indicator on the trolling motor. -
Page 35: Troubleshooting The Foot Pedal And Handheld Remote
Section 6 - Owner Service Assistance Symptom Possible Cause Resolution Weak trolling motor Check the battery charge indicator on the trolling motor. batteries Recharge or replace the battery as required. Loose or corroded battery Inspect battery connections for cleanliness and tightness. connections Wiring or electrical Wire gauge from the battery to the trolling motor is insufficient. -
Page 36: Handheld Remote Battery Replacement
Section 6 - Owner Service Assistance Remove the two screws securing the battery cover plate. Remove the battery cover plate. Battery cover plate Screws 51760 Remove the batteries from the battery holder. Install the new batteries in the proper orientation for correct polarity. Ensure the rubber seal is positioned correctly around the battery cover plate. -
Page 37: Service Assistance
Your satisfaction with your product is very important to us. If you have a problem or question about your motor, contact your dealer or any certified MotorGuide Service Center. For more service assistance information, refer to Section 1 ‑ Warranty Information. -
Page 38: Mercury Marine Service Offices
Section 6 - Owner Service Assistance The following information will be needed by the service office: • Your name and address • Daytime telephone number • Model and serial number of your trolling motor • Proof of purchase or registration verification •...
Need help?
Do you have a question about the Xi5 and is the answer not in the manual?
Questions and answers