MotorGuide Tour Manuam
Hide thumbs
Also See for Tour:
- Owner's instructions manual (22 pages) ,
- Owner's instruction manual (21 pages)
Table of Contents
Advertisement
Thank You
Thank you for choosing MotorGuide
with a motor designed to deliver Digital Variable Speed Control and maximum time on the water.
The Tour Series was designed with quality and durability in mind. The all‑metal construction provides years of reliability
with un‑matched control and feel. The stainless‑steel cables and pulleys allow you to concentrate less on boat control and
more on fishing. Couple these mechanics with MotorGuide Digital electronics, and you have one of the most popular trolling
motors in the fishing world.
Through the alliance between MotorGuide and Lowrance, we have co‑developed one of the quietest, most accurate
transducer integrated trolling motors ever built. The 200/83 kHz transducer provides an accurate sonar plot and a
responsive temperature reading. This combination is sure to improve your fishing, season after season.
Remember to keep your receipt and immediately register your trolling motor. A warranty card is enclosed or you can
complete registration on the internet at www.motorguide.com.
At MotorGuide, we believe there are some things you should Never Stop doing.
NEVER STOP LEARNING, NEVER STOP IMPROVING,
AND NEVER, EVER STOP FISHING.
Warranty Message
The product you purchased comes with a Limited Warranty from MotorGuide. The terms of the policy are set forth in the
Warranty Information section of this manual. The policy statement contains a description of the duration of coverage,
important disclaimers and limitations of damages, and other related information. Please review this important
information.
The description and specifications contained herein were in effect at the time this manual was approved for printing.
MotorGuide, whose policy is one of continued improvement, reserves the right to discontinue models at any time, to change
specifications, designs, methods, or procedures without notice and without incurring obligation.
MotorGuide, Tulsa, Oklahoma U.S.A.
Litho in U.S.A.
© 2009, Mercury Marine. All Rights Reserved. Reproduction in whole or in part without permission is prohibited.
Safari is a trademark of Brunswick Corporation.
Mercury, Mercury Marine, MerCruiser, Mercury MerCruiser, Mercury Racing, MotorGuide, Gator, Machete, Mercury
Precision Parts, Mercury Propellers, Mariner, Quicksilver, #1 On The Water, Alpha, Bravo, Bravo Two, Pro Max, OptiMax,
Sport‑Jet, K‑Planes, MerCathode, SmartCraft, Total Command, VesselView, Zero Effort, Zeus, M with Waves logo,
Mercury with Waves logo, and SmartCraft logo are all registered trademarks of Brunswick Corporation. Mercury Product
Protection logo is a registered service mark of Brunswick Corporation.
Lowrance is a registered trademark of Navico Inc. Garmin is a registered trademark of Garmin Ltd. Vexilar is a registered
trademark of Vexilar, Inc.
®
Tour Series. MotorGuide capitalized on many years of experience to provide you
Advertisement
Table of Contents

Related Manuals for MotorGuide Tour


Summary of Contents for MotorGuide Tour
- Page 1 Warranty Message The product you purchased comes with a Limited Warranty from MotorGuide. The terms of the policy are set forth in the Warranty Information section of this manual. The policy statement contains a description of the duration of coverage, important disclaimers and limitations of damages, and other related information.
-
Page 3: Table Of Contents
Tour Lowrance Sonar Series..........6 Boater's Responsibilities............8 Tour Series................7 Safe Boating Suggestions............8 Section 3 - Product Installation, Wiring, and Battery Information Tour Gator 21 Spring Mount Installation........12 Wire and Cable Routing............14 Gator Flex 360.................13 Establishing A Common Ground..........15 Foot‑Pedal Permanent Installation...........13 Battery Connection.............. - Page 4 Page ii 90-8M4002564 JANUARY 2010...
- Page 5 Section 1 - Warranty Information Section 1 - Warranty Information Table of Contents MotorGuide Limited Warranty..........2 90-8M4002564 JANUARY 2010 Page 1...
-
Page 6: Motorguide Limited Warranty
MotorGuide Marine to distribute the product in the country in which the sale occurred. Warranty coverage and duration varies by the country in which the owner resides. This warranty applies to MotorGuide Trolling Motors sold and used in the United States. - Page 7 Section 1 - Warranty Information 12. ALL INCIDENTAL OR CONSEQUENTIAL DAMAGES ARE EXCLUDED FROM THIS WARRANTY, WARRANTIES OF MERCHANTABILITY AND FITNESS ARE EXCLUDED FROM THIS WARRANTY, IMPLIED WARRANTIES ARE LIMITED TO THE LIFE OF THIS WARRANTY. SOME STATES DO NOT ALLOW LIMITATIONS ON HOW LONG AN IMPLIED WARRANTY LASTS OR THE EXCLUSION OR LIMITATION OF INCIDENTAL OR CONSEQUENTIAL DAMAGES, SO THE ABOVE LIMITATIONS OR EXCLUSIONS MAY NOT APPLY TO YOU.
- Page 8 Section 1 - Warranty Information Notes: Page 4 90-8M4002564 JANUARY 2010...
-
Page 9: Section 2 - General Information And Component Identification
Section 2 - General Information and Component Identification Table of Contents Component Identification............6 Recording Serial Number............8 Tour Lowrance Sonar Series .......... 6 Boater's Responsibilities............8 Tour Series ..............7 Safe Boating Suggestions............8 90-8M4002564 JANUARY 2010 Page 5... -
Page 10: Component Identification
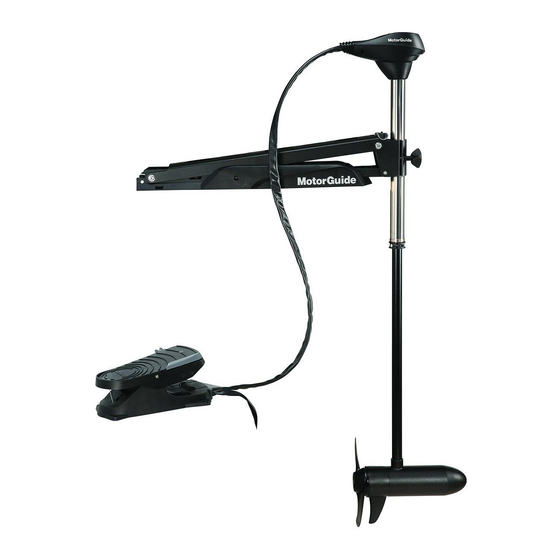
Section 2 - General Information and Component Identification Component Identification Tour Lowrance Sonar Series 41368 Top housing Directional indicator Tour Gator 21 Spring mount Foot‑pedal Lowrance 7‑pin connector cable Gator Flex 360 Tour Gator 24 Spring mount Propeller Tour sonar lower unit Nose cone Stainless‑steel column... -
Page 11: Tour Series
Section 2 - General Information and Component Identification Tour Series 41568 Top housing Directional indicator Gator 20.8 Breakaway mount Foot‑pedal Gator Flex 360 Tour Gator 21 Spring mount Tour Gator 24 Spring mount Propeller Lower unit Nose cone Stainless‑steel column 90-8M4002564 JANUARY 2010 Page 7... -
Page 12: Recording Serial Number
Section 2 - General Information and Component Identification Recording Serial Number Record the serial number for future reference. For warranty purposes, complete the enclosed warranty card or register your trolling motor at www.motorguide.com. 41371 Serial number Model identification number Voltage Boater's Responsibilities The operator (driver) is responsible for the correct and safe operation of the boat and safety of its occupants and general public. - Page 13 Section 2 - General Information and Component Identification Report accidents. Boat operators are required by law to file a Boating Accident Report with their state boating law enforcement agency when their boat is involved in certain boating accidents. A boating accident must be reported if 1) there is loss of life or probable loss of life, 2) there is personal injury requiring medical treatment beyond first aid, 3) there is damage to boats or other property where the damage value exceeds $500.00 or 4) there is complete loss of the boat.
- Page 14 Section 2 - General Information and Component Identification Notes: Page 10 90-8M4002564 JANUARY 2010...
-
Page 15: Section 3 - Product Installation, Wiring, And Battery Information
Section 3 - Product Installation, Wiring, and Battery Information Section 3 - Product Installation, Wiring, and Battery Information Table of Contents Tour Gator 21 Spring Mount Installation....... 12 Wire and Cable Routing............14 Gator Flex 360..............13 Establishing A Common Ground.......... 15 Foot‑Pedal Permanent Installation........ -
Page 16: Tour Gator 21 Spring Mount Installation
Section 3 - Product Installation, Wiring, and Battery Information Tour Gator 21 Spring Mount Installation NOTE: This bow mount installation procedure applies to the Gator 20.8 Breakaway mount (pictured), the Tour Gator 21 Spring mount and the Tour Gator 24 Spring XL mount. -
Page 17: Gator Flex 360
Section 3 - Product Installation, Wiring, and Battery Information Gator Flex 360 IMPORTANT: Choose an area on the deck with a 7.6 cm (3 in.) clearance from the bow of the boat for all motor positions, including deployed and stowed positions. Select an appropriate area on the deck of the boat to install the mount. -
Page 18: Standard Practices And Procedures
Use 13 mm (6‑gauge) battery cables if extending the existing wire 3 m (10 ft) beyond the standard battery cable supplied with the product. Recommended MotorGuide Accessory Description Part Number 6‑Gauge Battery Cable and Terminals With 50‑Amp Manual Reset Circuit Breaker MM309922T 50‑Amp Manual Reset Circuit Breaker... -
Page 19: Establishing A Common Ground
Disconnecting or connecting the battery cables in the incorrect order can cause injury from electrical shock or can damage the electrical system. Always disconnect the negative (‑) battery cable first and connect it last. Recommended MotorGuide Accessory Description Part Number 6‑Gauge Battery Cable and Terminals With 50‑Amp Manual Reset Circuit Breaker... -
Page 20: 36-Volt Battery Connection
Section 3 - Product Installation, Wiring, and Battery Information Connect the black battery lead from the power cable to the negative (–) post on battery A. Connect the jumper wire (not included) between the negative (–) post on battery B to the positive (+) post on battery A. 36‑Volt Battery Connection Power cable 50‑amp manual reset circuit... - Page 21 Section 4 - Trolling Motor Operation Section 4 - Trolling Motor Operation Table of Contents Installing And Removing The Motor........18 Deploying The Trolling Motor ........19 Removing The Motor ............ 18 Adjusting The Motor Depth........... 20 Connecting The Sonar Display To Motor......18 Foot‑Pedal Operation............
-
Page 22: Installing And Removing The Motor
To remove the motor from the bow mount, turn the bracket knob counter clockwise to loosen and open the bracket door. Remove the motor column from the bracket and close the door. Connecting The Sonar Display To Motor NOTE: This sonar display connection procedure applies to the Tour Series motors that offer built‑in 200/83 kHz sonar transducers ® ®... -
Page 23: Stowing The Trolling Motor
Section 4 - Trolling Motor Operation Stowing The Trolling Motor NOTE: Secure trolling motors with a Trolling Motor Tie‑Down Strap (not included) on all mounts. Recommended MotorGuide Accessory Description Part Number Trolling Motor Tie‑Down Strap MGA507A1 Firmly grasp the mount rope handle. -
Page 24: Adjusting The Motor Depth
Section 4 - Trolling Motor Operation Once the motor is in the deployed position, the lock pin will engage to secure the trolling motor. 41389 Deployed position Adjusting The Motor Depth CAUTION Avoid possible serious injury from dropping the motor when adjusting the motor depth. Firmly grasp the motor shaft with one hand when raising or lowering the motor. -
Page 25: Foot-Pedal Operation
Section 4 - Trolling Motor Operation Foot‑Pedal Operation WARNING Rotating propellers can cause serious injury or death. Never start or operate the motor out of water. Direction Control Pivot the foot‑pedal heel‑down to steer left and toe‑down to steer right. To operate the motor in reverse, continue to press all the way down on the foot‑pedal in either operation. - Page 26 Section 4 - Trolling Motor Operation Use the on‑off toggle switch to power the motor on and off. On–off toggle switch Off position On position 41385 Page 22 90-8M4002564 JANUARY 2010...
- Page 27 Section 5 - Maintenance and Storage Section 5 - Maintenance and Storage Table of Contents Trolling Motor Care............... 24 Storage Preparation............. 24 Selecting Replacement Parts ........24 Battery Inspection..............25 Inspection And Maintenance Schedule........ 24 Propeller Replacement............25 Before Each Use ............24 Removing the Propeller ..........
-
Page 28: Trolling Motor Care
Record all maintenance performed and save maintenance work orders and receipts. Selecting Replacement Parts Use only original MotorGuide replacement parts. Inspection And Maintenance Schedule Before Each Use •... -
Page 29: Battery Inspection
IMPORTANT: If the propeller cannot be removed easily, hold one blade and use a rubber mallet to lightly tap the back side of the opposite blade. If the propeller cannot be removed, refer to Troubleshooting. NOTE: If the propeller pin is bent, replace the propeller pin. 41439 Recommended MotorGuide Accessory Description Part Number MotorGuide Prop Wrench Kit MGA050B6 Installing the Propeller Rotate the motor shaft to insert the propeller pin horizontally. -
Page 30: Foot-Pedal Cable Tension Adjustment
Section 5 - Maintenance and Storage Install the propeller nut. Tighten securely. 41439 Use a MotorGuide propeller wrench or pliers to tighten the propeller nut another ¼ turn. Recommended MotorGuide Accessory Description Part Number MotorGuide Prop Wrench Kit MGA050B6 Foot‑Pedal Cable Tension Adjustment The foot‑pedal cable tension adjustment is correct when the exposed number of threads on the tension adjustment shafts are... -
Page 31: Section 6 - Owner Service Assistance
Section 6 - Owner Service Assistance Section 6 - Owner Service Assistance Table of Contents Troubleshooting..............28 Mercury Marine Service Offices........... 29 Service Assistance............... 29 90-8M4002564 JANUARY 2010 Page 27... -
Page 32: Troubleshooting
Section 6 - Owner Service Assistance Troubleshooting NOTE: For service information, contact any certified MotorGuide Service Center. For a full listing of MotorGuide service centers, go to www.motorguide.com or contact any Mercury Service office. Refer to Owner Service Assistance . -
Page 33: Service Assistance
Your satisfaction with your product is very important to us. If you have a problem or question about your motor, contact your dealer or any certified MotorGuide Service Center. For more service assistance information, refer to Warranty Information. The following information will be needed by the service office: •... - Page 34 Section 6 - Owner Service Assistance Japan Telephone 072‑233‑8888 Kisaka Co., Ltd. 4-130 Kannabecho Sakai-shi Sakai-ku 5900984 Osaka, 072‑233‑8833 Japan Asia, Singapore Telephone 5466160 Mercury Marine Singapore 72 Loyang Way 5467789 Singapore, 508762 Page 30 90-8M4002564 JANUARY 2010...
-
Page 35: Section 7 - Accessories And Adapters
Section 7 - Accessories and Adapters Section 7 - Accessories and Adapters Table of Contents Trolling Motor Accessories........... 32 Tour Series Lowrance® Sonar Adapters......33 90-8M4002564 JANUARY 2010 Page 31... -
Page 36: Trolling Motor Accessories
39157 MotorGuide Prop Wrench Kit Comes complete with spare prop nut and two prop pins, allowing fast prop MGA050B6 changes. 37853 Replacement Handle With soft grip handle and Tour rope for unsurpassed durability. 8M4000275 39084 Page 32 90-8M4002564 JANUARY 2010... -
Page 37: Tour Series Lowrance® Sonar Adapters
Sonar Adapters ® The Tour Series Lowrance sonar adapters will connect the standard 7‑pin Lowrance connector coming out of the Tour foot‑pedal to select sonar fish finders to optimize sonar performace. No adapter is needed for Lowrance 7‑pin sonar units. - Page 38 Section 7 - Accessories and Adapters ® Vexilar 3‑Pin Sonar Adapter Works with Tour Series 200/83 kHz Lowrance motors 8M4001960 41391 ® Garmin 6‑Pin Sonar Adapter Works with Tour Series 200/83 kHz Lowrance motors 8M4001961 41392 ® Humminbird 7‑Pin Sonar Adapter...
Need help?
Do you have a question about the Tour and is the answer not in the manual?
Questions and answers