
Subscribe to Our Youtube Channel
Related Manuals for MotorGuide Freshwater


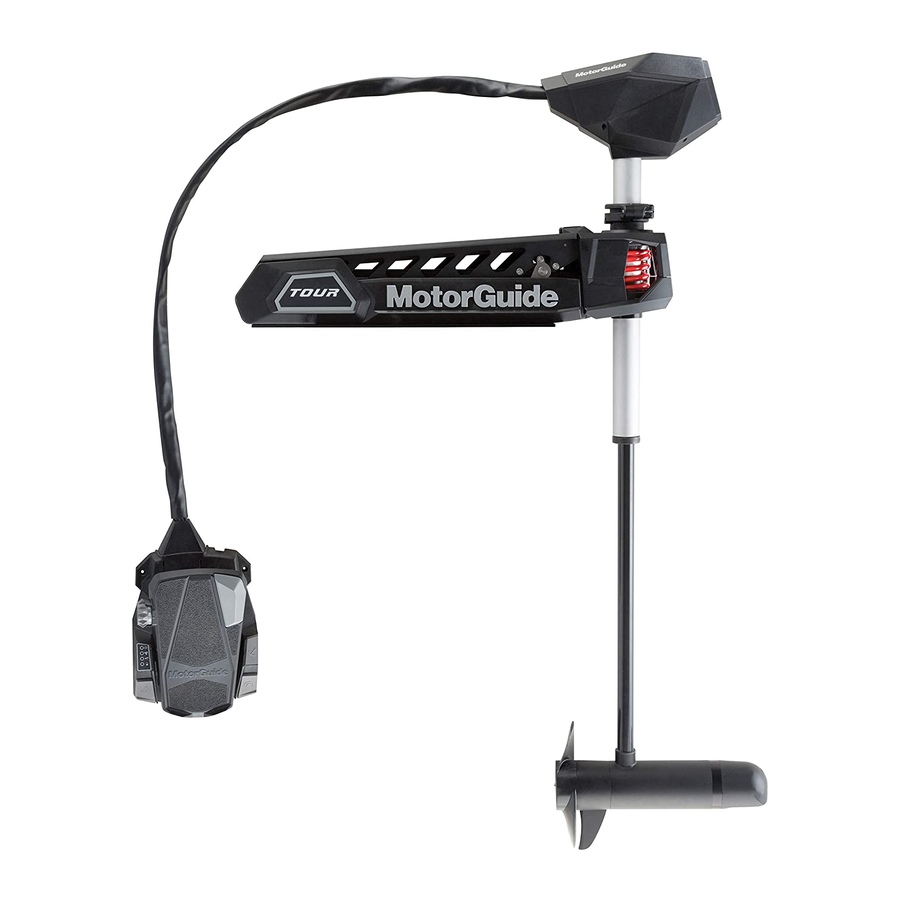
Summary of Contents for MotorGuide Freshwater
- Page 1 OWNER’S INSTRUCTION MANUAL • INSTALLATION • OPERATION • MAINTENANCE MODELS: Freshwater, Saltwater, Tour and Tour ES 90-10235021 502...
- Page 2 This MotorGuide electric outboard motor assembled of U.S.A and foreign components by MotorGuide, 835 W. 41st St., Tulsa, OK, USA, complies with requirements of Directives 89/392/EEC and 89/336/EEC as amended. Larry Register Motorguide Business Unit Manager MotorGuide 835 W. 41st St., Tulsa, OK, USA...
-
Page 3: Table Of Contents
TABLE OF CONTENTS Maintenance General Information How to Replace the Propeller..........12 Customer Responsibilities ............ 12 Safety Do’s and Don’ts ............2 Specifications ................ 2 Troubleshooting Wiring and Battery Recommendations ........2 Transom Mount Installation ..........4 Trolling Motor ................ 13 Pontoon Mount Installation ............ -
Page 4: General Information
16.00 existing wire more than (3 m) 10 feet beyond the standard battery cable supplies with product. • Bow Plugs – For temporary trolling motor installations, MotorGuide recommends the use of a quality plug designed for marine applications. 90-10235R21 502... - Page 5 12 Volt battery hook-up 24 volt battery hook-up a. Black battery lead d. Main engine, bilge pumps, a. Battery A g. To optional sonar display b. Red battery lead aerators, accessories b. Battery B h. Black battery lead (-) c. 50 amp circuit breaker e.
-
Page 6: Transom Mount Installation
36 volt battery hook-up TRANSOM MOUNT INSTALLATION a. Battery A h. To foot pedal b. Battery B (ES models only) c. Battery C i. To optional sonar display d. Main engine, bilge (PinPoint ready models pumps, aerators, only) accessories j. 50 amp circuit breaker e. -
Page 7: Pontoon Mount Installation
• If you are securing the Quik Stow, push down on column while pulling lever up. If your transom did not come with Quick Stow you can order the Quick Stow kit (MGA052B6) from a Motorguide Super Center. 90-10235R21 502... -
Page 8: Bow Mount Installation
BOW MOUNT INSTALLATION a. Standard bow mount b. Heavy duty breakaway mount with spring Select mounting position very carefully. Be sure to check for clearance in all motor positions, including running and a. Down strap stowing positions. Make sure there is a (5 cm) 2 inch clearance from top of deck to underside for mounting screws. -
Page 9: Bow Mount Operation
BOW MOUNT OPERATION Adjust steering tension: (Hand operated motors only.) a. Depth adjustment collar c. Door knob b. Steering tension knob d. Breakaway tension knobs Loosen the steering tension knob until the motor shaft slides freely. Adjust motor depth: (Hand operated motors only.) Position the depth adjustment collar so the propeller blades will be submerged (15 to 30 cm) 6 to 12 inches below the water surface. -
Page 10: Operation
OPERATIONS Speed control Directional indicator 2, 3, 4 The speed of your foot operated motor can be controlled with your foot by rolling the speed control knob on the foot pedal to the desired speed. The speed control is either 5 speed or variable, depending on your model motor. -
Page 11: Tour Es
#10, wood screw. If you would like to purchase a Weight Plate Kit for your MotorGuide trolling motor, contact the MotorGuide Super Adjusting the foot pedal resistance Center. Order Weight Plate Kit part number MLP312315. See the back of your manual for the Super Center nearest you, or visit our website at www.motorguide.com. -
Page 12: Features And Operation
Selecting Momentary Buttons FEATURES AND OPERATION a. Press and hold button(s) to activate b. Press and release three times Both momentary buttons are programmed to be active from the factory. Tour ES allows the user the option of activating either or both momentary buttons. -
Page 13: How To Operate Motor
TO SELECT TROLLING MODE Auto ON/OFF – Tour ES turns itself ON when deployed to the run position and turns itself OFF when stowed. Operation has never been so simple. Swing the motor into the water (run position) and fish. When you have finished, hit the STOW button, which will position the motor to land on the bracket channel, and pull it back into the boat and onto the bracket. - Page 14 Things to keep in mind before calibration FIRST TIME SETUP • Pick a location protected from wind and free of heavy weeds, Stow alignment procedure timber, and other obstructions so you can learn the basic operation of your motor. Once you understand how the motor works, you will find it is very simple to use and to apply to your style of fishing.
- Page 15 Center alignment procedure Foot pedal calibration Your motor was shipped with its foot pedal calibrated. You will want to calibrate your foot pedal if you notice you are not getting a full 400 degree steering rotation or if a new pedal is installed on your motor.
-
Page 16: Maintenance
MAINTENANCE CUSTOMER RESPONSIBILITIES The warranty on this motor/mount does not cover items that HOW TO REPLACE THE PROPELLER have been subjected to operator abuse or negligence. To receive full value from the warranty, operator must maintain motor/mount as instructed in this manual. 1. -
Page 17: Troubleshooting
• Loose wire on rotary switch. Check wiring diagram. FOR REPLACEMENT PARTS AND ORDERING • Loose connections in top housing. MotorGuide has established MotorGuide Super Centers as Parts Distributors throughout the United States and Canada. • Rotary switch bad. Contact the nearest Super Center for parts ordering. When •... - Page 18 INSIDE THE UNITED STATES AND CANADA MOTORGUIDE SUPER CENTER ALABAMA TROLLING MOTORS Trolling Motors Unlimited C WEBB TROLLNG MOTOR SALES & 4340 B Hwy 79 (Vanderbilt Rd) 301 E. Magistrate, Suite A SERVICE BIRMINGHAM, AL 35217 Chalmette, LA 70043 9705 S. Padre Island Dr.
- Page 19 OUTSIDE THE UNITED STATES AND CANADA MOTORGUIDE SUPER CENTER AUSTRALIA, PACIFIC ASIA, SINGAPORE MERCURY MARINE AUSTRALIA MERCURY MARINE SINGAPORE 132 - 140 Franston Road 72 Loyang Way Dandenong, Vistoria 3164, Austratia Singapore 508762 (61) (3) 9791-5822 (65) 546 6160 EUROPE, MIDDLE EAST, AFRICA JAPAN MARINE POWER - EUROPE, INC.
- Page 20 Model Number that service. Purchaser shall not, unless requested by MotorGuide, ship the product or parts of the product directly to b. Model Name the importer of the product. The warranty registration card is c.
- Page 21 MotorGuide 835 W. 41st Street Tulsa, OK 74107 (920) 929-5040...
Need help?
Do you have a question about the Freshwater and is the answer not in the manual?
Questions and answers