Table of Contents
Advertisement
Quick Links
Advertisement
Table of Contents

Related Manuals for Vermeiren NAVIX


Summary of Contents for Vermeiren NAVIX
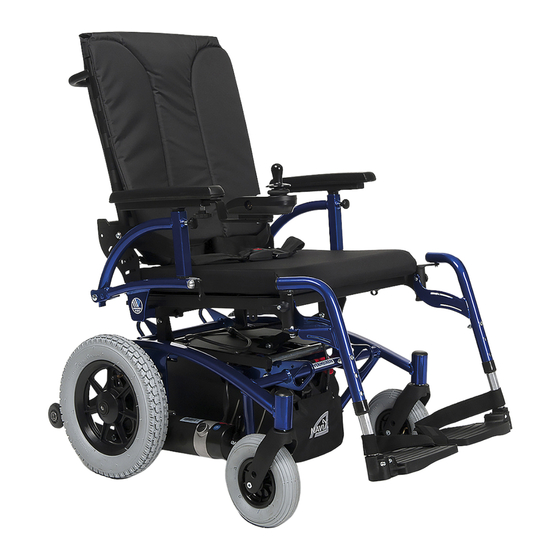
- Page 1 V RM IR N N VIX I N S T R U C T I O N M Rear wheel drive Front wheel drive...
- Page 2 No part of this manual may be reproduced in any form what so ever (print, photocopy, microfilm or any other process) without written permission of the publisher, or processed, duplicated or distributed by using electronic systems. © N.V. Vermeiren N.V. 2012...
-
Page 3: Table Of Contents
Navix 2012-10 Contents Productdescription ......................3 Intended Use ....................... 3 Technical specifications ....................4 Components ........................ 7 Accessories ......................... 8 Explanation of symbols ....................8 Safety instructions ...................... 9 Use ............................10 Remarks on electromagnetic compatibility (EMC) ..........10 Carrying the electric wheelchair ................11 Assembly and disassembly of the electric wheelchair .......... - Page 4 Following of the user instructions and the maintenance instructions are an essential part of the warranty. This manual reflects the latest product developments. Vermeiren has the right to introduce changes without the obligation to adapt or replace previously delivered models.
-
Page 5: Productdescription
Intended Use The electric wheelchair Navix is equipped with two motors, of 220W. The electric wheelchair Navix is intended to comfortably transport persons with walking difficulties or no walking abilities. This electric wheelchair is designed to transport 1 person. The electric wheelchair is designed to transport persons only, no goods. -
Page 6: Technical Specifications
Changes in outdoor temperatures, humidity, uphill's, downhill's, soils and battery levels can reduce output. Brand Vermeiren Address Vermeirenplein 1/15, B-2920 Kalmthout Type Electric wheelchair, Class A Model Navix (Front wheel drive) Maximum occupant mass 130 kg Description Dimensions Effective seat width 400 mm 450 mm 500 mm... - Page 7 2012-10 Brand Vermeiren Address Vermeirenplein 1/15, B-2920 Kalmthout Type Electric wheelchair, Class A Model Navix (Front wheel drive) Maximum occupant mass 130 kg Description Dimensions Minimum Dimensions Maximum Battery charger Exendis Impulse S (6A); IP21; Insulation class II Thermal fuse...
- Page 8 Brand Vermeiren Address Vermeirenplein 1/15, B-2920 Kalmthout Type Electric wheelchair, Class A Model Navix (Rear wheel drive) Maximum occupant mass 130 kg Description Dimensions Minimum Dimensions Maximum Masses of parts that can be dismantled or Armrest: 0.95 kg; Footrests: 1.90 kg;...
-
Page 9: Components
Navix 2012-10 The wheelchair complies to the requirements set up in: ISO 7176-8: Requirements and test methods for static, impact and fatigue strengths. ISO 7176-14: Wheelchairs - Part 14: Power and control systems for electrically powered wheelchairs and scooters -- Requirements and test methods ISO 7176-21: Wheelchairs - Part 21: Requirements and test methods for electromagnetic compatibility of electrically powered wheelchairs and motorized scooters. -
Page 10: Accessories
Navix 2012-10 Accessories The following accessories are available for the electric wheelchair Navix: • Table (B13, B15) • Adjustable leg-rest (BZ7) • Electronic adjustable leg-rest (BZ7-E) • Different seat and back cushions; Fixed back/seat (L14/L15), Soft comfort back/seat (L34/L35) •... -
Page 11: Safety Instructions
Never use your electric wheelchair as a seat in an automobile or other vehicle Never exceed the maximum load of 130 kg. Use only Vermeiren approved accessories. Before getting on or off, taking apart or transporting your electric wheelchair, put your wheelchair off with "ON/OFF"... -
Page 12: Use
This chapter describes the everyday use. These instructions are for the user and the specialist dealer. To find a service facility or specialist dealer near you, contact the nearest Vermeiren facility. A list of Vermeiren facilities can be found on the last page. -
Page 13: Carrying The Electric Wheelchair
Navix 2012-10 Possible sources of radiation include: • Portable receiver and transmitter installations (receiver and transmitter with fixed antenna) Transmitting and receiving sets Portable TV, radio and navigation devices Other personal transmitting devices • Mobile medium-range transmitting and receiving devices (e.g. car antennas) - Page 14 Navix 2012-10 2.3.1 Disassembly of the electric wheelchair To disassembly the electric wheelchair: Fold up the footplates of the footrests. Remove the footrests (paragraph 2.6). Remove armrest with joystick (paragraph 2.5). Remove other armrest (paragraph 2.5). Fold up the back (paragraph 2.7).
-
Page 15: Mounting Or Fold Away Armrest
Navix 2012-10 Mount the armrest with joystick (paragraph 2.5). Mount the footrests (paragraph 2.6). Fold the footplates of the footrests down. Mounting or Fold away armrest CAUTION: Risk of clamping – Keep fingers, buckles and clothes away from the attachment points of the armrest or armpad. -
Page 16: Mounting Or Removing Of The Footrests
Navix 2012-10 Mounting or removing of the footrests The wheelchair has two footrests that can be fold away to the "outside" with a 3 point attachment system ( , on the figure below). This system provides a stady, play-free connection of the footrest to the seat frame. -
Page 17: Back Inclination
Navix 2012-10 To unfold the backrest: Pull gently on the back strap. Pull to the backrest until it clicks into position. Be sure that both safety pins click in the holes of the backrest adjustment plate. Back inclination Make sure that the backrest is on both sides placed in the same position for the comfort of the patient. - Page 18 Navix 2012-10 1. Slide the front tube of the seat frame Ⓐ over the front hooks Ⓑ until the front seat tube Ⓐ fall in the groove of the front hooks Ⓑ. The seat frame clicks automatically in the correct place.
-
Page 19: Seat Cushions
Navix 2012-10 2.10 Seat cushions The seat cushion can be removed or mounted with the velcro strips on the seat frame plate 2.11 Back rest cushions L L L L WARNING: Risk of injury – Check that all straps are secured with Velcro. -
Page 20: Correct Position In The Electric Wheelchair
The instructions for use from the operator controls you can find in the seperate user manals of the operator controls that is included with your wheelchair. Changing the software is only allowed by Vermeiren. For changes in the software contact Vermeiren. - Page 21 Here, too, is the connnection for the programming unit, which should only be connected and used by authorised persons who have been trained to program it (Vermeiren personnel). 2.15.5...
- Page 22 Navix 2012-10 Take care not to enter curves and corners diagonally. By ‘cutting the corner’, chances are that your rear wheels, back of wheelchair will run into obstacles and destabilize your electric wheelchair. 2.15.6 Backward movement L L L L...
-
Page 23: Driving The Electric Wheelchair On Ramps
Navix 2012-10 Always approach downhill slopes directly from the front. Slantwise approaches can lead to some of the wheels no longer staying in contact with the ground (danger of tipping over). The weight of the electric wheelchair will increase your downhill speed. Lower the speed on the operator control. -
Page 24: Transport In The Car
Navix 2012-10 2.17.1 220W motors-6km/h Put the chair in neutral with the adjusting levers on both motors. Clutch or declutch the motor by following the instructions below: DRIVING Push the adjusting levers of both motors in the position of the symbol for driving. -
Page 25: Transport In An Airplane
Navix 2012-10 When the wheelchair does not fit in the car it is also possible to transport the wheelchair by the following steps: 1. Remove all moveable parts prior to transporting (footrests, armpads, operator control, seat frame, lower frame, etc.). -
Page 26: Battery Charger
Navix 2012-10 2.21 Battery charger To charge the batteries, only use the battery charger supplied - IMPULSE S (6 A). For the user instructions of the battery charger you can refer to the manual of the Impulse S that is delivered with your battery charger. -
Page 27: Thermal Fuse
The instructions in this chapter are for the specialist dealer only. The Navix has been designed as a front wheel drive electric wheelchair. The advantage of this wheelchair is a better maneuverability. These wheelchair is also available in a rear wheel drive model. -
Page 28: Possible Adjustments
Risk of injury - Never change the seat height or angle when the user is sitting in the wheelchair. The Vermeiren Navix is adjustable in 3 different seat heights by changing the position of the front plates Ⓐ and the back plates Ⓑ of the seat frame upwards or downwards. -
Page 29: Adjusting The Seat Depth
Risk of injury - Never change the seat depth when the user is sitting in the wheelchair. The Vermeiren Navix is adjustable in different seat depths over a range of 380 mm to 500 1. Remove the seat cushion with the velcro straps. -
Page 30: Adjusting The Seat Width
Navix 2012-10 3.3.3 Adjusting the seat width L L L L WARNING: Risk of tipping over - Check that the armrests and footrests are positioned identically on each side. The seat width can be adjusted over a range of 50 mm by moving the armrests and footrest in horizontal direction. -
Page 31: Adjusting Of The Footrests
Navix 2012-10 * Adjusting footrests: 1. Loosen the hexagon socket set screws Ⓐ just under the seat frame on each side. 2. Move the footrest in an horizontal direction until the correct seat with, by moving the square tubes Ⓑ and Ⓒ over each other. -
Page 32: Changing The Batteries
Navix 2012-10 Adjust the length of the footrests as follow: 1. Remove the screw Ⓒ. 2. Adjust the length of the footrest to a comfortable length according table 7. 3. Tighten the screw Ⓒ properly. Check that the footrests are positioned identically on both sides. -
Page 33: Tyre Changing
Navix 2012-10 Tyre changing L L L L CAUTION: There must be no air in the tube before the tyre can be removed. L L L L CAUTION: Risk of damage - If handled improperly, the rim might become damaged. -
Page 34: Maintenance
(note the maximum) and the valve cap should be replaced. When inflating the tyres, always check that the pressure is correct. The correct pressure is given on the tyre sides. Maintenance For the maintenance manual of the electric wheelchairs refer to the Vermeiren website: www.vermeiren.be. Page 32... - Page 37 Dealer´s stamp: Dealer´s stamp: Date: Date: Dealer´s stamp: Dealer´s stamp: Date: Date: Dealer´s stamp: Dealer´s stamp: Date: Date: • For service checklists an additional technical information, please see our specialist dealers nearest to you. More information on our website at: www.vermeiren.com.
- Page 38 Notes ........................................................................................................................................................................................................................................................................................................................................................................................................................................................................................................................................................................................................................................................................................................................................
- Page 40 Fax: +41(0)31 818 40 98 website: www.reatime.it website: www.vermeiren.ch e-mail: info@reatime.it e-mail: info@vermeiren.ch Poland The Netherlands Vermeiren Polska Sp. z o.o Vermeiren Nederland B.V. Domstraat 50 Łączna PL-55-100 Trzebnica NL-3864 PR Nijkerkerveen Tel: +48(0)71 387 42 00 Tel: +31(0)33 2536424...
Need help?
Do you have a question about the NAVIX and is the answer not in the manual?
Questions and answers