Aastra DT390 User Manual
For mx-one
Hide thumbs
Also See for DT390:
- Quick reference manual (160 pages) ,
- User manual (121 pages) ,
- User manual (106 pages)

Related Manuals for Aastra DT390


Summary of Contents for Aastra DT390
- Page 1 USER GUIDE 1424-EN/LZT 103 087 2011 Aastra DT390 Cordless Phone for MX-ONE™ USER GUIDE rsiimes Mats Höglander 1424-EN/LZT 103 087 Uen H 2014-04-04...
- Page 2 While every effort has been made to ensure accuracy, Aastra Technologies Limited, will not be liable for technical or editorial errors or omissions contained within this documentation. The informa- tion contained in this documentation is subject to change without notice.
-
Page 3: Preparing For Use
This guide describes the available features of the DT390 cordless phone when it is connected to MX-ONE™. The DT390 cordless phone is designed for use in an office environment where messaging is not needed. It is intended for telephony and has high quality voice. -
Page 4: Software Version
NTRODUCTION Dial *#06# when the phone is in idle mode. The IPEI and IPDI numbers appear in the display. Press Back to return to idle mode. Note: If your phone is broken and needs to be replaced with another phone, please contact the system administrator. Software Version To view the phone’s software version: Dial *#34# when the phone is in idle mode. -
Page 5: Accessibility And Voice Quality
USER GUIDE Accessibility and Voice Quality The base network is not always available. If you cannot connect to the system, contact the system administrator. For best voice quality, avoid positioning yourself near a computer, a radio, or similar equipment. 1.5.1 Operating area You can use your cordless phone in the area that is covered by the network. -
Page 6: Safety Instructions
AFETY NSTRUCTIONS Safety Instructions Read this section before using the telephone. For safe and efficient operation of the telephone, observe the guidelines given in this manual and all necessary safety precautions when using the telephone. Follow the operating instructions and adhere to all warn- ings and safety precautions located on the product, the Quick Reference Guide and this User Manual. - Page 7 USER GUIDE • Remove the battery before cleaning the telephone to reduce risk of electric shock. • Unplug the battery charger from a power source before cleaning the telephone to reduce risk of electric shock. • Do not use the telephone with auxiliary equipment not exclusively recommended by the manufacturer, as it may result in fire, electric shock, or injury, and will void the warranty.
-
Page 8: Frequency Range
(except China) Regulatory Compliance Statements (EU and EFTA only) Hereby, Aastra Telecom Sweden AB, Box 42214, SE-126 17 Stockholm, declares that this telephone is in conformity with the essential require- ments and other relevant provisions of the European Directive 1999/5/EC (R&TTE Directive). -
Page 9: Exposure To Radio Frequency Signals
0.037 W/kg. This device must not be co-located or operating in conjunction with any other antenna or transmitter. Use of non-Aastra approved accessories may violate the FCC RF expo- sure guidelines and should be avoided. 1424-EN/LZT 103 087 Uen G 2014-04-14... -
Page 10: Information To User
AFETY NSTRUCTIONS 2.3.3 Information to User This device complies with Part 15 of the FCC Rules. Operation is subject to the following conditions: (1) this device may not cause harmful interference, and (2) this device must accept any interference received, including interfer- ence that may cause undesired operation. -
Page 11: Environmental Requirements
USER GUIDE Environmental Requirements 2.4.1 Cordless Telephone • Note: Do not use the cordless phone in areas with a danger of explosion, as it is not specified as intrinsically safe. • Only use the telephone in temperatures between 0 C to +40 F to 104 •... - Page 12 AFETY NSTRUCTIONS condense, remove it immediately and let it dry completely before reinserting it. • Do not expose a battery to an open flame. This could cause the battery to explode. • Never carry or store the battery together with electrically conducting objects (neck chains, pencil leads, etc.) •...
- Page 13 USER GUIDE • Do not, under any circumstance, connect the battery's positive and negative leads altogether. • Do not strike or drop the battery. It may cause damage to the battery. • The battery should be stored in a dry place, with the ambient temperature of approximately +25°C (+77°F) for best performance.
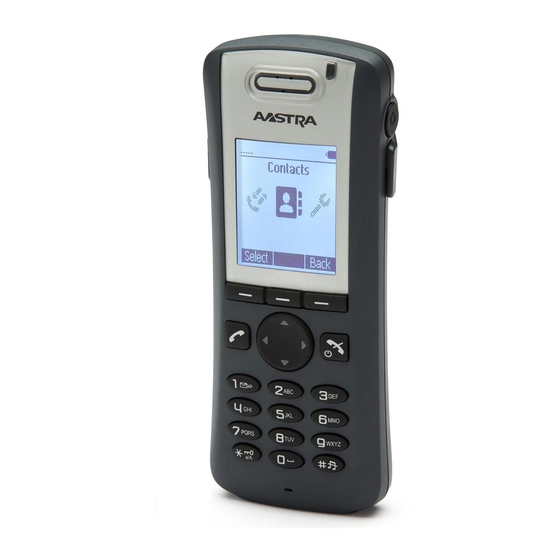
- Page 14 DT390 D ESCRIPTION DT390 Description This chapter describes the DT390 cordless phone and its display, menu structure, and tones. The phone is shown in figure 1 on page 14. Figure 1: Overview of the DT390 cordless phone Soft keys Can be pre-programmed or used with the GUI Off-hook key Used to connect calls, and as a shortcut to the call list.
-
Page 15: Functions And Accessories
Indication lamp Indicates incoming calls, low battery, and charging status Functions and Accessories The DT390 functions are listed in table 1 on page 15, and its accessories are listed in table 2 on page 16. Table 1 Functions DECT Security... - Page 16 DT390 D ESCRIPTION Table 2 Accessories Desk charger Desk PDM charger Rack PDM charger Leather case Belt clip, hinge type Belt clip, swivel type Security chain Headset with microphone on boom Headset with microphone on cable 3.1.1 Accessories Case The plastic cover parts are made of durable PC/ABS material.
-
Page 17: Display Information
USER GUIDE Display Information The icons and text in the display indicate functions and settings available to the user. The display gives visual feedback on all actions performed, and also textual warnings, see figure 2 on page 17. The owner ID can be set manually by the user. - Page 18 DT390 D ESCRIPTION 3.2.1 Soft keys Menu Soft keys Figure 3: Soft keys “Call” and “List” Note: The information displayed varies depending on the version and configuration of the exchange, and whether you use the phone in a DECT or an IP DECT system. Consult the system administrator to find out which type of system your phone is used in.
-
Page 19: System Connection Messages
USER GUIDE that the call is diverted to your extension. When you have answered the call, the display shows only the number of the person calling. 3.2.2 System Connection Messages Possible system connection messages that can be displayed on your phone is described below. - Page 20 DT390 D ESCRIPTION Icon (Cont.) Description (Cont.) Empty battery Flashing when the remaining battery capacity is 5% or lower. Loudspeaking Displayed in the soft key bar during a call. Pressing this icon will activate loudspeaking mode. Loudspeaking off Displayed when loudspeaking mode is enabled.
- Page 21 USER GUIDE 3.2.4 Menu Tabs The menu tabs are listed and described below. Icon Description Contacts Contains all names and numbers in the local phonebook. In addition, a company phonebook with up to 500 entries can be downloaded from the WinPDM or CPDM3 to the phone. It is also possible to access a central phonebook from this menu.
-
Page 22: Menu Structure
DT390 D ESCRIPTION Menu Structure All available phone features can be accessed through the menus. • In idle mode, press Menu to open the main menu. • To confirm a selection, press Select. • Press Back to return to the previous menu, and press to exit the menu structure. -
Page 23: Calls Menu
USER GUIDE 3.3.1 Calls Menu An overview of the Calls menu is presented in figure 5 on page 23. —> • Call 7891 01:30 • Call list —> 7827 03:35 —> • More • Time of call 7682 05:26 Edit number >... -
Page 24: Contacts Menu
DT390 D ESCRIPTION 3.3.2 Contacts Menu An overview of the Contacts menu is presented in figure 6 on page • Call contact • Search ——> • From contact list > ——> • Add contact ——> • Name > • New •... -
Page 25: Settings Menu
USER GUIDE 3.3.3 Settings Menu An overview of the Settings menu is presented in figure 7 on page • Sound & Alerts —> • Volume > • Internal call • Ring signals —> • External call • Callback • Vibrator alert —>... -
Page 26: In-Call Menu
DT390 D ESCRIPTION 3.3.4 In Call Menu The In Call menu displays a list of functions that can be accessed during a call. to see the available functions, press the “More” soft key. Some functions are always provided and others may be made available by the administrator via WinPDM/CPDM3. - Page 27 USER GUIDE > • Contacts • Microphone on/off > > • Call —> • New call > • Phonebook access • Cancel • Switch > > • End call > • Transfer* > • Transfer to new call* • Call —>...
- Page 28 DT390 D ESCRIPTION Tone (Cont.) Description (Cont.) Special dial tone Ringing tone or queue tone Busy tone Congestion tone Number unobtainable tone Call waiting tone Intrusion tone Conference every 15 seconds (to all parties) tone Verification tone Warning tone, expensive...
- Page 29 USER GUIDE Indicators 3.5.1 Phone Indicator The status indicators listed below are used to indicate phone status. Table 3 Cordless Phone Indicator Indicator Description Orange, fixed (phone placed in Battery is being charged. charger) Green, fixed (phone placed in Battery is fully charged. charger) Red, fixed Battery warning.
-
Page 30: Switching On And Off
Press and hold The phone will vibrate when it is on and the display lights up. The following confirmation message is displayed: DT390 Switch on?. Press Yes to confirm. If the phone does not switch on, or if the battery icon indicates low level, charge the battery and try again. -
Page 31: Free Seating
USER GUIDE Free Seating Free Seating is used for people who have an office extension number but no phone set of their own, for example, people who are mostly working outside the office. As a free seating user, and working from the office, you can log on to any free phone set. -
Page 32: Incoming Calls
NCOMING ALLS Incoming Calls An incoming call is indicated by a flashing indicator, accompanied by a ring signal and a vibrating phone. The ring type tells you if the call is an internal, external or callback call. Both ring signal and vibrator can be disabled. -
Page 33: Rejecting A Call
USER GUIDE 6.1.1 Call Pick-up To answer a call to a phone in another room: Call the ringing extension and press When you hear a busy tone, press 8. Note: France and New Zealand press 4; Sweden press 6. 6.1.2 Mute Ring Signal If the phone rings at an inconvenient moment, you can switch off the ring signal temporarily:... -
Page 34: Ending A Call
NCOMING ALLS Ending a Call If you want to end an ongoing call, you hang up: • Press The display shows the duration of the call. The total time of the call can also be retrieved from the Calls menu, see Call Statistics on page 84. -
Page 35: Restoring Parallel Ringing
USER GUIDE 6.4.2 Restoring Parallel Ringing To restore parallel ringing, do the following: Press #21#. Note: U.K., press #2#. Press Wait for the call timer to start in the display. Press to finish the procedure. Note: If you want to restore parallel ringing for all phones defined in the list, follow the procedure for restoring the function from the phone with the main extension number and enter the number of the answering position. -
Page 36: Outgoing Calls
UTGOING ALLS Outgoing Calls This chapter describes how to make calls, how to conceal your number from being displayed to the person you are calling, and how to redial the last external number dialed. Calling To make a call, you can either select a contact in one of the phonebooks available, or get the phone number or extension from the call list. - Page 37 USER GUIDE • If the 0 key has been configured as a hot key. • If the handset has been set up to perform advanced functions normally used by a system administrator. 1424-EN/LZT 103 087 Uen G 2014-04-14...
-
Page 38: Dialing A Number From The Call List
UTGOING ALLS 7.1.1 Dialing a Number From the Call List To dial a number stored in the call list, do the following: Press The call list is opened. If a number occurs more than once, the most recent time stamp is shown along with the total number of occur- rences. -
Page 39: Last External Number Redial
USER GUIDE Note: The feature can be blocked for use on your extension by the system administrator. To hide your name and number from the person you are calling, do the following: Press *42# and press Wait for a dial tone. Dial the number. - Page 40 UTGOING ALLS 7.4.1 Callback When you order callback for a busy extension, you will be called back as soon as the extension or line becomes free. If you order callback when there is no answer, you will be called back when the extension has been used the next time.
- Page 41 USER GUIDE Note: Only one callback can be activated on a busy external line. 7.4.1.3 Canceling a Single callback To cancel a callback, do the following: Press #37*. Note: U.S. and Canada, press #6*. Dial the extension number and press #. Note: To cancel a single callback on a specific external line, dial the digit or digits to get a line instead of the extension number.
-
Page 42: Answer Call Waiting
UTGOING ALLS Keep the phone off hook but close the menu. When the called extension or external line becomes free, it will be called automatically. 7.4.3 Answer Call Waiting Note: Depending on system setup and configuration, this feature might be handled in one of two different ways: Method 1 During an ongoing conversation and a short tone for another incoming call appears, do as follows:... -
Page 43: Speed Dialing
USER GUIDE tone. Before the intrusion is executed, an intrusion tone is sent to the parties in the ongoing call. As long as the three parties are connected, you will hear an intrusion tone. Note: Intrusion might be blocked for use on your extension (this is programmed by the system administrator). -
Page 44: Common Authorization Code
UTGOING ALLS Authorization Codes Authorization codes are used to grant different user groups different levels of access to the telephony system. There are two types of authorization codes, common and individual, which are presented in the following sections. 7.7.1 Common Authorization Code If you are assigned to use a common authorization code (1 to 7 digits) you can change temporarily any phone used within the exchange to the authority level connected to this code. -
Page 45: Individual Authorization Code
USER GUIDE Press *73*. Note: U.S. and Canada, press *71*. Enter the authorization code, press # and Wait for a verification tone. Press to finish the procedure. 7.7.2 Individual Authorization Code If you are assigned to use an individual authorization code (1 to 7 digits, assigned to your own extension), you can lock your own extension to a common authority level when, for example, you are out of the office. - Page 46 UTGOING ALLS Enter the authorization code, press # and Press to finish the procedure. 7.7.2.4 Assigning Own the Individual Authorization Code to Other Phone To assign your own authority level to another phone, do the following: Press *75*. Note: Germany, The Netherlands, and Sweden, press *72*. Enter the authorization code and press *.
-
Page 47: Opening The Call List
USER GUIDE Call List The 25 last received, dialed and missed calls are stored in a call list. The numbers can be either extension numbers or external numbers, and External numbers are preceded by the digit(s) for external call access. If supported by the system, the number’s contact name can be displayed in the call list. - Page 48 Saving a Number in the Call List To edit a number in the call list, when your phone is in idle mode, do the following: Press Menu, select , and press Select. Select Call list, and press Select. Scroll the list to select a number to edit. Select More and Edit number.
- Page 49 USER GUIDE Contacts The phone is equipped with the following phonebooks: Local phonebook The local phonebook can hold up to 250 entries (that is, names and numbers), which can be added, deleted and edited by the user. The phonebook lists all names in alphabetical order, where three numbers can be added for each contact;...
-
Page 50: Dialing A Contact From The Central Phonebook (Optional)
ONTACTS Dialing a Contact from the Central Phonebook (Optional) In the central phonebook, it is possible to search by name, number, or the last result. When the search is finished, it is possible to view contact information, add the number to a new contact, and to call the number. 9.2.1 Searching by Name To search a central phonebook contact by name, do the following:... - Page 51 USER GUIDE 9.2.3 Viewing Last Search Result To view the last search result: Press Menu, select , and press Select. Select Central Phonebook, and press Select. Select Last Result, and press Select. Adding a Name and a Number To add a name and a number to the phonebook, do the following: Press Menu, select , and press Select.
- Page 52 ONTACTS The names in the contact list are shown in alphabetical order. To search in the list, enter the first character(s) in the name, or step with the navigation key. Select the contact to change, and press Edit. Select what to edit for this contact (Name, Work number, Mobile number or Other number) and press Edit again.
-
Page 53: Number Input Mode
USER GUIDE Writing Text and Numbers This section explains how to write text and numbers, which is useful when you want to add a new entry in the phonebook. To enter a name or number, use the following keys: • Press on the navigation key, , to move the cursor... -
Page 54: Special Characters
ONTACTS 9.6.3 Special Characters Use the keypad to enter letters and characters. Press a key once for the first letter or character, twice for the second, three times for the third, and so on. The most common letters are printed above each key on the phone. -
Page 55: During Calls
USER GUIDE During Calls This chapter describes the options available during a call, such as call forwarding, call waiting, and conference. It also describes how to change the volume level and mute the microphone during a call. 10.1 Volume Control To adjust the speaker volume during a call, you press the navigation key. - Page 56 URING ALLS To switch on the microphone again, do the following: Press More, select Microphone on, and press Select. Press and hold Note: During an emergency call, the soft key More is disabled, which means that you can only turn off the microphone by pressing and holding 10.4 Opening Contacts During Call...
-
Page 57: Refer Back
USER GUIDE Note: If New call does not appear when you press More, it is possible to press R and dial the third party to initiate the inquiry. Dial the third party's phone number and press Press the soft key, select a contact, press Select, and then press Call. -
Page 58: Emergency Call
URING ALLS To transfer an ongoing call to another extension, do the following: Press More, select New call and press Select. Dial the third party and press You can dial the number, or use the phonebook or the call list to make the call. -
Page 59: Resuming A Call
USER GUIDE 10.9 Call Parking (On Hold) An ongoing call can be put on hold temporarily. Calls put on hold can be resumed to your own or on another phone. To put a call on hold, do the following: Press R. Wait for a dial tone. - Page 60 URING ALLS The ongoing call is put on hold and your phone rings to announce the waiting call. Note: R is default for this function. If this soft key is reprogrammed to something other than R, this function is disabled. Press to finish the call.
-
Page 61: Dialing During A Connected Call
USER GUIDE Note: If Conference does not appear when you press More, you can also do the following to establish a conference: Press R, dial the number to include, and press 3. Repeat the procedure to add more conference members. 10.12 Dialing During a Connected Call When calling interactive teleservices, such as phone banks, you need to... -
Page 62: Call Forwarding
ORWARDING Call Forwarding This chapter describes different ways of forwarding incoming calls to another internal or external destination whenever you are absent or busy, or travelling, or when you simply would rather not be disturbed. 11.1 Diversion from Call Services Menu All calls to your extension can be diverted to an internal or external answering position of your choice, and calls to your extension can be diverted to other phone numbers when your extension is busy or when... -
Page 63: Internal Follow-Me
USER GUIDE 11.1.2 Canceling Diversion To stop diversion, do the following: Press Menu, select and press Select. Step to Call services, and press Select. Select Divert calls and press Select. Select Internal, External, No reply or When busy, and press Select. -
Page 64: Remote Programming Of Follow-Me
ORWARDING Press Wait for the call timer to start in the display. Press to finish the procedure. 11.2.3 Remote Programming of Follow-me Using remote programming of Follow-me, you can manage the Follow-me settings of other extensions besides the extension you are currently located at. - Page 65 USER GUIDE Note: U.S. and Canada, press *23#. Dial the digit or digits to get a line, and enter the external number. Press # and Wait for the call timer to start in the display. Press to finish the procedure. 11.3.2 Cancelling External Follow-me To cancel external follow-me, do the following:...
-
Page 66: Personal Number
ORWARDING 11.4 Personal Number With the personal number feature you can be reached at your office number even if you are out of the office. Depending on the functionality of your office exchange, you can have either one individual single search profile (standard) or choose between five individual search profiles (optional). - Page 67 USER GUIDE 11.4.2 Cancelling Personal Number From Your Office Phone To cancel the personal number feature from your phone, do the following: Press #10#. Press Wait for the call timer to start in the display. Press to finish the procedure. 11.4.3 Activating or Changing Personal Number From an External Phone...
-
Page 68: Cancelling From External Phone
ORWARDING 11.4.4 Cancelling From External Phone To be able to cancel the personal number feature from an external phone, the external phone must be of push button type, provided with the keys # and *, or a mobile phone adapted for dial tone pulses (DTMF). To cancel the personal number feature from an external phone, do the following: Call the DISA function at your office. - Page 69 USER GUIDE • Consider what should happen while you are busy on a phone. Available options are Diversion to Voice Mail and Diversion to the operator. • If an answering machine, a fax or other answering device is used as an early answering position, it might interrupt the searching. Disconnect the answering device, or design the ring times so they do not affect the searching.
- Page 70 ORWARDING 11.5 Settings Form For Search Profiles Fill in your contact details • Name: _____________________________________ • Department: _________________________________ • Phone Number: ___________________________ • Account: ___________________________________ Table 7 Profile 1 - ______________ Search Type of phone or Phone number Ring time order Answering position (seconds)
- Page 71 USER GUIDE Table 10 Profile 4 - ______________ Search Type of phone or Phone number Ring time order Answering position (seconds) Can be Desk, Cordless, Mobile, External, Voice Mail, Operator, and so on. Table 11 Profile 5 - ______________ Search Type of phone or Phone number Ring time...
- Page 72 ORWARDING Press and wait for the call timer to start in the display. Press 11.6.2 Remote Programming of Diversion on No Answer By using Diversion on no answer, incoming calls are forwarded to a predefined extension after a number of signals. Using remote program- ming of Diversion on no answer, you can manage the Diversion on no answer settings of other extensions besides the extension you are currently located at.
- Page 73 USER GUIDE Press and wait for the call timer to start in the display. Press 1424-EN/LZT 103 087 Uen G 2014-04-14...
-
Page 74: Absence Information (Optional)
BSENCE NFORMATION PTIONAL Absence Information (Optional) Absence information is used to inform callers why you are absent and when you will return. If your own extension is the answering position for another extension, you can enter absence information for that extension, if you are authorized to do so. - Page 75 USER GUIDE Enter the absence code (0-9) and, if requested, enter time or date of return preceded by *. Press # followed by Note: The absence codes are system dependent. Contact the system administrator regarding the available absence codes. 12.2 Cancelling Absence Information For Your Extension To cancel absence information, do the following:...
- Page 76 BSENCE NFORMATION PTIONAL Press * and enter the date or time for when the other person will return. Press # and Wait for the call timer to start in the display. Press to finish the procedure. The display on the other person's extension shows the reason, and if entered, time or date of return.
-
Page 77: Manual Message Waiting (Mmw)
USER GUIDE Messages There are two types of messages available in the DT390 phone: • Manual Message Waiting (MMW), see Manual Message Waiting (MMW) on page 74. • Voice Mail, see Voice Mail (Optional) on page 75. Note: If you receive a message during an ongoing call, you are notified by a beep. -
Page 78: Voice Mail (Optional)
ESSAGES Press *31*. Dial the extension number and press # and Wait for the call timer to start in the display. Press to finish the procedure. The message is sent to the called extension. 13.1.3 Cancelling an MMW Indication To cancel a MMW indication that you have sent to another extension, do the following: Press #31*. -
Page 79: Activating Voice Mail
USER GUIDE 13.2.1 Activating Voice Mail For instructions on how to activate voice mail, see Diversion from Call Services Menu on page 59. Use the number to the voice mail system as the diversion number. 13.2.2 Listening To Voice Mail When you receive a new voice mail, the voice mail icon appears in the header bar, where it remains until you have deleted the message. -
Page 80: Group Features
ROUP EATURES Group Features This chapter describes the different group features available for this cordless phone. 14.1 Group Call Pickup People working in a team can have their phones programmed by their system administrator to form call pickup groups. In a call-pick-up group, any member can answer any individual call to group members. -
Page 81: Group Do Not Disturb
USER GUIDE 14.3.1 Answering a Group Call A group call is answered in the normal way. 14.3.2 Leaving the Group Temporarily To leave a group temporarily, do the following: Press *21*. Note: U.K., press *2*. Dial your own extension number and press # and Wait for the call timer to start in the display. - Page 82 ROUP EATURES Replace the handset. 14.4.2 To cancel group do not disturb An extension having GroupDoNotDisturb programming category set can cancel group do not disturb by dialing the following procedure: Lift the handset (dial tone) Press #25*group number#. Replace the handset. 14.4.3 To bypass group do not disturb An extension having GroupDoNotDisturb programming category set can...
-
Page 83: Other Useful Features
USER GUIDE Other Useful Features This chapter describes more useful features available for the cordless phone and the exchange. 15.1 Account Code The account code function is used to charge a call to an account number or to prevent unauthorized calls from your phone. The account code can have 1 to 15 digits. -
Page 84: Call Statistics
THER SEFUL EATURES 15.2 Call Statistics Your phone can tell you the duration of your last call and display the total time of all calls. To see the time spent on your last call and on all outgoing calls, do the following: Press Menu, select , and press Select. -
Page 85: Emergency Mode
USER GUIDE Common Night Service All incoming calls to the operator are transferred to one specific extension. Answer the call in the normal way. Individual Night Service Selected external calls to the operator are transferred to one specific extension. Answer the call in the normal way. Universal Night Service All incoming calls to the operator are transferred to a universal signaling device, for example the common bell. -
Page 86: Direct Inward System Access (Disa)
THER SEFUL EATURES 15.7 Direct Inward System Access (DISA) If you are assigned to use the DISA function, you can work from outside the office network and still have all your outgoing business calls charged to your office extension number or an account number. You will only be charged for the call you have to make to the office in order to get access to an external line through the office network. -
Page 87: Do Not Disturb (Dnd)
USER GUIDE 15.8 Do Not Disturb (DND) This feature is used to avoid that incoming calls are indicated in a tele- phone. However you can still use the telephone for outgoing calls as usual. The calling party receives a number unobtainable tone and a display message is informing about this feature 15.8.1 To order do not disturb... -
Page 88: Adjusting Ringer Volume
ETTINGS Settings From the Settings tab, , in the main menu, it is possible to specify the settings for sound and alert, display, time and date, system, and headset. 16.1 Sound and Alerts Sound and alert settings include ringer volume, ring signals and so on. 16.1.1 Adjusting Ringer Volume To adjust ringer volume, do the following:... -
Page 89: Setting The Key Sound
USER GUIDE Select Sound & Alerts, and press Select. Select Vibrating alert, and press Select. Choose between On, On when silent (the vibrator is on when the phone is muted), or Off, and press Select. Press Back to save the setting. 16.1.4 Setting the Key Sound Setting the key sound means that each time a key is used, the phone... -
Page 90: Time And Date
ETTINGS Select Information, Black or Black also in call, and press Select. Press Back to save the setting. Note: When charging the handset in an advanced charger or rack charger, information is replaced by the large license indicator shield. When in desktop charger it is the same as when out of the charger. Note: When the handset with the screen saver set to “information”... -
Page 91: Setting Date Format
USER GUIDE 16.3.2 Setting Date Format To set the date, do the following: Press Menu, select , and press Select. Select Time & Date, and press Select. Select Date format, and press Select. The formats to select from are the following: •... -
Page 92: Activating Manual Key Lock
ETTINGS Note: An incoming call can be answered or closed while keypad is locked. In addition, any of the pre-defined emergency numbers can be called while the keypad is locked. 16.4.2 Activating Manual Key Lock You are recommended always to have the automatic lock on, but it is possible to manually lock and unlock the keypad as well. -
Page 93: Deactivating Phone Lock
USER GUIDE Note: .If configured in the handset, any of the pre-defined emergency numbers can be called while the handset is locked. If PIN code is lost it is possible to configure a new, or to do a factory reset in WinPDM or CPDM3, contact the system adminis- trator. -
Page 94: Changing Answering Methods
ETTINGS Enter a name and press Save to save the setting. 16.6 Changing Answering Methods The phone can be set to answer a call automatically when a headset is used, or to answer a call by a press on any key. You can also change the answering behavior to: •... -
Page 95: Changing Menu Language
USER GUIDE 16.6.3 Loudspeaking (Handsfree Mode) To set the phone to automatically answer with loudspeaker when you press , do the following: Press Menu, select , and press Select. Select Answering, and press Select. Select Answer behaviour, and press Select. Select Loudspeaking and press Change to activate. - Page 96 ETTINGS • The IP-DECT system is configured for Easy Registration, see Installation and Operation Manual, IP-DECT Base Station for Aastra. • The handset‚Äôs extension number and IPEI are registered in the IP-DECT system, see the corresponding manual for the IP-DECT system.
-
Page 97: Unsubscribe System
USER GUIDE Press "Next". Enter PARK code (max. 31 digits). The PARK code may not be needed if there is no alien DECT system within the coverage area. Enter AC code. The AC code length must be between 4 - 8 digits. Press "Next". - Page 98 ETTINGS can be edited by the user. It is possible to set the systems in priority by moving them up or down in the list. Note:This is used in combination with system set to be “Automatic”, Change System on page 37. Enter the menu by pressing the "Menu"...
- Page 99 USER GUIDE Note: When the phone is removed from the charger it will switch back on again. 16.9.3 Muting the Phone While Charging To mute the phone while charging, do the following: Press Menu, select , press Select. Select In charger, and press Select. Select Sound off, and press Select.
- Page 100 ETTINGS 16.10 Headset Profiles In order to achieve optimal audio quality with the different headset types, it is recommended that you select the corresponding profile. The default setting is microphone on a boom, meaning that the audio is optimized for using a headset with microphone on a boom.
-
Page 101: Installation
If the standby time for the cordless phone becomes too low, replace the battery with a new one. Contact the system administrator or your certi- fied Aastra Sales partner for information on new batteries. The battery is easy to replace. It is attached inside the battery lid and is connected to the cordless phone in such a way as to avoid misinsertion. - Page 102 If you frequently use the phone or want to have both hands free, it is recommended that you use a headset. The headset for the DT390 cordless phone comes in two versions: • With the microphone integrated in the cable •...
-
Page 103: Leather Casing
USER GUIDE 17.2.2.1 Attaching a Standard Clip (Hinge Type) Attach the standard clip as described in figure 11 on page 103. Figure 11:Click the clip into position 17.2.2.2 Attaching a Security Clip (Swivel Type) Attach the security (swivel) clip as described in figure 12 on page 103. Figure 12:Click the clip into position 17.2.3 Leather Casing... -
Page 104: Desk Pdm Charger
NSTALLATION 17.3 Chargers There are different types of chargers available for the cordless phone. They are described in the following sections. Note: Limit the distance between the mains socket and the cordless phone when charging for easy accessibility. 17.3.1 Desk Charger The desk charger is used only for charging. -
Page 105: Rack Pdm Charger
USER GUIDE The desk PDM charger is connected to a PC through the USB or one of the network connectors, see figure 15 on page 105. When you connect the charger with a PC through one of the network connectors, the charger acts as a switch, making it possible to connect the other connector to the LAN. - Page 106 NSTALLATION 17.4 WinPDM and CPDM3 Software and parameters in the cordless phone can be upgraded by using the WinPDM or the CPDM3. This is most often only done by system administrators. The following are examples of additional features that can be downloaded or configured through PDM: •...
-
Page 107: Troubleshooting
USER GUIDE Troubleshooting This chapter contains information on how to solve common operational problems, see table 12 on page 107, and warnings, see table 13 on page 107, you may receive. Go through the following lists if you encounter any problems. - Page 108 ROUBLESHOOTING Display shows Probable cause Action or comment The phone is out of Stop the beep by No system The phone beeps coverage or phone is pressing once a minute defective. Then go into range, (during max 30 or contact the system minutes) with a low administrator.
- Page 109 USER GUIDE Display shows Probable cause Action or comment There is no voice Define a voice mail Voice mail mail number defined number via WinPDM number not in the phone. or CPDM3. Contact defined the system administrator. The “Encryption Perform one or more Could not Required”...
- Page 110 LOSSARY Glossary Authentication code. Abbreviated number Short number. Initiating a call to a pre-programmed number by dialing a code or pressing a key. Conference If you have an ongoing conversation you can include other persons and establish a phone conference. CPDM3 Centralized Portable Device Manager: A system version with more features than the...
- Page 111 USER GUIDE IP call Internal call sent through an internal data network (LAN or WAN). IPEI International Portable part Equipment Identity, unique identity assigned to your phone by the manufacturer. IPDI The unique global GAP identity number for the DECT registration. IPDI is exchanged between phones during the easy replacement procedure.
-
Page 112: Telephony Function Codes
ELEPHONY UNCTION ODES Telephony Function Codes This chapter describes the country specific function codes used in MX-ONE that are relevant for the cordless phone. The codes are listed in Standard and alternative codes on page 108. The following application systems are concerned: Australia, Austria, Belgium, Brazil, Canada, China, Denmark, Export, Finland, France, Germany, Hong Kong A-law, Hong Kong My-law, Indonesia, Ireland, Italy, Malaysia, Mexico, The Netherlands, New Zealand, Norway, Korea,... - Page 113 USER GUIDE Ordering or Cancellation of U.S. and Canada: 24 Interception Message Print Interception Message Sweden: N/A Manual Message Waiting Cancellation of Message U.S. and Canada: 56 Waiting Automatic Call Back, U.S. and Canada: 6 Cancellation Malicious Call Tracing Calling Line Identification Restriction Per Call By-pass of Diversion U.S.
Need help?
Do you have a question about the DT390 and is the answer not in the manual?
Questions and answers