Sign In
Upload
Manuals
Brands
Ricoh Manuals
All in One Printer
Aficio 1022
Ricoh Aficio 1022 Manuals
Manuals and User Guides for Ricoh Aficio 1022. We have
4
Ricoh Aficio 1022 manuals available for free PDF download: Operating Instructions Manual, Service Manual, Parts Catalog, Manual
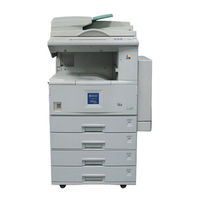
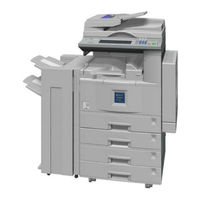
Ricoh Aficio 1022 Operating Instructions Manual (880 pages)
Ricoh Aficio 1022: User Guide
Brand:
Ricoh
| Category:
All in One Printer
| Size: 20.56 MB
Table of Contents
Table of Contents
8
Safety During Operation
5
Safety Information
5
Machine Types
13
What You Can Do with this Machine (Copy Mode)
14
Guide to Components
17
Options
19
Control Panel
20
Display Panel
22
Displays and Key Operations
22
Function List Based on Options
24
Basics
27
Turning on the Power
27
Turning on the Main Power
27
Turning on the Power
28
Turning off the Power
28
Changing Modes
29
Originals
30
Sizes and Weights of Recommended Originals
30
Sizes Detectable by the Auto Paper Select
32
Missing Image Area
33
Copy Paper
34
Recommended Paper Sizes and Types
34
Direction-Fixed Paper or 2-Sided Paper
37
Non-Recommended Paper
38
Paper Storage
38
Toner
39
Handling Toner
39
Toner Storage
39
Used Toner
39
Copying
41
Basic Procedure
41
Auto off
42
Placing Originals
43
Placing Originals on the Exposure Glass
43
Placing Originals in the Document Feeder
44
Placing a Stack of Originals in the Document Feeder
44
Original Orientation
45
Placing Special Originals
46
Placing Custom Size Originals
48
Basic Functions
50
Adjusting Copy Image Density
50
Selecting Original Type Setting
52
Selecting Copy Paper
53
Rotated Copy
55
Auto Reduce/Enlarge
56
Sort/Stack/Staple
57
Sort
59
Stack
61
Staple
63
To Stop Scanning Temporarily
68
When Memory Reaches 0
68
To Remove Paper from the Staple Unit
68
Copying from the Paper Tray 2
69
Using Tray 2 as Bypass Tray
69
Copying from the Bypass Tray
73
Programs
79
Storing a Program
79
Deleting a Program
81
Recalling a Program
81
Job Preset
82
Other Functions
83
Energy Saver Mode
83
Interrupt Copy
83
Original Beeper
84
Sample Copy
84
Changing the Number of Sets
85
Preset Reduce/Enlarge
86
Create Margin Mode
88
Zoom
89
Size Magnification
91
Directional Magnification (%)
93
Directional Size Magnification (Inch)
95
Duplex/Combine/Series
97
Original Direction and Completed Copies
98
Originals and Copy Direction
98
Specifying Orientation of Bound Originals
98
Duplex
100
1 Sided → → → → 2 Sided
100
Combine
103
❖ ❖ ❖ ❖ 1 Sided 2 Pages → → → → Combine 1 Side
103
❖ ❖ ❖ ❖ 2 Sided 4 Pages → → → → Combine 1 Side
103
❖ ❖ ❖ ❖ 1 Sided 8 Pages → → → → Combine 1 Side
103
❖ ❖ ❖ ❖ 1 Sided 4 Pages → → → → Combine 2 Side
103
❖ ❖ ❖ ❖ 1 Sided 8 Pages → → → → Combine 2 Side
103
❖ ❖ ❖ ❖ 1 Sided 16 Pages → → → → Combine 2 Side
103
Series/Book
117
Series Copies
117
Copying Book Originals
121
Edit Image
127
Image Repeat
127
Double Copies
128
Centering
129
Positive/Negative
130
Erase
131
Border Erase
132
Center Erase
133
Center/Border Erase
134
Margin Adjustment
136
Stamp
138
Background Numbering
138
Preset Stamp
139
User Stamp
141
Program/Delete User Stamp
143
Date Stamp
145
Page Numbering
148
Cover/Slip Sheet
154
Front Cover
154
Front/Back Covers
156
Designate
157
Slip Sheets
161
Storing Originals in the Document Server
163
Combination Chart
164
Troubleshooting
165
If Your Machine Does Not Operate as You Want
165
General
165
Document Server
166
Display
167
If You Cannot Make Clear Copies
168
If You Cannot Make Copies as You Want
169
General
169
Adjust Image
169
Stamp
170
Combine
170
Duplex
171
When Memory Is Full
171
B Loading Paper
172
Loading Paper in Tray 1-4
172
Loading Paper in the Large Capacity Tray
173
D Adding Toner
174
Clearing Misfeeds
176
Changing the Paper Size
182
Changing the Paper Size in Tray 1-4/Paper Tray Unit
182
Adding Staples
184
500-Sheet Finisher
184
1000-Sheet Finisher
185
Removing Jammed Staples
187
500-Sheet Finisher
187
1000-Sheet Finisher
188
User Tools (Copy/Document Server Features)
191
Accessing the User Tools (Copy/Document Server Features)
191
Exiting from the User Tools
192
User Tools Menu (Copier/Document Server Features)
194
General Features
196
General Features 2 / 4
196
General Features
199
Reproduction Ratio
203
Reproduction Ratio 2 / 2
203
Edit
206
Edit
207
Stamp
211
Background Numbering
211
Preset Stamp
211
User Stamp
212
Date Stamp
213
Page Numbering
214
Input/Output
216
Remarks
219
Do's and Don'ts
219
Where to Put Your Machine
220
Machine Environment
220
Moving
220
Power Connection
221
Access to the Machine
221
Maintaining Your Machine
222
Cleaning the Exposure Glass
222
Cleaning the Exposure Glass Cover
222
Cleaning the Document Feeder
222
Replacing Photo Conductor Unit (PCU)
223
Specification
229
Mainframe
229
Document Feeder (Option)
234
500-Sheet Finisher (Option)
235
1000-Sheet Finisher (Option)
236
Shift Sort Tray (Option)
238
Duplex Unit (Option)
239
Internal Tray 2 (1 bin Tray) (Option)
240
Bypass Tray (Option)
241
Large Capacity Tray (LCT) (Option)
242
Paper Tray Unit (Option)
243
Index
244
System Settings
247
Copyrights and Trademarks
250
Energy Star Program
254
Table of Contents
257
Manuals for this Machine
260
Machine Types
261
Additional Functions Provided by Internal Options
262
Copy Mode
262
Facsimile Mode (Option)
262
Printer Mode (Option)
262
Scanner Mode (Option)
262
Connecting the Machine
264
Requirements
265
Connecting the Network Cable to the Network
266
1 Basics
264
Turning on the Power
268
Turning on the Main Power
268
Turning on the Power
269
Turning off the Power
269
Configuring the Network
271
Configuring the Network with the Operation Panel
272
Control Panel
282
2 Combined Function Operations
282
Changing Modes
284
Copy Mode
285
Changing to Copy Mode
285
Document Server Mode
287
Copying by Using the Document Server
287
Storing Documents in the Document Server
287
Interrupt the Operating Function and Start Storing
288
Facsimile Mode
289
Changing to Facsimile Mode
289
Printing a Received Fax
289
Sending a Fax
290
Printer Mode
291
Changing to Printer Mode
291
Printing
291
Scanner Mode
292
Changing to Scanner Mode
292
Interrupting Scanning
293
Multi-Access
294
Overview
298
Process
299
3 Document Server
298
Relationship between Document Server and Other Functions
300
Features and Benefits
301
On Demand Printing
301
File Merge Printing
302
Facsimile Resend
304
Operation from a Computer
305
Scanning Originals
306
Scanning in Document Server Mode
306
Printing Saved Documents
310
Sample Copy
313
Print First Page
314
Deleting Saved Documents
315
Searching Saved Documents
317
To Search by File Name
317
To Search by User Name
317
To Check the Details of Stored Documents
319
Accessing the User Tools (System Settings)
320
Changing the Settings
320
Exiting from the User Tools
321
4 User Tools (System Settings)
320
User Tools Menu (System Settings)
322
Settings You Can Change with the User Tools
327
General Features
327
General Features
330
Paper Size Settings
331
Paper Size Settings 2 / 3
331
Paper Size Settings 3 / 3
331
Timer Setting
336
Interface Settings/Network
338
Interface Settings/Parallel Interface
340
File Transfer
341
Key Operator Tools
343
Key Operator Tools 2 / 2
358
Entering Text
359
Available Characters
359
Keys
359
How to Enter Text
360
5 Appendix
362
Other Functions
362
Inquiry
362
Changing the Display Language
363
Displaying the Total Counter
363
Index
364
Printer Controller
365
Table of Contents
369
Features of this Machine
371
1 Getting Started
371
Printer Drivers for this Machine
372
Software and Utilities Included on the CD-ROM
374
Guide to this Machine
376
Control Panel
376
Display Panel
377
Connecting the Machine
380
Requirements
380
Connecting the Machine to the Host Using the Parallel Cable
381
Connecting the IEEE 1394 Interface Cable to the Machine
382
Installation Method
385
2 Installing the Printer Driver and Software
385
Installing by Auto Run
388
Installing the PCL 6/5E Printer Driver
389
Windows 95/98/Me - Installing the PCL 6/5E Printer Driver
389
Windows 2000 - Installing the PCL 6/5E Printer Driver
390
Windows NT 4.0 - Installing the PCL 6/5E Printer Driver
391
Installing the RPCS™ Printer Driver
392
Windows 95/98/Me - Installing the RPCS™ Printer Driver
392
Windows 2000 - Installing the RPCS™ Printer Driver
393
Windows NT 4.0 - Installing the RPCS™ Printer Driver
394
Installing the Postscript 3 Printer Driver
396
Windows 95/98/Me - Installing the Postscript 3 Printer Driver
396
Windows 2000 - Installing the Postscript 3 Printer Driver
398
Windows NT 4.0 - Installing the Postscript 3 Printer Driver
400
Using Adobe Pagemaker Version 6.0 or 6.5
403
Macintosh
404
Macintosh - Installing the Postscript 3 Printer Driver
404
Setting up the PPD File
405
Setting up Options
405
Index
406
Table of Contents
411
PCL 6/5E - Accessing the Printer Properties
413
Windows 95/98/Me - Accessing the Printer Properties
413
Windows 2000 - Accessing the Printer Properties
414
Windows NT 4.0 - Accessing the Printer Properties
415
1 Setting up the Printer Driver and Canceling a Print Job
413
RPCS™ - Accessing the Printer Properties
417
Windows 95/98/Me - Accessing the Printer Properties
417
Windows 2000 - Accessing the Printer Properties
418
Windows NT 4.0 - Accessing the Printer Properties
419
Postscript 3 - Setting up for Printing
421
Windows 95/98/Me - Accessing the Printer Properties
421
Windows 2000 - Accessing the Printer Properties
422
Windows NT 4.0 - Accessing the Printer Properties
423
Macintosh - Setting up for Printing
425
Canceling a Print Job
426
Windows 95/98/Me - Canceling a Print Job
426
Windows 2000 - Canceling a Print Job
427
Windows NT 4.0 - Canceling a Print Job
428
Macintosh - Canceling a Print Job
429
Uninstalling the PCL 6/5E Printer Driver
431
Windows 95/98/Me - Uninstalling the PCL 6/5E Printer Driver
431
Windows 2000 - Uninstalling the PCL 6/5E Printer Driver
431
Windows NT 4.0 - Uninstalling the PCL 6/5E Printer Driver
432
2 Uninstalling the Printer Driver and Software
431
Uninstalling the RPCS™ Printer Driver
433
Windows 95/98/Me - Uninstalling the RPCS™ Printer Driver
433
Windows 2000 - Uninstalling the RPCS™ Printer Driver
433
Windows NT 4.0 - Uninstalling the RPCS™ Printer Driver
434
Uninstalling the Postscript 3 Printer Driver
435
Windows 95/98/Me - Uninstalling the Postscript 3 Printer Driver
435
Windows 2000 - Uninstalling the Postscript 3 Printer Driver
435
Windows NT 4.0 - Uninstalling the Postscript 3 Printer Driver
436
Macintosh - Uninstalling the Postscript 3 Printer Driver
436
Sample Print
437
Printing a Sample Print File
437
Deleting a Sample Print File
440
Checking the Error Log
441
3 Printing with the Control Panel
437
Locked Print
442
Printing a Locked Print File
442
Deleting Locked Print Files
444
Checking the Error Log
446
Accessing the Document Server
447
Error & Status Messages on the Display Panel
449
Machine Configuration
453
4 Troubleshooting
449
Machine Does Not Print
456
Other Printing Problems
458
Adjusting Printer Features
461
Printer Features Menu
461
Accessing the Printer Features
463
Exiting from the Printer Features
463
5 Using the Control Panel
461
Printer Features Parameters
464
Paper Input
464
List/Test Print
464
Maintenance
464
System
465
Host Interface
469
PCL Config. Page
469
Machine Condition
471
6 Appendix
473
Staple
473
Specifications
475
Options
476
Index
478
Table of Contents
489
1 Network Scanner
491
Network TWAIN Scanner
491
Network Delivery Scanner
492
Document Server
493
Names and Functions of Components
494
Control Panel
494
Display Contents
495
Common Key Operations
497
Preparation Sequence
499
Using as a Network TWAIN Scanner
499
Using as a Network Delivery Scanner
500
Using the Document Server
501
2 Preparations for Use as a Network Scanner
499
Initial Scanner Setup
502
Default Settings
502
Setting Scanner Features
504
Making Scanner Settings
508
Making Scan Data Subject Settings
511
Installing Software
513
Auto Run Program
513
Software for Using a Network TWAIN Scanner
515
Software for Using a Network Delivery Scanner
516
Software Required to Use the Document Server
517
Desktopbinder V2 Lite
517
Software Supplied on CD-ROM
518
3 Setting Originals
523
Placing the Original on the Exposure Glass
524
Placing the Original in the Automatic Document Feeder (ADF)
525
Placing the Divided Original in the Automatic Document Feeder (SADF)
526
Original Orientation and Scan Area Setting
527
For a Network Delivery Scanner and Document Server
527
For a Network TWAIN Scanner
528
Flow of Operations
529
4 Scanning Originals Using Network TWAIN Scanner
529
Scanning Originals
530
Functions of the TWAIN Driver
532
List Displays of Destinations and Senders
533
5 Delivering Stored Scan Data by the Network Delivery Scanner
533
Delivery Procedure
535
Checking the Delivery Result
539
Using the Network Delivery Scanner with the Document Server
540
Simultaneous Delivery and Storage
540
Delivering Stored Files
541
Storing Data
543
Storage Procedure
544
6 Using the Document Server
543
Viewing a List of Stored Files
548
Viewing the List
549
Searching for Files
551
Deleting Stored Files
552
Changing File Information
553
7 Appendix
555
The Relationship between the Resolution and the Data Size
555
Troubleshooting
556
When Scanning Is Not Performed as Expected
556
Delivery Function Does Not Work
556
When the Error Message Is Displayed on the Control Panel
557
When the Error Message Is Displayed on the Computer
560
Powering off the Machine
563
Turning off the Operation Switch
563
Turning off the Main Power Switch
563
Specifications
565
Table of Contents
580
Manuals for this Machine
583
Basic Features (this Manual)
583
Advanced Features
583
Guide to Components
585
Front View
585
Rear View
587
1 Getting Started
585
Control Panel
588
Starting the Machine
590
Turning on the Power
590
Turning off the Power
591
Switching between Copy Mode, Facsimile Mode and Printer/Scanner Mode
592
Reading the Display
594
Reading the Display Panel and Using Keys
594
Standby Display
596
Communication Display
597
Display Prompts
598
Transmission Modes
599
2 Faxing
599
Placing Originals
600
Placing a Single Original on the Exposure Glass
601
Placing Originals in the Document Feeder (ADF)
602
Setting a Scan Area
603
If the Machine Cannot Detect the Size of Your Original
605
Original Sizes Difficult to Detect
606
Memory Transmission
607
Canceling a Memory Transmission
611
Canceling the Transmission before the Original Is Scanned
611
Canceling a Transmission While the Original Is Being Scanned
611
Canceling a Transmission During Transmission Standby Mode
611
Immediate Transmission
614
Canceling an Immediate Transmission
617
Canceling a Transmission before You Have Pressed the Start Key
617
Canceling a Transmission after You Have Pressed the Start Key
617
Scan Settings
618
Resolution
618
Original Type
619
Image Density (Contrast)
620
Mixing Scan Settings for a Multiple
622
Dialing
623
Number Keys
623
Quick Dials
626
Groups
627
Selecting the Reception Mode
628
Initial Settings and Adjustments
629
Programming
630
Editing
633
Deleting
634
3 Setup
629
Quick Dial
636
Programming Quick Dials
636
Editing Quick Dials
640
Deleting Quick Dials
643
Groups
645
Programming Groups
645
Editing Groups
648
Deleting Groups
651
Entering Text
654
Available Characters
654
Keys
654
How to Enter Text
655
Adjusting Volume
657
4 Troubleshooting
657
Error Messages and Their Meanings
659
When the { { { { Facsimile} } } } Key Is Lit in Red
660
Solving Problems
661
Advertisement
Ricoh Aficio 1022 Service Manual (313 pages)
Brand:
Ricoh
| Category:
All in One Printer
| Size: 5.72 MB
Table of Contents
Service Manual
1
Laser Safety
3
Table of Contents
4
1 Overall Machine Information
18
Specifications
18
Machine Configuration
22
System Components
22
Installable Option Table
24
Copier Options
24
Fax Option
24
Printer/Scanner Options
24
Paper Path
25
Mechanical Component Layout
26
Electrical Component Descriptions
28
Electrical Component Layout
28
Electrical Component Description
29
Drive Layout
31
Copy Process
32
Overview
32
Board Structure
34
Overview
34
Controller
36
2 Detailed Section Descriptions
38
Scanning
38
Overview
38
Scanner Drive
39
Original Size Detection in Platen Mode
40
Image Processing
42
Overview
42
Sbu (Sensor Board Unit)
43
Auto Image Density
44
Ipu (Image Processing Unit)
45
Overview
45
Image Processing Modes
46
Image Processing Path
47
Overview
47
SP Modes for each Image Processing Step
48
Text Mode
48
Photo Mode
49
Text/Photo Mode
50
Pale Mode
51
Generation Copy
52
Auto Shading
53
Pre-Filtering
53
Main Scan Magnification/Reduction
53
Mirroring for ADF Mode
53
Characteristic Detection
54
Filtering
54
Overview
54
MTF Filter
54
Smoothing Filter
54
Characteristic Filter
54
Independent Dot Erase
55
Background Erase
55
Gradation Processing
55
Overview
55
Grayscale Processing
56
Binary Picture Processing
56
Error Diffusion
56
Dithering
56
Line Width Correction
56
Video Control Unit (Vcu)
57
Fine Character and Image (FCI)
57
Laser Exposure
58
Overview
58
Auto Power Control (Apc)
59
Ld Safety Switch
60
Photoconductor Unit (Pcu)
61
Overview
61
Drive
62
New Pcu Detection
63
Drum Charge
64
Overview
64
Charge Roller Voltage Correction
65
Correction for Environmental Conditions
65
ID Sensor Pattern Production Timing
66
Drum Charge Roller Cleaning
67
Development
68
Overview
68
Drive
69
Developer Mixing
70
Development Bias
71
Toner Supply
72
Toner Bottle Replenishment Mechanism
72
Toner Supply Mechanism
73
Toner Density Control
74
Overview
74
Toner Density Sensor Initial Setting
76
Toner Density Measurement
76
Vsp/Vsg Detection
76
Toner Supply Reference Voltage (Vref) Determination
76
Toner Supply Determination
76
Toner Supply Motor on Time Determinations
77
Toner Supply in Abnormal Sensor Conditions
78
ID Sensor
78
TD Sensor
78
Toner Near End/End Detection and Recovery
78
Toner Near End Detection
78
Toner Near End Recovery
79
Toner End Detection
79
Toner End Recovery
79
Drum Cleaning and Toner Recycling
80
Drum Cleaning
80
Toner Recycling
81
Paper Feed
82
Overview
82
Paper Feed Drive Mechanism
83
Paper Feed and Separation Mechanism
84
Paper Lift Mechanism
85
Paper End Detection
86
Paper Height Detection
87
Feed Pressure Adjustment for Paper Size
88
Overview
88
Paper Size Thresholds
88
Feed Pressure Adjustment
89
Effect of the Amount of Remaining Paper
89
From Tray Full to Paper Near-End
89
From Paper Near End to Paper End
90
Paper Size Detection
91
Special Paper Setting
92
Side and End Fences
93
Side Fences
93
End Fence
93
Paper Registration
94
Image Transfer and Paper Separation
95
Overview
95
Image Transfer Current Timing
96
Transfer Roller Cleaning
97
Paper Separation Mechanism
97
Image Fusing and Paper Exit
98
Overview
98
Fusing Drive and Release Mechanism
99
Fusing Entrance Guide Shift Mechanism
100
Pressure Roller
101
Cleaning Mechanism
101
Fusing Temperature Control
102
Temperature Control
102
Fusing Lamp Control
103
Overheat Protection
104
Paper Exit
104
Energy Saver Modes
105
Overview
105
Energy Saver Mode
106
Entering the Energy Saver Mode
106
What Happens in Energy Saver Mode
106
Return to Stand-By Mode
106
Auto off Mode
107
Entering off Stand-By and off Modes
107
Off Stand-By Mode
107
Off Mode
107
Returning to Stand-By Mode
107
3 Installation Procedure
108
Installation Requirements
108
Environment
108
Machine Level
108
Minimum Space Requirements
109
Power Requirements
110
Copier Installation
111
Power Sockets for Peripherals
111
Installation Flow Chart
112
Accessory Check
113
Installation Procedure
114
Paper Tray Unit Installation
118
Accessory Check
118
Installation Procedure
118
Lct Installation
121
Accessory Check
121
Installation Procedure
121
Auto Reverse Document Feeder Installation
124
Accessory Check
124
Installation Procedure
124
Interchange Unit Installation
127
Component Check
127
Installation Procedure
128
1-Bin Tray Unit Installation
130
Component Check
130
Installation Procedure
130
Shift Tray
133
Component Check
133
Installation Procedure
133
By-Pass Feed Unit Installation
135
Components Check
135
Installation Procedure
135
Duplex Unit Installation
137
Accessory Check
137
Installation Procedure
138
Bridge Unit Installation
140
Accessory Check
140
Installation Procedure
140
1,000-Sheet Finisher Installation
142
Accessory Check
142
Installation Procedure
143
500-Sheet Finisher Installation
146
Accessory Check
146
Installation Procedure
147
Platen Cover Installation
149
Memory (G578/G579)
150
Hdd (B420)
151
Key Counter Installation
153
Anti-Condensation Heater
155
Tray Heater
156
Tray Heater (Optional Paper Tray Unit)
158
Tray Heater (Optional Lct)
161
4 Service Tables
164
General Caution
164
Pcu (Photoconductor Unit)
164
Transfer Roller Unit
164
Scanner Unit
164
Laser Unit
165
Fusing Unit
165
Paper Feed
165
Others
165
Service Program Mode
166
Service Program Mode Operation
166
Entering and Exiting SP Mode
166
SP Mode Button Summary
167
Switching between SP Mode and Copy Mode for Test Printing
168
Selecting the Program Number
168
Service Program Mode Tables
169
SP1-XXX: Feed
169
SP2-XXX: Drum
179
SP4-XXX: Scanner
188
SP5-XXX: Mode
194
SP6-XXX: Peripherals
204
SP7-XXX: Data Log
206
Tray Shift
211
SP9-XXX: Debug/Testing
215
Test Pattern Printing (Sp2-902-3)
216
Input Check
217
Main Machine Input Check (SP5-803)
217
ARDF Input Check (SP6-007)
220
Original Trailing Edge Sensor
220
Finisher Input Check (SP6-117)
221
Output Check
223
Main Machine Output Check (SP5-804)
223
Paper Feed Clutch
223
ARDF Output Check (SP6-008)
225
Finisher Output Check (SP6-118)
225
Stamp
225
Smc Data Lists (Sp5-990)
226
Memory All Clear (Sp5-801)
227
Using a Flash Memory Card
227
Without Using a Flash Memory Card
228
Replacement and Adjustment
228
Uploading/Downloading Nvram Data
229
Uploading NVRAM Data (SP5-824)
229
Downloading NVRAM Data (SP5-825)
230
Aps Output Display (Sp4-301)
231
Df Aps Sensor Output Display (Sp6-901)
232
Nip Band Width Measurement (Sp1-109)
233
Program Download
234
Software Reset
235
System Settings and Copy Setting Reset
235
System Setting Reset
235
Copier Setting Reset
236
User Tools
237
System Settings
237
Copier/Document Server Features
238
Printer, Facsimile, Scanner Settings
238
Inquiry
238
Counter
239
Leds
240
Controller
240
Sbcu
240
Ipu
240
Dip Switches
240
Controller: DIP SW2
240
Sbcu: Dip Sw102
240
Special Tools and Lubricants
241
Special Tools
241
Lubricants
241
5 Preventive Maintenance Schedule
242
Pm Table
242
Ricoh Aficio 1022 Parts Catalog (121 pages)
Ricoh MFP Parts catalog
Brand:
Ricoh
| Category:
All in One Printer
| Size: 8.01 MB
Table of Contents
Parts Catalog
1
Table of Contents
9
Location and List
13
Exterior 1 (B022/B027)
22
Exterior 2 (B022/B027)
24
Operation Panel (B022/B027)
26
Platen Cover (Option B406)
28
Optics Section 1 (B022/B027)
30
Optics Section 2 (B022/B027)
32
Optics Section 3 (B022/B027)
34
Laser Unit (B022/B027)
36
Transfer Unit (B022/B027)
38
Paper Feed Section 1 (B022/B027)
40
Paper Feed Section 2 (B022/B027)
42
Paper Feed Section 3 (B022/B027)
44
Toner Hopper Unit (B022/B027)
46
Paper Registration (B022/B027)
48
Paper Tray (B022/B027)
50
Fusing Unit 1 (B022/B027)
52
Fusing Unit 2 (B022/B027)
54
Paper Exit (B022/B027)
56
Drive Section 1 (B022/B027)
58
Drive Section 2 (B022/B027)
60
Drive Section 3 (B022/B027)
62
Drive Section 4 (B022/B027)
64
Electrical Section 1 (B022/B027)
66
Electrical Section 2 (B022/B027)
68
Frame Section (B022/B027)
70
Sbcu Board (B022/B027)
72
Sbcu Board (B022/B)
78
Controller Board (B022/B027)
80
Controller Board (B022/B)
84
Ipu Board (B022/B027)
86
Decal and Document (B022/B027)
94
Decal and Document (B022/B)
97
Special Tools (B022/B027)
98
Special Tools (B022/B)
99
Parts Index
101
Parts Index
105
Advertisement
Ricoh Aficio 1022 Manual (12 pages)
SAP Printing
Brand:
Ricoh
| Category:
Printer
| Size: 0.06 MB
Table of Contents
Table of Contents
2
1 The Concept
3
The Sap Systems Supported
3
The Device Models Supported
3
The Family of Provided Device Types
3
2 The Device Types
6
ZA00 (and ZA04)
6
ZA01 (and ZA05)
6
Zb00
7
3 The Documentation
8
Volume 1 = Readme
8
Volume 2 : [Device Type] = Device Type Specific Information
8
Volume 2B = Barcode and Ocr Text Printing
8
Volume 3 : [Device Class] = Device-Specific Information
8
4 Appendices
9
Appendix D: Device Models Supported
9
Advertisement
Related Products
Ricoh Aficio 1027
Ricoh 1000SF - Aficio SP B/W Laser
Ricoh aficio 1013F
Ricoh Aficio 1060
Ricoh Aficio 1075
Ricoh Aficio 1050
Ricoh Aficio 1035 Series
Ricoh Aficio 106/LD215c
Ricoh Aficio 1015
Ricoh Aficio 1085
Ricoh Categories
All in One Printer
Printer
Digital Camera
Copier
Printer Accessories
More Ricoh Manuals
Login
Sign In
OR
Sign in with Facebook
Sign in with Google
Upload manual
Upload from disk
Upload from URL