NetComm NTC-6000 SERIES User Manual
Calldirect series industrial hspa cellular routers
Hide thumbs
Also See for NTC-6000 SERIES:
- User manual (117 pages) ,
- Command manual (32 pages) ,
- Quick start manual (20 pages)

Related Manuals for NetComm NTC-6000 SERIES


Summary of Contents for NetComm NTC-6000 SERIES
-
Page 1: User Guide
NETCOMM CALLDIRECT™ SERIES Industrial HSPA Cellular Routers NTC-6000 SERIES USER GUIDE... -
Page 2: Important Safety Instructions
Copyright©2011 NetComm Limited. All rights reserved. The information contained herein is proprietary to NetComm Limited. No part of this document may be translated, transcribed, reproduced, in any form, or by any means without prior written consent of NetComm Limited. NOTE: This document is subject to change without notice. -
Page 3: Table Of Contents
NetComm CallDirect™ Series - NTC-6000 Series Table of Contents Introduction ������������������������������������������������������������������������������������������������������������������������������������������������������������������������������������������������5 1.1 Hardware overview ........................................6 Configuring your Router �����������������������������������������������������������������������������������������������������������������������������������������������������������������������������9 2.1 Inserting the SIM card .......................................9 2.2 Setting up the cellular router ......................................9 2.3 Preparing your computer ......................................10 2.4 Accessing your router’s configuration pages ................................14 2.5 Unlocking the SIM ........................................15... - Page 4 Introduction...
-
Page 5: Introduction
Using the recovery console is further detailed in the document NTC-6XXX Firmware Upgrade VX.X.X.pdf that is part of all NTC-6000 series firmware upgrade packs released, which are available for download in the support section of our website: www.netcomm-commercial.com.au/. -
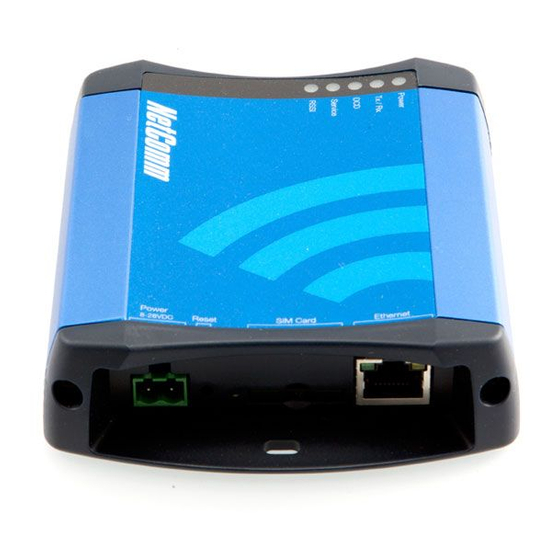
Page 6: Hardware Overview
Solid ON Strong:Indicates the RSSI level is -86dbm Flashing once per second Medium: Indicates the RSSI level is -110dbm and -86dbm Poor: Indicates the RSSI level is less than -110dbm NTC-6000 Series User Guide YML6000 www.netcomm.com.au... -
Page 7: Indicator Leds
NetComm CallDirect™ Series - NTC-6000 Series 1�3�2 Overview of the Cellular Router Interfaces Main Antenna Receive Diversity Socket (SMA) Antenna Socket (SMA) Indicator LEDs Serial RS-232 Port (DE-9 DCE) Ethernet Port (RJ45) Reset SIM Card Reader Locking Power Terminal Block... - Page 8 Configure...
-
Page 9: Configuring Your Router
NetComm CallDirect™ Series - NTC-6000 Series Configuring your Router You will need the following hardware components to set up the router: Power supply (8-28VDC) Ethernet cable Laptop or PC Active SIM card Inserting the SIM card Press the SIM ‘Eject’ button to eject SIM card bay. Make sure the SIM card is inserted correctly by inserting the SIM with the gold side... -
Page 10: Preparing Your Computer
Under General tab, select radio button ‘Obtain an IP address automatically’ and ‘Obtain DNS server address automatically’. Then press the OK button to close TCP/IP configuration window and then press the Close button to complete the computer preparation for the router. NTC-6000 Series User Guide YML6000 www.netcomm.com.au... - Page 11 NetComm CallDirect™ Series - NTC-6000 Series 2.3.2 Ethernet interface configuration in Windows Vista Click on the Start button, then the Control Panel and then Network and Sharing Center. In the Manage network connections, click on “Manage network connections” to continue.
- Page 12 The screen will display the information “User Account Control” and click “Continue” to continue and then double click on “Internet Protocol Version 4 (TCP/IPv4)”. Click“Obtain an IP address automatically” and “Obtain DNS server address automatically” then click on “OK” to continue. Click on “OK” to complete the computer preparation for the router. NTC-6000 Series User Guide YML6000 www.netcomm.com.au...
- Page 13 NetComm CallDirect™ Series - NTC-6000 Series 2.3.3 Ethernet interface configuration in Windows 7 Click on the Start button then the Control Panel (in Category View) and then click on View network status and tasks In the network settings control panel window, click on “Change adapter settings” to continue.
-
Page 14: Accessing Your Router's Configuration
Below illustrates the steps required to access the router’s web browser configuration: 1. Open your web browser (e.g. Internet Explorer/Firefox/Safari) and navigate to http://192.168.20.1/ 2. Click Login and type “admin” (without quotes) in the Username and Password fields. Then click on Submit. NTC-6000 Series User Guide YML6000 www.netcomm.com.au... -
Page 15: Unlocking The Sim
NetComm CallDirect™ Series - NTC-6000 Series Unlocking the SIM If the SIM card is locked you will need to unlock it with a PIN provided with your SIM card. You can find out if the SIM is locked by viewing the SIM Status on the Status page: If the SIM Status is SIM locked as above, you should be automatically redirected to the SIM unlock page. - Page 16 Your carrier will issue you a PUK code to enable you to unlock the SIM and enter a new PIN code. Enter the new PIN and PUK codes, click Save. If you have entered the PUK correctly you should see the following message: NTC-6000 Series User Guide YML6000 www.netcomm.com.au...
- Page 17 Band / Provider Selection...
- Page 18 When this feature is disabled and the SIM is PIN locked, the user must manually enter the PIN via the router‘s configuration interface. This is clearly not desirable where the router is unattended. NTC-6000 Series User Guide YML6000 www.netcomm.com.au...
- Page 19 Connection...
-
Page 20: Band / Provider Selection
4. Select your chosen provider from the list of detected operators and click the Apply button The router will then use the chosen operator to attempt to connect to the cellular service profile you have elected to use. NTC-6000 Series User Guide YML6000... -
Page 21: How To Establish A Connection To The Cellular Network
NetComm CallDirect™ Series - NTC-6000 Series How to Establish a Connection to the Cellular Network This section describes how to set up the router to initiate a WWAN connection. There are 2 different ways to set up a WWAN connection via PPP: Initiating the PPP Connection directly from the router (most common). - Page 22 Ethernet Related Commands...
-
Page 23: Initiating A Connection Using The Router In Transparent Pppoe Mode
NetComm CallDirect™ Series - NTC-6000 Series 4.1.2 To confirm successful connection Now click on the link to return to the status page. Please pay close attention to WWAN section on the page. The WWAN status should be ’’up”. The Local field shows the current IP address that the network has allocated for the router. -
Page 24: 5Ethernet Related Commands
Upon enabling DNS Masquerade, you will notice that the DNS1 address is automatically set to the IP address of the Ethernet port. DNS addresses are then automatically assigned by the connection to the network. NTC-6000 Series User Guide YML6000 www.netcomm.com.au... - Page 25 Virtual Private Networks...
-
Page 26: How To Configure Your Device's Ip Address Manually (No Dhcp)
Do not use the IP address assigned to the router’s Ethernet interface. Set your device’s subnet to: 255.255.255.0. Set your Gateway to the IP address of the router’s Ethernet interfacer: 192.168.20.1 DNS (if required) set to 192.168.20.1 or manually set to your carrier’s DNS Servers. NTC-6000 Series User Guide YML6000 www.netcomm.com.au... -
Page 27: Virtual Private Networks
NetComm CallDirect™ Series - NTC-6000 Series Virtual Private Networks A Virtual Private Network (VPN) is a tunnel providing a private link between two networks or devices over a public network. Data to be sent via a VPN needs to be encapsulated and as such is generally not visible to public network. - Page 28 Routing Configuration...
- Page 29 NetComm CallDirect™ Series - NTC-6000 Series 2: Enable PPTP: Click on the VPN menu item (By clicking on the “Internet Settings” menu followed by the “VPN” menu item) and enter the PPTP/GRE server IP address and user name and passwords in the appropriate boxes and click “Enable“ and then “Save”.
-
Page 30: Routing Configuration
192.168.20.5 in the Gateway IP address field The lower the metric value the higher the priority this routes has over other routes. 7�1�2 Deleting Static Routes Select the “Delete Entry” text (in blue) for the route as shown above. NTC-6000 Series User Guide YML6000 www.netcomm.com.au... -
Page 31: How To Configure Rip
NetComm CallDirect™ Series - NTC-6000 Series How to configure RIP RIP (Routing Information Protocol) is used for advertising routes to other routers. Thus all the routes in the router’s routing table will be advertised to other nearby routers. For example, the route for the router’s Ethernet subnet could be advertised to a Router on the PPP interface side so that a Router on this network will know how to route to a device on the router’s Ethernet subnet. -
Page 32: Nat Configuration
The Demilitarised Zone (DMZ) enables a device to utilise a direct connection to the WAN. This means any incoming connections are forwarded directly to this device. This facility is available by clicking on the “Internet Settings” menu followed by “Routing“ and then the “DMZ” menu item on the right. NTC-6000 Series User Guide YML6000 www.netcomm.com.au... - Page 33 How to configure WEP/WPA-PSK/WPA2-PSK Wireless Security Services Features...
-
Page 34: Services Features
Therefore, the management application should always communicate with the agents along with the associated community name. The default SNMP community names are “public” for read-only (GET) operations and “private” for read-write (SET) operations. Click Save NTC-6000 Series User Guide YML6000 www.netcomm.com.au... -
Page 35: How To Configure Ntp
NetComm CallDirect™ Series - NTC-6000 Series How to configure NTP This facility is available by clicking on the “Services” menu followed by the “NTP” menu item on the right.. The NTP (Network Time Protocol) settings allow your router to synchronise its internal clock with a global Internet Time server. This setting will affect functions such as System Log entries and Firewall settings. -
Page 36: How To Configure A Periodic Reset Timer
The modem can be utilised to communicate with serial devices via the DE-9 connector on the router. This enables the router to communicate with remote monitoring systems, as well as a variety of embedded systems utilising serial port connections. The modem settings can be adjusted if required to match your serial device settings. NTC-6000 Series User Guide YML6000 www.netcomm.com.au... -
Page 37: Gps
NetComm CallDirect™ Series - NTC-6000 Series This facility is available by clicking on the “Services” menu followed by the “GPS” menu item on the right. The built-in GPS module enables you to utilise location based services, keep track of hardware out in the field or find your current location. - Page 38 SMS Tools...
-
Page 39: Sms Tools
NetComm CallDirect™ Series - NTC-6000 Series SMS Tools The SMS tools application has been developed to include basic SMS functionality such as sending a message, receiving a message and redirecting an incoming message to another destination. You can also utilise this functionality to read and change run-time variables on the router. -
Page 40: Sms Tools Setup
Forward incoming text messages to the remote UDP destination defined. UDP Port to redirect: The UDP port on which to connect to the remote destination on. Enable Remote Diagnostics: Enable diagnostics to be performed by a specially crafted SMS message. NTC-6000 Series User Guide YML6000 www.netcomm.com.au... -
Page 41: Sms Configuration For Redirection
NetComm CallDirect™ Series - NTC-6000 Series SMS Configuration for Redirection Incoming text messages can be redirected to another mobile device and/or a TCP/UDP message server. Redirect To Mobile You can forward incoming text messages to a different destination number. This destination number can be another mobile phone or 3G router phone number. -
Page 42: Inbox/Outbox
If the number does not exist in “White List” or the password does not match, the router does not execute the incoming Diagnostics/ Command Execution SMS message. This is enabled by default. It is highly recommended to enable security when utilising the Diagnostics/Command Execution feature. NTC-6000 Series User Guide YML6000 www.netcomm.com.au... - Page 43 NetComm CallDirect™ Series - NTC-6000 Series Send Ack� SMS for Set Command Enable or disable sending an acknowledge message after execution of a “Set” command. If disabled the router does not send any acknowledgement after execution of a “Set” command. This can be useful to determine if a command was received and executed by the router.
-
Page 44: Security
PASSWORD get VARIABLENAME1; get VARIABLENAME2 set VARIABLENAME=VALUE1 ; set VARIABLENAME2=VALUE2 PASSWORD set VARIABLENAME1=VALUE1; set VARIABLENAME2=VALUE2; set VARIABLENAME3=VALUE3 If required, values can also be bound by an apostrophe, double apostrophe or back tick. For Example: “set VARIABLE=’VALUE’” “set VARIABLE=”VALUE”” NTC-6000 Series User Guide YML6000 www.netcomm.com.au... -
Page 45: List Of Valid Commands (Which Can Be Used In Conjunction With The Execute Command)
NetComm CallDirect™ Series - NTC-6000 Series “set VARIABLE=`VALUE`” “get VARIABLE” A password (if required), only needs to be specified once per SMS, but can be prefixed to each command if desired. “PASSWORD get Variable1”; “get VARABLE2” “PASSWORD set VARIABLE1=VALUE1”; “set VARIABLE2=VALUE2”... -
Page 46: Sms Diagnostics Examples
Password1234 execute pdpup1 Send multiple get command Not required get wanip; get rssi Required Password1234 get wanip; get rssi Send multiple set command Not required set apn1=”3netaccecss”; set password1=’NetComm’ Required Password1234 set apn=”3netaccecss”; set password=NetComm NTC-6000 Series User Guide YML6000 www.netcomm.com.au... - Page 47 System Features...
-
Page 48: System Features
3. Click “Login” and type “admin” or “root” in the Username and “admin” in the Password fields (without quotes). Then click on “Submit”. Note: To perform functions like Firmware upgrade, device configuration backup and to restore and reset the router to factory defaults, you need to login as the root user. NTC-6000 Series User Guide YML6000 www.netcomm.com.au... -
Page 49: To Save A Copy Of The Routers Configuration
NetComm CallDirect™ Series - NTC-6000 Series 10.2 To save a copy of the routers configuration This facility is available by clicking on the “System” menu followed by “Load / Save“ and then the “Settings” menu item on the right.. To perform functions like Firmware Upgrade, Device Configuration Backup and to Restore and Reset router to factory defaults, you need to login in the root manager mode. -
Page 50: To Upgrade The Router's System Or Recovery Console Software Version
To update the firmware of the embedded cellular WAN module please consult the module upgrade manual available with the respective upgrade files on our website (www.netcomm-commercial.com.au), in the support section. Note: In order to perform an update, you must be logged into the router as the root user (see chapter 9.1 Remote Administration for more details). - Page 51 NetComm CallDirect™ Series - NTC-6000 Series Click “Login” and type “root” in the Username and and “admin” in the Password fields (without quotes). Then click on “Submit”. The banner at the top of the page should be different to show that the router is currently in recovery console mode.
- Page 52 When the upload has completed, the screen should refresh and list the file you have just uploaded. Click on the “Install” link to the right of this. Once you see “Done” shown as per the screenshot below, Click on the browse button again and navigate to where the main system image upgrade file is located on your computer NTC-6000 Series User Guide YML6000 www.netcomm.com.au...
- Page 53 Troubleshooting...
- Page 54 Once the install has completed, the router will automatically reboot, install the new main system image and then start up and reconnect to your selected Internet service. Note: This process can take up to 10 minutes. NTC-6000 Series User Guide YML6000 www.netcomm.com.au...
-
Page 55: Troubleshooting
NetComm CallDirect™ Series - NTC-6000 Series 11 Troubleshooting 11.1 Viewing the system log This facility is available by clicking on the “System” menu followed by “Log“.. The System Log enables you to troubleshoot any issues you may be experiencing with your router. - Page 56 Specifications...
- Page 57 NetComm CallDirect™ Series - NTC-6000 Series 11�2�5 I cannot seem to get a cellular WAN connection Click on the “Internet Settings” menu followed by “WWAN (3G)“ and then the “Connection” menu item on the right and check that the APN is correct.
-
Page 58: Specifications
White/Orange TX - Orange/White RX + White/Green Blue/White White/Blue RX - Green/White White/Brown Brown/White NOTE: The Ethernet port on the router supports Auto MDI/MDIX, you may use a straight through or cross-over Ethernet cable. NTC-6000 Series User Guide YML6000 www.netcomm.com.au... -
Page 59: Rs-232 Serial Port Integration Parameters
The NTC series router covered in this manual offers the ability for the user to install custom application / firmware images via the application programming interface. For further information, please contact the NetComm 3G Mobile Broadband Solution support team. Phone:... - Page 60 Appendix...
-
Page 61: Legal & Regulatory Information
Where the NetComm product supplied is not of a kind ordinarily acquired for personal, domestic or household use or consumption, NetComm Limited and its affiliates limit their liability to, at their option, the replacement or repair of the NetComm product or the payment of the cost of replacement or repair of the NetComm product. -
Page 62: Gnu General Public License
4. The cost of transporting product to and from NetComm’s nominated premises is your responsibility; and, 5. NetComm does not have any liability or responsibility under this warranty where any cost, loss, injury or damage of any kind, whether direct, indirect, consequential, incidental or otherwise arises out of events beyond NetComm’s reasonable control. This includes but is not limited to: acts of God, war, riot, embargoes, acts of civil or military authorities, fire, floods, electricity outages, lightning, power surges, or shortages of materials or labour. - Page 63 F: 09 448 5549 W: www.netcommlimited.com. E: sales@dynalink.co.nz W: www.dynalink.co.nz Trademarks and registered trademarks are the property of NetComm Limited or their respective owners. Specifications are subject to change without notice. Images shown may vary slightly from the actual product.