Table of Contents
Advertisement
B
Q
H
I
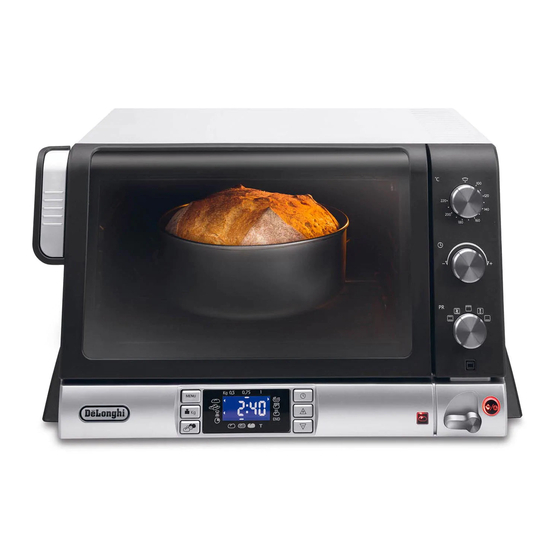
Description of appliance
A Top heating element
B Pivoting bottom heating element
C Bread pan connector cover
D Internal light
E Bread pan connector
F "Oven" control panel
G Main switch
H Measuring spoon (if present)
I Measuring cup (if present)
L Paddle
M Bread pan
A C
P
L
M
D
E
R
N
N Wire rack
O Drip pan
P Door
Q "Bread maker" control panel
R Oven/bread maker mode selector
Technical specification
Voltage: 220-240 V ~ 50/60Hz max 16A
Absorbed power: 1400 W
Dimensions LxHxW: 512 x 295 x 400
Weight: 12,1 kg
34
description
F
I
O
en
G
Advertisement
Table of Contents

Related Manuals for DeLonghi Oven


Summary of Contents for DeLonghi Oven
- Page 1 A Top heating element P Door B Pivoting bottom heating element Q “Bread maker” control panel C Bread pan connector cover R Oven/bread maker mode selector D Internal light E Bread pan connector F “Oven” control panel Technical specification G Main switch...
-
Page 2: Important Safety Warnings
Please note: nearest authorised customer services. • Before using the oven for the first time, remove any pa- • Never position the appliance near heat sources. per and other material inside the oven such as protective • Do not use the appliance as a heat source. cardboard, booklets, plastic bags, etc. • Never place paper, cardboard or plastic inside the oven • Before using for the first time, operate the oven empty and never rest anything on top of the appliance (utensils, with the thermostat at maximum for at least 15 minutes wire racks, other objects). - Page 3 • Use oven gloves to lift the bread pan and remove it from • For your personal safety, never take the appliance to pie- the baking chamber. ces on your own. Always contact customer services.
-
Page 4: Turning The Appliance On
Press the clock button (The minutes flash). START/STOP button on, off and standby Oven/bread maker mode selector Setting the clock Set the required minutes by repeatedly pressing the The first time the appliance is connected to the mains electri- buttons. city supply or after it has been without power for some time, it emits a beep and four dashes (“-- : --”) appear on the display. - Page 5 Description of control panel Thermostat dial Timer dial Mode selector START/STOP button on, off and standby Oven/bread maker mode selector Please note: to use the appliance as an oven, turn the oven/bread maker mode selector to the position. The icon lights up.
- Page 6 Ideal for lasagne, meat, pizza, pies, cakes, bre- ad and all foods which must have a brown or crisp surface. Fan oven cooking 100°C - 220°C To use the accessories see the tips in the table on page 41. Ideal for cooking stuf- fed vegetables, fish and pound cake.
-
Page 7: Timer Dial
To cook frozen foods refer to the recommended times on the required (max. 120 minutes). The cooking time appears on product packaging. the display. At the end of the set time, the oven emits a beep, is displayed and the oven goes off automatically. Defrosting Mode selector... - Page 8 Fan oven cooking • Turn the timer dial to the required time. • Press the START/STOP button. This mode is ideal for excellent pizza, lasagne, au gratin dishes, • Preheat the oven for 5 minutes, then insert the food. all types of meat-based dish, roast potatoes, cakes and pies in general. Proceed as follows: • Place the wire rack in the position given in the table. • Turn the mode selector to the position.
-
Page 9: Traditional Oven Cooking
Traditional oven cooking • Select the required temperature by turning the thermo- stat dial. This mode is ideal for all types of fish, stuffed vegetables, con- • Turn the timer dial to the required time. fectionery and desserts using beaten egg white or requiring • Press the START/STOP button. long cooking times (more than 60 minutes). • Preheat the oven for 5 minutes, then insert the food. Proceed as follows: • Place the wire rack in the position given in the table. • Turn the mode selector to the position. Programme Thermostat... - Page 10 Crust colour button want the bread to be ready using the delay bake function. Please note: to use the appliance as a bread ma- ker, turn the oven/bread maker mode selector to the buttons position. The icon lights up. Use the buttons to set the time and the various cooking programmes.
-
Page 11: White Bread
Baking bread: an art and a science The flour is more granular and straw yellow. It is easily digestible and tasty. Baking bread is both an art and a science. Spelt flour: • The appliance does most of the work, but there are some Obtained by grinding spelt, the oldest form of cereal in things you need to know about each of the basic ingredients the bread-making tradition. - Page 12 (if you are using the delay bake function, the ingredients Use oven gloves to lift the bread pan and remove it from the must NOT be mixed). baking chamber. Now remove the cover from the bread pan connector and posi- tion the pan in the oven.
- Page 13 How to use the delay bake function. Automatic The moisture content of the ingredients affects the recipes which may therefore need to be modified. For example, the programmes (AU...) only weight of the flour changes when it absorbs moisture from You can delay baking for up to 12 hours, enabling you to wake the air.
-
Page 14: Table Of Contents
5. Press the START/STOP button. TIP: at the end of rising (after 1h 45min with durum wheat flour and 1h 25min with soft wheat flour), the oven emits a Durum and soft wheat Pugliese bread beep and pauses for 5 minutes. The time flashes on the di- 1. -
Page 15: Ciabatta Bread Rolls
4. Insert the bread pan in the oven and select programme drip pan previously lined with greaseproof paper. SE2. 8. Insert the drip pan in the oven on the wire rack in the 5. Press the START/STOP button. bottom position and press the START/STOP button. -
Page 16: Breadsticks
(6 breadsticks per pan) and 1. Add the ingredients to the bread pan in the order given in insert the pan in the oven on the wire rack in the bottom the recipe. position. -
Page 17: Boule De Pain
Boule de pain TIP: at the end of the rising stage (after 1h 25min), the oven pauses for 5 minutes and the time flashes on the display. If you 1. Insert the paddle. wish, you can remove the bread pan from the oven, sprinkle 2. -
Page 18: Quick Bread
Quick bread 4. Press the START/STOP button. TIP: at the end of the rising stage (after 35min), the oven pau- Note: This programme allows you to make bread in an hour. ses for 5 minutes and the time flashes on the display. If you The quick bake setting has shorter rising times. -
Page 19: Pan De Campagne
2, divide between two pans) knife, then put the pan back in the oven (you do not need to by hand, place back in the oven and press the START/STOP press the START/STOP button). -
Page 20: Vollkornbrot
(you do not need to Leave to rest in the oven for 10 hours. -
Page 21: Vegetable Breads
Insert the pan in the oven on the wire rack in the bottom posi- 2. Use a wooden spoon to mix the ingredients by hand for a tion, close the door and press the START/STOP button. -
Page 22: Pumpkin Bread
At the end of this time, remove the skin and liquidise Insert the pan in the oven on the wire rack in the bottom posi- the pulp with a food processor. tion, close the door and press the START/STOP button. -
Page 23: Gluten-Free Bread With Buckwheat
7. When the first batch is ready, place the second batch in few seconds. the oven, set 20 minutes and press the START/STOP but- 3. Insert the bread pan in the oven and select programme ton (the mozzarella should always be added 10 minutes SE7. -
Page 24: Focaccia
Shape the rolls by hand (750 g of dough make two batches of bread) and place them in the drip pan previously lined with gre- aseproof paper. Insert the pan in the oven on the wire rack in the Chocolate/milk/honey/walnut bread bottom position, close the door and press the START/STOP button. - Page 25 Ingredients for chocolate bread 500 gr 750 gr 1000 gr Ready in… 2h 05min 2h 10min 2h 15min Milk 125 gr/ml 190 gr/ml 250 gr/ml Eggs 60 gr (1) 90 gr (1/2) 120 gr (2) Butter at room temperature 10 gr 15 gr 20 gr Strong flour (type 0)
-
Page 26: Vienna Bread
1. Insert the paddle. Insert the pan in the oven on the wire rack in the bottom posi- 2. Add the ingredients to the bread pan in the order given in tion, close the door and press the START/STOP button. -
Page 27: Cakes And Desserts
Cakes and desserts thoroughly by hand to obtain a smooth dough. 4. Insert the bread pan in the oven and select programme Torta Margherita/chocolate/yoghurt cake AU15. 5. Press the START/STOP button. 1. Insert the paddle. TIP: when the cake has cooled, dust with icing sugar. -
Page 28: Rice Pudding
3. Use a wooden spoon to mix the ingredients by hand for a Insert the bread pan in the oven (you do not need to press few seconds. the START/STOP button). 4. Insert the bread pan in the oven and select programme PREPARING THE ICING: beat the egg white with the almond AU16. -
Page 29: Kouglof
3. With the help of a wooden spoon, mix the ingredients minutes before the end of the programme). thoroughly by hand to obtain a smooth dough. 4. Insert the bread pan in the oven and select programme AU17. Ingredients 750 gr Ready in…... -
Page 30: Biga Starter
25 minutes) and rising (max. 2 hours) stages to obtain the bread you want. Kneaded risen bread can also be cooked in the fan oven at the required temperature (preheat the oven before inserting the bread pan containing the risen bread). -
Page 31: Cleaning And Maintenance
Dry thorou- ghly. Do not use abrasives or aggressive household cleaning pro- ducts to clean the inside of the oven, bread pan or drip pan as After cleaning, put the heating element back in position. they could damage the non-stick surface.