Advertisement
Quick Links
Presence detector
EN
thePiccola P360-100 DE WH
2090200
1. Basic safety information
WARNING
Danger of death through electric shock or fire!
Installation should only be carried out by a
¾
¾
qualified electrician!
•
The device conforms with EN 60669-2-1 if correctly
installed
2. Proper use
•
Presence detector for automatic lighting control depen-
dent on presence and brightness
•
Suitable for ceiling installation (false ceilings)
•
Suitable for small rooms, corridors, toilets, etc.
Disposal
Dispose of the device in an environmentally sound manner
†
¾
(electronic waste)
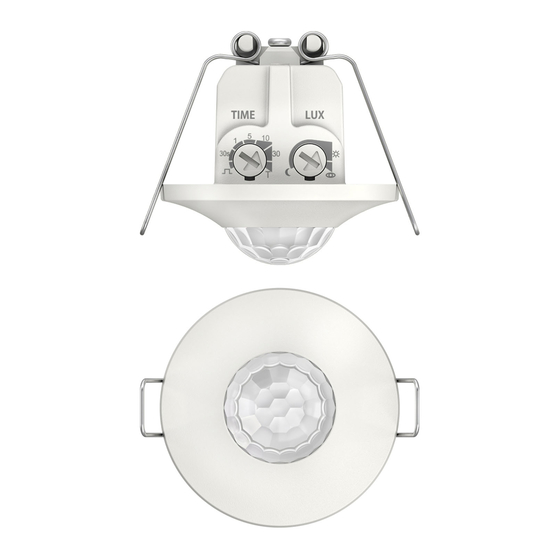
3. Device description
Sensor unit
2 potentiometers for setting
the time delay (TIME) and
the brightness switching
value (LUX)
red LED
Power supply unit
4. Installation and connection
Installing the presence detector
L Installation height: 2–4 m
L Cable length: 45 cm
L Presence detector requires clear line of sight to people
Disconnect power source
†
¾
307146 03
Create a ceiling opening of Ø 34–36 mm
†
¾
Connect power supply unit according to the wiring diagram
†
¾
Make settings at the potentiometers
†
¾
Push the power supply unit through the ceiling opening
†
¾
and attach the sensor with tensioned springs in the ceiling
Ø 34-36 mm
Connecting the presence detector
Danger of death through electric shock or fire!
Installation should only be carried out by a
¾
¾
qualified electrician!
Disconnect power source
†
¾
Ensure device cannot be switched on
†
¾
Check absence of voltage
†
¾
Earth and bypass
†
¾
Cover or shield any adjacent live components
†
¾
The warm-up phase takes approx. 1 min. The LED is perma-
nently red.
6–8 mm
max. 1 x 2,5 mm
2
WARNING
1
Advertisement

Related Manuals for Theben thePiccola P360-100 DE WH


Summary of Contents for Theben thePiccola P360-100 DE WH
- Page 1 Make settings at the potentiometers † ¾ Push the power supply unit through the ceiling opening † ¾ thePiccola P360-100 DE WH and attach the sensor with tensioned springs in the ceiling 2090200 Ø 34-36 mm 1. Basic safety information 6–8 mm...
-
Page 2: Walking Test
Individual switching mode, it must be switched on manually and switches off automatically. Settings are entered via remote control. In individual switching, the presence detector as master Switching behaviour detects presence and brightness and controls lighting. Every time the power supply is switched on, the presence detector runs through two phases that are shown on an LED and the connected lighting: 1. -
Page 3: Settings With Remote Control
L The walking test can also be activated with theSenda P deactivated by using the remote control, the switch contact light only switches depending on presence (with SendoPro and SendoPro 868-A remote controls, see chapter 7. 868-A: brightness switching value set to «measurement off» 3 sec via the remote control;... -
Page 4: Technical Data
Settings by using theSenda S min. Time min. lighting time delay, 10 s Pulse 1 s Pulse function theSenda S can only be used to switch the presence detector on or off ( 500 lux Brightness setpoint value 500 lux 300 lux Brightness setpoint value 300 lux Settings by using theSenda P... - Page 5 LED lamps (< 2 W) 55 W LED lamps (2 W – 8 W) 180 W LED lamps (> 8 W) 200 W 9. Contact Theben AG Hohenbergstr. 32 72401 Haigerloch GERMANY Phone +49 7474 692-0 Fax +49 7474 692-150 Hotline Phone +49 7474 692-369 hotline@theben.de...