
Related Manuals for Theben thePiccola P360-100 DE


Summary of Contents for Theben thePiccola P360-100 DE
-
Page 1: Table Of Contents
307146 02 Presence detector thePiccola P360-100 DE WH 2090200 1. Basic safety information 2. Proper use Disposal 3. Device description 4. Installation and connection 4 Installing the presence detector Connecting the presence detector Individual switching Parallel switching... - Page 2 Push button control Installation instructions and detection area 5. Walking test 6. Setting Setting the brightness switching value (LUX) Setting the time delay (TIME) 12 7. Settings with remote control Settings by using theSenda S 13 Settings by using theSenda P 13 Settings with Sendo Pro 868-A 8.
-
Page 3: Basic Safety Information
1. Basic safety information WARNING Danger of death through electric shock or fire! Installation should only be carried out by a ¾ ¾ qualified electrician! • The device conforms with EN 60669-2-1 if correctly installed 2. Proper use • Presence detector for automatic lighting control depen- dent on presence and brightness •... -
Page 4: Device Description
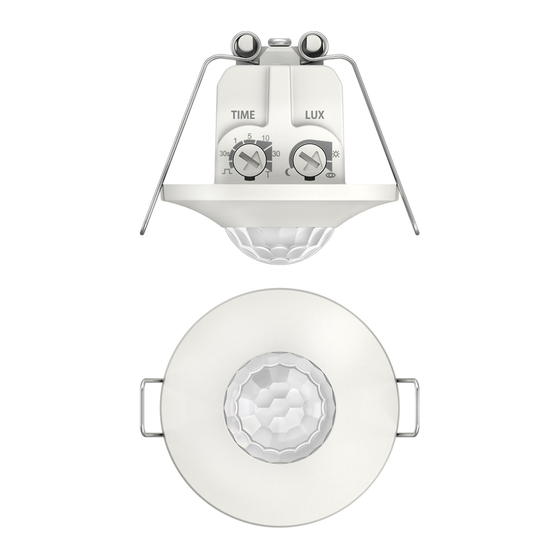
3. Device description Sensor unit 2 potentiometers for setting the time delay (TIME) and the brightness switching value (LUX) red LED Power supply unit 4. Installation and connection Installing the presence detector L Installation height: 2–4 m L Cable length: 45 cm L Presence detector requires clear line of sight to people... - Page 5 Disconnect power source † ¾ Create a ceiling opening of Ø 34–36 mm † ¾ Connect power supply unit according to the † ¾ wiring diagram Make settings at the potentiometers † ¾ Push the power supply unit through the ceiling opening †...
-
Page 6: Connecting The Presence Detector
Connecting the presence detector WARNING Danger of death through electric shock or fire! Installation should only be carried out by a ¾ ¾ qualified electrician! Disconnect power source † ¾ Ensure device cannot be switched on † ¾ Check absence of voltage †... -
Page 7: Individual Switching
Individual switching In individual switching, the presence detector as master detects presence and brightness and controls lighting. L’ Parallel switching If the detection area covered by a single presence detector is insufficient (in larger rooms), then the switch contacts of several detectors can be directly connected with each other. -
Page 8: Push Button Control
Push button control The lighting can be manually switched on/off via a button. If the light is switched on manually, it will remain on as long as people are present (plus time delay). Then the light goes into the set automatic mode. If the light is switched off manually, it will remain off as long as people are present (plus time delay). -
Page 9: Walking Test
L recommended installation height: 2 – 4 m L Transverse detection area: 8 m (transversal to the detector) L Frontal detection area: 2 m (directly approaching the detector) L Detection angle: 360° 5. Walking test The walking test is used to test the detection area. Set the time delay potentiometer (TIME) to T (Test). -
Page 10: Setting The Brightness Switching Value (Lux)
Setting the brightness switching value (LUX) You can set different brightness values with the potentiome- ter for the brightness switching value (LUX). If you want to change the preset brightness Set the potentiometer to the desired brightness (5 – 1000 †... - Page 11 or want a specific brightness value to be learned using the teach-in function At the desired brightness, set the potentiometer to . The † ¾ LED flashes for 20 s, afterwards the measured brightness value is accepted as the new brightness switching value. Leave the potentiometer at position †...
-
Page 12: Setting The Time Delay (Time)
Setting the time delay (TIME) If the presence detector detects no further movement, it swit- ches off after the set time delay. If you want to change the preset time Set the potentiometer to the desired time (30 s – 30 min). †... -
Page 13: Settings By Using Thesenda S
Settings by using theSenda S theSenda S can only be used to switch the presence detector on or off ( Settings by using theSenda P Setting the teach-in function with theSenda P At the desired brightness, press the button ). The †... - Page 14 The following parameters or functions functions can be set with theSenda P: Test Test mode, ends after 10 min Switch on light 15 lux Brightness setpoint value 15 lux 10 lux Brightness setpoint value 10 lux Deactivation of Lux On Brightness measurement 800 lux Brightness setpoint value 800 lux...
-
Page 15: Settings With Sendo Pro 868-A
Settings with Sendo Pro 868-A Parameters Brightness switching value: 5 – 1000 lux; measurement off (deactivation of the brightness measurement) Time delay: 30 s – 30 min; pulse (control of staircase light timer switch) Control commands Teach-in (teach in brightness value) Switching light (on/off light) Presence test (walking test) Restart (restart of the detector) -
Page 16: Contact
LED lamps (< 2 W) 55 W LED lamps (2 W – 8 W) 180 W LED lamps (> 8 W) 200 W 9. Contact Theben AG Hohenbergstr. 32 72401 Haigerloch GERMANY Phone +49 7474 692-0 Fax +49 7474 692-150 Hotline Phone +49 7474 692-369 hotline@theben.de...