Table of Contents
Advertisement
Quick Links
Advertisement
Table of Contents

Related Manuals for Parker Gemini GT6 Series


Summary of Contents for Parker Gemini GT6 Series
- Page 1 Artisan Technology Group is your source for quality new and certified-used/pre-owned equipment SERVICE CENTER REPAIRS WE BUY USED EQUIPMENT • FAST SHIPPING AND DELIVERY Experienced engineers and technicians on staff Sell your excess, underutilized, and idle used equipment at our full-service, in-house repair center We also offer credit for buy-backs and trade-ins •...
- Page 2 Gemini GT6 Hardware Installation Guide Effective: December 17, 1999 N . O A – N . O B – A – B – 5 / 8 N / C GT6-U5 GT6-L5 GT6-U8 GT6-L8 - L 5 Gemini GT6 Series Digital Stepper Controller/Drives...
- Page 3 Since Parker Hannifin constantly strives to improve all of its products, we reserve the right to change this user guide and software and hardware mentioned therein at any time without notice.
-
Page 4: Table Of Contents
Table of Contents 1 – I ..........................5 HAPTER NTRODUCTION Gemini Products—Overview .............................. 6 Compatible Compumotor Products ............................. 8 2 – I ............................9 HAPTER NSTALLATION Checking Your Shipment ..............................10 “Express Setup” Overview ..............................10 Step 1 – Connecting the Motor ............................13 Step 2 –... - Page 5 Product Type : Gemini Family of Drives, GTn Including, but not limited to : GT(6)-L5, GT(6)-L8, GT(6)-U5, GT(6)-U8 When installed in accordance with this installation guide, the above products have been demonstrated to be in compliance with the requirements of directives •...
-
Page 6: Chapter 1 - Introduction
C H A P T E R O N E Introduction IN THIS CHAPTER • Gemini Product Overview • Compatible Compumotor Products Chapter 1 – Introduction... -
Page 7: Gemini Products-Overview
Gemini Products—Overview The Gemini Series is a family of high performance digital drives. The family contains drives for both stepper and servo motors. With many models and options available, the user can choose the precise level of power and control for the application’s motion requirements. - Page 8 Gemini Product Names The following table lists the meanings of letters and numbers in Gemini product names. Notice that “T” is associated with step motor products (“sTep”), and “V” is associated with servo motor products (“serVo”). Control Level: Step Motor Drives and Drive/Indexers Servo Motor Drives and Controller/Drives Step Motor Drive Servo Motor Drive...
-
Page 9: Compatible Compumotor Products
Compatible Compumotor Products GT-nn Stepper 6K or other Compumotor indexer GV-nnn Servo ±10V mode: 6K or other Compumotor controller Step/Direction mode: 6K or other Compumotor indexer Software Motion Planner Pocket Motion Planner (version 1.2 or higher) Note: Gemini drives are not compatible with ASCII communication programs such as Motion Architect or X Language software. -
Page 10: Chapter 2 - Installation
C H A P T E R T W O Installation IN THIS CHAPTER • Checking Your Shipment • Express Setup Chapter 2 – Installation... -
Page 11: Checking Your Shipment
Checking Your Shipment Inspect your shipment carefully. You should have received one or more of the following: Gemini Drives GT6-U5 GT6-U8 GT6-L5 GT6-L8 Ship Kit Items The following ship with the drive: Part Part Number Gemini GT6 Quick Reference Guide 88-018375-01 Gemini GT6 Hardware Installation Guide 88-018374-01... - Page 12 In the express setup, we will give procedures for the following steps: Connecting the motor to the drive (without a load connected) Connecting AC power to the drive Establishing communications and configuring the drive for autorun Enabling the drive and observing the motor turn Information you may need for final installation will be presented in Chapter 3 Configuration, in Chapter 4 Special Features, in Appendix A Specifications, and in the separate Gemini Motor Reference Manual.
- Page 13 System Overview In this express setup procedure, we will give instructions for a Compumotor system—Gemini drive with Compumotor motor, and Compumotor cables. If you use non-Compumotor equipment, try to follow along and perform the steps in the Express Setup procedure; consult Appendix A Specifications for additional information you may need.
-
Page 14: Step 1 - Connecting The Motor
Step 1 – Connecting the Motor The Gemini drive is compatible with 4, 6, or 8 lead step motors designed for use with a bipolar drive. Connecting the Motor Make sure power is off before you connect the motor. Wire your motor in series or parallel. For wiring diagrams, color codes, dimensions and speed/torque curves for Compumotor motors, consult the separate Gemini Motor Reference Manual . -
Page 15: Step 2 - Connecting Ac Power
Step 2 – Connecting AC Power GT6-L5 and GT6-L8 can be operated only at 120VAC. GT6-U5 and GT6-U8 can be operated at 120VAC or single phase 240VAC. Acceptable ranges of AC input voltage are listed below: Drive AC Input Range GT6-L5 95VAC –... - Page 16 120VAC Operations: Connect power system’s safety earth to drive’s protective conductor terminal, marked with the symbol. Do not fuse the protective conductor terminal. Connect 120VAC, 50/60 Hz, single phase power line to drive’s L1 and N terminals. Reinstall the clear plastic terminal cover after you make connections. Connect jumper for 120VAC operations Fuses...
-
Page 17: Step 3 - Configuring The Drive
Step 3 – Configuring the Drive Gemini drives have no DIP switches or potentiometers for configuration. You will use software tools to communicate with the drive and configure drive settings. Configuration Software Two software programs are located on the Motion Planner CD-ROM. Motion Planner runs on a personal computer (PC). - Page 18 Configuring the Drive Choose one of the columns below, based upon which software program you are using—Motion Planner, or Pocket Motion Planner—and follow the procedure to configure your drive. NOTE: If this is not the first time the drive has been configured, issue an RFS command (Return to Factory Settings) from the terminal emulator, before performing the following procedures.
-
Page 19: Step 4 - Verifying Correct System Installation
Step 4 – Verifying Correct System Installation Commanding Motion in Autorun Mode In this procedure you will enable the drive; the motor will then rotate in autorun mode. This will verify correct system wiring and drive configuration. Connect a jumper wire between Pin 1 and Pin 2 on the 50 pin DRIVE I/O connector. (For connector diagrams, cable color codes, and breakout module information see Appendix A Specifications .) Issue the following command to the drive:... -
Page 20: What's Next
What’s Next? This chapter has given you information and instructions for performing an Express Setup. The following list explains the steps you should take to complete your installation, and indicates where to find additional information for each of those steps. Mount the drive. - Page 21 Gemini GT6 Hardware Installation Guide...
-
Page 22: Chapter 3 - Configuration
C H A P T E R T H R E E Configuration IN THIS CHAPTER • Configuration • Damping Configuration • Stall Detect Configuration • Motor Matching Chapter 3 – Configuration... -
Page 23: Configuration
Configuration You can configure the Gemini drive’s settings for optimum system performance. For most of these settings, configuration is optional—if you do nothing, the drive will use default values the very first time it powers up. If you change any settings, the new settings are automatically saved. -
Page 24: System Settings
DIGNC current loop gain DIGND current loop gain If you use a non-Compumotor motor, see Appendix B – Using Non-Compumotor Motors for additional instructions. System Settings The system settings configure the drive’s mode of operation, resolution, inertia ratio, and fault modes. Drive Settings Command Description Options:... -
Page 25: Communications Settings
Digital Outputs Command Description Options: Output Definition and Sense configure up to 7 outputs Analog Monitors Command Description Options: DMONAV analog monitor A variable unused/turn off output drive temperature velocity setpoint acceleration setpoint phase A commanded current phase A actual current phase B commanded current phase B actual current phase A commanded voltage... -
Page 26: Procedure For Configuring Advanced Features
Damping These commands are used to configure the drive’s settings for damping. A procedure for adjusting damping settings is presented below. Relevant commands are: Command Description Options: DACTDP active damping gain you enter a number DDAMPA damping during acceleration can be turned on or off DELVIS electronic viscosity can be turned on or off... - Page 27 The default setting is disabled . (DABSD0) To turn ABS damping on , use the DABSD command. (DABSD1) If you use a Parker motor, the following parameters are automatically set when you use the configuration utilities (Motion Planner or Pocket Motion Planner) to select a motor.
-
Page 28: Configuring Stall Detect Settings
LJRAT system load-to-rotor inertia ratio If you use a Parker motor, the following parameters are automatically set when you use the configuration utilities (Motion Planner or Pocket Motion Planner) to select a motor. You do not need to enter values for them now. -
Page 29: Procedure For Motor Matching
Use the following procedures to configure the stall detect settings. Configuring Stall Detect The DSTALL command sets the sensitivity for the stall detection circuitry. The default setting is disabled . (DSTALL0) NOTE: Match the motor to the load (see the procedure on the following pages) before you configure stall detect settings. - Page 30 Setting Up Your System for the Motor Matching Procedure Before beginning the Motor Matching procedure, set up your system as follows: The Motor Matching procedure below is a bench top procedure—temporarily connect the drive, motor, and PC running Motion Planner (or a palm PC running Pocket Motion Planner), but do not permanently mount the components yet.
- Page 31 Gemini GT6 Hardware Installation Guide...
-
Page 32: Chapter 4 - Special Features
C H A P T E R F O U R Special Features IN THIS CHAPTER • Relay Connections • +24VDC Keep Alive Power Connections • Multiple Drive Installations • RS-232/485 Communications • Updating the Drive’s Operating System Chapter 4 – Special Features... -
Page 33: Relay Connections (Optional)
Relay Connections (optional) To use the drive’s internal relay, connect your external circuit to the RELAY COM and RELAY N.O. terminals. The next drawing shows a typical application—connecting a motor brake to the relay terminals. GEMINI Drive User Supplied +24VDC +5VDC RELAY COM Motor Cable... -
Page 34: Multiple Drive Installations
DRIVE POWER SUPPLY VDC+ +24V DC 24V RTN VDC– RELAY COM RELAY N.O. Use twisted pair wiring +24VDC Power Input +24VDC Specifications: Input voltage range: 19.2 – 28.8 VDC Input current: 500 mA (maximum) Functions powered under +24VDC: position information (encoder or motor position counters in drive) communications diagnostics... -
Page 35: Rs-232/485 Communications
RS-232/485 Communications The Gemini drive has a single serial port marked, “ ,” on the front of the RS-232/485 unit. In the following this port will be referred to as the COM port. The Gemini drive uses a binary language for communication; it does not use ASCII. To enable 6000 ASCII level communication in a terminal mode, the Gemini uses a translator utility in Pocket Motion Planner and in the CommServer (for use with Motion Planner). -
Page 36: Configuring The Serial Port
Configuring the Serial Port The following commands can be used to configure the Gemini serial port and the terminals used by Motion Planner and Pocket Motion Planner. Complete descrip- tions of these commands can be found in the Gemini Programmer's Reference. Enable Serial Communication ECHO Enable Communication Echo... -
Page 37: Rs-232 Daisy-Chaining
RS-232 Daisy-Chaining Up to ninety-nine stand-alone Gemini drive products may be daisy-chained. Refer to the wiring diagrams for daisy-chain connections. Follow these steps to implement daisy-chaining: Step 1 To enable and disable communications on a particular drive unit in the chain, you must use the Daisy-Chain Address (ADDR) command to establish a unique device address for each unit. -
Page 38: Rs-485 Communications
Units with RS-232 disabled (EØ) will not respond to any commands, except E1; however, characters are still echoed to the next device in the daisy chain. Commands: 3_E0 ; Disable RS-232 on unit #3 DRES25000 ; Set resolution to 25000 on all other units 3_E1 ;... -
Page 39: Rs-485 Multi-Drop
RS-485 Multi-Drop Up to 99 Gemini drives may be multi-dropped. Refer to the diagrams in this section for daisy-chain connections. The ADDR command allows you to establish up to 99 unique addresses. To use the ADDR command, you must address each unit individually before it is con- nected on the multi drop. -
Page 40: Chapter 5 - Troubleshooting
C H A P T E R F I V E Troubleshooting IN THIS CHAPTER • LED Status • Software Commands for Troubleshooting • RS-232/485 Troubleshooting • System Problems Chapter 5 – Troubleshooting... - Page 41 Troubleshooting Guidelines If your system is not functioning properly, first try these steps. First Troubleshooting Steps: • Is the left LED illuminated? If not, look for problems with AC power. Also see System Problems at the end of this chapter. •...
- Page 42 Save the Configuration File Since further troubleshooting steps may change the drive configuration, you should upload the current drive configuration file and save it to your PC, in case you need it for future reference. Reconfigure the Drive To verify proper configuration, you may wish to reconfigure the drive. Pay particular attention to selecting proper configuration settings for the motor that you have installed, as motor configuration problems can cause a variety of errors.
- Page 43 TASX – Transfer Extended Axis Status The TASX command returns the axis status conditions. It reports more informa- tion than the TAS command, and is helpful for identifying which faults occurred. It returns a 32 bit response (1 = Yes; Ø = No). Note the positions of bits that are “1”...
- Page 44 RS-232/485 Communication Problems If you cannot establish RS-232 or RS-485 communications, the next sections give instructions for procedures to help isolate problems. Testing the COM Port Install and launch either Motion Planner or Pocket Motion Planner. See Chapter 2 Installation for information about using these software tools. RS-232 communications require that you use a null modem cable.
- Page 45 Testing the Cable Use the following two procedures to test your null modem cable, and verify that it is working properly. “Loop Back” Test Connect one end of your RS-232 cable to your PC, palm PC, or HPC. Disconnect the other end of the cable from the drive. Connect pin 2 to pin 3 on the drive end of the RS-232 cable.
- Page 46 System Problems If your Gemini drive is functioning properly, other parts of your system may be causing problems. It may be difficult to identify where the problem is coming from. To diagnose system problems, we recommend that you first have the drive perform its autorun function.
- Page 47 Mechanical Transmission Verify that your mechanical system functions properly, and is not jammed. Motion Problems If problems occur during motion, check these possible causes: • Motor Sizing (ensure that the motor has enough torque to perform the move) • Excessive Acceleration or Deceleration •...
-
Page 48: Appendixa - Specifications
A P P E N D I X A Specifications IN THIS APPENDIX • Gemini Drive Specifications • Input/Output Specifications • Dimensions • Protective Circuits • Cable Specifications Appendix A – Specifications... -
Page 49: Power Specifications
Power Specifications Input Power Drive AC Input Range GT6-L5 95VAC – 132VAC, 50/60 Hz, single phase GT6-L8 95VAC – 132VAC, 50/60 Hz, single phase GT6-U5 95VAC – 132VAC and 190VAC – 264VAC, 50/60 Hz, single phase GT6-U8 95VAC – 132VAC and 190VAC – 264VAC, 50/60 Hz, single phase Connector Drive connector: #8 (M4) screw terminals. -
Page 50: Interface/Communication
Interface/Communication Connector Drive connector: 9 pin D-subminiature plug. Mating connector: 9 pin D-subminiature receptacle RS-232: RS-485:* Rx, Tx, Gnd 4-wire plus ground (Rx+, Rx-, Tx+, Tx-, Gnd) 9600 baud 9600 baud 8 data bits 8 data bits 1 stop bit 1 stop bit no parity no parity... -
Page 51: Inputs And Outputs
Standards UL, cUL 508C CE for LVD 72/23/EEC BS EN61010-1:1993/A2:1995 (ie includes 1995 amendment AMD 8961) Safety requirements for electrical equipment for measurement, control, and laboratory use Part 1. General requirements CE for EMC 89/336/EEC BS EN61800-3: 1997 Adjustable speed electric power drive systems Part 3. - Page 52 Enable Input (required) To enable the drive and energize the motor, you must connect the enable input (pin 1) to digital ground (pin 2), and issue a DRIVE1 command. The next drawing shows the internal circuit. DRIVE I/O Connector Internal Connections Inputs internally pulled up to +24V, unless you connect an external 5 –...
- Page 53 Digital Inputs (optional) The Gemini drive has eight digital inputs. All connections are shown in the next drawing. Defaults are shown in parentheses, but you can use the INFNC command to redefine the function of any of the inputs. See the Gemini Programmer’s Reference for more information.
- Page 54 Digital Outputs (optional) The Gemini drive has six digital outputs. All connections are shown in the next drawing. Defaults are shown in parentheses, but you can use the OUTFNC command to redefine the function of any of the outputs. See the Gemini Programmer’s Reference for more information.
- Page 55 Analog Monitor (optional) Two analog monitor outputs are available on pins 21 and 22. Use pin 25 as a ground reference for these monitors. Analog Monitor Specifications: Maximum Output: ±10V (scalable; use DMON command) Resolution: 8 bits peak to peak (for full scale signal) Internal Connections DRIVE I/O Connector 221 Ω...
-
Page 56: Dimensions
Dimensions Panel Layout Dimensions NOTE: Provide proper spacing to maintain minimum clearance between drives. 1.00 (25.4 ) MINIMUM CLEARANCE 1.00 (25.4 ) MINIMUM CLEARANCE 1.00 (25.4 ) MINIMUM CLEARANCE 1.00 1.00 0.50 (25.4 ) (25.4 ) (25.4 ) MINIMUM MINIMUM CLEARANCE CLEARANCE Dimensions in... - Page 57 Drive Dimensions 2.75 6.00 (70) (153.0) 3x clearance 1.38 for #8 or M4 5.40 (35) mounting screws (138.0) (203.2) 7.75 (196.9) (177.8) Dimensions in inches (mm) 1.00 0.88 (25.4 ) (22.2) Fin Height Product Overall Width inches (mm) inches (mm) GT6-L5 3.13 (79.4) 0.38 (9.5)
- Page 58 2.75 6.00 (70) (153.0) 3x clearance 1.38 for #8 or M4 (35) 5.40 mounting screws (138.0) (251.5) 9.63 (244.5) (226.1) Dimensions in inches (mm) 1.00 0.88 (25.4 ) (22.2) Fin Height Overall Width Product inches (mm) inches (mm) GT6-U5 3.13 (79.4) 0.38 (9.5) GT6-U8 3.75 (95.3)
-
Page 59: Protective Circuits
Protective Circuits Short Circuit Protection The Gemini drive has an internal circuit that protects it from short circuits between one motor terminal to another (phase to phase), or from any motor terminal to earth. A short circuit fault is a latched fault. Causes of Fault: Phase to phase short circuit Phase to earth short circuit... - Page 60 Undervoltage Protection The Gemini drive’s undervoltage protection circuit monitors AC input voltage. If input voltage falls below 75VAC while the drive is operating, the drive issues an undervoltage fault, and turns off power to the motor. Undervoltage protection has the following features: Threshold Voltage: Voltage falling below 75VAC trips fault Results of Fault:...
-
Page 61: Cable Specifications
Cable Specifications This section contains specifications for Compumotor cables and cabling accesso- ries you can use with Gemini drives. CE Cables Many Compumotor cables are CE Cables. If installed according to instructions in Appendix C Regulatory Compliance: UL and CE, these cables are designed to aid the user in gaining European Compliance, and are thus an integral part of a CE system solution. - Page 62 Gemini 50 Pin Connector to 50 Pin D-Connector Cable Use this cable to connect the Gemini drive’s 50 pin DRIVE I/O connector to the 50 pin D-connector on the Gemini 50 pin breakout module (GEM-VM50). Part Number: 71-016945-03 CE Cable: Yes, if installed according to instructions in Appendix C This cable has the same pinout and color code as the flying lead cable;...
- Page 63 Gemini GC-50 – 50 Pin Connector The Gemini GC-50 is a 50 pin breakout module that connects directly to the 50 pin DRIVE I/O connector. Dimensions are shown below. CAUTION Connect wires to the GC-50 before installing it in the Gemini drive. This will avoid damage that may be caused by wiring the GC-50 while it is attached to the drive.
-
Page 64: Motors
A P P E N D I X B Using Non-Compumotor Motors IN THIS APPENDIX • Commands for Motor Configuration • Wiring and Connections: 4-, 6-, and 8-lead motors • Setting Motor Current and Drive Gains Appendix B – Non-Compumotor Motors... - Page 65 Commands for Configuration If you use a non-Compumotor motor, you must configure the drive for your motor by setting values for all commands in the following table. Also see the Motor Parameters table on the Motion Planner CD-ROM for examples of recommended drive configuration settings for Compumotor motors.
- Page 66 Wiring Configurations Refer to the manufacturer’s motor specification document to determine the motor’s wiring configuration. You can also determine the wiring configuration with an ohmmeter using the procedures below (4-Lead Motor, 6-Lead Motor, 8- Lead Motor). Once you determine the correct motor wiring configuration, use the terminal connection diagram, shown at the end of this section, that applies to your configuration.
- Page 67 8-Lead Motor Because of the complexity involved in phasing an 8-lead motor, you must refer to the manufacturer’s motor specification document. Using the manufacturer’s specifications, label the motor leads as shown in the next drawing. Phase B Windings 8-Lead Motor – Labeling the Leads You can configure the 8-lead motor in series or parallel.
- Page 68 Terminal Connections After you determine the motor’s wiring configuration, connect the motor leads to the Gemini drive’s MOTOR connector according to the following figure. 4-Lead Motor 6-Lead Motor Gemini Gemini Terminals Terminals A-CT A– A– A– A– B– B– B-CT B–...
- Page 69 Direction of Motor Rotation The procedures above do not determine the direction of motor shaft rotation. To find out which direction the shaft turns, you must power up your system and command motion. If the shaft turns in the opposite direction than you desire, exchange the motor leads connected to A+ and A–...
- Page 70 8-Lead Motors Manufacturers generally use either a bipolar rating or a unipolar rating for motor current in 8-lead motors. Bipolar Rating: If the manufacturer specifies the motor current as a bipolar series rating: • If you wire the motor in series, use the DMTIC command directly. •...
- Page 71 Gemini GT6 Hardware Installation Guide...
-
Page 72: Appendixc - Regulatory Compliance : Ul And Ce
A P P E N D I X C Regulatory Compliance: UL and CE IN THIS APPENDIX • Installation Instructions • Installation Guidelines • System Installation Techniques Appendix C – Regulatory Compliance: UL and CE... - Page 73 Regulatory Agencies The Gemini family of products is designed to meet the requirements of global regulatory agencies. Gemini products have shown compliance with the regulatory agencies in the following list. The list also shows additional steps users must take to ensure compliance.
- Page 74 89/336/EEC, the entire system must comply: motor, drive, cabling, and peripher- als. The installation of the product must include the following items. EMC Cabling For electromagnetic compatibility, you must use Parker Compumotor CE cables. EMC Motor For system CE compliance, you must use an EMC-ready motor, or a motor that has demonstrated acceptable EMC performance.
- Page 75 Installation Guidelines Gemini products are made available under “Restricted Distribution” for use in the “Second Environment” as described in EN 61800-3: 1996, page 9. Cabinet Mounting For Electromagnetic Compatibility, cabinet mounting is not required. However, Gemini drives have high voltage terminals—for safety purposes, the drive must not be user accessible during normal operation.
- Page 76 R-Clamp Remove outer jacket only. Do not cut braid. Bulkheak Clamshell Clamp Bulkheak Clamshell Clamp Enclosure Panel Enclosure Panel Cable Cable 360° Bonding Techniques The following clamps and clamp kits are available from Compumotor. Clamp Type: Compumotor Part Number: R-Clamp 58-016050-01 R-Clamp Kit (10 per) R CLAMP KIT...
- Page 77 System Installation The next figure shows a typical EMC installation. Gemini Limits Drive Bond braid to earthed panel. Use R-clamp or bulkhead clamshell clamp. (See 360° bonding drawing.) RS-232/485 Cable Mount to earthed metal panel, paint removed from VDC+ mounting locations +24VDC VDC–...
-
Page 78: Index
Index current Symbols bipolar rating 69 +24VDC keep alive power 32, 48 unipolar rating 68, 69 +24VDC power input 33 connector 50 current selection 360° bonding 75 pinouts 50 non-Compumotor motors 4-lead motor wiring 65 INDEB 52 68, 69 50 pin breakout module 61 INLVL 52 6-lead motor wiring 65 input voltage 48... - Page 79 panel mounting 55, 75 TAS 41 part numbering system 7 TASX 42 performance 49 TCS 42 phase balance 28 temperature 49 phase offset 28 temperature limits 58 Pocket Motion Planner 22 TERRLG 41 power connections 14 troubleshooting 40 product names 7 tuning 28 protective circuits 58 UL 50, 72...
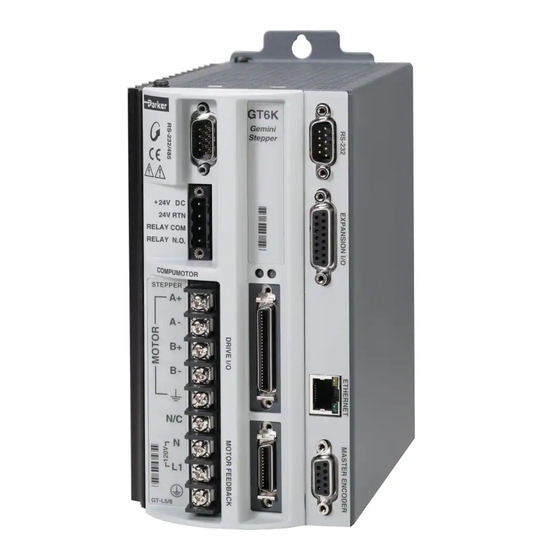
- Page 80 RS-232/485 Connector – Configuration Port: see page 34 LEDs – see page 40 To configure all drive parameters, connect a PC or HPC to this Green/Red Yellow/Green port. Use Motion Planner or Pocket Motion Planner for drive Gemini GT6 configuration. Digital Stepper RS-485 Connections LED Color:...
- Page 81 Artisan Technology Group is your source for quality new and certified-used/pre-owned equipment SERVICE CENTER REPAIRS WE BUY USED EQUIPMENT • FAST SHIPPING AND DELIVERY Experienced engineers and technicians on staff Sell your excess, underutilized, and idle used equipment at our full-service, in-house repair center We also offer credit for buy-backs and trade-ins •...