User Manuals: Bosch BULLS Twenty 6 EVO Mountain Bike
Manuals and User Guides for Bosch BULLS Twenty 6 EVO Mountain Bike. We have 2 Bosch BULLS Twenty 6 EVO Mountain Bike manuals available for free PDF download: Translation Of The Original Operating Instructions

Bosch BULLS Twenty 6 EVO Translation Of The Original Operating Instructions (116 pages)
Table of Contents
-
2 Safety
9-
Data Privacy11
-
Emergency12
-
-
Damper13
-
-
3 Overview
14-
Description15
-
Wheel15
-
Valve15
-
Suspension15
-
Rigid Fork15
-
Brake System17
-
Rim Brake17
-
Disc Brake18
-
Abs18
-
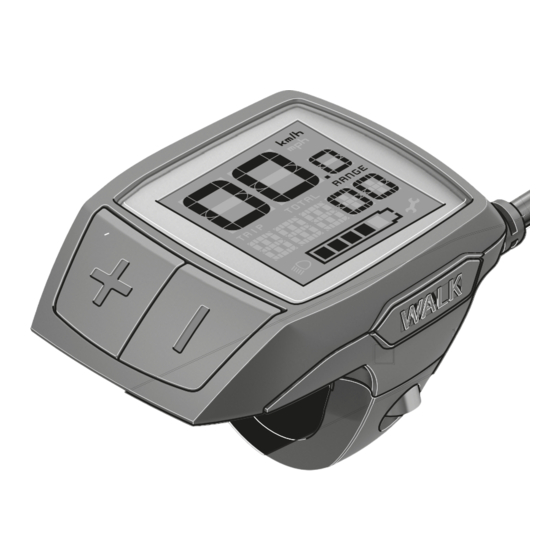
Display22
-
Riding Light22
-
Charger22
-
Proper Use23
-
Improper Use24
-
Pedelec25
-
-
Emissions27
-
Handlebars30
-
Transporting35
-
Storing36
-
Assembly37
-
Unpacking37
-
Kabolt Axle43
-
Firm Hold43
-
Pedelec Sale43
-
-
6 Operation
44-
Display46
-
-
Accessories61
-
Child Seat61
-
Pannier Rack62
-
Display69
-
Brake72
-
Using ABS73
-
While Riding74
-
-
Suntour Fork74
-
-
Gear Shift77
-
Using Eshift78
-
-
Hub Gears78
-
-
-
Hub Gears79
-
-
-
Servicing83
-
Wheel84
-
Brake System85
-
11 Documents
97 -
13 Glossary
113
Advertisement
Bosch BULLS Twenty 6 EVO Translation Of The Original Operating Instructions (119 pages)
Brand: Bosch
|
Category: Bicycle Accessories
|
Size: 18 MB
Table of Contents
-
Language8
-
Warnings9
-
Nameplate11
-
Safety12
-
Data Privacy14
-
Brake Fluid16
-
Damper16
-
Overview17
-
Description18
-
Valve18
-
Suspension18
-
Brake System20
-
Rim Brake20
-
Disc Brake21
-
Abs22
-
Riding Light26
-
Charger26
-
Proper Use27
-
Improper Use28
-
Pedelec29
-
Lighting30
-
USB Port30
-
Emissions31
-
Handlebars34
-
Transporting39
-
Storing40
-
Assembly42
-
Unpacking42
-
(15 MM)43
-
(20 MM)44
-
Pedelec Sale49
-
Operation50
-
Release55
-
Suntour Fork59
-
Accessories66
-
Child Seat66
-
Pannier Rack67
-
Brake79
-
Using ABS81
-
While Riding82
-
Fox Fork82
-
Shox Damper84
-
Gear Shift84
-
Use Eshift85
-
Hub Gears86
-
Servicing90
-
Maintenance91
-
Wheel91
-
Dunlop Valve91
-
Presta Valve92
-
Brake System92
-
Gear Shift93
-
Stem93
-
USB Port93
-
Maintenance94
-
Repair98
-
Documents100
-
Parts List100
-
Assembly Report101
-
Maintenance Log103
-
Keyword Index115
-
Glossary116
-
Appendix119
Advertisement