Sign In
Upload
Manuals
Brands
Applied Biosystems Manuals
Laboratory Equipment
GeneAmp PCR System 9700
Applied Biosystems GeneAmp PCR System 9700 Manuals
Manuals and User Guides for Applied Biosystems GeneAmp PCR System 9700. We have
4
Applied Biosystems GeneAmp PCR System 9700 manuals available for free PDF download: User Manual
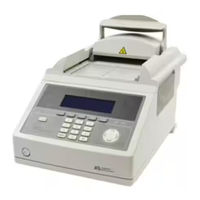
Applied Biosystems GeneAmp PCR System 9700 User Manual (128 pages)
Base Module
Brand:
Applied Biosystems
| Category:
Laboratory Equipment
| Size: 1 MB
Table of Contents
Table of Contents
5
1 Introduction and Safety
13
Overview
13
About this Chapter
13
In this Chapter
13
About this Manual
14
Overview
14
Instrument Safety
15
Before Operating the Instrument
15
Documentation User Attention Words
15
Symbols on Instruments
16
Electrical Symbols
16
Safety Symbols
16
Safety Labels on Instruments
17
Chemical Safety
18
Chemical Hazard Warning
18
Chemical Waste Hazard Warning
18
About Msdss
19
Ordering Msdss
19
About Waste Disposal
20
Geneamp PCR System 9700 Labels and Warnings
21
Instrument Safety Labels
21
Instrument Warnings Diagram
21
Danger of Burns
22
Grounding and Electrical Safety
22
Fuses
22
Laboratory Environmental Requirements
23
Introduction
23
Pollution
23
Emission/Immunity Statement
23
Routine Maintenance for Safe Operation
23
• U.S. and Canadian Safety Standards
24
Canadian EMC Standard
24
European Safety and EMC Standards
24
Australian EMC Standards
24
2 Product Overview
25
Overview
25
About this Chapter
25
In this Chapter
25
About the Geneamp PCR System 9700
26
About the Instrument
26
Control Panel
26
Control Panel Diagram
26
Using the Keys
27
Selecting a Field
27
Entering Numeric Values
27
Transfer or Storage of Methods
28
Upgrading the Firmware
28
How the 9700 Differs from the Geneamp PCR System 9600
29
3 Instrument Setup
31
Overview
31
About this Chapter
31
In this Chapter
31
Unpacking the Instrument
32
Inspecting the Instrument
32
Additional Part Numbers
32
Setting up Your Laboratory
33
Choosing a Location
33
Operating Temperature
33
What to Avoid
33
Do Not Block Air Vents
33
Fuse Service Configuration
34
Input Voltage
34
Interchangeable Sample Block Modules
34
Double-Line Fuse
35
Introduction
35
Fuse Part Number
35
Power Entry Module Diagram
35
Turning on the Instrument
36
Setting Custom Parameters
37
Overview
37
Displaying the Configuration Screen
37
Setting the Time
38
Setting the Date
38
Enabling or Disabling a Printer
38
Turning the Run-Time Beeper on or off
39
Setting the Pause Time out
39
Defining the Idle State Setpoint Temperature
40
Defining the Baud Rate for Your Printer Port
40
Configuring the Contrast and Screen Saver Options
41
Setting the IP Address
41
Running Instrument Diagnostics
43
Overview
43
Viewing the Diagnostic Screen
43
Testing the Electrical Components
44
Testing the Display Screen
45
Testing the Keypad
46
Using the T Calculator
47
How to Use the T
47
Calculator
47
Upgrading the System Firmware
48
Introduction
48
Upgrading through the Serial Port
48
Downloading Firmware Using Windows 95 or Windows NT
50
Downloading Firmware Using Windows 3.1
51
Upgrading Firmware from a PCMCIA Flash Memory Card
52
Copying Methods
54
How to Copy Methods
54
Connecting and Configuring a Printer
56
Connecting a Printer
56
Configuring the Printer
56
4 Running PCR Samples
57
Overview
57
About this Chapter
57
In this Chapter
57
Selecting a Method
58
Introduction
58
What Is a Method
58
Predefined Methods
58
Selecting a Method
59
Viewing Method Parameters
60
Searching for Methods
60
Sorting Methods
61
Running a Method
62
Starting a Run
62
About the Run Time Screen
63
Viewing Method Information
64
Pausing a Run
64
Stopping a Run before It Completes
65
Reviewing the History of a Run
66
How to Review the History of a Run
66
History Formats
66
History File Records
67
When a Run Completes
68
End of Run Screen
68
Method Not Stored Screen
68
5 Creating and Editing Methods
69
Overview
69
About this Chapter
69
In this Chapter
69
Adding or Changing Users
70
Introduction
70
Adding a New User Name
70
Protecting Methods
71
Changing a User Name
73
Deleting a User Name
73
Creating Methods
74
About the Default Method
74
Basic Parameters
74
Displaying the Create Methods Screen
75
Entering Temperature Control Parameters
76
Defining Pre-PCR Holds
77
Defining PCR Parameters
77
Defining Post-PCR Holds
78
Modifying Cycling
79
Introduction
79
Changing Temperature Control Parameters
79
Modifying Ramp Rates
80
Inserting Holds
81
Deleting Holds
82
Inserting Cycles
82
Inserting Programmed Pauses
82
Editing Programmed Pauses
84
Naming and Storing Methods
84
Printing a Method
85
Introduction
85
Editing or Deleting Methods
86
Introduction
86
Editing a Method
86
Deleting a Method
88
6 Converting Hold Times
91
Overview
91
About this Chapter
91
In this Chapter
91
About Setting Hold Times
92
Introduction
92
Hold Time Differences
92
Guidelines for Converting Hold Times
93
Introduction
93
What to Base the New Hold Times on
93
Setting up Ramps
93
Table of Conversions
93
Up Ramp Example
94
Setting down Ramps
94
Table of Conversions
95
Down Ramp Example
95
7 Routine Maintenance
97
Overview
97
About this Chapter
97
In this Chapter
97
Changing the External Fuses
98
Introduction
98
Power Entry Module Diagram
98
Changing Fuses
99
8 Troubleshooting
101
Overview
101
About this Chapter
101
In this Chapter
101
If There Is a Power Failure
102
Introduction
102
During a Power Failure
102
Display Screen Error Messages
103
Error Messages Table
103
Troubleshooting Information
106
Troubleshooting Table
106
A Instrument Specifications
107
Overview
107
About this Appendix
107
In this Appendix
107
System Specifications
108
Dimensions
108
Power Configurations
108
Electrical Requirements
108
Control Panel Specifications
110
Display Screen
110
Keys
110
Sample Temperature Information
110
Temperature
110
Printer Specifications
110
Serial Interface Board Specifications
110
Cable Part Number
110
B Supplied Methods
111
Overview
111
About this Appendix
111
In this Appendix
111
About the Methods
112
Introduction
112
Amplicycle Sequencing
112
Amplitaq Gold DNA Polymerase
112
Bigdye Terminators
113
General PCR
113
Lms2
114
Time Release PCR
114
Touchdown PCR
115
Xl Pcr
115
C Contacting Services and Support
117
D Limited Warranty Statement
119
Computer Configuration
119
Limited Product Warranty
119
Damages, Claims, and Returns
121
Advertisement
Applied Biosystems GeneAmp PCR System 9700 User Manual (132 pages)
Base Module
Brand:
Applied Biosystems
| Category:
Control Unit
| Size: 1 MB
Table of Contents
Table of Contents
3
1 Introduction and Safety
11
Overview
11
About this Chapter
11
In this Chapter
11
See Page
11
About this Manual
12
Overview
12
Instrument Safety
13
Before Operating the Instrument
13
Documentation User Attention Words
13
Safety Alert Symbols
14
Chemical Safety
16
Chemical Hazard Warning
16
Chemical Waste Hazard Warning
16
About Msdss
17
Ordering Msdss
17
Geneamp PCR System 9700 Labels and Warnings
19
Danger of Burns
20
Electrical Shock Hazard
20
Fire Hazard
21
Grounding and Electrical Safety
21
Fuses
21
Laboratory Environmental Requirements
22
Introduction
22
Pollution
22
2 Product Overview
23
Overview
23
About this Chapter
23
In this Chapter
23
About the Geneamp PCR System 9700
24
About the Instrument
24
Control Panel
24
Control Panel Diagram
24
Using the Keys
25
Selecting a Field
25
Entering Numeric Values
25
Transfer or Storage of Methods
26
Upgrading the Firmware
26
How the 9700 Differs from the Geneamp PCR System 9600
27
3 Instrument Setup
29
Overview
29
About this Chapter
29
In this Chapter
29
Unpacking the Instrument
30
Inspecting the Instrument
30
Additional Part Numbers
30
Setting up Your Laboratory
31
Choosing a Location
31
Operating Temperature
31
What to Avoid
31
Do Not Block Air Vents
31
Input Voltage
32
Interchangeable Sample Block Modules
32
Converting from a Single to Double-Line Fuse
33
Introduction
33
Fuse Part Number
33
Power Entry Module Diagram
33
Turning on the Instrument
35
Setting Custom Parameters
36
Overview
36
Displaying the Configuration Screen
36
Setting the Time
37
Setting the Date
37
Enabling or Disabling a Printer
37
Defining the Idle State Setpoint Temperature
39
Defining the Baud Rate for Your Printer Port
39
Configuring the Contrast and Screen Saver Options
40
Setting the IP Address
40
Running Instrument Diagnostics
42
Overview
42
Viewing the Diagnostic Screen
42
Testing the Keypad
45
Using the T Calculator
46
How to Use the T Calculator
46
Upgrading the System Firmware
47
Introduction
47
Upgrading through the Serial Port
47
Downloading Firmware Using Windows 95 or Windows NT
49
Downloading Firmware Using Windows 3.1
50
Upgrading Firmware from a PCMCIA Flash Memory Card
51
Copying Methods
53
How to Copy Methods
53
Connecting and Configuring a Printer
55
Connecting a Printer
55
Configuring the Printer
55
4 Running PCR Samples
57
Overview
57
About this Chapter
57
In this Chapter
57
Selecting a Method
58
Introduction
58
Predefined Methods
58
Selecting a Method
59
Viewing Method Parameters
60
Searching for Methods
60
Sorting Methods
61
Running a Method
62
Starting a Run
62
About the Run Time Screen
63
Viewing Method Information
63
Pausing a Run
63
Stopping a Run before It Completes
63
Reviewing the History of a Run
66
How to Review the History of a Run
66
History Formats
66
History File Records
67
When a Run Completes
68
End of Run Screen
68
5 Creating and Editing Methods
69
Overview
69
About this Chapter
69
In this Chapter
69
Adding or Changing Users
70
Introduction
70
Adding a New User Name
70
Protecting Methods
71
Deleting a User Name
73
Creating Methods
74
About the Default Method
74
Basic Parameters
74
Displaying the Create Methods Screen
75
Entering Temperature Control Parameters
76
Defining Pre-PCR Holds
77
Defining PCR Parameters
77
Defining Post-PCR Holds
78
Modifying Cycling
79
Introduction
79
Changing Temperature Control Parameters
79
Modifying Ramp Rates
80
Inserting Holds
81
Deleting Holds
82
Inserting Cycles
82
Inserting Programmed Pauses
82
Editing Programmed Pauses
84
Naming and Storing Methods
84
Printing a Method
85
Introduction
85
Editing or Deleting Methods
86
Editing a Method
86
Deleting a Method
88
6 Converting Hold Times
91
Overview
91
About this Chapter
91
In this Chapter
91
About Setting Hold Times
92
Introduction
92
Hold Time Differences
92
Guidelines for Converting Hold Times
93
Introduction
93
What to Base the New Hold Times on
93
Setting up Ramps
93
Table of Conversions
93
Up Ramp Example
94
Setting down Ramps
94
Table of Conversions
95
Down Ramp Example
95
7 Routine Maintenance
97
Overview
97
About this Chapter
97
In this Chapter
97
Changing the External Fuses
98
Introduction
98
Changing Fuses for Single-Line Operation
99
Changing Fuses for Double-Line Operation
100
8 Troubleshooting
101
Overview
101
About this Chapter
101
In this Chapter
101
If There Is a Power Failure
102
Introduction
102
During a Power Failure
102
Display Screen Error Messages
103
Error Messages Table
103
Troubleshooting Information
106
Troubleshooting Table
106
Overview
107
About this Appendix
107
In this Appendix
107
System Specifications
108
Dimensions
108
Power Configurations
108
Electrical Requirements
108
Control Panel Specifications
109
Display Screen
109
Keys
109
Sample Temperature Information
109
Temperature
109
Printer Specifications
109
Serial Interface Board Specifications
109
Cable Part Number
109
B Supplied Methods
111
Overview
111
About this Appendix
111
In this Appendix
111
About the Methods
111
Introduction
112
Amplicycle Sequencing
112
Amplitaq Gold
112
Bigdye
112
General PCR
112
Lms2
114
Time Release PCR
114
Touchdown PCR
115
Xl Pcr
115
100 C Contacting Technical Support
117
Technical Support
117
Contacting Technical Support
117
To Contact Technical Support by E-Mail
117
To Contact Technical Support by Telephone or Fax (North America
119
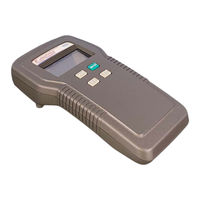
Applied Biosystems GeneAmp PCR System 9700 User Manual (151 pages)
Thermal Cycler Temperature Verification System
Brand:
Applied Biosystems
| Category:
Laboratory Equipment
| Size: 3 MB
Table of Contents
Table of Contents
3
Preface
7
Safety Information
7
How to Use this Guide
8
How to Obtain Support
8
Introduction 1
9
About the Temperature Verification System
10
About this Manual
10
Digital Thermometer
13
Probe Assembly
13
Temperature Verification Tests for the 2
15
Temperature Verification Tests for the 2720 Thermal Cycler
15
Overview
16
Temperature Calibration Verification Test
17
Temperature Non-Uniformity Test
21
Data Sheet: Calibration Verification Test
26
Data Sheet: Temperature Non-Uniformity Test
27
Temperature Verification Tests for the 3
29
Temperature Verification Tests for the Geneamp 9700 Thermal Cycler
29
Overview
30
Temperature Calibration Verification Test
31
Temperature Non-Uniformity Test
35
Data Sheet: Calibration Verification Test
40
Data Sheet: Temperature Non-Uniformity Test
41
Temperature Verification Tests for the 4
43
Overview
44
Calibration Verification Test
45
Temperature Non-Uniformity Test
50
Data Sheet: Calibration Verification Test
55
Data Sheet: Temperature Non-Uniformity Test
56
Thermal Cycler Temperature Verification System for Geneamp ® PCR Systems 2720, 9600, 9700, 9800
56
® Temperature Verification Tests for the Geneamp 9700, Dual 384-Well Sample Block Module 5
57
Calibration Verification Test
58
Temperature Non-Uniformity Test
63
Data Sheet: Calibration Verification Test
68
Data Sheet: Temperature Non-Uniformity Test
69
® Temperature Verification Tests for the Geneamp 9700, Auto-Lid Sample Block Module 6
71
Calibration Verification Test
72
Temperature Non-Uniformity Test
77
Data Sheet: Calibration Verification Test
82
Data Sheet: Temperature Non-Uniformity Test
83
® Temperature Verification Tests for the Geneamp 9700, 0.5-Ml Sample Block Module 7
85
Calibration Verification Test
86
Temperature Non-Uniformity Test
91
Data Sheet: Calibration Verification Test
96
Data Sheet: Temperature Non-Uniformity Test
97
Temperature Verification Tests for the Geneamp 9800 8
99
Calibration Verification Test
100
Temperature Non-Uniformity Test
105
Data Sheet: Calibration Verification Test
111
Data Sheet: Temperature Non-Uniformity Test
112
Temperature Verification Tests for the Geneamp 9600 9
113
Overview
114
Calibration Verification Test
115
Temperature Non-Uniformity Test
119
Data Sheet: Calibration Verification Test
122
Data Sheet: Temperature Non-Uniformity Test
123
Temperature Verification Tests for the Veriti Thermal Cycler 10
125
Overview
126
Calibration Verification Test
127
Temperature Non-Uniformity Test
131
Data Sheet: Calibration Verification Test
135
Data Sheet: Temperature Non-Uniformity Test
136
Advertisement
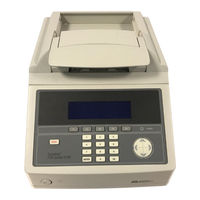
Applied Biosystems GeneAmp PCR System 9700 User Manual (53 pages)
Dual 96 Sample Block Module
Brand:
Applied Biosystems
| Category:
Laboratory Equipment
| Size: 2 MB
Table of Contents
Table of Contents
3
How to Use this Guide
5
Preface
5
How to Obtain more Information
6
How to Obtain Services and Support
6
Safety and EMC Compliance Information
8
Safety Conventions Used in this Document
8
Symbols on Instruments
9
Safety Labels on Instruments
10
Chemical Safety
11
General Instrument Safety
11
Chemical Waste Safety
13
Physical Hazard Safety
14
Electrical Safety
14
Workstation Safety
15
Safety and Electromagnetic Compatibility (EMC) Standards
16
Chapter 1 Dual 96 Sample Block Module Overview
17
About the Dual 96 Sample Block Module
18
Installing the Dual 96 Sample Block Module
22
Sample Tray and Plate Configurations
23
Loading Samples
25
Chapter 2 Maintaining the Sample Block Module
27
Cleaning the Sample Block Module
28
Putting the Heated Cover into Cleaning Position
28
Cleaning the Heated Cover
29
Cleaning the Sample Block Wells
29
Performing the Calibration Verification Test
31
Performing the Temperature Non-Uniformity Test
38
Advertisement
Related Products
Applied Biosystems GeneAmp PCR System 9600
Applied Biosystems GeneAmp 9800
Applied Biosystems GeneAmp PCR System 2700
Applied Biosystems 2720
Applied Biosystems 7300
Applied Biosystems 7500
Applied Biosystems 7500 Fast
Applied Biosystems 7900HT
Applied Biosystems A30207
Applied Biosystems A30208
Applied Biosystems Categories
Laboratory Equipment
Measuring Instruments
Bicycle Accessories
Software
Control Unit
More Applied Biosystems Manuals
Login
Sign In
OR
Sign in with Facebook
Sign in with Google
Upload manual
Upload from disk
Upload from URL