Applied Biosystems GeneAmp PCR System 9700 User Manual
Base module
Hide thumbs
Also See for GeneAmp PCR System 9700:
- User manual (53 pages) ,
- User manual (128 pages) ,
- User manual (151 pages)
Table of Contents
Advertisement
Quick Links
Advertisement
Table of Contents
Troubleshooting

Related Manuals for Applied Biosystems GeneAmp PCR System 9700


Summary of Contents for Applied Biosystems GeneAmp PCR System 9700
- Page 1 GeneAmp PCR System 9700 ® Base Module User’s Manual...
- Page 2 Information in this document is subject to change without notice. Applied Biosystems assumes no responsibility for any errors that may appear in this document. This document is believed to be complete and accurate at the time of publication. In no event shall Applied Biosystems be liable for incidental, special, multiple, or consequential damages in connection with or arising from the use of this document.
-
Page 3: Table Of Contents
GeneAmp PCR System 9700 Labels and Warnings........ - Page 4 Control Panel ............2-2 Control Panel Diagram .
- Page 5 Setting the IP Address ..........3-12 Running Instrument Diagnostics .
- Page 6 History File Records ........... 4-11 When a Run Completes .
- Page 7 6 Converting Hold Times Overview ..............6-1 About This Chapter .
- Page 8 To Contact Technical Support by Telephone or Fax (Outside North America) ..C-4 To Reach Technical Support Through the Applied Biosystems Web Site ... C-6 To Obtain Technical Documents.
- Page 9 To Obtain Customer Training Information ........C-7 D Limited Warranty Statement Index...
-
Page 11: Introduction And Safety
This chapter provides information to help you safely operate the GeneAmp System 9700. In This Chapter The following topics are covered in this chapter: Topics See Page About This Manual Instrument Safety Chemical Safety GeneAmp PCR System 9700 Labels and Warnings Laboratory Environmental Requirements 1-12 Introduction and Safety 1-1... -
Page 12: About This Manual
About This Manual Overview ® This manual describes how to use the GeneAmp PCR System 9700. It includes the following chapters and appendixes: Chapter 1, “Introduction and Safety,” contains safety information. Chapter 2, “Product Overview,” describes the instrument, its components, and requirements for installation. -
Page 13: Instrument Safety
Although the instrument has been designed to protect the user, this protection can be impaired if the instrument is used improperly. Documentation User Five user attention words appear in the text of all Applied Biosystems user Attention Words documentation. Each word implies a particular level of observation or action as described below. -
Page 14: Safety Alert Symbols
Safety Alert Symbols The following chart is an illustrated glossary of all electrical symbols that are used on Applied Biosystems instruments. Whenever such symbols appear on instruments, please observe appropriate safety procedures. Electrical Symbols This symbol indicates the On position of the main power switch. - Page 15 Nonelectrical Symbols The following is an illustrated glossary of all nonelectrical safety alert symbols found on Applied Biosystems instruments. This symbol illustrates a heater hazard. Proceed with caution when working around these areas to avoid being burned by hot components.
-
Page 16: Chemical Safety
Chemical Safety Chemical Hazard WARNING . Some of the chemicals used with Applied Biosystems CHEMICAL HAZARD Warning instruments and protocols are potentially hazardous and can cause injury, illness, or death. Read and understand the material safety data sheets (MSDSs) provided by the chemical manufacturer before you store, handle, or work with any chemicals or hazardous materials. -
Page 17: About Msdss
1.800.668.6913 From any other See the specific region under “To Contact Technical Support by country Telephone or Fax (Outside North America)” . To view, download, or order documents through the Applied Biosystems web site: Step Action Go to http://www.appliedbiosystems.com Click SERVICES &... - Page 18 About Waste As the generator of potentially hazardous waste, it is your responsibility to perform the Disposal actions listed below. Characterize (by analysis if necessary) the waste generated by the particular applications, reagents, and substrates used in your laboratory. Ensure the health and safety of all personnel in your laboratory. Ensure that the instrument waste is stored, transferred, transported, and disposed of according to all local, state/provincial, or national regulations.
-
Page 19: Geneamp Pcr System 9700 Labels And Warnings
GeneAmp PCR System 9700 Labels and Warnings Instrument Safety Safety labels are located on the instrument. Each safety label has three parts: Labels A signal word panel, which implies a particular level of observation or action (e.g., or WARNING). If a safety label encompasses multiple hazards, the CAUTION signal word corresponding to the greatest hazard is used. -
Page 20: Danger Of Burns
ELECTRICAL HAZARD. To reduce the chance of electrical shock do not remove covers that require tool access. No user serviceable parts are inside. Refer servicing to Hazard Applied Biosystems qualified service personnel. The three-pronged power cord and receptacle contain the grounding connector. WARNING ELECTRICAL HAZARD. -
Page 21: Fire Hazard
Fire Hazard WARNING FIRE HAZARD. For continued protection against the risk of fire, replace fuses only with Listed and Certified fuses of the same type and rating as those currently in the instrument. Grounding and The system 9700 must be grounded for protection against electrical shock. Electrical Safety CAUTION ELECTRICAL HAZARD. -
Page 22: Laboratory Environmental Requirements
Laboratory Environmental Requirements Introduction Take the precautions described in this section whenever you operate the system 9700. Read this section before you install the instrument. CAUTION The instrument should be used according to the instructions provided in this manual. If used otherwise, the protection provided by this instrument may be impaired. Temperature, IMPORTANT This instrument is designed for indoor use. -
Page 23: Product Overview
About This Chapter This chapter describes the GeneAmp ® PCR System 9700, its components, and requirements for installation. In This Chapter The following topics are contained in this chapter: Topic See page About the GeneAmp PCR System 9700 Product Overview 2-1... -
Page 24: About The Geneamp Pcr System 9700
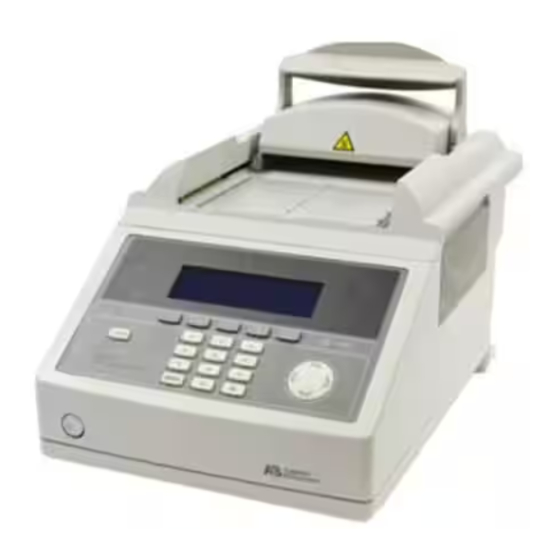
About the GeneAmp PCR System 9700 About the The GeneAmp PCR System 9700 is an automated instrument, specifically designed Instrument for the amplification of nucleic acids using the Polymerase Chain Reaction (PCR) process. The user interface consists of a control panel with a full numeric keypad, soft keys, and a graphical display screen that shows the time and temperature profile for each run. -
Page 25: Using The Keys
Using the Keys The following table describes the Control Panel keys in the previous figure. Use to... Soft keys (F1-F5) Select the function specified above the key. The function of each key is defined on the display screen above the key, and is redefined as you view different screens. Numeric keys Enter numbers from left to right into a field you highlight. -
Page 26: Transfer Or Storage Of Methods
RS485 ports With a PCMCIA Flash Memory Card Note Upgrade firmware can be ordered from the Applied Biosystems web site or by contacting PCR Technical Support. For more information about upgrading the firmware, see the following. If you are using... -
Page 27: How The 9700 Differs From The Geneamp Pcr System 9600
How the 9700 Differs ® The GeneAmp PCR System 9700 differs from the GeneAmp PCR System 9600 in from the GeneAmp the following ways: PCR System 9600 Reaction volumes of up to 50 µL only can be run and in the “9600 Mode”, as opposed to 100 µL in the GeneAmp PCR System 9600. -
Page 29: Instrument Setup
Instrument Setup Overview About This Chapter ® This chapter provides information on how to set up the GeneAmp PCR System 9700 and place it correctly in the laboratory, how to configure the instrument, and how to connect and configure a printer. In This Chapter The following topics are covered in this chapter: Topic... -
Page 30: Unpacking The Instrument
To order additional instruments or supplies, contact one of the regional offices listed in Appendix C, “Contacting Technical Support.” Additional Part You can order modules, accessories, and disposables from Applied Biosystems. Numbers To order this part... Use P/N... -
Page 31: Setting Up Your Laboratory
Setting Up your Laboratory Choosing a Location To prevent vibration, place the GeneAmp PCR System 9700 on a solid, stable, level surface that allows free airflow overhead and around the sides and back. You should keep all ventilation slots in the instrument cover free of obstruction, for example from excess printer paper. -
Page 32: Input Voltage
The GeneAmp PCR System 9700 will not operate without an interchangeable sample block module installed. For an example, refer to the GeneAmp PCR System 9700 96-Well Sample Block Module User Guide, for instructions on how to install a block and configure the samples. -
Page 33: Converting From A Single To Double-Line Fuse
Converting from a Single to Double-Line Fuse Introduction WARNING FIRE HAZARD. For continued protection against the risk of fire, replace fuses only with listed and certified fuses of the same type and rating as those currently in the instrument. This procedure describes how to convert the instrument from the single-line configuration to double-line service (220/230/240 V nominals only). - Page 34 Converting Single to The following procedure describes how to convert from a single to a double-line fuse. Double-line Fuse Note Remove the jumper clip from the fuse compartment to convert the instrument from single-line to double-line service. To convert from a single to a double-line fuse: Step Action Disconnect the power cord from the power entry module.
-
Page 35: Turning On The Instrument
GeneAmp® PCR System 9700 Name:tc001 User:<<pe>> Create Edit Util User Note The Main menu should appear within a few seconds. If any permanent patterns of lines or bars display on the screen, contact Applied Biosystems Technical Support. Instrument Setup 3-7... -
Page 36: Setting Custom Parameters
Setting Custom Parameters Overview The instrument is shipped with default configuration values. The following procedure describes how to set customized values as well as how to enable or disable optional features. Displaying the To display the Configuration Screen: Configuration Screen Step Action From the... -
Page 37: Setting The Time
Setting the Time In the first Configuration screen, you can set the current time and date for file memory maintenance, and run-time displays. You can also enable or disable the run-time printer and the run-time beep. To set the time: Step Action Use the Circular Key Pad to select the... - Page 38 Turning the When turned on, the run-time beeper beeps during a pause and once at the Run-Time Beeper completion of a run. The default value is Off. On or Off To turn the Run Time-Beeper on or off: Step Action Select the field.
-
Page 39: Defining The Idle State Setpoint Temperature
Baud Rate field. Printer Port Serial Board Specifications You can connect the GeneAmp PCR System 9700 to any printer with a serial interface board and the following specifications. Baud Rate... -
Page 40: Configuring The Contrast And Screen Saver Options
IP address and instrument name you select in the following procedure. Note See the System 9700 Networking Software User’s Manual (P/N 4309575) for more information about networking GeneAmp PCR System 9700 instruments. To set the IP Address for an instrument: Step Action... - Page 41 To set the IP Address for an instrument: (continued) Step Action Using the Circular Key Pad and key, enter up to a 16 character name for Enter identifying the instrument on the network. abcdefghi jklmnopqr stuvwxyz IP Name: Cycler 01 .,-+/():= Press ENTER key to select a character.
-
Page 42: Running Instrument Diagnostics
Running Instrument Diagnostics Overview The instrument provides a number of internal diagnostic utilities, tests you can run to verify that the instrument hardware and software components meet performance specifications. Viewing the The following procedure describes how to view the Diagnostic screen. Diagnostic Screen To view the Diagnostic screen: Step... - Page 43 Testing the Use the hardware diagnostic utilities to test the electrical components of the 9700 Electrical instrument. Components To test the electrical components: Step Action From the screen, press Diagnostics Hard The Hardware Diagnostics appears. Hardware Diagnostics Disp - LCD Display Diagnostic Keypad - Keypad Diagnostic Disp...
- Page 44 Testing the Display The Display diagnostic test allows you to visually determine if the display screen is Screen properly functioning by turning on and off all the LCD pixels. To test the display screen: Step Action From the screen, press Hardware Diagnostics Display The Display Diagnostic screen appears.
-
Page 45: Testing The Keypad
Testing the Keypad Use the Keypad diagnostic test to verify that all 22 keys on the control panel are functioning properly. To test the keypad: Step Action From the screen, press Hardware Diagnostics Keypad The Keypad Diagnostic screen appears. Keypad Diagnostic After pressing Run, press the blinking key or press STOP twice to exit. -
Page 46: Using The T Calculator
Using the T Calculator How to Use the Use the T Calculator to determine the annealing temperature of a primer set of Calculator known sequence. To use the T Calculator: Step Action From the menu, press . The Utilities screen opens as shown below. Main Util Utilities... -
Page 47: Upgrading The System Firmware
Upgrading the System Firmware Introduction You can update the GeneAmp PCR System 9700 firmware from a serial connection to the RS485 port or from a PCMCIA Flash Memory Card. Contact your local Applied Biosystems representative to obtain a PCMCIA Flash Memory Card. - Page 48 To upgrade the firmware through the RS485 serial port: (continued) Step Action From the screen, press Firmware Upgrade Serial Serial Port Firmware Upgrade Attach cable from RS485 port on 9700 to serial port on computer. Press Update, then begin download of file from the computer.
-
Page 49: Downloading Firmware Using Windows 95 Or Windows Nt
Protocol Enter Kermit. A dialog box appears that displays the current packet number and the number remaining. When the download is complete, the GeneAmp PCR System 9700 automatically resets. From the menu, choose to save the parameters. -
Page 50: Downloading Firmware Using Windows 3.1
A message at the bottom of the window indicates that the program is sending the file and a progress bar appears. When the download is complete the GeneAmp PCR System 9700 automatically resets. When the download is complete, from the... -
Page 51: Upgrading Firmware From A Pcmcia Flash Memory Card
The following procedure describes how to upgrade the firmware using a PCMCIA Firmware from a Flash Memory Card. PCMCIA Flash Contact your local Applied Biosystems representative to obtain a PCMCIA Note Memory Card Flash Memory Card. To upgrade using a PCMCIA Flash Memory Card:... - Page 52 To upgrade using a PCMCIA Flash Memory Card: (continued) Step Action If the PCMCIA Flash Memory Card contains a valid firmware upgrade, the Upgrade screen appears. DO NOT TURN OFF THE INSTRUMENT OR REMOVE THE PC CARD! Upgrading the instrument firmware will take approximately 30 seconds.
-
Page 53: Copying Methods
Copying Methods How to Copy You can copy methods from a Methods Transportability card to the instrument or from Methods the instrument to a Methods Transportability card (P/N 940-1064). Runs can be made directly from methods on a Methods Transportability card. To copy a method: Step Action... - Page 54 To copy a method: (continued) Step Action In the dialog box, you can take the following action: Copy Method Press... To... ToInst Transfer a method from a Methods Transportability card to the instrument. ToCard Transfer a method from the instrument to a Methods Transportability card.
-
Page 55: Connecting And Configuring A Printer
Connecting and Configuring a Printer Connecting a Printer If you connect an optional printer to your 9700 instrument, you can print out a hard copy of the time and temperature parameters for the PCR methods you create. Connect one end of your printer cable (N805-1326) to the RS-485 serial port on the side panel of the 9700 instrument and connect the other end to the RS-232C interface serial adapter on the rear panel of the printer. -
Page 57: Running Pcr Samples
Running PCR Samples Overview About This Chapter This chapter provides information on selecting a method, starting and stopping a run, reviewing the history of a run, and what to do when the run is completed. In This Chapter The following topics are covered in this chapter: Topic See page Selecting a Method... -
Page 58: Selecting A Method
Selecting a Method Introduction After you have prepared your samples and loaded them in the sample block, you can run a PCR amplification with a new or a stored method. What Is a Method A method is a set of instructions in which you specify how the instrument should heat and cool your samples in a PCR thermal profile. -
Page 59: Selecting A Method
Selecting a Method If the method you want to run has already been created and stored, you can select it from a list. If the method you want to run has not been created, see Chapter 5, “Creating and Editing Methods.” To select a method: Step Action... -
Page 60: Viewing Method Parameters
Viewing Method To view parameters of a method before running: Parameters Step Action From the Stored Methods screen, press View screen appears. The screen shows all the parameters of the View Method method you selected. 2 Hld 3 Tmp 25 Cycles 2 Holds 94.0 94.0... -
Page 61: Sorting Methods
Sorting Methods If you have a large number of stored methods, you can sort them by name, date last used, date stored and size. To sort methods: Step Action From the screen, press Stored Methods Sort The sorting criteria screen appears. Sort Methods By: Method name Date last used... -
Page 62: Running A Method
Running a Method Starting a Run After choosing a method, follow these steps to start a run. To start a run: Step Action From the menu, press to display stored methods. Main Use the up and down Circular Key Pad to select the method. a. -
Page 63: About The Run Time Screen
To start a run: (continued) Step Action Press to start a run. Start If the temperature of the heated cover is less than 103 °C, this message, “Cover is heating” appears. Please wait. Cover is heating Current temperature: 65°C The run will begin when the heated cover reaches 103°C. - Page 64 Viewing Method You can view the Method Information screen during a run by pressing Info. Press Information Return to return to the Run Time screen. 02:32 PM Information 55.2°C User: lisa Method: XL PCR Run started at 01:32:30 PM, 01/01/00. Run will end at 06:35:30 PM, 01/01/00.
- Page 65 Stopping a Run The following procedure describes how to stop a run before it completes. Before It Completes To stop a run before it completes: Step Action Press the key. Stop screen appears. Stop confirmation Sample 50.1 Confirm Stop Press STOP to abort. Press Resume to continue.
-
Page 66: Reviewing The History Of A Run
Reviewing the History of a Run How to Review the You can read a record of the events and errors that occurred during a run by reviewing History of a Run the history file. The instrument stores the history file until it is overwritten by the next method used. -
Page 67: History File Records
History File Records The following table lists the history file records. Record Description Type History of method xxxxxxxxxxxxxxx This header record is always created. Report User xxxxxx Reaction volume xxx µL Note If you stopped a method before Run started at hh:mm:ss am mm/dd/yy it completed running, then the Run ended at hh:mm:ss am mm/dd/yy message, Run ended at..., will be Run... -
Page 68: When A Run Completes
When a Run Completes End of Run Screen At completion of a run, the instrument beeps and the End of Run screen appears. From the End of Run screen you can perform the same functions as you can from the Stop Run screen. -
Page 69: Creating And Editing Methods
Creating and Editing Methods Overview About This Chapter This chapter provides information about how to create and edit PCR methods and how to work with stored methods. In This Chapter The following topics are covered in this chapter: Topic See page Adding or Changing Users Creating Methods Modifying Cycling... -
Page 70: Adding Or Changing Users
Adding or Changing Users Introduction ® The GeneAmp PCR System 9700 stores methods by user’s names. You can add up to 19 different user names to the instrument. Once you’ve added your name to a list of users, and stored a method under that name, you can run the method at any time by selecting it from the Stored Methods screen (See “Selecting a Method”... -
Page 71: Protecting Methods
To add a new user name: (continued) Step Action In the field, enter an alphanumeric name up to six characters in length. User Name You can take the following action: If you want to... Then... select a character in the list shown in use the Circular Key Pads. - Page 72 Follow the procedure below to protect a method. To protect a method: Step Action Press PIN # New PIN Number screen appears. Create a PIN Number Your PIN number protects the access to your user name and protection level Enter a PIN number. New PIN #: XXXX Accept Cancel...
-
Page 73: Deleting A User Name
Changing a User If you know the personal identification number for a user name, you can use the Name Circular Key Pad to select that name, and change it. To change a user name: Step Action From the menu, press Main User screen appears. -
Page 74: Creating Methods
Creating Methods About the Default The GeneAmp PCR System 9700 comes with a default PCR thermal profile called a Method method. The create screen displays this default method. For information on displaying the create screen, see “Displaying the Create Methods Screen” on page 5-7. -
Page 75: Displaying The Create Methods Screen
Displaying the Follow the steps below to display the Create Methods screen. Create Methods To display the Create Methods screen Screen Step Action From the menu, press . The create screen appears. Main Create 1 Hld 3 Tmp 25 Cycles 2 Holds 94.0 94.0 72.0... -
Page 76: Entering Temperature Control Parameters
Entering When you enter temperature control parameters, you define values for parameters in Temperature each of the three segments of a method: pre-PCR, PCR, and post-PCR. Control Parameters To enter temperature control parameters: Step Action On the screen, select a field. Create When you first display the Create screen, the field is highlighted. -
Page 77: Defining Pre-Pcr Holds
Defining Pre-PCR The Hld field on the Create screen defines the number of holds for the pre-PCR Holds segment of your method. One (1) is the typical setting for most PCR amplifications and is the default value for the Hld field. Generally, pre-PCR holds define a temperature and hold-time sufficient to denature any endonucleases or exonucleases that may contaminate your prepared samples. -
Page 78: Defining Post-Pcr Holds
To define the PCR parameters: (continued) Step Action Create the first hold-time parameter: a. Press Enter b. Type in a hold-time value between 00:00 and 98:59 (minutes:seconds). Repeat step 3 and step 4 until you have time and temperature values for each of the segment temperature control parameters you defined in step 1. -
Page 79: Modifying Cycling
Modifying Cycling Introduction In addition to customizing values for PCR temperature control parameters, you can use the More function on the create screen and access cycle modification functions that allow you to: Auto-increment/decrement time and temperature parameters. Modify up-ramp and down-ramp rates in the cycling segment of a method. Insert holds, cycles, and programmed pauses. -
Page 80: Modifying Ramp Rates
To automatically change temperature control parameters: (continued) Step Action You can take the following action: If you want to... Then press... increase the value every cycle + (plus sign). (a plus sign displays in the current field) decrease the value every cycle - (minus sign). -
Page 81: Inserting Holds
To modify ramp rates: (continued) Step Action Modify the up-ramp and down-ramp rates you selected by defining them as a percentage of the maximum of 100%: If you want to... Then press... increase the ramp rate by 10% up to a maximum of 100% key. -
Page 82: Deleting Holds
Deleting Holds Follow the procedure below to delete holds. To delete holds: From the screen, select a hold parameter and press Edit More Use the Circular Key Pad to a select a time or temperature hold parameter. 2 Pre-PCR 3 Tmp 25 Cycles 2 Holds 94.0 94.0... - Page 83 To insert a programmed pause: (continued) Step Action From the Insert screen, press . The screen appears. Pause Programmed Pause Define Programmed Pause Start first pause at cycle 1 of 25. Pause every 25 cycles for 00:30. Beep during the pause? No Accept Cancel In the...
-
Page 84: Editing Programmed Pauses
Editing If you have inserted a programmed pause in your method, you can edit the Programmed Pauses parameters for the pause at any time. To edit programmed pauses: Step Action From the screen, use the Circular Key Pad to highlight the word . -
Page 85: Printing A Method
To name and store methods: (continued) Step Action In the field, follow these steps to enter a 1–16 character alphanumeric Method Name name. Step Action Use the Circular Key Pad to select a character in the list shown in the upper right portion of the screen. -
Page 86: Editing Or Deleting Methods
Editing or Deleting Methods Introduction After you create a method, you can edit its parameters, and store the method by the same name, or change its name. At some time, you may also want to delete a method if you are no longer using it. You can access all editing functions from the Main menu. The delete screen is accessed through the utility menu. - Page 87 To edit a method: (continued) Step Action Press after selecting a method. The Edit screen appears. Edit 2 Pre-PCR 3 Tmp 25 Cycles 2 Holds 94.0 94.0 72.0 72.0 55.0 10:00 0:30 55.0 0:30 5:00 2:00 0:30 Hold Cycle Pause Cancel Choose a temperature or time parameter within a PCR segment.
-
Page 88: Deleting A Method
Deleting a Method The following procedure describes how to delete a method. To delete a method: Step Action From the screen, press and then press . The Delete Method Utilities More Delete screen appears. Delete Method Methods on Inst User Size Stored exp001... - Page 89 To delete a method: (continued) Step Action Press to confirm the deletion. This deletes the method and returns you to the Delete screen. Note Even after you delete the last method stored under a User name, the name is removed from the instrument. To delete the name, see “Deleting a User Name” on page 5-5.
-
Page 91: Converting Hold Times
Converting Hold Times Overview About This Chapter ® This chapter provides information about setting hold times for the GeneAmp System 9700 compared to the DNA Thermal Cycler or DNA Thermal Cycler 480. This information is based upon differences in how the instruments heat and cool samples. Note Protocols using sample volumes between 5 µL and 50 µL, developed on either the ®... -
Page 92: About Setting Hold Times
A hold time of one minute or greater is required on the DNA Thermal Cycler and the DNA Thermal Cycler 480 for samples to reach the target temperature. On the GeneAmp PCR System 9700, hold times of less than one minute are generally used. -
Page 93: Guidelines For Converting Hold Times
Subtract the number of seconds indicated from the hold time used for the DNA Thermal Cycler or the DNA Thermal Cycler 480. The result is the hold time to use for the GeneAmp PCR System 9700. Note The typical hold time is 10 to 15 seconds for denaturation. -
Page 94: Up Ramp Example
35 seconds (see the figure below). Note If methods developed on the GeneAmp PCR System 9700 will be used on the DNA Thermal Cycler or the DNA Thermal Cycler 480, you can also use Table 6-1 to convert the hold times. -
Page 95: Table Of Conversions
Thermal Cycler 480, resulting in a new hold time of 27 seconds. Note If the methods developed on the GeneAmp PCR System 9700 will be used on the DNA Thermal Cycler or the DNA Thermal Cycler 480, use Table 6-2 to convert the hold times. Add the indicated times instead of subtracting them. -
Page 97: Routine Maintenance
System 9700. CAUTION Do not remove the instrument cover. There are no components inside the GeneAmp PCR System 9700 that you can safely service yourself. If you suspect a problem, contact an Applied Biosystems Technical Support Representative. In This Chapter... -
Page 98: Changing The External Fuses
Changing the External Fuses Introduction CAUTION FIRE HAZARD. For continued protection against the risk of fire, replace fuses only with listed and certified fuses of the same type and rating as those currently in the instrument. All instruments have factory installed fuses. However, if you should ever need to change a fuse, or if you need to convert from the factory configured single-line service to double-line service, follow the instructions that follow in this chapter. -
Page 99: Changing Fuses For Single-Line Operation
Changing Fuses for There is one Type T 250 V fuse accessible from the side of the instrument. You need a Single-Line flat-tip screwdriver to open the door of the Power Entry Module and change the fuse. Operation To change the fuse for single-line operation: Step Action Turn off the instrument and disconnect the power cord from the side of the... -
Page 100: Changing Fuses For Double-Line Operation
Changing Fuses for Instruments configured for double-line operation have two 8 amp Type T 250 V Double-Line 5x20 mm fuses ( P/N 0999-1683). Operation To change the fuses for double-line instruments: Step Action Turn off the instrument and disconnect the power cord from the side of the instrument. -
Page 101: Troubleshooting
Troubleshooting Overview About This Chapter This chapter describes instrument problems you may have, the probable causes of these problems, and any display screen messages you may encounter when using ® the GeneAmp PCR System 9700. In This Chapter The following topics are covered in this chapter: Topic See page If There Is a Power Failure... -
Page 102: If There Is A Power Failure
If There Is a Power Failure Introduction An automated restart function allows for power failures and safe continuation of a PCR run after resumption of power. During a Power The following table lists the actions the instrument takes if the power is interrupted and Failure the instrument turns off while you are operating it. -
Page 103: Display Screen Error Messages
Display Screen Error Messages Error Messages Refer to the following table for a description of error messages, and recommended Table actions that you should take. Table 8-1 Error Messages Message Description Recommended Action Battery RAM version number This error is generated when the battery RAM has Call Technical Support. - Page 104 The feature is not implemented in the current firmware Upgrade firmware when the version. new version is available from Applied Biosystems. PC card and Flash do not The PC (upgrade) card and instrument memory do not Call Technical Support. verify match.
- Page 105 Table 8-1 Error Messages (continued) Message Description Recommended Action Preferences battery RAM User configuration has been reset due to software Call Technical Support. initialized error. Printer not responding The printer has been disconnected or is off line. Check printer connections and power switch.
-
Page 106: Troubleshooting Information
Heated cover not responsive Heated cover failure. Call Technical Support. Heating rate too slow Run Rate Test diagnostic. Peltier failure. Call Applied Biosystems Technical Support. Instrument can’t reach high or low Ambient temperature is too warm. Run Rate Test diagnostic. temperature range Peltier failure. -
Page 107: Overview
Instrument Specifications Overview About This This appendix describes the dimensions, power, and electrical specifications for the Appendix GeneAmp ® PCR System 9700 system, including the control panel, sample temperature information, and printer specifications. In This Appendix The following topics are covered in this appendix: Topic See page System Specifications... -
Page 108: System Specifications
System Specifications Dimensions The following tables list the footprint and the weight of the instrument with the 96–Well or 60–Well sample block module. Footprint (With Sample Block Module Installed) Height 26 cm (10 in) Width 28 cm (11 in) Depth 41 cm (16 in) Note You must provide sufficient space around the instrument for unrestricted air circulation. -
Page 109: Control Panel Specifications
Control Panel Specifications Display Screen The display screen is a 7 x 40 character display with a graphics mode of 60 x 240 pixel resolution. Keys The instrument control panel consists of a display screen and 22 keys. The keys are: Function keys Arrow keys Stop key... -
Page 111: B Supplied Methods
Supplied Methods Overview About this Appendix This appendix provides information about the methods that are supplied with the GeneAmp ® PCR System 9700. In This Appendix The following topics are covered in this appendix: Topic See page About the Methods AmpliCycle Sequencing AmpliTaq Gold BigDye... -
Page 112: Introduction
About the Methods Introduction The instrument supplies you with eight pre-coded methods stored under the user name <<pe>>. The eight pre-coded methods are: AmpliCycle ® Sequencing ® AmpliTaq Gold ™ BigDye General PCR LSM2 Time Release PCR Touchdown PCR XL PCR See the following sections for detailed information about the methods. - Page 113 (Sanger) RISM ® terminator sequencing using ABI P BigDye™ Terminator Cycle Sequencing Ready Reaction Kits (available from Applied Biosystems). It consists of 25-cycle, three-temperature cycle sequencing followed by an infinite hold at 4 °C. 3 Tmp 25 Cycles 1 Hld 96.0...
-
Page 114: Lms2
LMS2 The GeneAmp PCR System 9700 software includes a pre-coded LMS2 method for RISM ® ABI P Linkage Mapping Set Version 2 (LMS2) thermal cycling. Linkage Mapping Set 2 employs over 400 fluorescent-labeled PCR primer pairs for analysis of select microsatalite loci from the Généthon human linkage map. -
Page 115: Touchdown Pcr
Touchdown PCR When the optimal annealing temperature is unknown, one strategy, touchdown PCR, incrementally decreases the annealing temperature in early cycles in order to maximize the yield of specific products. 2 Tmp x 20 2 Tmp x 10 94.0 94.0 0:15 0:15 65.0... -
Page 117: Technical Support
You can order Applied Biosystems user documents, MSDSs, certificates of analysis, and other related documents 24 hours a day. In addition, you can download documents in PDF format from the Applied Biosystems web site. (Please see the section “To Obtain Technical Documents” following the telephone information below) - Page 118 ™ (PS1) Systems ICAT ™ Reagent ä FMAT 8100 HTS Systems ä Mariner ESI-TOF Mass Spectrometry Workstations ä Voyager MALDI-TOF Biospectrometry Workstations ® CytoFluor 4000 Fluorescence Plate Reader LC/MS support@sciex.com (Applied Biosystems/MDS Sciex) Chemiluminescence (Tropix) tropix@appliedbiosystems.com C-2 Contacting Technical Support...
-
Page 119: To Contact Technical Support By Telephone Or Fax (North America
To Contact Technical To contact Applied Biosystems Technical Support in North America, use the telephone Support by or fax numbers in the table below. Telephone or Fax Note To schedule a service call for other support needs, or in case of an emergency, dial (North America) 1.800.831.6844, then press 1. - Page 120 8:00 AM to 6:00 PM Eastern time. c. 9:00 AM to 5:00 PM Eastern time. To Contact Technical To contact Applied Biosystems Technical Support or Field Service outside North Support by America, use the telephone or fax numbers below.
- Page 121 Region Telephone Norway (Oslo) 47 23 12 06 05 47 23 12 05 75 Portugal (Lisboa) 351.(0)22.605.33.14 351.(0)22.605.33.15 Spain (Tres Cantos) 34.(0)91.806.1210 34.(0)91.806.12.06 Sweden (Stockholm) 46 (0)8 619 4400 46 (0)8 619 4401 Switzerland (Rotkreuz) 41 (0)41 799 7777 41 (0)41 790 0676 The Netherlands (Nieuwerkerk a/d 31 (0)180 392400 31 (0)180 392409...
- Page 122 To Reach Technical At the Applied Biosystems web site, you can search through frequently asked Support Through questions (FAQs) or a solution database, or you can submit a question directly to the Applied Technical Support. Biosystems Web Site Search FAQs...
- Page 123 Follow the voice instructions to order documents (for delivery by fax). Note There is a limit of five documents per fax request. Obtaining Documents Through the Web Site To view, download, or order documents through the Applied Biosystems web site: Step Action Go to http://www.appliedbiosystems.com...
- Page 125 Applied Biosystems or its designees, or that has been used in a manner not in accordance with the instructions contained in the Instrument User’s Manual.
- Page 127 Index Numerics cycling, modifying 5-11 to 5-17 AutoX function, using 5-11 to 5-12 480 DNA Thermal Cycler cycles, inserting 5-14 converting hold times 6-2 to 6-5 deleting holds 5-14 holds inserting 5-13 alphanumeric characters, entering 5-3 ramp rates, modifying 5-12 to 5-13 AmpliCycle Sequencing 4-2, B-2 about supplied method B-1, B-2, B-3 AmpliTaq Gold 4-2, B-2...
- Page 128 1-10 fire hazard 1-11 GeneAmp PCR System 9700 instrument warnings 1-9 Control Panel heated cover screen 4-7 about 2-2 heating, of samples 5-8 specifications A-3 history of run, reviewing copying methods 3-25 to 3-26 history file records 4-11...
- Page 129 Create Methods screen, displaying 5-7 parity bit 3-11, 3-27 default method, about 5-6 part numbers PCR holds, defining 5-9 to 5-10 for ordering accessories 3-2 post-PCR holds, defining 5-10 fuse part number 3-5 pre-PCR holds, defining 5-9 Pause Time Out, setting 3-10 temperature control parameters, entering 5-8 pauses, programmed editing or deleting methods 5-18 to 5-21...
- Page 130 SRAM card, using to copy methods 3-25 to 3-26 starting instrument 3-7 warning stop bit 3-11, 3-27 chemical hazard 1-6 Stop key, definition of 2-3 chemical waste hazard 1-6 storing methods 5-16 to 5-17 waste disposal 1-8 system firmware, upgrading 3-19 to 3-24 Win 3.1, downloading firmware using 3-22 through serial port 3-19, 3-22 Windows 95/Windows NT...
- Page 132 Technical Support and Training appendix in this document. www.appliedbiosystems.com Applera Corporation is committed to providing the world’s leading technology and information for life scientists. Applera Corporation consists of the Applied Biosystems and Celera Genomics businesses. Printed in Singapore 11/2001 Part Number 4303481 Rev. E...
Need help?
Do you have a question about the GeneAmp PCR System 9700 and is the answer not in the manual?
Questions and answers