Table of Contents
Advertisement
Quick Links
Apollo DLG
Apollo
Apollo
Apollo
Discus Launch Glider
Discus Launch G
Discus Launch G
Discus Launch G
Almost-Ready-to-Fly
Instruction Manual
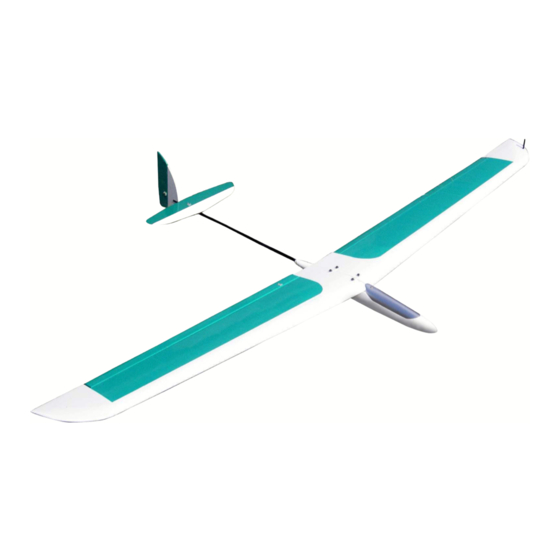
Specifications
Wing Span: 1550mm (61in)
Length: 1050mm (41in)
Wing area: 24.5sq dm (358sq in)
Weight (kit): 350g (12.35oz)
Airfoil: MH32
DLG
DLG
DLG
lider
lider
lider
Advertisement
Table of Contents

Related Manuals for Value Hobby Apollo DLG


Summary of Contents for Value Hobby Apollo DLG
- Page 1 Apollo Apollo DLG Apollo Apollo Discus Launch G Discus Launch Glider Discus Launch G Discus Launch G lider lider lider Almost-Ready-to-Fly Instruction Manual Specifications Wing Span: 1550mm (61in) Length: 1050mm (41in) Wing area: 24.5sq dm (358sq in) Weight (kit): 350g (12.35oz)
-
Page 2: Dear Customer
Further, Value Hobby reserves the right to modify this warranty without notice. Value Hobby has no control over the final stages of assembly or the material used for the final assembly. No liability shall be assumed nor materials used for the final user-assembled product. By the act of using the final product the user accepts all resulting liability. -
Page 3: Safety In Flying
Examination Unpack your airplane and examine the components. Check for damage of any kind. If you see any damage, please contact Value Hobby immediately. Covering Your airplane was packed in plastic at the factory without any wrinkles in the covering. You may notice some wrinkles now;... -
Page 4: Recommended Setup
www.valuehobby.com/apollo-dlg.html Recommended Setup Configuration Model Radio 4 channel Speed Control 3A Brushless ESC Recommended GForce 20C 240mAh 2S 7.4V LiPO Battery′LiPO″ Servos 9g servos Universal Servo Y-Harness ′300mm″ 11.8-Inch (Futaba "J" and Y-Harness JR Compatible) Universal Servo Extension ′600mm″23.6-Inch (Futaba "J" and Extension JR Compatible) Charger... -
Page 5: Section 1: Horizontal Tail Installation
www.valuehobby.com/apollo-dlg.html Step4. Place the tail boom on the horizontal tail and Section 1: Horizontal Tail Installation adjust tail boom to make the distance of AB is 400mm (15.7in). Step1. Locate the horizontal tail wing.(The measurement shows the location of the mounting block). -
Page 6: Section 2: Vertical Tail Installation
www.valuehobby.com/apollo-dlg.html Step4. Use the CA to glue the vertical tail to the tail Section 2: Vertical Tail Installation boom. (Adjust to make the vertical tail perpendicular to the wing). Step1. Mark on the vertical fin where 70mm (2.8in) from the left edge of the vertical tail is. Note: As shown, when finishing the installation. -
Page 7: Section 3: Elevator And Rudder Servo And Linkage Installation
www.valuehobby.com/apollo-dlg.html Step4. Thread the pushrod wire into the clevis and Section 3: Elevator and Rudder Servo tighten the bolt. and Linkage Installation Connect the clevis to the control horn. Position the control horn on the rudder, the pushrod Step1. Install two servos on the servo mounts. wire will be aligned with the tail boom, and drill the mounting holes for the bolts. -
Page 8: Section 4: Aileron Servo And Linkage Installation
www.valuehobby.com/apollo-dlg.html Step7. Finish the elevator servo and linkage Step3. Use two M2*8mm (.3in) self-tapping screws to installation in the same way. secure the two blocks wont loose. (Center the servo arm before mounting.) Step4. Use two M2*8mm (.3in)self-tapping screws to mount the servo to the blocks. -
Page 9: Section 5: Wing Installation
www.valuehobby.com/apollo-dlg.html Step7. Thread the clevis onto the aileron pushrod and Section 5: Wing Installation connect the clevis to the servo arm. Mount the servo hatch to the wing using four Step1. Locate the items shown in the picture. M2*8mm (.3in) self-tapping screws. Step2. -
Page 10: Section 6: Battery Installation
www.valuehobby.com/apollo-dlg.html Section 6: Battery Installation Section 9: Adjust the CG. For the first flights, the recommended Center of Install the battery into the fuselage as shown. Sponge Gravity location is 260mm (10.2in) behind the nose. can be used to prevent the battery from moving. Use the battery pack, moving it forward or backward, to achieve the correct balance. -
Page 11: Section 11: Method Of Throwing
www.valuehobby.com/apollo-dlg.html Section 11: Method of Throwing Step1. Your right index finger and middle finger Step4. This is the second half of the rotation and the should be wrapped around the peg. section that is most responsible for a good high lunch. Do not use too much arm in this section. - Page 12 www.valuehobby.com/apollo-dlg.html www.valuehobby.com 2012-10-29...
Need help?
Do you have a question about the Apollo DLG and is the answer not in the manual?
Questions and answers