Marantz PMD570 User Manual
Solid state recorder
Hide thumbs
Also See for PMD570:
- Owner's manual addendum (7 pages) ,
- User manual (55 pages) ,
- Service manual (72 pages)
Table of Contents
Advertisement
Quick Links
Advertisement
Chapters
Table of Contents

Subscribe to Our Youtube Channel
Related Manuals for Marantz PMD570


Summary of Contents for Marantz PMD570
- Page 1 Model PMD570 User Guide Solid State Recorder ®...
-
Page 2: Precautions Warnings And Cautions
Warnings and Cautions CAUTION: TO REDUCE THE RISK OF ELECTRIC SHOCK, REFER SERVICING TO QUALIFIED SERVICE PERSONNEL WARNING TO REDUCE THE RISK OF FIRE OR ELECTRIC SHOCK, DO NOT EXPOSE THIS APPLIANCE TO RAIN OR MOISTURE. CAUTION: CAUTION RISK OF ELECTRIC SHOCK DO NOT OPEN DO NOT REMOVE COVER (OR BACK) NO USER-SERVICEABLE PARTS INSIDE... -
Page 3: Important Safety Instructions
Important Safety Instructions This product was designed and manufactured to meet strict quality and safety standards. There are, however, some installation and operation precautions which you should be particularly aware of. Read Instructions – All the safety and operating instructions should be read before the product is operated. -
Page 4: Note To Catv System Installer
GROUND CLAMP ELECTRIC SERVICE EQUIPMENT GROUND CLAMPS FIGURE 1 EXAMPLE OF ANTENNA GROUNDING AS PER NATIONAL ELECTRICAL CODE, ANSI/NFPA 70 NEC - NATIONAL ELECTRICAL CODE NOTE TO CATV SYSTEM INSTALLER: This reminder is provided to call the CATV (Cable-TV) system installer's attention to Article 820-40 of the NEC, which provides guidelines for proper grounding and, in particular, specifies that the cable ground shall be connected to the grounding system of the building,... -
Page 5: This Class B Digital Apparatus Complies With Canadian Ices-003
"Este aparato lleva elementos antiparasitarios necesarios para cumplir con ls limites que se estableren en el Anexo V del Reglamento sobre Pertubaciones Radioelectricas e Interferencias aprobado en el Real Decreto 138/1989. (B.O.E. de 9 Febrero 1989)." MARANTZ EUROPE B.V. 5600 EINDHOVEN THE NETHERLANDS - 5 -... -
Page 6: Table Of Contents
Table of Contents Precautions Warnings and Cautions ... 2 Important Safety Instructions ... 3 Regulatory Compliance ... 4 Table of Contents ... 6 Package Contents ... 7 CF card ... 7 Introduction ... 8 Features ... 9 Basic installation and start-up ... 10 Recording setup ... -
Page 7: Package Contents
• PDF format manual(s) Several languages may be included. • Demonstration copy of Marantz Professional's PMDEdit application software • Instructions for obtaining full copy of Marantz Professional's PMDEdit application software • This User Guide • Customer Registration Document - 7 -... -
Page 8: Introduction
The PMD570 records directly onto CF cards. Record- ings can be transferred to your desktop or laptop computer by removing the CF card from the PMD570 or by connecting the PMD570 to your computer via the I/O port. Audio recorded in the popular MP3 compression format is directly available for intranet or internet file sharing. -
Page 9: Edl Marks
EDL (Edit Decision List) marks can be created during recording manually or automatically. EDL marks help you find those specific points in the recording. *The EDL marking system is proprietary to Marantz Professional solid state recorders. • During playback you can instantly locate EDL marks. -
Page 10: Basic Installation And Start-Up
The PMD570 comes factory preset (Preset1) for recording in stereo with MP3 compression, recom- mended quality for music recording. 1. Rack mount the PMD570 or install on a stable cart or stand. 2. Connect line level analog inputs and/or outputs to the ANALOG IN/OUT jacks. -
Page 11: Recording Setup
CANCEL REC BAL Example display shows a newly formatted CF card with default Preset1. 10. The PMD570 is ready to record. You may want to Recording setup The PMD570 is shipped setup (Preset1 default). - 11 - (a) and click in (b). Leave or push the Card eject button so it is in the in (b) position. -
Page 12: Controls And Connections Front
Input choices. 5. When correct push and release the Jog Wheel. Display returns to Input flashing. 6. Push and release the MENU/STORE button. 11. Push and release the Record button . PMD570 enters record pause. SOLID STATE RECORDER PMD570 DISPLAY... -
Page 13: Cf Card Access Light
Controls and Connections Front continued SOLID STATE RECORDER PMD570 DISPLAY TOTAL TRACKTIME REC REMAIN kbps POWER ON/OFF HEADPHONE LEVEL LOCK SHIFT TRACK MARK 4. CF card access light (green) Flashing while the CF card is being read from or written to. -
Page 14: During Playback
TRACKTIME TRACK 5b. LOCK button Push and hold SHIFT and release the DISPLAY button LOCK (or unlock) the keys (buttons LOCK and controls) on the PMD570. TIME REC REMAIN TIME REC REMAIN while you push and SHIFT over LOCK while you push... -
Page 15: Display
R is the label for the lower (Right) level meter. 12. Upper level meter The louder the sound input to the PMD570 on the Left /mono channel the more bars are displayed. 13. Decibel scale The scale in dB (decibels) for the upper and lower level meters. - Page 16 The LINE label appears when the input Menu selection for recording is Bal.IN or UnBal. 19. Record icon The Record icon appears when the PMD570 is in record mode. Appears with the Play icon when recording. Appears flashing when in record pause.
-
Page 17: Menu/Store Edit Button
Controls and Connections Front continued SOLID STATE RECORDER PMD570 DISPLAY TOTAL TRACKTIME REC REMAIN kbps POWER ON/OFF HEADPHONE LEVEL LOCK SHIFT TRACK MARK MENU/STORE 7. MENU/STORE button EDIT There are two Menu selections Menu and EDIT Menu 7a. Menu Menu, accessed from stop by pushing and releasing... -
Page 18: Rewind, Fast Forward Button Group
TRACK or the Fast Forward button and Fast Forward button 9. Jog Wheel This is a main control which changes function depending on the state of the PMD570 PUSH ENTER MARK REC BAL choose an EDL mark (during stop or... -
Page 19: How To Select Tracks During Playback
Turn the Jog Wheel to choose the track when in stop, play or play pause. The PMD570 switches to the beginning of that track. How to select an EDL mark When in stop, playback or play pause, push and hold... -
Page 20: Shift Button
Controls and Connections Front continued SOLID STATE RECORDER PMD570 DISPLAY TOTAL TRACKTIME REC REMAIN kbps POWER ON/OFF HEADPHONE LEVEL LOCK SHIFT TRACK MARK How to A-B repeat continued To exit A-B repeat push and release the Jog Wheel. A- B repeat is cancelled and playback is paused at the B point. -
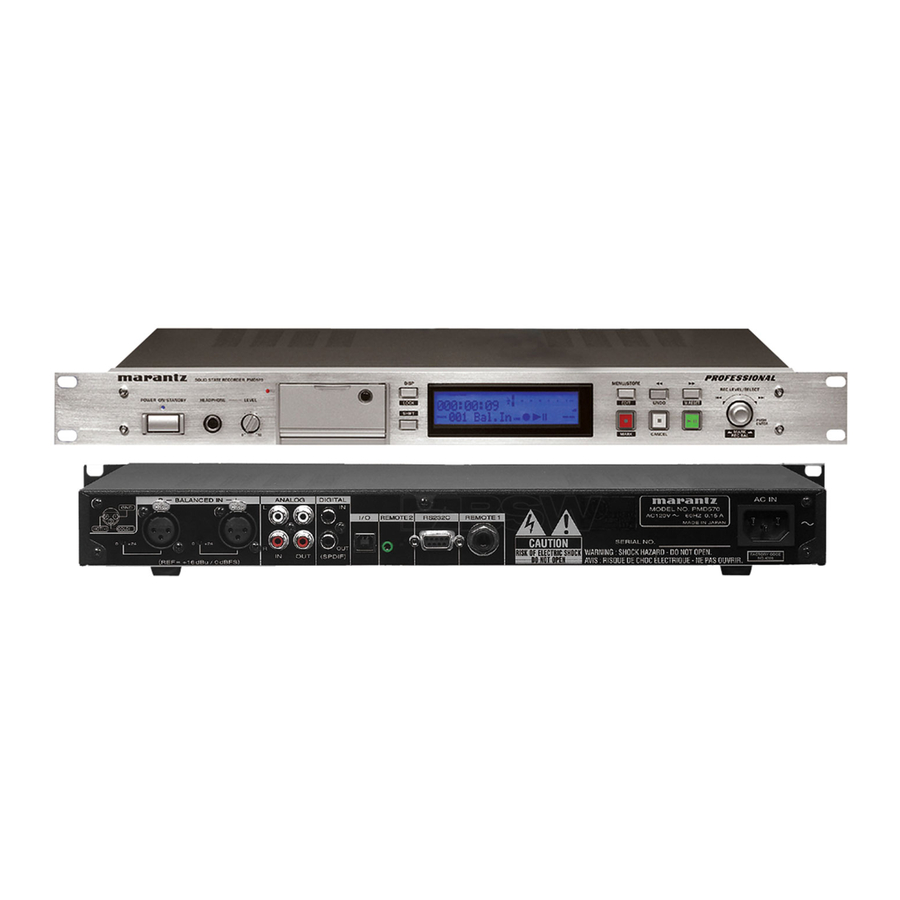
Page 21: Back
- 21 - BALANCED IN + 24 + 24 REF=+16dBu/0dBFS The pin out for the XLR jacks is printed on the PMD570 for easy reference: HOT (+) 2. ANALOG IN / OUT jacks ANALOG RCA jacks for line level input and output. -
Page 22: L&R Analog Out Jacks
The connection makes it easy to copy audio files to your computer's hard drive. The I/O connection can only be made active when the PMD570 is off (neither recording or during playback). See page 43 for a full discussion of the I/O connection. -
Page 23: Rs-232C Connector
PMD570 externally. • The PMD570 automatically transmits status data when status is changed. • The PMD570 will respond to a status request by transmitting the associated status data. See RS-232C control, page 47, for details. With Marantz Professional's PMD570 control setup application (check the enclosed CD ROM or see www.d-mpro.com to download) you can control the... -
Page 24: Table Of Preset Defaults
Table of Preset defaults - 24 -... -
Page 25: Preset Defaults
See page 26. General Menu procedure: 1. With the PMD570 at Stop, push and release the MENU/STORE button. 2. Turn the Jog Wheel to scroll to the choice within Menu. -
Page 26: How To Set Or Change The Date And Time
Display returns to stop mode. Notes: • The Date/Time settings will remain for about 5 years if the PMD570 is not plugged in. • Date/Time setting applies to all three presets. • If you set any of the three Presets to default, you have to reset the Date and Time. -
Page 27: How To Set Or Change The Date Form
How to set or change the Date Form The date form is the date order month/day/year or day/month/year. The US default is M/D/Y (month/day/year). The Europe default is D/M/Y (day/month/year). 1. From stop push and release the MENU/STORE button. 2. Turn the Jog Wheel to select Preset1, 2 or 3. 3. -
Page 28: Recformat
RecFormat The PMD570 can record in a variety of compression algorithm, associated bit rate, file format, and record- ing type (channels recorded) parameters. See explana- tions and chart below. First determine the input connection you want to record from; BALANCED IN, ANALOG, or DIGI- TAL IN. -
Page 29: How To Set Or Change The Recformat Parameters
How to set or change the RecFormat parameters This table of RecFormat parameters reflects the menu setting procedure of those parameters. Bal.In, Unbal. or Dig-In - - - (1536) - - - (1412) 44.1 - - - (1024) - - - (768) 22.05 - - - (704) - - - (512) - Page 30 How to set or change the RecFormat parameters continued Bal.In, Unbal. or Dig-In - - - (1536) - - - (1412) 44.1 - - - (1024) - - - (768) 22.05 - - - (704) - - - (512) 384,256,192,128,96,64 44.1 Stereo 320,256,160,128,80,64...
-
Page 31: Pre Record
Pre Record When PreRecord is on and the PMD570 is in record pause, it 'listens to' the selected audio input(s) and continuously buffers 2 seconds of audio. When record- ing begins the 2 second pre record buffer is written at the beginning of the new track. -
Page 32: Manual Tr
2 ... 1:01 - 2:00 3 ... 2:01 - 3:00 Note: If you intend to transfer your PMD570 audio recording to a CD the Auto Track function can make the CD easily navigable without requiring any post production to divide files into tracks. -
Page 33: Seamlsply (Seamless Play)
5. While Auto Trk is flashing, push and release the Jog Wheel. The On or Off will be flashing. 6. Turn the Jog Wheel to toggle between On and Off. Example display 7. When correct, push and release the Jog Wheel. The display switches to time interval flashing. -
Page 34: Silentskp (Silent Skip)
Silent Skip looks for sound below a preset level for a preset period of time. When that occurs the PMD570 switches to record pause. When a signal of about -30 dB is input record- ing resumes. -
Page 35: Auto Cue
Display returns to stop mode. Note: When Auto Cue is turned On, the PMD570 will continue to search until audio of a significant level is located within the playing track - where the unit will then enter Play/Pause. To end this process, either press stop or turn Auto Cue off in the menu. -
Page 36: Play Mode
When playback reaches the end of a track it automati- cally begins the next track until all tracks on the CF card have been played. After the last track on the CF card, playback stops. The PMD570 returns to stop mode. Repeat All During playback all tracks are repeated. -
Page 37: Edl Play
EDL Play The EDL Play menu turns EDL Play On or Off. PMD570 playback does not respond to EDL mark instructions. PMD570 follows EDL mark instructions regarding playback order, skipping sections of recording on the memory card, or repeating (EDL A-B repeat) a section of recording on the memory card. -
Page 38: Id1Dscrpt, Id2Origin, Id3Orref (Broadcast Wave Id Numbers)
settings: StartPause, StrtPausTR, EDL Mark, and Manual TRK. Example display 7. When correct, push and release the Jog Wheel. The display returns to Remote flashing. 8. If you are done making Menu changes to the Preset, push and release the MENU/STORE button to save your changes, stored will be displayed... -
Page 39: Default (Menu Default)
Default (Menu Default) The Default menu choice resets all Menu (not Edit Menu) items in the Preset to their default values. This is handy if you are setting up a new Preset configura- tion because you don't have to check all the settings, you know they are at the default. -
Page 40: Renumber (Tracks)
Jog Wheel. EXECUTING will be displayed and the percentage executing will increase to 100%. 100% Done will be displayed momentarily The PMD570 and the display will return to stop mode. *To cancel push and release the Stop/CANCEL button TrkERASE TrkERASE lets you erase a chosen track. -
Page 41: Trkmkerase
4. While AllMkErOK? is flashing press and release the Jog Wheel to confirm. (Or press and release the Stop/CANCEL button EXECUTING will be displayed momentarily. Done will be displayed momentarily. The PMD570 and the display will return to stop mode. - 41 - button SHIFT... -
Page 42: Format (Cf Card)
CF cards with 2 - 8 GB capacity are automatically format- ted FAT32. The maximum CF card that can be formatted in the PMD570 is 8 GB. If larger cards are used please format in your computer. To FORMAT a CF card: 1. -
Page 43: I/O Port
I/O port the CF card can remain in the PMD570 and appear as a drive on your computer. How to connect via the I/O port 1. Connect a cable to the PMD570 I/O jack and your computer's I/O port. BALANCED... -
Page 44: Edl Marks
EDL* (Edit Decision List) marks help you locate specific points in the recording. During regular playback EDL marks are silent. *The EDL marking system is proprietary to Marantz Professional solid state recorders. EDL marks can be created during recording manually or automatically. -
Page 45: How To Edit Edl Marks
EDL Play See page 37 for instructions on turning the EDL Play Menu item On or Off. OFF: When the EDL Play is Off PMD570 playback does not respond to EDL mark instructions. over ON: When EDL Play is ON PMD570 playback... -
Page 46: Rs-232C Control Windows Application
RS-232C Control Windows Application An RS232 Windows Application for the PMD570 is available for free download (see www.d-mpro.com to download). The Application lets you control and setup the PMD570 from your PC. Connect your Windows compatible computer to the PMD570 via the REMOTE RS-232C connector on the PMD570 to your computer's RS-232C port. -
Page 47: Rs-232C Control
Not Connected on TxD. Receive Data 4. When data output finishes, the host sets RTS to H. Transmit Data 5. The PMD570 checks if CTS is H and sets RTS to L. Not Connected Ground Not connected Command format RTS send... -
Page 48: Handshake Flow Charts For Control Command
PMD570 status. For example, Host requests Play during Playback. Typical Host PMD570 Received Command Status Request Commands from the host are received by the PMD570, then the status information code is transmitted to the host. Typical Host PMD570 Received Command Status Information... - Page 49 Table of Control command codes continued Fast Reverse Stop << ... “@0235001” + CR Fast Forward Start >> ... “@02352” + CR Fast Forward Stop >> ... “@0235201” + CR PLAY ... “@02353” + CR STOP ... “@02354” + CR RECORD ...
-
Page 50: Table Of Status Request And Status Information Codes
Table of Status Request and Status Information codes: When a Status Request Command from the host is received by the PMD570, the PMD570 sends the Status Information to the host. When the PMD570 changes status, the PMD570 automatically sends Status Information to the host. -
Page 51: Recording Time Chart
Recording time chart - 51 -... -
Page 52: Troubleshooting
Marantz Professional at 630 741 0330. The PMD570 does not turn on Check power cord and your home circuit breaker The PMD570 seems to record but there is no sound on playback • check input settings (For example, if Bal.In input... -
Page 53: Specifications
Specifications subject to change without notice. - 53 - *A CF card (Compact Flash™ memory card) or a Microdrive™ is needed for the PMD570 to work. Also used in digital cameras, removable flash memory media, widely available at consumer electronics retailers and computer resellers, come in a variety of sizes and connection configurations. -
Page 54: Limited Warranty
Manufacturer shall not be liable for damage to other products caused by any defects in Marantz products, damages based on inconvenience or loss of use of the product, or any other damages, whether incidental, consequential, or otherwise. - Page 55 ® Marantz is a registered trademark. 2004/4...
Need help?
Do you have a question about the PMD570 and is the answer not in the manual?
Questions and answers