Table of Contents
Advertisement
Advertisement
Table of Contents

Related Manuals for Marantz PMD661MK II


Summary of Contents for Marantz PMD661MK II
- Page 1 Model PMD661MK User Guide Handheld Solid State Recorder...
-
Page 3: Fcc Information
This product, when installed as indicated in the instructions contained in this presence of uninsulated “dangerous voltage” within the manual, meets FCC requirements. Modification not expressly approved by Marantz product’s enclosure that may be of sufficient magnitude may void your authority, granted by the FCC, to use the product. -
Page 4: Important Safety Instructions
IMPORTANT SAFETY 12. Use only with the cart, stand, tripod, bracket, or table specified by the manufacturer, or sold with the INSTRUCTIONS apparatus. When a cart is used, use caution when READ BEFORE OPERATING EQUIPMENT moving the cart/apparatus combination to avoid injury from tip-over. - Page 5 2. Do not open the rear cover In order to prevent electric shock, do not open the top cover. If problems occur, contact your Marantz DEALER. 3. Do not place anything inside Do not place metal objects or spill liquid inside the system.
- Page 6 NOTE ON USE NOTAS SOBRE EL USO English Español WARNINGS ADVERTENCIAS • Handle the power cord carefully. • Maneje el cordón de energía con cuidado. • Hold the plug when unplugging the cord. • Sostenga el enchufe cuando desconecte el cordón de energía. • Keep the unit free from moisture, water, and dust. • Mantenga el equipo libre de humedad, agua y polvo.
- Page 7 NOTE SULL’USO OBSERVERA Italiano Svenska AVVERTENZE VARNINGAR • Manneggiate il cavo di alimentazione con attenzione. • Hantera nätkabeln varsamt. • Tenete ferma la spina quando scollegate il cavo dalla presa. • Håll i kabeln när den kopplas från el-uttaget. • Tenete l’unità lontana dall’umidità, dall’acqua e dalla polvere. • Utsätt inte apparaten för fukt, vatten och damm.
- Page 8 DECLARATION OF CONFORMITY DICHIARAZIONE DI CONFORMITÀ English Italiano We declare under our sole responsibility that this product, to which this declaration Dichiariamo con piena responsabilità che questo prodotto, al quale la nostra relates, is in conformity with the following standards: dichiarazione si riferisce, è...
- Page 9 CAUTION: ATTENZIONE: English Italiano To completely disconnect this product from the mains, disconnect the plug from the Per scollegare definitivamente questo prodotto dalla rete di alimentazione elettrica, wall socket outlet. togliere la spina dalla relativa presa. The mains plug is used to completely interrupt the power supply to the unit and must La spina di rete viene utilizzata per interrompere completamente l’alimentazione be within easy access by the user.
- Page 10 A NOTE ABOUT RECYCLING: English This product’s packaging materials are recyclable and can be reused. Please dispose of any materials in accordance with the local recycling regulations. When discarding the unit, comply with local rules or regulations. Batteries should never be thrown away or incinerated but disposed of in accordance with the local regulations concerning battery disposal. This product and the supplied accessories, excluding the batteries, constitute the applicable product according to the WEEE directive.
- Page 11 NOTA RELATIVA AL RICICLAGGIO: Italiano I materiali di imballaggio di questo prodotto sono riutilizzabili e riciclabili. Smaltire i materiali conformemente alle normative locali sul riciclaggio. Per lo smaltimento dell’unità, osservare le normative o le leggi locali in vigore. Non gettare le batterie, né incenerirle, ma smaltirle conformemente alla normativa locale sui rifiuti chimici. Questo prodotto e gli accessori inclusi nell’imballaggio sono applicabili alla direttiva RAEE, ad eccezione delle batterie.
-
Page 13: Table Of Contents
Table of Contents Package Contents......2 USB Mode ........38 Encrypted Recording ....... 20 Retake Recording ........21 Computer compatible ....... 38 Introduction ........3 Basic Playback Operation ....23 How to connect via the USB port ..... 38 Features ............. 3 Diagram of file structure ......39 Connection Diagram ........ -
Page 14: Package Contents
Package Contents • PMD661MK • User guide • CD-ROM • Carry strap • SD card • Audio cable • USB cable • AC adapter... -
Page 15: Introduction
Introduction Thank you for selecting the Marantz Professional PMD661MK • Easy one control recording Portable Solid State Recorder. Simply push the REC button. The PMD661MK is an audio recorder that records in digital audio • Automatic recording formats onto an SD (Secure Digital) card. -
Page 16: Quick Start Guide
Quick Start Guide Follow the instructions on this page to Quick Start your new Slide and hold the POWER switch. PMD661MK Solid State Recorder and begin recording. The PMD661MK comes with factory preset defaults for MP3 recording using internal microphones. Unpack the AC adapter and the PMD661MK Setup the power supply. - Page 17 Press the REC button to start recording. Press the STOP button to stop playback. • For other recording condition, v P.16. • For the clock setting, v P.14. Press the STOP button to stop recording. Press the 1/3/ENTER button to play the just recorded file via headphones or speaker.
-
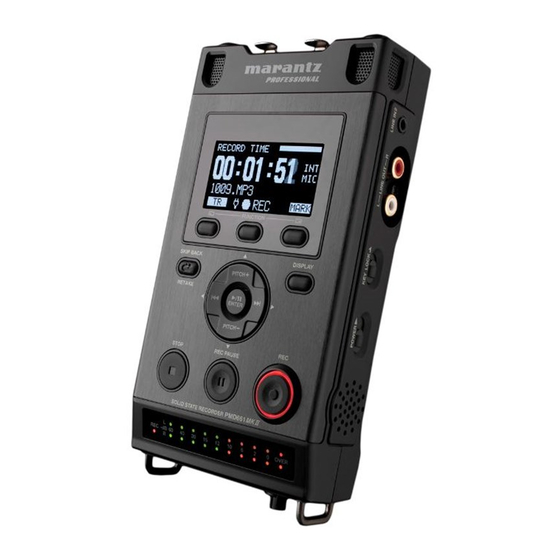
Page 18: Names And Functions
Names and Functions q Internal Microphones Stereo condenser microphones. w DISPLAY The display shows the information of the PMD661MK . (v P.10) e FUNCTION button Press the FUNCTION button to change the functions on (F1) (F2) buttons with toggle operation. The functions are different depending on each operation mode. - Page 19 t DISPLAY button Q 1 PITCH+ button Press the DISPLAY button to change the display contents Press this button to make a speed up of playback. like the time information with toggle operation. The content is During menu mode, this button is used to change item. different depending on each operation mode.
-
Page 20: Right Side
Right Side Left Side q DC IN Jack q Speaker Insert the provided AC adapter plug. Internal speaker of R channel. If the AC adapter plug is inserted while using the recorder on w POWER slide switch battery power, the recorder will automatically switch to adapter Slide and hold for a little time to turn power On. -
Page 21: Front
Front Back PHONES Jack REMOTE Control Jack For monitoring and private listening, you can connect your The Jack for the optional remote RC600PMD and the external headphones to this jack. remote controller. HP/SPK VOL Control MIC/LINE IN Jacks Use this to adjust the output level of the headphones or internal XLR stereo for MIC/LINE level. -
Page 22: Bottom
Bottom Display Remaining space of the card Input source F2 function r Status t Battery icon y Timer icon This icon appears if the Timer Record/Playback is set. During the Timer Record/Playback, it blinks. Tripod Hole u F1 function Threaded screw hole for Tripod mount. i Number of files Battery compartment For 4 AA alkaline or rechargeable Ni-MH batteries. -
Page 23: Preparation Before Use
Preparation Before Use Installing the carry strap Installing batteries Put the carry strap through the shaft of the PMD661MK Remove the battery compartment cover. Insert the new batteries (AA type) with correct +/– polarity. Put the carry strap through the stopper of the PMD661MK Secure the carry strap by putting it through the second stopper. -
Page 24: Removing Batteries
Battery remaining indicator Removing batteries The recorder operates using commercially available AA size alkaline or Ni-MH batteries. During operation, the battery remaining indicator Battery compartment is located in the bottom of the unit. is as follows. Remove the battery compartment door. Remove four AA type batteries. -
Page 25: Installing A Memory Card
Installing a memory card Removing a memory card Check that the power is turned off. The PMD661MK records onto various types of SD cards. Pull the SD card lid. Check that the power is turned off. Push the card, then pull it to remove it. Pull the SD card lid. -
Page 26: Clock Setting
Press the 1/3/ENTER button to enter the Time/Date setting. Clock Setting The date and time are written on each audio track (file) when the track is started. When an audio track is viewed on a computer, this date and time appears as when the file was 'modified'. From Stop, press the (F1: MENU) button. -
Page 27: Language
Press the 1/3/ENTER button to enter the Language setting. Language The Language menu item allows you to choose a display language (English, French, Spanish, German, Italian and Swedish). From Stop, press the (F1: MENU) button. • Press the STOP button to cancel. •... -
Page 28: Basic Recording Operation
Basic Recording Operation Connection Diagram Recording Procedure Slide and hold the POWER switch to turn on. MIC IN MICROPHONE Press the REC button to begin recording. • The Rec indicator will be lit and steady while recording. • The display will show the information display of recording. LINE AMPLIFIER LINE... - Page 29 Press the REC PAUSE button to pause recording. Press the STOP button to stop recording and end the file (close the audio file). You can press the 1/3/ENTER button to play the just recorded file or press the STOP button again to enter the Stop mode. Then pressing the 1/3/ENTER button will play the beginning of the first audio file.
-
Page 30: Audio Input For Recording
Audio Input for Recording The audio input for recording can be set from the “Input” menu. (v P.43) Set the “Rec Channel” menu to “stereo” to create a stereo (2-channel) sound file. Or set it to “D.Mono” to create a stereo sound file. The left channel input is recorded in both left and right channels. -
Page 31: Recording Time Chart
Recording Time Chart All times are approximated record times. Different media manufacturers allow more or less space for error correction and the like on their respective products. Recording Time Stereo channel Recording Times (hours : minutes) Settings Bitrates 16GB 32GB PCM-24 (96kHz) 4608kbps 0:30... -
Page 32: Recording Level Control
Recording Level Control Encrypted Recording The recording level control lets you select the type of input level When “Encrypt Rec” on the preset menu is set to “On”, files Control. recorded on SD cards are encrypted. Encryption is performed based on the passcode (0000 to 9999) set –... -
Page 33: Retake Recording
While monitoring the sound being played, find the position at which Retake Recording you want to start retake recording. • Press the 1/3/ENTER button to pause playback. The PMD661MK is equipped with a retake recording function for • Press the SKIP BACK, 8 or 9 button to search for the recording over from any position in a file. - Page 34 Press the REC button to start retake recording. Played data (Take 1) The unneeded data (Take 1) is deleted and Take 2 is recorded in its place. Search for the desired retake starting position. Press the REC PAUSE button to set the retake starting position. Recorded data Take 2 (Take 1)
-
Page 35: Basic Playback Operation
Basic Playback Operation Caution: Connection Diagram To prevent hearing loss, do not raise the volume level excessively when using headphones. Playback Procedure Slide and hold the POWER switch to turn on. Press the 8 or 9 button to choose the file you wish to play. LINE AMPLIFIER LINE... -
Page 36: Access From File List
Press the STOP button to stop playback. Access from File List There are two ways to select the file you want to play. Either use the 8 or 9 buttons during Stop mode, or select the files from the File List. From Stop, press the (F2: LIST) button. -
Page 37: Search
Search Skip Back Press the SKIP BACK button during playback or pause to return the In Play-Pause mode, press and hold the 8 or 9 button for amount of time set in the preset Skip Back from the current playback high speed searching without audio. -
Page 38: Passcode Input
Passcode Input The passcode between 0000 and 9999 that is set at “Passcode” must be input to make the “Menu Lock” and “Passcode” settings on the preset menu and to play files recorded with encrypted recording. When starting to make these settings or to play such files, the passcode input screen appears on the display and the character selected with the cursor flashes. -
Page 39: Advanced Features
Advanced Features Microphone recommendations Microphone(s) Professional condenser microphone(s) (which require additional power from either the PMD661MK ’s phantom power or from another – Attenuator source) are recommended because they provide greater sensitivity The microphone attenuation switch permits the direct use of and higher quality audio recording. -
Page 40: Pre Record
Pre Record Silent Skip When PreRecord is on and the PMD661MK is in record pause, The Silent Skip automatically pauses recording when there is a it listens to the selected audio input(s) and continuously buffers 2 period of silence and resumes recording when sound resumes. seconds of audio. -
Page 41: Auto Track
Auto Track Copy Segment With the Auto Track (Automatic Track incrementing) On, a new Copy Segment physically turns your “highlighted” section into a new audio file is begun automatically at specified intervals of recording and separate file, without destroying the original source file(s). time. -
Page 42: File Divide
Continue to let the PMD661MK play to your desired OUT-point, or File Divide use the standard transport controls like the 8 or 9 button to span greater time lengths. The File divide allows you to divide a file at the position you want to divide. -
Page 43: Marking
Search the marks Marking During play-pause or playback, press the FUNCTION button until “MK–” and “MK+“ appear on the display. Then press the (F1: Marks can be added during recording or playback manually or MK–) or (F2: MK+) button to select the mark you wish to access. automatically. -
Page 44: Additional Features
Additional Features • “Key Locked” is displayed for one second when the key is pressed Key Lock during key lock. Slide the KEY LOCK switch to lock the keys. The key lock secures the PMD661MK in the state it is in during recording, playback or stop. -
Page 45: Remote
The RC600PMD includes: Remote The PMD661MK allows you to use an optional remote controller RC600PMD. (sold separately). The RC600PMD is designed for microphone interviews. It attaches to your microphone. The remote’s five feet cord with a four contact mini plug, plugs into the PMD661MK . -
Page 46: Extended Remote Jack
Plug Type (1/8” T-R-R-S Mini Plug) Extended Remote Jack ø3.5/4P (TMP-B66) The PLAY, FF and REW keys can be added to the remote control functions by using the equivalent circuit showing below. Circuit diagram: 1: Tip 3.9k 6.8k 470k 2: Ring 3: Ring 4: Sleeve REC PLAY REW... -
Page 47: Display Control
Display Control Press the DISPLAY button to alternate information displays. Displays are slightly different in Stop, Record and Playback mode. During Stop mode: q Total Remain Remaining space of the card Input source Total remain time Number of files F1 function F2 function w Current Time/Date Current time... - Page 48 During Record mode: q Record Time Remaining space on the card Input source Record time File name F1 function F2 function w Total Remain Time Total remain time e Record Level Input audio level r Record Setup Preset Input source Rec Channel Rec format MP3 bitrate...
- Page 49 During Playback mode: q Elapsed Time Current position on the file Elapsed time File name F1 function F2 function w Remain Time Remaining time e Output Level Output audio level r File Properties Created time Rec channel Sample rate MP3 bitrate Quantization q Elapsed Time (Default display)
-
Page 50: Usb Mode
USB Mode The PMD661MK records directly onto SD cards. How to connect via the USB port Recordings can then be transferred to your desktop or laptop computer by removing the SD card from the PMD661MK , or by The SD card in the PMD661MK appears as an external drive on a connecting the PMD661MK to your computer via the USB port. -
Page 51: Diagram Of File Structure
• While USB is on, a set screen is displayed. Diagram of file structure A folder (directory) titled MPGLANG1 (Default) will appear on your computer. Files within the MPGLANG1 folder are numbered from aaaaa001 through the number of files recorded to a maximum of aaaaa999. -
Page 52: Menu
Menu Menu Structure 1 Presets ......................Preset-1 ....1 Select 2 Display ..............01 Brightness Preset-2 2 Edit ...... 01 Input 3 Time/Date 02 Timer Preset-3 3 Rename 02 Rec Format 4 Utility ......1 Record Timer 03 LED 03 Rec Channel 5 Language 2 Play Timer1 04 Time Form 04 Sample Rate... -
Page 53: Top Menu
Top Menu Protecting the Menu Settings When “Menu Lock” on the preset menu is set to “On”, the passcode From Stop, press the (F1: MENU) button. is required to select items below the top menu, thereby protecting the settings. The passcode is the number from 0000 to 9999 set at “Passcode” on the preset menu. -
Page 54: Preset Menu
Press the 1/3/ENTER button to accept the selected Preset. Preset Menu You can stores 3 detailed presets on the recorder for such settings as recording input, recording format, playback mode, etc. There are 20 setting items in the preset menu, and 3 presets can be set with the desired conditions. -
Page 55: Preset Rename
Preset Rename Rename the preset title. Text can be changed and deleted. Press the 8 or 9 button to (F1: MENU) button. From Stop, press the move the cursor to the place you wish to change text or delete text from. - Page 56 Preset Menu List Display Selectable Value Input INT MIC / MIC/LINE / LINE2 / D.IN Rec Format MP3-320 / MP3-256 / MP3-192 / MP3-128 / MP3-64 / PCM-16 / PCM-24 Rec Channel Stereo / Mono / D.Mono Sample Rate 44.1k / 48k / 96k PreRecord On / Off Level Cont.
- Page 57 Default Value List Display Preset-1 Preset-2 Preset-3 Input INT MIC INT MIC INT MIC Rec Format MP3-128 MP3-320 PCM-24 Rec Channel Stereo Stereo Stereo Sample Rate 44.1k 44.1k PreRecord Level Cont. Manual Manual Auto Track Auto Mark Silent Skip 10 Mic Atten. 11 Low Cut 12 High Cut 13 Skip Back...
- Page 58 General Procedure in the edit mode 2) Rec Format The “Rec Format” allows you to select the record audio format MP3 In the Preset Action Menu, press the PITCH + or PITCH – button to compression or high-fidelity PCM, the bitrate of the MP3 (320, 256, select “Edit”...
- Page 59 4) Sample Rate 7) Auto Track The “Sample Rate” allows you to select the sampling frequency of The “Auto Track” allows you to set the Auto Track function off or on the recording. and select a time interval to create a new track automatically. Set Value Description Set Value...
- Page 60 9) Silent Skip 12) High Cut The “Silent Skip” menu item allows you to turn the silent skip feature The “High Cut” menu item turns the high cut feature Off or On. on and set the silent level or turn the silent skip feature Off. While the Set Value Description silent skip feature is on, the record is automatically paused when the...
- Page 61 15) Battery 17) Beep The “Battery” menu item allows you to set the battery type. The The “Beep” menu item allows you to turn the Beep alarm feature On PMD661MK operates on 4 standard AA sizes Alkaline or Ni-MH or Off. While the feature is on, the unit beeps when the battery power batteries.
- Page 62 20) Passcode 23) Machine ID This is the encryption key used for encrypted recording. When the An audio file created by the PMD661MK has Machine ID “Menu Lock” is turned on, it is also used as the password. information. The information is included in the file name. For example, if the Machine ID is “aaaaa”, the first file is numbered Set Value “aaaaa001.wav”...
-
Page 63: Display Menu
Press the PITCH + or PITCH – button to select an item. Display Menu Then press the 8 or 9 button to tab through the choices. You can store presets on the display menu for such settings as Press the PITCH + or PITCH – button to select other menu Brightness, Timer, LED, Time form, Date form and File sort. - Page 64 1) Brightness 4) Time Form The “Brightness” menu choice allows you to adjust the brightness The “Time Form” item allows you to select the format of the current of the OLED (Organic Light-Emitting Diode) display on the time, 12-hour format with AM/PM (12H) or 24-hour format (24H). PMD661MK Set Value Description...
-
Page 65: Utility Menu
7) Default Utility Menu The “Default” menu item allows you to return the settings of the Display Menu to the default. The record and play timer settings, the setting data load and save See the table of Display Menu Functions. functions and the SD card format and card writing performance can be checked on the “Utility”... - Page 66 Utility Functions 1) Record Timer The Record Timer menu allows you to set or change a recording Display Description start time and the duration. Set a start time and the duration for Record Timer recording. Select the Record Timer menu. Play Timer 1 Set a start time of playback 1.
- Page 67 2/3/4) Play Timer (1/2/3) Set the start time. • While the “Start Time” is highlighted, press the 1/3/ENTER The “Play Timer” menu allows you to set or change a start time for button. playback and the filename of the playback file. •...
- Page 68 5) Load Settings Set the start time. • While the “Start Time” is highlighted, press the 1/3/ENTER The “Load Settings” menu allows you to load all of the preset value button. from an SD card in the PMD661MK • Press the 8 or 9 button to select AM/PM, hour or minute. When performing load settings, use an SD card in which the preset •...
- Page 69 6) Save Settings From Stop, press the (F1: MENU) button. “Save Settings” saves all of the preset values onto the SD card. To Press the PITCH + or PITCH – button to select “Utility”. set the saved files onto the PMD661MK , perform Load Settings.
- Page 70 7) Card Check File format of the 661preset2.txt The “Card Check” checks the writing performance of the SD card Item Separator Set Value Break being used and displays the results, as shown below. [Preset-1] Fixed value 0D0Ah Display Description Name 0D0Ah Good Recording is possible without problems.
-
Page 71: File List Menu
Press the PITCH + or PITCH – button to select the file you want File List Menu to access. Then press the 1/3/ENTER button to enter the File list Menu. The file list displays a list of file titles, MP3 and WAV in ‘MPGLANG1’ or other folders. - Page 72 1) Play 2) Information The “Play” menu item allows you to play the selected file. The “Information” menu item allows you to display the information of the selected file. In the file list menu, press the PITCH + or PITCH – button to select “Play”.
- Page 73 3) File Rename 4) Delete The “Rename” menu item allows you to change the file name of the The “Delete” menu item allows you to delete the selected file. selected file. In the file list menu, press the PITCH + or PITCH – button to select In the file list menu, press the PITCH + or PITCH –...
-
Page 74: Folder List Menu
6) Move Folder List Menu The “Move” menu item allows you to move a file from the current folder to another folder. The folder list menu item allows you to display a list of folder titles. And you can set the selected folder as a current directory, change In the file list menu, press the PITCH + or PITCH –... - Page 75 1) Select Press the PITCH + or PITCH – button to select the folder you want to access. Then press the 1/3/ENTER button or the (F1: The “Select” menu item allows you to set the selected folder as the MENU) button to enter the Folder list Menu. current folder.
- Page 76 3) Rename 4) Delete The “Delete” menu item allows you to delete the selected folder. In the folder list menu, press the PITCH + or PITCH – button to select “Rename”. In the folder list menu, press the PITCH + or PITCH – button to select “Delete”.
-
Page 77: Troubleshooting
Troubleshooting Should problems occur, it is often unnecessary to consult your There is excessive noise on the PMD661MK dealer or technical service department. On the basis of the following • Check cable connections and/or replace cable. checks, you may be able to rectify a number of conditions yourself •... -
Page 78: Error Message
Error Message Details of error processing Display Description No Card Card cannot be found Unformat Format other than FAT16/32, or card format error Full Card Memory is not enough Full 999 Number of files is already 999 (maximum) Full MARK Number of marks in the current file is already 30 (maximum) No File No file found... -
Page 79: Factory Default
Factory Default Perform the procedure below to restore the menu settings, If the 1/3/ENTER button is pressed “Executing ...” flashes in the passcode, etc., to their factory defaults. display section. • When the settings have returned to the factory default settings, “Completed”... -
Page 80: Specifications
Specifications Digital Audio System General System ................. Solid State Recorder Power consumption Usable media ..............SD/SDHC cards Recording/Playback ............4.2 W (DC) Recording format Battery life (Alkaline) ...........5 hours (Typical) MP3 ............MPEG1 Layer III Compression Phantom power ............48V, 10mA (Max.) WAV ...............16/24 bit linear PCM Power Recording MP3 bit-rate ........ -
Page 81: Limited Warranty
Repair or attempted repair by a non-Marantz authorized agent. 2. You must pay any shipping charges if it is necessary to ship the d) Any shipment (claims must be presented to the carrier). - Page 82 Marantz Professional products Sales Office Site: Liability for any defective product is limited to repair or replacement For inquiries or information on repair service of Marantz Professional of the product at manufacturer’s option. Manufacturer shall not Products, please contact our Sales Office or Tech Support Centre be liable for damage to other products caused by any defects near you which are listed in D&M Professional website below.
- Page 84 3520 10188 00AM...
Need help?
Do you have a question about the PMD661MK II and is the answer not in the manual?
Questions and answers