Table of Contents
Advertisement
Quick Links
FOREWORD
This section must be read before any connection is made
to the mains supply.
WARNINGS
Do not expose the equipment to rain or moisture.
Do not remove the cover from the equipment.
Do not push anything inside the equipment through
the ventilation holes.
COPYRIGHT
Recording and playback of any material may require
consent. For further information refer to the following:
—Copyright Act 1956
—Dramatic and Musical Performers Act 1958
—Performers Protection Acts 1963 and 1972
—any subsequent statutory enactments and orders
INTRODUCTION
Please read these operating instructions carefully. We
recommend that you read the entire user guide before
you connect or operate the unit.
After you have reviewed the contents this manual, we
suggest that you make all system connections before you
attempt to operate the unit.
PRECAUTIONS
The following precautions should be considered when
operating the equipment.
When setting the equipment ensure that :
– air is allowed to circulate freely around the equipment
– the equipment is on a vibration free surface
– the equipment will not be exposed to interference from an
external source
– the equipment will not be exposed to excessive heat, cold,
moisture or dust
– the equipment will not be exposed to direct sunlight
– the equipment will not be exposed to electrostatic discharges
• In addition, never place heavy objects on the equipment.
• If a foreign body or water does enter the equipment, contact
your nearest dealer or service center.
Features
• MPEG I Layer 2 compression technology for recording
and playback of mono MPEG audio.
• Recording and playback to and from approved
PCMCIA PC Cards (ATA flash or hard disk card).
• MS-DOS compatible file system.
– MPEG Files in .wav, .mpg, and .bwf.
– PCM files in broadcast .wav and .bwf.
• A wide variety of input and output jacks.
– Microphone input jacks (XLR and 1/4").
– Line level RCA input and output jacks.
– Digital coaxial output jack (SPDIF, 48kHz).
– Telephone jack (input/output).
• Three recording modes; LP, MP, and SP.
• Bit rate is assigned to each mode by presetting.
• Three record level options: manual, manual with
limiter, and automatic level control (ALC).
• Skip playback and repeat playback using a built-in
EDL (Edit Decision List).
• In pre-recording mode, 2 seconds recording prior to
the recording start is done.
Unexpected chance of starting recording is not missed.
• 3-way power supply:
– 8 Alkaline AA (R6) batteries
– AC adaptor (supplied)
– Rechargeable Ni-Cad pack (optional)
• ANC (Ambient Noise Control) switch for eliminating
unwanted background noise.
• Built in clock automatically imprints each file with the
date and time of creation.
• Built-in mono condenser microphone.
• Built-in speaker.
• Backlit LCD display.
• Remote jack for external start/stop control.
SETTING UP
1
Advertisement
Table of Contents

Related Manuals for Marantz PMD680


Summary of Contents for Marantz PMD680
- Page 1 SETTING UP FOREWORD Features This section must be read before any connection is made to the mains supply. • MPEG I Layer 2 compression technology for recording and playback of mono MPEG audio. WARNINGS • Recording and playback to and from approved PCMCIA PC Cards (ATA flash or hard disk card).
-
Page 2: Table Of Contents
SETTING UP How to Use this Manual Contents This manual is divided into the 6 sections described SETTING UP below. To find out how to use a specific control, refer to the “Index of Parts, Controls, and Display" on page xxx. Batteries and AC Adapter .......... -
Page 3: Batteries And Ac Adapter
AC outlet Load as shown in the following illustration. Battery replacement Notes • It is recommended to always use a Marantz AC adaptor When the battery alert indicator ( ) appears in the (DA740PMDU). display, replace all batteries with new ones. Once this... -
Page 4: Power On/Off
SETTING UP Power On/Off Setting the Date and Time Before operating your PMD680, perform the following Power on operations to set the current date and time. Sliding the power switch rightward makes power on The current date and time are recorded automatically at and off in turn. -
Page 5: Understanding Pc Card
Before using a PC Card for the first time, perform the following operations to format the PC card so that it can The model PMD680 records directly to Flash or Hard be used to record audio. This operation completely Disk-type PC cards. One of the many advantages is that erases any information stored on the card. -
Page 6: Connecting Microphones
MIC 2 (1/4" phone) jack. LINE IN MIC (1/4") MIC (XLR) Notes • To connect the mono PMD680 LINE OUT to a stereo input, a Y-adaptor cable can be used. To record from or output through a telephone wire Notes •... -
Page 7: Other Connections
SETTING UP Other Connections Connecting Digital Components Remote control The following illustrations show you how to connect digital audio components for recording. Contact closure switch To output digital audio signals to another audio component Connect the source component’s digital input jacks to this unit’s DIGITAL OUT (coaxial) jack, and set the DIGITAL OUT switch ON. -
Page 8: General Function
GENERAL FUNCTION Charging Battery Data Display Charging Battery is done while, Changing Display Information • power is supplied from AC adaptor. • Ni-Cad battery is loaded. Pressing DISPLAY (TIME/DATE) key changes the • presetting of battery is Ni-Cad battery (refer to page xxx, display information as follows. -
Page 9: Keylock
GENERAL FUNCTION During playback During Recording q Current Track No Recording elapsed time on q Current Track No Time elapsed on current current track playing track TRACK TIME TRACK TIME OVER OVER w Current Track No Remain recording time w Current Track No Remain time of current (Time available for playing track... -
Page 10: Recording
RECORDING Ambient Noise Control Selection and Manipulation ANC (Ambient Noise Control) is effective for all of Input Source microphone input and telephone input, but is not effective for line input. 2/INT Input Source Selection Input source is selected from external XLR microphone SPEAKER REC MODE LIMITER... -
Page 11: Recording Behavior Settings
RECORDING SILENT SKIP Recording Behavior Setting After detecting continuous certain length of silence, the unit enters rec-pause status and stays in that status as long as silence continues. When sound input is detected, REC MODE the unit resumes recording. This function saves the card Three recording modes are selectable memory by skipping the silent part. -
Page 12: Recording Operation
RECORDING Track Number of New Recording Recording Operation Track number of new recording is next number to that of the last track. If number of the last track is N, the track number of new recording is N+1. Basic Procedure •... -
Page 13: Operation
PLAYBACK and EDITING Stop Basic Operation To stop playback, press STOP ( 7 ). If mark was edited during the playback, EDL file is updated. During EDL update, display shows "TOC" Playback can be monitored through the internal speaker blinking (about EDL, refer to Marking and EDL or a pair of headphones. - Page 14 PLAYBACK and EDITING Audible Seek Un-audible Fast Access This section explains about higher speed (x4) audible This section explains about 30-250 times fast un-audible access. access. (refer to Summary of Accessing Behavior on page xxx (refer to Summary of Accessing Behavior on page xxx for the details) for the details) Seek...
- Page 15 PLAYBACK and EDITING Track Count Up/Down Track Jump Starting from stop status, track count up/down enables This section explains about track jump, which enables to quick track select. access to the top of the destination track. (refer to Summary of Accessing Behavior on page xxx (refer to Summary of Accessing Behavior on page xxx for the details) for the details)
-
Page 16: Repeat Play
PLAYBACK and EDITING Repeat Play You can have the unit repeatedly play a single track or the full card. Or, you can specify repeat points anywhere in the tracks (refer to page xxx, EDL play) REPEAT 1 / 4 ¢ / ¡ PLAY / PAUSE Repeating a Track Use 1˜4 or ¢˜¡... - Page 17 PLAYBACK and EDITING Summary of Accessing Behavior Behavior in Repeat Mode Status when Action during Action after the key key is hit holding the key is released Repeat Mode On Repeat mode Off pressed Entire Card Single Track Key Operation Repeat Repeat Next Track Jump...
-
Page 18: Marking And Edl Playback
PLAYBACK and EDITING AUTO MARK Marking and EDL Playback AUTO MARK mode automatically places a mark when recording starts from rec-pause status. In silent skip recording mode as well, a mark is placed Marking Operation every time when recording is resumed detecting sound Pushing REC/MARK key during playback, playback from the rec-pause status made by silence. - Page 19 PLAYBACK and EDITING Access to the Mark Defining Mark While pausing at the mark point after mark access Forward Mark Access (Jump To Mark) operation, press MARK SELECT key. In stop status, pressing ¢/¡ key while pressing Every time MARK SELECT key is pressed, the display JUMP TO MARK key makes the location jump to the shows definition cyclically.
- Page 20 PLAYBACK and EDITING Display during EDL playback Meaning of Mark Definition During EDL playback, the play icon (3) blinks. Mark put by REC/MARK key or AUTO MARK mode is defined as Point (default definition). Then you can change definition by above operation according to the sequence control purpose such as skip play or repeat TRACK play using defined mark.
- Page 21 PLAYBACK and EDITING Playback Control in EDL playback Display at mark erase operation and in EDL Repeat playback Pause Pause is effective in EDL playback and EDL Repeat. Pressing PLAY/PAUSE key during EDL playback or EDL Repeat playback, the unit pauses. Pressing it again resumes EDL Playback or EDL Repeat playback.
- Page 22 PLAYBACK and EDITING Initialization of EDL Displaying Total Number of Marks Placed Initialization of EDL deletes all marks put in a card. Pressing REC/MARK key while pressing JUMP TO Press ERASE key while pressing JUMP TO MARK key MARK key in stop status. The total number of marks is in STOP status while pressing JUMP TO MARK key.
-
Page 23: Track Handling
PLAYBACK and EDITING Renumbering Track Number Track Handling To renumber the track numbers of tracks after the absent number caused by track erase; From stop status, press RENUMBER key.Renumber Track Erase message blinks for confirmationPressing RENUMBER To erase a track you want to erase; key again, renumbering is executed. -
Page 24: Presetting
PRESETTING Preset Operation Presseting Parameters AUTO MARK Presetting parameters, the unit can be tuned to be most PRESET suitable for each user. 1 / 4 ¢ / ¡ Presettable Parameters • Bit rate (MPEG or PCM) assigned to each of SP/LP/ MP mode. - Page 25 PRESETTING Example of Presetting Operation OVER Parmeter: Bit rate for SP mode, showing default setting. ¢ / ¡ OVER Parameter: Bit rate for MP mode, showing default setting. PLAY / PAUSE OVER Selected parameter is bit rate of MP ¢ / ¡ OVER Diplay the selectable setting PLAY / PAUSE...
- Page 26 PRESETTING Battery Type Presetting ID Number Presetting ID number is applied to the Broadcast Extension Chunk of BWF. ID1: Description ID2: Originator ID3: Originator Reference OVER ID number setting operation • In the ID1 parameter setting menu, left most digits blinks.
- Page 27 PRESETTING Display at Parameter Selection Menu OVER OVER Bit rate for SP setting Battery type setting OVER OVER Bit rate for MP setting File format setting OVER OVER Bit rate for LP setting ID1 setting OVER OVER Sound level for LSR setting ID2 setting OVER OVER...
-
Page 28: Additional Information
ADDITIONAL INFORMATION Capacity of Card and Error Handling Recording Time File check and recovery is done at abnormal ending. The maximum capacity supported by the unit is up to Error Detection 640 MB Error is detected in the following case occurs during Recording time varies according to recording bitrate playback, recording, or editing;... -
Page 29: Troubleshooting
The unit does not work normally. • Check all settings. Playback is not possible. • Check to make sure the PMD680 acknowledges track information on the PC card. Recording is not possible. • 255 tracks are the maximum number of recorded tracks. -
Page 30: Specifications
ADDITIONAL INFORMATION LINE OUT SPECIFICATIONS Type: RCA pin jack Standard output level: –1.5 dBu DIGITAL OUT Digital audio system Type: coaxial pin jack Output impedance: 75 ohms System Standard output level: 0.5 Vp-p MPEG/Linear PCM Audio Sampling frequency: 48 kHz Usable Media PCMCIA ATA flash memory cards GENERAL... -
Page 31: Index Of Parts, Controls, And Display
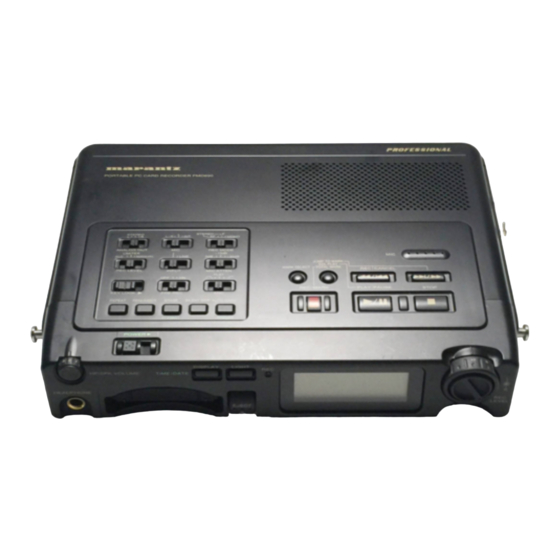
ADDITIONAL INFORMATION Index of Parts, Controls, and Display See the pages in parenthesis for details regarding operation. Top Panel PORTABLE SOLID STATE RECORDER PMD680 2/INT q, w, e SPEAKER REC MODE LIMITER -15dB MANUAL LINE -30dB r, t, y JUMP TO MARK... - Page 32 ADDITIONAL INFORMATION Top Pannel Front Pannel SPEAKER switch (page xxx) HEADPHONE jack (page xxx) MIC switch (page xxx) HP/SPK VOLUME knob (page xxx) REC MODE switch (page xxx) DISPLAY, TIME/DATE key (page xxx) REC LEVEL switch (page xxx) LIGHT key (page xxx) INPUT switch (page xxx) REC LED (page xxx) MIC ATTENUATION switch (page xxx)
-
Page 33: Left Panel
ADDITIONAL INFORMATION Left Panel DIGITAL OUT DC IN 13V CHARGE (SPDIF 48kHz) REMOTE DC IN 13V (page xxx) Charge LED (page xxx) Charge switch (page xxx) REMOTE IN jack (page xxx) DIGITAL OUT switch (page xxx) DIGITAL OUT jack (page xxx) Right Panel TELEPHONE PUSH... - Page 34 ADDITIONAL INFORMATION Display ! 7 u S.SKIP REPEAT A.MARK RECORDED TRACK TOTAL REMAIN TIME SP LP OVER Item Type Explanation TRACK Turns on while track number is diplayed Track Number 7 Seg x 3 digits 001~255 error message, mode message TOTAL Turns on while Total Time is diplayed Blinks while REC Pause, Steadily on while Recording...
Need help?
Do you have a question about the PMD680 and is the answer not in the manual?
Questions and answers