COBHAM EXPLORER 710 User Manual
Handy portable terminal supporting simultaneous voice and data
communication over bgan
Hide thumbs
Also See for EXPLORER 710:
- User manual (181 pages) ,
- Getting started (15 pages) ,
- User manual (117 pages)
Table of Contents
Advertisement
Quick Links
Download this manual
See also:
User Manual
Advertisement
Table of Contents
Troubleshooting

Related Manuals for COBHAM EXPLORER 710


Summary of Contents for COBHAM EXPLORER 710
- Page 1 EXPLORER 710 User manual...
- Page 2 Thrane & Thrane is not responsible for the content or accuracy of any translations or reproductions, in whole or in part, of this manual from any other source. Thrane & Thrane A/S trading as Cobham SATCOM. Copyright © 2013 Thrane & Thrane A/S. All rights reserved.
-
Page 3: Safety Summary
Failure to comply with these precautions or with specific warnings elsewhere in this manual violates safety standards of design, manufacture and intended use of the equipment. Cobham SATCOM assumes no liability for the customer's failure to comply with these requirements. -
Page 4: Antenna Safety Instructions
Antenna Safety Instructions FCC Radiation Exposure statement Transceiver Unit (when separated from the Antenna Unit): This equipment complies with FCC radiation exposure limits for an uncontrolled environment. This equipment should be installed and operated at a distance greater than 20 centimeters (8 inches) between the Transceiver Unit, yourself or any bystander to comply with the Radiation Exposure Requirements. -
Page 5: About This Manual
About this manual Intended readers This manual is a user manual for the EXPLORER 710. The manual is intended for anyone who is using or intends to use the EXPLORER 710. No specific skills are required to operate the EXPLORER 710. However, it is important that you observe all safety requirements listed in the Safety summary in the beginning of this manual, and operate the EXPLORER 710 according to the guidelines in this manual. - Page 6 About this manual Typography In this manual, typography is used as indicated below: Bold is used for the following purposes: • To emphasize words. Example: “Do not touch the antenna front during pointing”. • To indicate what the user should select in the user interface. Example: “Select Control panel >...
-
Page 7: Table Of Contents
To connect the antenna ........................14 To connect power ..........................14 Starting up the EXPLORER 710 ...................15 To switch the EXPLORER 710 on or off ..................15 Options for the start-up procedure ..................15 To enter the SIM PIN ........................16 To point the antenna ........................16 The registration procedure ......................17... - Page 8 To connect a phone using LAN or WLAN ................27 To connect an analogue phone ....................29 To connect an ISDN phone or modem ..................30 To make or receive a phone call with EXPLORER 710 .............31 Local numbers and special functions ..................32 To charge your smartphone or tablet ..................32 Viewing alarm messages ....................33...
- Page 9 To configure the ISDN interface ....................49 Configuring the USB interface ..................49 To enable or disable the USB interface ..................49 Managing IP handsets or smartphones ..............50 Overview ..............................50 To manage IP handsets or smartphones in your EXPLORER 710 .......50 Support ...............................51 98-140012-A...
- Page 10 To upload software with USB ......................58 Maintenance ..........................59 Normal use of the battery ......................59 To recharge batteries ........................59 To connect an extra external EXPLORER 710 battery .............59 Accurate display of the battery capacity ................60 Storage ..............................60 Disposal of the EXPLORER 710 ....................60 98-140012-A...
- Page 11 Table of Contents Troubleshooting ........................61 Troubleshooting guide ........................61 Status signalling ..........................66 Log files ..............................67 Diagnostics report ..........................67 Call log and data log .........................67 App. A Technical specifications General specifications ......................68 Battery specifications ......................69 Interfaces specifications ....................70 Power input ............................70 Phone/Fax interface .........................71 ISDN interface ............................72 LAN interface, 2-port ........................73 WLAN access point ...........................74...
-
Page 12: Chapter 1 Introduction To Explorer 710
BGAN satellite - and you are online. The EXPLORER 710 provides access to the highest bandwidth available on the BGAN network. With BGAN HDR (High Data Rate) you get a portfolio of four channel streaming rates including symmetric and asymmetric options so you only pay for the data you need. -
Page 13: Features And Interfaces Of The Explorer 710
• VPN (Virtual Private Network) access to corporate servers The EXPLORER 710 can withstand severe environmental conditions such as humidity, dust, extreme weather and changing temperatures. It is small in size and fits easily into a backpack or similar. With the detachable antenna it is well suited for temporary camps or fixed installations. -
Page 14: Overview Of Interfaces
WLAN ISDN or Phone Using the EXPLORER 710 on page 21 describes how to use each of the available interfaces Minimizing power consumption The EXPLORER 710 is designed for minimum power consumption. This means that functions that are not currently used will automatically go into a “sleep mode” to minimize the power consumption. -
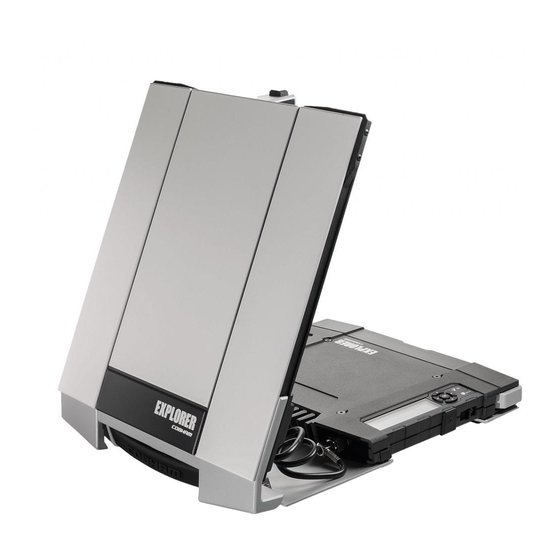
Page 15: Your Explorer 710 Terminal
Chapter 1: Introduction to EXPLORER 710 Your EXPLORER 710 terminal Overview The EXPLORER 710 is a compact unit comprising a transceiver with a detachable antenna, compass, display and keypad, all in one unit. Transport lock Antenna for BGAN and GNSS... -
Page 16: Display And Keypad
Chapter 1: Introduction to EXPLORER 710 Display and keypad The EXPLORER 710 has a display and keypad providing quick access to important functions and simple setup, and for displaying status. 1. Menu: Opens the display menu. For a menu overview, see next page. -
Page 17: User Interfaces
For further information on the web interface, see Using the web interface on page 35. Antenna The white part of the EXPLORER 710, including the support bracket, is the detachable antenna module. The antenna module comprises a GNSS (Global Navigation Satellite System) antenna and a BGAN antenna. -
Page 18: Battery
SIM card The EXPLORER 710 requires a SIM card to go online. Without a SIM card you can still configure the terminal and you may be able to make emergency calls if the network allows it, but you cannot make normal calls nor access the internet. -
Page 19: Chapter 2 Getting Started
• how to insert and remove the battery and SIM card, and • how to start up the EXPLORER 710 and make the first call or data session. Unpacking and assembling Initial inspection Inspect the shipping carton immediately upon receipt for evidence of damage during transport. -
Page 20: To Open The Transport Latch
You can now access the keypad and connectors on the EXPLORER 710. To detach the antenna You have two options for using the EXPLORER 710 antenna: Attached. You can go through the pointing process with the antenna and transceiver •... - Page 21 Chapter 2: Getting Started To detach the antenna, do as follows: 1. Locate the slide locks on the bottom of the terminal. 2. Press and slide the locks outwards while lifting the transceiver to release it from the antenna bracket. 3.
-
Page 22: To Insert The Sim Card
The EXPLORER 710 can be used during the discharging process, but the remaining battery capacity may not be displayed correctly. -
Page 23: To Remove The Battery
Chapter 2: Getting Started To remove the battery For protection of the transceiver, always leave the battery inserted. Only remove the Note battery to replace it. To remove the battery, do as follows: 1. If the transceiver and antenna are attached, open the transport latch and detach the antenna as described in To detach the antenna on page 9. -
Page 24: Connecting Cables
Chapter 2: Getting Started Connecting cables Connectors The connector panel is placed on the side of the EXPLORER 710 and has the following connectors: ISDN LAN1 LAN2 (PoE) Phone DC in External battery 1 Ext battery connector for connecting an extra EXPLORER 710 battery. -
Page 25: To Connect The Antenna
Chapter 2: Getting Started To connect the antenna The antenna cable is connected at delivery. If you want to use the antenna separated from Note the transceiver, use a longer antenna cable and remove the transceiver from the antenna bracket. See the To detach the antenna on page 9. -
Page 26: Starting Up The Explorer 710
Chapter 2: Getting Started Starting up the EXPLORER 710 To switch the EXPLORER 710 on or off 1. Slide and hold the power button until the Status indicator lights up. This may take some seconds. 2. When the Status indicator flashes slowly or is constant green, and the display shows Ready, the terminal is ready for use. -
Page 27: To Enter The Sim Pin
50° 40° 30° 20° 10° 0° 10° 20° 30° 40° 50° 60° 70° 80° 90° 180° 160° 140° 120° 100° 80° 60° 40° 20° 0° 20° 40° 60° 80° 100° 120° 140° 160° 180° 98-140012-A Starting up the EXPLORER 710... -
Page 28: The Registration Procedure
If the GPS position has not yet been acquired at this point, the display may show NO GPS. READY (or other status information): • READY means the EXPLORER 710 is registered on the network and is ready to go online. If 98-140012-A Starting up the EXPLORER 710... -
Page 29: Using A Fixed Antenna Installation
You only have to point the antenna once, when you mount it. Using a computer connected to the EXPLORER 710, you can set up the EXPLORER 710 to skip pointing at power up. Refer to To set up pointing at power up on page 53. -
Page 30: Making The First Call Or Data Session
The following sections provide a short guide to making calls. For more detailed information, see To make or receive a phone call with EXPLORER 710 on page 31. For details on how to connect your phone, see •... -
Page 31: To Make The First Data Connection (Lan)
IP address and DNS server address automatically. Do as follows: 1. Connect a LAN cable between your computer and LAN#1 or LAN#2 on the EXPLORER 710. 2. When power up and pointing is completed, a Standard data connection is automatically established, if automatic activation is enabled (default enabled). -
Page 32: Chapter 3 Using The Explorer 710
Chapter 3 Using the EXPLORER 710 User interfaces The following user interfaces are available when using the EXPLORER 710 • Phone • ISDN • • WLAN • USB (Host) Enabling or disabling an interface Overview By default, only the LAN interface is enabled. However, you can enable or disable each of the interfaces independently. -
Page 33: To Enable Or Disable Interfaces With The Web Interface
To enable or disable interfaces with the web interface To enable or disable an interface using the web interface, do as follows: 1. Connect your smartphone, tablet or computer to the EXPLORER 710, using the LAN or WLAN interface. See: •... -
Page 34: Using A Computer, Smartphone Or Tablet
Chapter 3: Using the EXPLORER 710 Using a Computer, smartphone or tablet Overview The following interfaces are available for connecting computers, smartphones or tablets: • WLAN • To choose an interface for data connection The following table shows some characteristics of each interface to help you choose the right interface for your application. -
Page 35: To Connect To The Wlan Interface
For information on how to configure the WLAN interface, see Configuring the WLAN interface on page 45. Your device should now be connected to the EXPLORER 710. If the EXPLORER 710 is registered on the BGAN network, and automatic activation is enabled in the terminal, the connection to the Internet is established automatically. -
Page 36: To Connect To The Lan Interface
A suitable cable is provided with your EXPLORER 710. 2. Connect the other end of the cable to one of the LAN connectors on the EXPLORER 710. The ISDN interface and the LAN interface use the same connector type. Be Important careful not to connect to the wrong interface. -
Page 37: To Start Or Stop A Data Connection (Lan Or Wlan)
1. Connect your equipment to the interface you want to use. 2. Start up the terminal as described in Starting up the EXPLORER 710 on page 15. 3. Use the arrow keys to highlight the connection icon in the bottom left corner of the display. -
Page 38: Using A Phone
Codec priority: Highest priority codec type: G.711 The user name and password must match the IP handset settings in the web interface Note of the EXPLORER 710. See Managing IP handsets or smartphones on page 50. 98-140012-A Using a phone... - Page 39 • Managing IP handsets or smartphones on page 50. To use your phone to make calls through the EXPLORER 710 using WLAN, do as follows: 1. Start up the EXPLORER 710 terminal. 2. Connect your smartphone to the wireless access point of the EXPLORER 710.
-
Page 40: To Connect An Analogue Phone
1. Connect the cable to your phone. 2. Connect the other end of the cable to the Phone/Fax connector on the EXPLORER 710. 3. Power up the EXPLORER 710 and point the antenna as described in To point the antenna on page 16. -
Page 41: To Connect An Isdn Phone Or Modem
1. Connect the ISDN cable to your phone or modem. 2. Connect the other end of the cable to the ISDN connector on the EXPLORER 710. 3. Power up the EXPLORER 710 and point the antenna as described in To point the antenna on page 16. -
Page 42: To Make Or Receive A Phone Call With Explorer 710
EXPLORER 710 show an error message. To receive a call By default, all devices connected to the EXPLORER 710 will ring when one of the mobile numbers is called. Note however, that this depends on the call type settings. See Call types on page 27 Information on missed calls is stored in the call log. -
Page 43: Local Numbers And Special Functions
To make local phone calls You can make local calls between phones connected to the EXPLORER 710. For an overview of the available numbers, see the table in the previous section. -
Page 44: Viewing Alarm Messages
The default behaviour of the EXPLORER 710 is to power up automatically when you connect the power cable. If you wish, you can change this power up mode, so that the EXPLORER 710 is only powered if the Power button is pressed. -
Page 45: Viewing Properties Of The Explorer 710
Chapter 3: Using the EXPLORER 710 Viewing properties of the EXPLORER 710 Using the display and keypad, you can see properties of the EXPLORER 710. Do as follows: 1. From the display menu, select PROPERTIES. 2. To see the local IP address of the EXPLORER 710, Select IP ADDRESS. -
Page 46: Chapter 4 Using The Web Interface
Chapter 4 Using the web interface This chapter describes how to use the web interface to operate, set up and configure your system. It has the following sections: • Introduction • Entering the SIM PIN in the web interface • Pointing the antenna •... -
Page 47: Introduction
To access the web interface, do as follows: 1. Start up the terminal. For details, see Starting up the EXPLORER 710 on page 15. 2. Connect your computer to the terminal. 3. Open your browser and enter ut.bgan in the address bar. - Page 48 Chapter 4: Using the web interface Overview of the web interface When the web interface opens, the title bar shows the name of the product. Name and icon of current page (on opening page: the name of the product) Icon bar Contents section Breadcrumbs...
- Page 49 Chapter 4: Using the web interface Icons in the icon bars The icon bars are always available at the top and bottom of the web interface. Some of the icons are permanent while others are temporary. Icon Explanation Power status. The icon changes according to status. Tap or click to see detailed battery status.
-
Page 50: Entering The Sim Pin In The Web Interface
Chapter 4: Using the web interface Entering the SIM PIN in the web interface Do you need a SIM PIN? You may not have to enter a SIM PIN to access the terminal. This depends on Note whether or not the use of a SIM PIN is enabled on your SIM card. The administrator can enable and disable the use of a SIM PIN. -
Page 51: Pointing The Antenna
Chapter 4: Using the web interface Pointing the antenna For detailed information on the pointing procedure, see To point the antenna on page 16. You can use the web interface to help you with the pointing process. To start the pointing procedure, do as follows: ... -
Page 52: Using The Dashboard
38. To start and stop data connections To start and stop data connections on your EXPLORER 710, do as follows: 1. In the middle of the Dashboard, locate the connection profile you want to start. ... -
Page 53: The Control Panel
Chapter 4: Using the web interface The Control panel The control panel is used for accessing the settings and functions of your EXPLORER 710. To open the control panel, click from the bottom right corner of the web interface. -
Page 54: Using The Log
Chapter 4: Using the web interface Using the Log To access the Log and select Log from the menu. The Log page contains: To access the Log, select Call log: A list of all incoming, outgoing and missed calls since the log was last cleared. •... -
Page 55: Configuring The Lan Interface
Chapter 4: Using the web interface Configuring the LAN interface The terminal has two LAN connectors. LAN#1 is with PoE (Power over Ethernet). To enable or disable the LAN interface To enable or disable the LAN interface, do as follows: 1. -
Page 56: Configuring The Wlan Interface
Chapter 4: Using the web interface Configuring the WLAN interface The LAN network settings entered in the User group settings page also apply for the Note WLAN interface. To enable or disable the WLAN interface To enable or disable the WLAN interface, do as follows: 1. -
Page 57: Port Forwarding
3. Select Active to activate the port forwarding. 4. Type in the Incoming port start and the Incoming port end. This is the range of port numbers on the EXPLORER 710 for which incoming traffic to the EXPLORER 710 will be forwarded. -
Page 58: User Group Settings (Lan And Wlan)
• Select Router mode if one or more computers are connected using the LAN interface, and the EXPLORER 710 should act as a router. When Router mode is selected, the EXPLORER 710 uses the built-in NAT module for making the necessary address translations. -
Page 59: Configuring The Phone Interface
Chapter 4: Using the web interface Configuring the Phone interface To enable or disable the Phone interface 1. In the Control panel , locate the Phone field. 2. Click the symbol in the right side to enable or disable the Phone interface. ... -
Page 60: To Configure The Isdn Interface
Chapter 4: Using the web interface To configure the ISDN interface 1. In the Control panel , select ISDN. 2. Set the call type for incoming calls. You can select Standard voice, 3.1 kHz audio, UDI and/or RDI. An incoming call to the ISDN interface will only make the connected device ring if the call type used for the call is selected here. -
Page 61: Managing Ip Handsets Or Smartphones
For details on SIP settings and how to connect your handset to the LAN or WLAN interface, see To connect a phone using LAN or WLAN on page 27. To manage IP handsets or smartphones in your EXPLORER 710 Do as follows: 1. -
Page 62: Support
Chapter 4: Using the web interface 7. Set the call type for incoming calls. You can select Standard voice or 3.1 kHz audio or both. • If you select both, the handset will react (ring) on incoming calls. • If you select e.g. Standard voice, the handset will only react on calls made to the Standard voice phone number. -
Page 63: To Upload Software
Chapter 4: Using the web interface To upload software To upload software from your computer to the terminal, do as follows: 1. Download the new software or acquire the software from Cobham SATCOM and save it on your computer. ... -
Page 64: Configuring The Terminal Settings
With this setting, the terminal will go through the pointing procedure every time the terminal is powered. 3. If the EXPLORER 710 antenna is placed in a fixed position and the signal strength is sufficient, clear the check box next to Pointing required at power up to make the EXPLORER 710 automatically establish a connection when the terminal is powered. -
Page 65: Advanced Settings
Advanced settings Fist time use The first time you access the EXPLORER 710 you are logged in as administrator by default. You are then guided to enable use of admin password and to type in the administrator password you want to use. -
Page 66: To Clear The Logs
This will reset the Time connected counters in the session log. Data limits You can set a limit for the use of data services with the EXPLORER 710 system. Once the entered limit is reached, the connection is automatically stopped. This is recorded in the data log. -
Page 67: To Set Up The Use Of Sim Pin In The Terminal
Chapter 4: Using the web interface To set up the use of SIM PIN in the terminal To enable or disable the use of a SIM PIN To enable or disable the use of a PIN to access the terminal, do as follows: 1. -
Page 68: Chapter 5 Maintenance And Troubleshooting
Cobham SATCOM Self Service Center web- portal, which may help you solve the problem. Your dealer, installer or Cobham SATCOM partner will assist you whether the need is user training, technical support, arranging on-site repair or sending the product for repair. -
Page 69: Software Update
5. On the EXPLORER 710, check in the display that the USB interface is enabled. 6. Insert the USB memory stick into the EXPLORER 710 USB connector on the front. 7. The EXPLORER 710 will read the software image from the USB memory stick and after a short moment start the software update process. -
Page 70: Maintenance
To connect an extra external EXPLORER 710 battery If you are not close to a power source, you may want to use an extra EXPLORER 710 battery as backup. Do as follows: 1. -
Page 71: Accurate Display Of The Battery Capacity
3. Recharge the battery. Storage Do not leave the battery inserted in the EXPLORER 710 during storage. If the battery is not to be used for a longer period of time, do as follows: 1. Fully charge the battery. -
Page 72: Troubleshooting
If the contacts are damaged, replace the battery. Press and simultaneously on There is no light in the The EXPLORER 710 may be in power indicator nor in Stealth Mode (all lights and the display keypad. This will toggle the display when the sounds are off). - Page 73 To insert the SIM card on page 11. The display shows The EXPLORER 710 is unable Make sure the view to the GPS to register on the network, satellites is not blocked.
- Page 74 GPS. If the EXPLORER 710 has not To help the EXPLORER 710 obtain been used recently within the GPS fix, it should be placed flat on same location, it can take up...
- Page 75 Phone/Fax interface on page 71. Incoming calls: The call type Make sure the call type used for used for the call is not calls to the EXPLORER 710 is selected in the web interface. selected in the web interface. Access the web interface and select Control panel >...
- Page 76 Remedy A LAN connection The interface is off in the Enable the interface by selecting cannot be established. EXPLORER 710. the LAN interface icon in the display, or by accessing the web interface and selecting Control panel, and clicking the icon in the right side of the LAN field.
-
Page 77: Status Signalling
Blue flashing Uploading software to the terminal Power off or Stealth mode Messages In the display and the web interface of the EXPLORER 710 you can see status messages and alarms that are currently active. Click the warning symbol to see a list of currently active alarms. -
Page 78: Log Files
Support > Diagnostics report. Then click Generate report. Call log and data log The log holds detailed information on each call or data session to and from the EXPLORER 710, including date and time, phone numbers, duration, amount of data transferred etc. -
Page 79: Technical Specifications
Technical specifications General specifications Item Specification Type EXPLORER 710, BGAN Class 1 terminal Max. IP data rate, Rx/Tx 492 kbps/492 kbps (simultaneously) Streaming data 32, 64, 128, 176 and 256 kbps, BGAN X-Stream, HDR, ½ channel HDR, Asynchronous HDR and ½ channel... -
Page 80: Battery Specifications
Appendix A: Technical specifications Battery specifications Item Specification Battery type Lithium Ion Voltage 10.95 Volt Capacity Typ. 5700 mAh Time between recharging Tx time, max 2h30m @ 144 kbps 1h30m @ 492 kbps Rx time, max 3h30m @ 492 kbps Charge time 2h. -
Page 81: Interfaces Specifications
Appendix A: Technical specifications Interfaces specifications Power input Connector pin-out This drawing shows the pin-out for the DC Power connector. Specifications Item Specification DC input range +10 to +32 VDC Power consumption up to 65 W depending on usage Connector type Power Jack - 2,5 mm Center AC/DC adapter Item... -
Page 82: Phone/Fax Interface
Appendix A: Technical specifications Phone/Fax interface Connector pin-out Function Ring Specifications Item Specification Connector type RJ-11, female Impedance 180 Ohm + 750 Ohm / 150 nF Max. cable length 100 m / 80 Ohm 98-140012-A Interfaces specifications... -
Page 83: Isdn Interface
Appendix A: Technical specifications ISDN interface Connector pin-out Function RJ-45 Connector Female (Receptacle) Specifications Item Specification Connector type RJ-45, female Data rate Voice 4 kbps Data 64 kbps Audio 3.1 kHz Max. cable length 100 m 98-140012-A Interfaces specifications... -
Page 84: Lan Interface, 2-Port
Appendix A: Technical specifications LAN interface, 2-port Connector pin-out Function RJ-45 Connector Female (Receptacle) Specifications Item Specification Number of connectors Connector type RJ-45, female, Auto cross-over MDI/MDI-X (IEEE 802.3 10/100BaseT) Standard ISO/IEC 8877:1992 and IEEE 802.3 1998 Edition Max. data rate 10/100 Mbps Max. -
Page 85: Wlan Access Point
Appendix A: Technical specifications WLAN access point Specifications Item Specification Standard IEEE 802.11 b/g Antenna External rotatable antenna for increased coverage Frequencies 2.4 GHz ISM band Max. coverage outdoor 100 m / 328 ft USB (Host) interface Connector pin-out Function VBUS Specifications Item... -
Page 86: Antenna Interface On Transceiver
Appendix A: Technical specifications Antenna interface on transceiver Specifications Item Specification Connector type TNC, female Max. cable length Typically up to 100 m depending on the cable type Max. cable loss Max 20 dB cable loss at 1.5 to 1.7 GHz Max. -
Page 87: Glossary
Glossary Glossary BGAN Broadband Global Area Network. A satellite network based on geostationary satellites, delivering data rates of up to 492 kbps and telephony to virtually any part of the earth, with full UMTS (3G) compatibility. BGAN enables users to access e-mail, corporate networks and the Internet, transfer files and make telephone calls. - Page 88 Glossary IMSO International Maritime Satellite Organisation. An intergovernmental body established to ensure that Inmarsat continues to meet its public service obligations, including obligations relating to the GMDSS. Ingress Protection. An international classification system for the sealing effectiveness of enclosures of electrical equipment against the intrusion into the equipment of foreign bodies (i.e.
- Page 89 Glossary Radio Frequency. Electromagnetic wave frequencies between about 3 kilohertz and about 300 gigahertz including the frequencies used for communications signals (radio, television, cell-phone and satellite transmissions) or radar signals. Subscriber Identity Module. The SIM provides secure storing of the key identifying a mobile phone service subscriber but also subscription information, preferences and storage of text messages.
-
Page 90: Index
31 2-wire missed, received, outgoing, 43 connect a phone, 29 total usage, 43 connector, 71 charge EXPLORER 710 batteries, 59 smartphone or tablet, 32 clear logs, 55 configuration AC⁄DC adapter specifications, 70 IP handsets and smartphones, 50 access to settings... - Page 91 36 password IP handset smartphone or IP handset, 50 connect, 27 permissions enable or disable in EXPLORER 710, 50 setting for users, 56 manage in EXPLORER 710, 50 SIP settings, 27 user name and password, 50 98-140012-A...
- Page 92 48 charge via USB, 32 connect to LAN or WLAN, 27 connect for calls, 27 connect to Phone interface, 29 enable or disable in EXPLORER 710, 50 connector, 71 manage in EXPLORER 710, 50 SIP settings, 27 SIP settings, 27...
- Page 93 Index warranty, 57 web interface accessing, 36 definition, 36 navigating, 38 what’s in the delivery, 8 WLAN automatic activation of, 47 configure, 45 connect to, 24 user group settings, 47 98-140012-A...
Need help?
Do you have a question about the EXPLORER 710 and is the answer not in the manual?
Questions and answers