
Related Manuals for Blizzard Lighting RokBox


Summary of Contents for Blizzard Lighting RokBox
-
Page 1: Rokbox™ Led
ROKBOX Blizzard Lighting, LLC www.blizzardlighting.com Waukesha, WI USA Copyright (c) 2012... -
Page 2: Table Of Contents
Features DMX Quick Reference The RokBox™ Pin-up Picture 3. Setup Fuse Replacement Connecting A Bunch Of RokBox™ PAR Cans 7 Data/DMX Cables Cable Connectors 3-Pin??? 5-Pin??? Huh? Take It To The Next Level: Setting up DMX Control Fixture Linking (Master/Slave Mode) Mounting/Rigging 4. -
Page 3: Getting Started
Blizzard Lighting™ assumes no responsibility or liability for any errors or omissions that may appear in this user manual. Blizzard Lighting™ reserves the right to update the existing document or to create a new document to correct any errors or omissions at any time. -
Page 4: Safety Instructions (Don't Stick Your Hand In The Toaster!)
• Make sure the power cord is never crimped or damaged. • Never disconnect the power cord by pulling or tugging on the cord. • Avoid direct eye exposure to the light source while it is on. Caution! There are no user serviceable parts inside the unit. Do not open the housing or attempt any repairs yourself. In the unlikely event your unit may require service, please contact Blizzard Lighting at sup- port@blizzardlighting.com. Page 4 RokBox Manual Rev. A © 2013 Blizzard Lighting, LLC... -
Page 5: Meet The Rokbox™ Led
2. MEET THE ROkBOx™ LED PAR CONTROL FEATURES • RGBW color mixing via 18x 10W Red/Green/Blue/White 4-in-1 LEDs • Variable electronic dimming & strobe • Built-in color & chase macros via DMX • Built-in automated programs via master/slave • Built-in sound active programs • RGBW color mixing ability in standalone mode ADDITIONAL FEATURES • Rugged and well-built (It hits the gym regularly) • Super-quiet variable-speed internal Fan Cooling • Dual mounting brackets for positioning flexibility • Flicker-free constant-current 400hz LED driver • 3-pin male input and 3-pin female output • PowerCon™ compatible AC power In/Out connectors DMX Quick Reference - 8 / 9 Channel Mode Channel 8 Channel 9 Channel Dimmer Dimmer Red Intensity... -
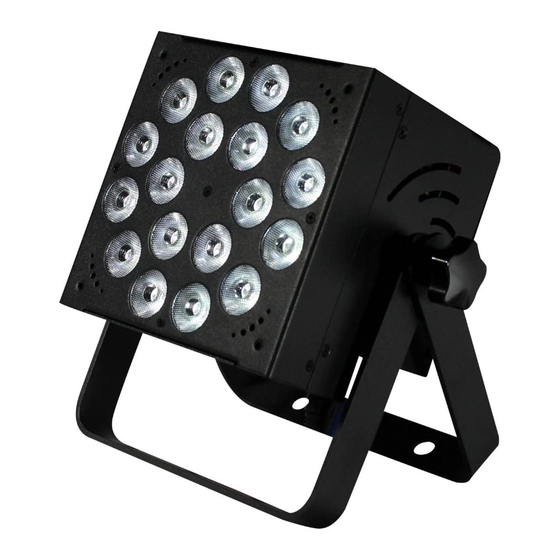
Page 6: The Rokbox™ Pin-Up Picture
Figure 1: The RokBox™ Pin-Up Picture Heavy-Duty Cast High Power 4-in-1 Aluminum Enclosure Quad Color LEDs Dual Mounting Yokes & Adjustment/Locking Knobs Figure 2: The Rear Connections DMX Out LED Display DMX In Menu Buttons AC Power Out AC Power In Page 6 RokBox Manual Rev. -
Page 7: Setup
3. SETUP Fuse Replacement CAUTION! The RokBox™ utilizes a high-output switch-mode power supply with an internal fuse. Under normal operating conditions, the fuse should not require replacement. The fuse is field replaceable, however it is an advanced procedure suited to qualified individuals. Should your RokBox™ fuse require replacement, please contact Bliz- zard Lighting for instructions, or to return your unit for service. Connecting A Bunch of RokBox™ Fixtures... -
Page 8: Cable Connectors
(input). Note: It doesn’t matter which fixture address is the first one connected. We recommend connecting the fixtures in terms of their proximity to the controller, rather than connecting the lowest fixture number first, and so on. Step 3: Connect other fixtures in the chain from output to input as above. Place a DMX terminator on the output of the final fixture to ensure best communication. Page 8 RokBox Manual Rev. A © 2013 Blizzard Lighting, LLC... -
Page 9: Fixture Linking (Master/Slave Mode)
Do not mount to surfaces with unknown strength, and ensure properly “rated” rigging is used when mounting fixutres overhead. Adjust the angle of the fixture by loosening both knobs and tilting the fixture. After finding the desired position, retighten both knobs. • When selecting installation location, take into consideration lamp replacement access (if applicable) and routine maintenance. • Safety cables MUST ALWAYS be used. • Never mount in places where the fixture will be exposed to rain, high humidity, extreme temperature changes or restricted ventilation. Page 9 RokBox Manual Rev. A © 2013 Blizzard Lighting, LLC... -
Page 10: Operating Adjustments
4. OPERATING ADJUSTMENTS The Control Panel All the goodies and different modes possible with the RokBox™ LED are accessed by using the control panel on the rear of the fixture. There are 4 control buttons below the LED display which allow you to navigate through the various control panel menus. <MENU> Is used to navigate to the previous higher-level menu item. -
Page 11: Control Panel Menu Structure
UL -- U.000 - U.255 White dimmer (0% <--> 100%) SouA So.uA Sound active mode on - oFF Display menu on/off nodE nod0-nod4 Dimming mode (0-4) UErn UE2.0 Software version Page 11 RokBox Manual Rev. A © 2013 Blizzard Lighting, LLC... -
Page 12: Dmx Mode
UL-- Level), (Blue Level) or (White Level), then hit <ENTER>. x000- 2.) Using the <UP/DOWN> buttons, select the maximum level for each color between x255 (000=off), then hit <ENTER> to confirm. Page 12 RokBox Manual Rev. A © 2013 Blizzard Lighting, LLC... -
Page 13: Dmx Channel Values In-Depth
192 <--> 223 4 Color Jump (Ch. 8 Controls Speed) 224 <--> 255 Sound Active, Multicolor (Ch. 8 Controls Speed) Fade Speed 0 <--> 255 Fade Speed (Slow <--> Fast) Page 13 RokBox Manual Rev. A © 2013 Blizzard Lighting, LLC... -
Page 14: Troubleshooting
Verify remote control cable is installed properly and securely. Work Verify remote is correct type (CA-9 or other as applicable.) Fixture Moving Verify proper mode of operation. Is the fixture in “Auto” mode? On Its Own If your problem persists or isn’t listed contact support@blizzardlighting.com. Page 14 RokBox Manual Rev. A © 2013 Blizzard Lighting, LLC... -
Page 15: Appendix
In summary, since its design and evolution in the 1980’s DMX has become the standard for lighting control. It is flexible, robust, and scalable, and its ability to control everything from dimmer packs to moving lights to foggers to lasers makes it an indispensable tool for any lighting designer or lighting performer. Page 15 RokBox Manual Rev. A © 2013 Blizzard Lighting, LLC... -
Page 16: Keeping Your Rokbox™ As Good As New
Keeping Your RokBox™ As Good As New The fixture you’ve received is a rugged, tough piece of pro lighting equip- ment, and as long as you take care of it, it will take care of you. That said, like anything, you’ll need to take care of it if you want it to operate as designed. -
Page 17: Tech Specs
LED’s. DISCLAIMER: The power connector fitted to the fixture and fixture cord are designed for compatibility with products manufactured by Neutrik AG, Neutrik USA and their related entities, however they are not manufactured by, affiliated with or endorsed by Neutrik AG, Neutrik USA, or any re- lated entity. Neutrik® and powerCON® are registered trademarks of Neutrik AG. Page 17 RokBox Manual Rev. A © 2013 Blizzard Lighting, LLC... - Page 18 This page intentionally left blank. Page 18 RokBox Manual Rev. A © 2013 Blizzard Lighting, LLC...
- Page 19 This page intentionally left blank.
- Page 20 Enjoy your product! Our sincerest thanks for your purchase! --The team @ Blizzard Lighting...
Need help?
Do you have a question about the RokBox and is the answer not in the manual?
Questions and answers