Table of Contents
Advertisement
Quick Links
Advertisement
Table of Contents

Related Manuals for GeoVision GV-HOT SWAP


Summary of Contents for GeoVision GV-HOT SWAP
- Page 2 The Windows XP Embedded is the componentized version of Microsoft Windows XP Professional, forsaking much functionality that Windows XP Professional provides and meeting the specific requirements of GV-Hot Swap DVR System. For details on embedded operation systems, please visit Microsoft's website.
- Page 3 Regulatory Notices FCC Notice This equipment has been tested and found to comply with the limits for a Class A digital device, pursuant to part 15 of the FCC Rules. These limits are designed to provide reasonable protection against harmful interference when the equipment is operated in a commercial environment.
-
Page 4: Safety Instructions
Safety Instructions Observe these safety instructions to help ensure against injury to yourself and damage to the product. Read all safety and installation instructions before you operate the product. Do not operate the product in high humidity areas or expose it to water or moisture. Do not put the product in an unstable, a slanting or vibrated place. -
Page 5: Regulatory Notices
Identifies the GV-Hot Swap DVR’s components. • Chapter 3, Getting Started Provides step-by-step instructions on setting up the GV-Hot Swap DVR. • Chapter 4, Troubleshooting Suggests courses of action if the GV-Hot Swap DVR doesn’t seem to be working properly. -
Page 6: Table Of Contents
3-6 Configuring an IP Address...…………………………………………..….. Exit to Windows...………………………………………………………… Back to GV-Desktop……………………………………………………… 3-7 Extended Installation……….……………………………………………… GV-Keyboard………..……………………………………………………. IR Remote Control................I/O Devices..................PTZ Domes..................3-8 Recovery DVD…...………………………………………………………… 3-9 Updating GV-Hot Swap DVR System…………………………………… Chapter 4 Troubleshooting …………………………………………………………………..Specifications…………………………………………………………………………… 35 Warranty Policy………..……………………………………………………………….. 39 Warranty Form………………………………………………………………………….. 43... -
Page 7: Chapter 1 Introduction
Introduction Chapter 1 Introduction 1.1 Unpacking The GV-Hot Swap DVR package includes the following items: Important: Please keep the original carton and all packing materials for future shipping need. 1. GV-Hot Swap DVR System x 1 2. D-Type Video Cable x 2 (1 x 1-8 Cams Black Cable, 1 x 9-16 Cams Blue Cable) 3. - Page 8 12. Surveillance System Software CD x 1 13. GV-Hot Swap DVR System User’s Manual x 1 14. GV-Hot Swap DVR System Quick Start Guide x 1 15. Surveillance System New Feature Guide x 1 16. Surveillance System Installation Guide x 1...
-
Page 9: Models
Introduction 1.2 Models The GV-Hot Swap DVR has the following three models: GV-1480H - Sixteen-channel digital video recorder - Records up to 480 (NTSC) / 400 (PAL) fps at the 320 x 240 resolution - Has the option of 4 / 6 / 8 hot-swap SATA drive bays... -
Page 10: Options
RS-232/RS-485 serial ports through the GV-Hot Swap DVR’s USB port. This unit can add 1 RS-232/RS-485 serial port through the GV-COM Box GV-Hot Swap DVR’s USB port. * The purchased GV-series cards will be added on the GV-Hot Swap DVR before shipment. -
Page 11: Chapter 2 Overview
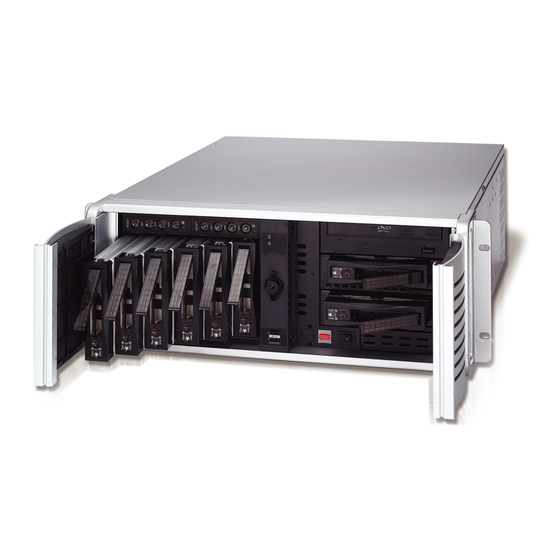
Overview Chapter 2 Overview 2.1 Front View Figure 1 SATA Backplane Reset Switch Hard Drive Activity LED HDD 1 (Power Switch) DVD (±) RW Drive HDD 2 (Power Switch) HDD 7 (Power Switch) HDD 3 (Power Switch) HDD 8 (Power Switch) HDD 4 (Power Switch) Power Switch HDD 5 (Power Switch) -
Page 12: Rear View
2.2 Rear View Figure 2 AC Power Input (110-230 V) Audio Speaker Out Port AC Power Switch Audio Line In Port PS/2 Mouse Input Audio Microphone In Port PS/2 Keyboard Input RJ-11 Port RS-485 ± for PTZ Control DB-9 Serial Input LPT Parallel Printer Port D-Type Video Port x 2 VGA Monitor Port... -
Page 13: Chapter 3 Getting Started
Getting Started Chapter 3 Getting Started 3.1 Basic Installation Basic installation describes all the equipments required to program and operate the GV-Hot Swap DVR. Figure 3 1. Using the supplied power cord, connect one end to the AC input and the other end to the power outlet. -
Page 14: Turning On The Power
Power On Figure 6 The GV-Hot Swap DVR will run a series of self-tests. After two or three minutes, a series of messages may be displayed as the various hardware and software subsystems are activated. After this finishes, the GV-System Software (Multicam Surveillance System) should load... -
Page 15: Installing The Hard Drive
Getting Started 3.3 Installing the Hard Drive The GV-Hot Swap DVR uses SATA hard drives for video and audio data storage. Before recording, ensure to install your hard drives. 1. Turn off the power of the SATA drive bay. Make sure the Power LED is off. - Page 16 Figure 10 8. Put the drawer back in the drive bay of the GV-Hot Swap DVR. 9. Push the handle back, and turn the safety lock to the LOCK position. 10. Press the Power button. When the Power LED indicates green, the hard drive is ready to...
-
Page 17: Formatting The Hard Drive
Getting Started 3.4 Formatting the Hard Drive After installing hard drives to your GV-Hot Swap DVR, you may need to format them before use. 1. Go to the GV-Desktop, click the Programs button, and select Disk Management. Figure 11 2. The Initialize and Convert Disk Wizard appears. Click Next to continue. - Page 18 3. The screen shows the drives you selected to initialize. Make sure all drives are checked, and click Next to continue. Figure 13 4. The screen gives you the option to convert the drives from basic to dynamic storage. Leave all drives unchecked, and click Next to continue. Figure 14...
- Page 19 Getting Started 5. When the initialization is complete, click Finish to close the wizard. Figure 15 6. Right-click in the unallocated space of a new drive, and select New Partition… . Figure 16...
- Page 20 7. The New Partition Wizard appears. Click Next to continue. Figure 17 8. Select Primary partition, and click Next to continue. Figure 18...
- Page 21 Getting Started 9. The default partition size is the same as the maximum disk space. Make changes if necessary. Click Next to continue. Figure 19 10. Assign a drive path that is not in use by other devices, and click Next to continue. Figure 20 Note: The default drive paths start from E.
- Page 22 11. Type a name in the Volume label box, ex. HDD1, and click Next to continue. Figure 21 12. When the formatting is complete, click Finish to close the wizard. Figure 22...
-
Page 23: Adding The Hard Drive To Recording Path
Getting Started 13. When the drive is successfully initialized, partitioned, and formatted, its status description should display “Healthy.” Figure 23 3.5 Adding the Hard Drive to Recording Path Before recording, you need to add the formatted hard drives to the recording path. 1. - Page 24 2. Right-click a new hard drive, and select Add for Recording. The Status field should display “Standby”, indicating the drive is ready for storing data. Hot Swap Drive Status field Figure 25 For the details on using Hot Swap HDD Tool, see Chapter 13 “Hot-Swap Recording” in the Surveillance System New Feature Guide.
-
Page 25: Configuring An Ip Address
GV-Hot Swap DVR over a network connection. The GV-Hot Swap DVR is enabled for DHCP network. An IP address will be automatically allocated when the GV-Hot Swap DVR is powered up. Despite the DHCP setting, it is recommended that a static IP address be configured on the unit. -
Page 26: Back To Gv-Desktop
5. Configure a static IP address on the Windows XP platform. Check your network administrator if you have questions about the configuration. Figure 27 The GV-Desktop Back to GV-Desktop Click the Windows Start button, point to Programs, click GV folder, and click Key Lock Utility. -
Page 27: Extended Installation
GV-Keyboard Figure 29 It is also possible to plug the Keyboard into other USB ports of the GV-Hot Swap DVR. For this, you must modify the default COM port on the Mulitcam Controller pop-up once the Keyboard is connected. See Figure 30-1. -
Page 28: Ir Remote Control
IR Remote Control The IR Remote Control is another plug-and-play device. Simply plug the Receiver into any USB ports of the GV-Hot Swap DVR. For details on the IR Remote Control, find the User’s Manual included in its own package. -
Page 29: I/O Devices
Getting Started I/O Devices The GV-Hot Swap DVR, with built-in GV-NET/IO Card, provides 4 alarm outputs and 4 sensor inputs. Relay Output 1~4 Sensor Input 1~4 Ground Figure 32 PTZ Domes When connecting PTZ domes, it is required to plug the supplied RJ-11 to DB9 cable into the DB9 port of the GV-Hot Swap DVR. -
Page 30: Recovery Dvd
Note: After recovery, you need to re-install all settings and passwords. But the recovery will not delete your recording files saved in the GV-Hot Swap DVR since it only reformats the partition C and all of your files are still stored at other partitions. - Page 31 Configuring the GV-Hot Swap DVR for PAL after Recovery The default video standard of the Recovery DVD is set to NTSC. If the video standard in your country is PAL, remember to configure the GV-Hot Swap DVR for PAL after using the Recovery DVD.
-
Page 32: Updating Gv-Hot Swap Dvr System
3.9 Updating GV-Hot Swap DVR System GeoVision will periodically release the updated Recovery DVD including the latest GV-System Software (Multicam Surveillance System) and Windows updates. If you like to update your GV-Hot Swap DVR System, contact your dealer to get one. -
Page 33: Chapter 4 Troubleshooting
GV-Hot Swap DVR won’t turn on. If your GV-Hot Swap DVR won’t turn on or you don't hear a startup sound or any fan or drive noise, try these steps: 1. Make sure that you switch on the AC power on the rear panel. - Page 34 GV-Hot Swap DVR’s hard disk corrupts. If you are experiencing file system corruption problems, such as lost clusters, cross-linked files or invalid files or directories, try these steps: 1. Use Windows built-in utility to scan your hard disk for errors and attempt to fix them.
- Page 35 3. If the problem persists, replace a hard disk drive. GV-Hot Swap DVR suffers virus attack. GV-Hot Swap DVR is designed and optimized for Windows XP platform. It may be vulnerable to newly created worms and exploits that attack any of the underlying operating system’s previously undocumented flaws.
- Page 36 If the screen image seems to be distorted, jitter, or not to look right, try these steps: 1. Make sure the video standard in your country matches the setting in the GV-Hot Swap DVR. Refer to Configuring the GV-Hot Swap DVR for PAL after Recovery in 3.8 Recovery DVD.
-
Page 37: Specifications
Specifications Specifications System Model GV-1480H GV-1240H GV-1120H Motherboard Intel 945G Chipset Intel Pentium 4 3.0 GHz, 800MHz FSB 512MB (256MB x 2) Dual Channel 4 / 6 / 8 bays Drive Bay Windows XP Embedded OEM Intel GMA 950 DirectX 9.0c DVD (±) RW Middle: 2 fans, Rear: 2 fans... - Page 38 Audio Model GV-1480H GV-1240H GV-1120H Audio Input 16 channels 8 / 16 channels 16 channels Input Level 0.5 ~ 1 Vp-p composite Compression ADPCM / G.723 Recording Model GV-1480H GV-1240H GV-1120H Recording Frame NTSC At 320 X 240 Resolution Image 720x480 / 720x480 De-interlace / 720x240 / 640x480 / NTSC 640x480 De-interlace / 640x240 / 320x240...
-
Page 39: Remote Client Software
Specifications Remote Client Software WebCam / Twin Server / CenterV2 / VSM / Control Center / Monitoring Remote Playback Server / Remote View / IP Multicast / Environment GView for PDA / MSView for Microsoft Smartphone / SSView for Symbian Smartphone / 3G Mobile Phone WebCam Live View Max. - Page 40 Connector Video Input BNC 16 ports Video Loop Output BNC 16 ports (Optional) Audio Input RCA 16 ports Audio Microphone In Mini stereo jack Audio Output Mini stereo jack TV Output 2-pin terminal RS±485 for PTZ Control RJ-45, 10/100/1000 Mbps Ethernet Front: 2 ports, Rear: 4 ports USB 2.0...
-
Page 41: Warranty Policy
Other packaged accessories and software (including but not limited to System Software) are excluded. If a defect where due to causes attributable to GeoVision arises and a valid claim is received by GeoVision within the Limited Warranty Period, at its option, GeoVision will (1) repair the... - Page 42 EXPRESSED OR IMPLIED WILL APPLY AFTER THIS PERIOD. GEOVISION SHALL NOT BE LIABLE FOR SPECIAL, DIRECT, INDIRECT, CONSEQUENTIAL DAMAGES. GEOVISION SHALL NOT BE LIABLE FOR LOST PROFITS, LOST OF DATA, PROGRAMS OR OTHER INFORMATION, DAMAGE TO OTHER PROPERTY CAUSED BY ANY...
- Page 43 2. Securely pack the product in its original carton using the original packing material, or in equivalent packaging. 3. The product shall be returned to GeoVision, Taiwan at your expense for shipping and insurance costs. BEFORE YOU DELIVER YOUR GV-HOT SWAP DVR SYSTEM FOR WARRANTY SERVICE, IT IS YOUR RESPONSIBILITY TO BACK UP YOUR DATA.
-
Page 45: Warranty Form
Warranty Form Warranty Form Thank you for purchasing the GV-Hot Swap DVR System. To help us validate your purchase and better serve you in the future, please go to http://www.geovision.com.tw/english/4_6.asp or click GeoVision Online Registration in My Favorite for a direct link to register online within 30 days from the date of purchase. - Page 46 Shipment Date: GeoVision, Inc. 9F, No. 246, Sec. 1, Neihu Rd., Neihu District, Taipei, Taiwan Tel: +886-2-8797-8377 Fax: +886-2-8797-8335 Email: sales@geovision.com.tw support@geovision.com.tw http://www.geovision.com.tw...
Need help?
Do you have a question about the GV-HOT SWAP and is the answer not in the manual?
Questions and answers