Table of Contents
Advertisement
Quick Links
Advertisement
Table of Contents

Related Manuals for Intelligent Home CAT-5 Series


Summary of Contents for Intelligent Home CAT-5 Series
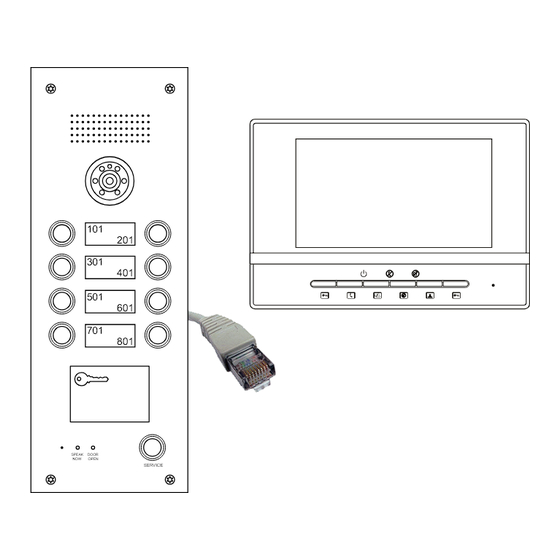
- Page 1 Video Door Entry System Direct Call for Apartments CAT-5 Series Installation and User Manual SPEAK DOOR OPEN SERVICE Manual covers all Genway models of CAT-5 Video monitors and Door Stations www.intelligenthomeonline.com...
- Page 2 PRECAUTIONS ● Read this manual through before using the product. ● Slots or openings in the back of the monitor, are provided for ventilation and to ensure reliable operation of the video monitor or equipment and to protect if from overheating. These openings must not be blocked or covered.
-
Page 3: Table Of Contents
CONTENT 1. Video Monitors - - - - - - - - - - - - - - - - - - - - - - - - - - - - - 1 2. Power Supply and Distributor - - - - - - - - - - - - - - - - - - 3 3. -
Page 4: Video Monitors
1. Video Monitors 1.1 CYGNI Colour Monitor 7” brushed aluminium finish Dimensions: W220xH150xD25mm Ding-dong ringtone Full Duplex. Handsfree. Ring time: 30s; Talk time: 120s; Direct wall mounting Mounting with 86 box Resolution: 480 x 234 pixel Monitoring time: 15s 1.2 LUNA Colour Monitor 7” Piano Black finish Mute button The recommended installation heights for both Reserved... - Page 5 1.4 JUNO Colour Monitor 3.5” in grey finish Note: To disable the Alarm function Dimensions: W180xH120xD25mm Ding-dong ringtone a) insert 9-pin plug into terminal on the rear of monitor Full Duplex. Handsfree. Ring time: 30s; Talk time: 120s; Resolution: 320 x 234 pixel Monitoring time: 15s b) twist together (short) all 9 wires 1.5 Muse Colour 7"...
-
Page 6: Power Supply And Distributor
1.7 Monitor mounting Note: Enure that RJ45 connector has enough room behind the monitor and is not under stress The recommended installation heights for both Monitor and Camera 145~160mm. Use the screws to fix the mounting bracket on the wall; Hang the Monitor on the mounting bracket firmly. - Page 7 2.2 Distributor 4110 Distributor 4110 is used for connection of up to 4 video monitors/audio phones. It has 4 ports with RG45 terminals. Each port is assigned to a specific button on the door station. 2 and 4-button Door Stations comes with one distributor 4110. 6 and 8-button Door Stations comes with two distributors 4110.
-
Page 8: Doorbell Cameras
3. Doorbell Cameras 3.1 Models of doorbell camera Door stations supplied with call buttons already pre-programmed according the drawing below. Please do not attempt to re-program those buttons. Button 4 Port 4, Distributor 1 Button 2 Button 3 Port 2, Distributor 1 Port 3, Distributor 1 Button 1 Button 2... - Page 9 3.2 Change the name plate How to change name tag Speaker Camera Lens Call buttons SPEAK DOOR SPEAK DOOR OPEN OPEN SERVICE SERVICE Card reader &Name tag paper Door open LED plastic tag Speak Now LED Microphone SPEAK DOOR OPEN Service Button SERVICE Push down on the plastic plate and move right to open the name plate window;...
- Page 10 3.4 Doorbell camera installation Make a square groove on proper position on wall or door according to the dimension of door station. Put the door station back cover into the groove, according to the hole on the cover to make marks in the groove, and then drill holes.
-
Page 11: System Connections
4. System connections 4.1 Two or Four buttons doorbell camera connection - 8 -... - Page 12 4.2 Six or Eight buttons doorbell camera connection Power supply 4001 Monitor 8 Monitor 7 button 8 button 7 PORT4 PORT3 PORT2 PORT1 distributor 2 Monitor 5 Monitor 6 Distributor 4110 button 5 button 6 Power supply 4001 Monitor 4 Monitor 3 button 4 button 3...
- Page 13 4.3 Two doorstation connection 2# 4110 1# 4110 Power supply 4001 distributor doorstation 2 download doorstation 1 Gate way 4301 door station 1 door station 2 SPEAK DOOR SPEAK DOOR OPEN OPEN SERVICE SERVICE -10-...
- Page 14 4.4 Additional Monitors/Audio Phones in apartments If additional Monitors or Audio Phones connected even in one of the apartments, 4110 should be changed to 4110s. 4# 4110S button 4 3# 4110S button 3 12345678 4. Blue 5. Blue/white 12345678 2# 4110S button 2 1# 4110S button 1...
-
Page 15: Lock Connections
5. Lock connections Magnetic lock Note 1 Electric lock Note 2 Note 2 Note 2 Note 2 Electric lock Electric lock Electric lock Note 2 Note 1: Short COM and 12V OUT if lock doesn't have it's own power supply. Note 2: Reverse diode not used only for electric gate system. -
Page 16: Basic Video Door Phone Operation
6. Basic Video Door Phone Operation When a visitor presses the 'Call' button, the monitor rings and screen shows the visitor. Press Button to talk. If you choose not to answer, the system will automatically reset to standby after 60 seconds. Press Button again to end the conversation;... -
Page 17: Mute Function
7. Mute function When you do not want to be disturbed by any calling, you can turn on the mute Mute function. indicator A d j u s t t h e [ R i n g V o l u m e Adjustment] to the lowest, the ring will be completely turned off, and the indicator will be turned on. -
Page 18: Remote Control Programming
9. Remote Control programming 9.1 Key panel discriptions Requires 2 x 1.5V AAA Batteries (not supplied) Working distance for programming < 1m 9.2 Programming To be able to do programming, first get into the programming mode. 9.2.1 Get into the system Press (FN) + password (4 digits) + (ENTER). -
Page 19: Distributor
9.2.2 Change password Press FN + new password ( 4 digits) + repeat new password + ENTER The door station will sound a long beep and DOOROPEN LED will flash slowly. If you hear “Sorry, wrong number. Please try again” then repeat step 1 Note: Please memorize your new password. -
Page 20: Button
9.2.4 SERVICE Button Note: When you program date and time please pay attention that door station confirms every digit by voice annunciation. If you hear no confirmation press last digit again. Failing to get voice confirmation will affect success of programming. -17-... - Page 21 9.2.5 Proximity Card/Token Register Single Card Press[REG-]+card number + [ENTER] The door station will sound a long beep and DOOROPEN LED will flash quickly. You can register a card by entering the card number (last 8 digits only) or by swiping the card. If the door station says"Sorry, wrong number.
- Page 22 Delete all cards Press DEL+EXTRA+password+ENTER Door station will sound a long beep and DOOROPEN LED will flash slowly. Press EXIT button to exit programming mode. 9.2.6 Unlock time Press[UNLOCK] +Number(1~10) + [ENTER] The door station will sound a long beep and the DOOROPEN LED will flash slowly. If you hear “Sorry, wrong number.
-
Page 23: Warranty Card
4. Attempting to force the device to perform functions for which it is not intended 5. Attaching the device to power supplies other than those recommended by the manufacturer Distributor for Warranty purposes: Intelligent Home Online Ltd 62 Hartley Old Road, Purley, Surrey, London, CR8 4HJ +44 (0)20 86170015 www.intelligenthomeonline.com... - Page 24 CAT5-Apartment-V2 2013-07-06 The design and specifications can be changed without notice to the user. Right to interpret and copyright of this manual are preserved. www.intelligenthomeonline.com...
Need help?
Do you have a question about the CAT-5 Series and is the answer not in the manual?
Questions and answers