
Subscribe to Our Youtube Channel
Related Manuals for Intelligent Home 7Avro610C


Summary of Contents for Intelligent Home 7Avro610C
- Page 1 AVRO Video Door System 2-wire Series Installation and User Manual www.intelligenthomeonline.com...
-
Page 3: Monitor Mounting
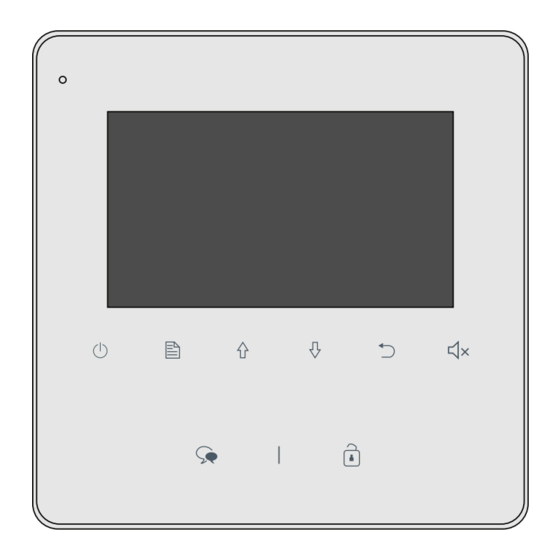
1.Monitor Parts and Functions Microphone LCD Screen Mounting Hook •••• RING Connection Port Close Button Mute Button/Indicator Menu Button Return Button Up Button Down Button Talk/Mon Button Unlock Button Monitor Terminals SW+,SW-: External C all button •••••••• connection port Ring,GND: External Ringer connection port NC: Not in use L1,L2: Bus line terminal... -
Page 4: Basic Operation
1. Use the screws to fix mounting bracket on the wall 2. Hang the Monitor on the mounting bracket firmly 3. Main Menu Menu / Close button, in Press standby, the main menu page will be shown as follows: 4. Basic Operation When door station is rung, the monitor comes On with video 00:23... -
Page 5: Intercom Between Monitors Function
5. Intercom Between Monitors Function Menu Button to enter main menu page. Use When the monitor is in standby, touch Button to move up/ down to select Intercom Call icon, touch Menu Button to enter the select intercom page with available Intercom options 1. -
Page 6: Do Not Disturb Function
6. Do not Disturb Function Do Not Disturb function will set the monitor to not react to door station calls. There are a few duration options to choose from Main Menu No Disturb Monitor By Select Normal Intercom Call Divert Call Don’t Disturb Always button to sele Don't... - Page 7 Sip Info Here you can v v v e e i i i w w w e t t t e e e h h h S S S p p p i i i f f f n n n i i i r r r o o o m m m i i i t t t a a a...
- Page 8 D D D s s s i i i b b b a a a e e e l l l “ “ “ P P P I I I V V V ” ” ” 6 6 6 i i i n n n 2 2 2 a a a E E E y y y s s s...
- Page 9 After scanning QR code check on status bar, or press “Registered” to register manually , until 2Easy APP display Surveillance of door station via 2Easy APP I n 2Easy APP, press on “Monitor” and wait for a few second (Due to 2-Wire communication will take around 12 second to get the video), blue screen is normally due to the monitor is verifying the password and a monitor code...
-
Page 10: Operating Security Light
9. Operating Security Light This function will be activated only when actual security light connected with an additional RLC Light/Lock Control Interface Main Menu Light Option Light Turn On Turn On 5min. Setup Restore Turn Off About button to selete Light Button to selete the item Menu button Menu button... -
Page 11: Entering Installer Setup
11.Restore to a Default Settings Here you can recover factory settings 12.2 Restore to Default Menu Button to enter the restore page, and then press Menu Button to Press confirm. About S/W : 00.01.00 Restore? Addr : 00.00 Video STD: AUTO Restore Menu button to confirm. -
Page 12: Electric Lock Release Settings
12.2 Power Saving Mode On/Off By default the system is set to Power Saving Mode, where only the first monitor in the system comes On with video when door station rung. All other monitors will ring but without video. Video will be transferred to the monitor which answers the call. To switch the power saving mode Off, so all monitor ring with video, use Code 8006 for each monitor ... - Page 13 12.4 Multiple Monitor System Configuration There are two way of connecting multiple monitors: a) Daisy Chain- each monitor connects to a next monitor b) Star Connection- all monitors connects to a central point Up to 16 video monitors can be connected in a House system. Up to 4 monitors in each apartment for Apartmen systems.
- Page 14 12.5 User Codes Tables • DIP switches 1-6 settings for up to 32 User Codes in the Tables below • DIP 6 is determine the end of line. Must be set ON if the Monitor is at the end of the line End of line settings with DIP 6 DIP state Setting...
-
Page 15: Basic Connection
13. Basic Connection door station BUS(IM) BUS(DS) B ell Button RING Switch 14. Adjusting Colour, Brightness and Talk Volume Menu Button, the During monitoring or talking, press ADJUST MENU will be displayed. Menu Button to select the adjustment item; use Button to decrease / increase Return the value,... -
Page 16: Speci Cations
15. Speci cations ● ● Power●supply●for●indoor●monitor:●● ● DC●20~28V● ● ● Power●consumption:● ●● Standby●0.17W;●Working●status●4.7W ● ● Monitor●screen:● ● 4.3●inch●digital●color●TFT ● ● Display●Resolutions:● ● 480(R,●G,●B)●x●272●pixel ● ● Video●signal:● ● 1Vp-p,●75Ω,●CCIR●standard ● ● Wiring:● ● 2●wires,●no-polarity ● ● Monitoring●time:● ● 40●seconds ● ● Talking●time:● ●... -
Page 17: Warranty Card
4. Attempting to force the device to perform functions for which it is not intended 5. Attaching the device to power supplies other than those recommended by the manufacturer Distributor for Warranty purposes: Intelligent Home Online Ltd 62 Hartley Old Road Purley Surrey... - Page 19 AVRO 2-wire series Right to interpret and copyright of this manual are preserved. www.intelligenthomeonline.com -18-...
Need help?
Do you have a question about the 7Avro610C and is the answer not in the manual?
Questions and answers