
Subscribe to Our Youtube Channel
Related Manuals for Intelligent Home CAT-5 Series


Summary of Contents for Intelligent Home CAT-5 Series
- Page 1 House Video Door Entry System CAT-5 Series Installation and User Manual SPEAK DOOR OPEN CALL SERVICE Manual covers all Genway models of CAT-5 Video monitors and Door Stations www.intelligenthomeonline.com...
- Page 2 PRECAUTIONS ● Read this manual through before using the product. ● Slots or openings in the back of the monitor, are provided for ventilation and to ensure reliable operation of the video monitor or equipment and to protect if from overheating. These openings must not be blocked or covered.
-
Page 3: Table Of Contents
CONTENT 1. Video Monitors - - - - - - - - - - - - - - - - - - - - - - - - - - - - - 1 2. Doorbell Cameras- - - - - - - - - - - - - - - - - - - - - - - - - - - 3 3. -
Page 4: Video Monitors
1. Video Monitors 1.1 CYGNI Colour Monitor 7” brushed aluminium finish Dimensions: W220xH150xD25mm Ding-dong ringtone Full Duplex. Handsfree. Ring time: 30s; Talk time: 120s; Direct wall mounting Mounting with 86 box Resolution: 480 x 234 pixel Monitoring time: 15s 1.2 LUNA Colour Monitor 7” Piano Black finish Mute button The recommended installation heights for both Reserved... -
Page 5: Monitor Mounting
1.4 JUNO Colour Monitor 3.5” in grey finish Dimensions: W180xH120xD25mm Ding-dong ringtone Note: To disable the Alarm function Full Duplex. Handsfree. Ring time: 30s; Talk time: 120s; a) insert 9-pin plug into terminal on the rear of monitor Resolution: 320 x 234 pixel Monitoring time: 15s b) twist together (short) all 9 wires 1.5 Monitor mounting... -
Page 6: Doorbell Cameras
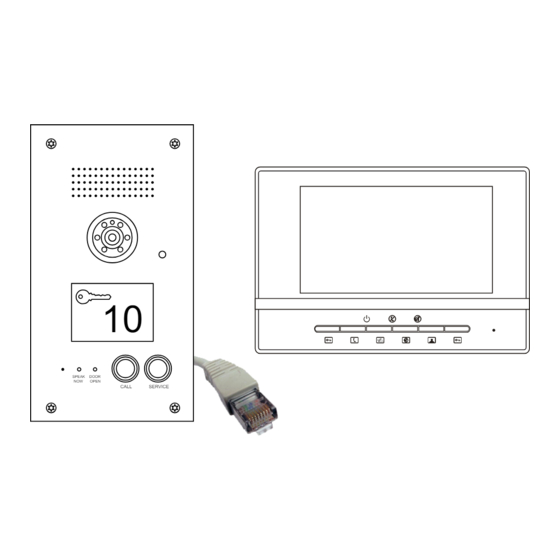
2. Doorbell Cameras 2.1 Doorbell Camera Model A Camera Lens Night-view LED Speaker Call Button Microphone 2.2 Doorbell Camera Model B How to change name tag Speaker Infrared LED Camera Lens Infrared Sensor Card reader &Name tag SPEAK DOOR SPEAK DOOR OPEN OPEN... - Page 7 How to adjust camera angle Mounting with box - 4 -...
-
Page 8: Power Supply And Distributor
3. Power Supply and Distributor 3.1 Power supply 4001 AC-DC Input: AC180V~270V 50~60Hz Output: DC35V 1,4A Wall mount with screws supplied. Connect N L and Earth to the mains, connect GRN and DC+ according to diagram Mains input Power Supply 4001 DC output 3.2 Distributor 4110s Working Voltage DC30-35V... -
Page 9: System Connections
4. System connections System requires CAT-5 or CAT-6 cabling and RG45 connectors (not supplied by default) Working distance up to 100m with one power supply Over 100m and up to 150m an additional power supply recommended. Maximum number of video monitors or Audio handsets in one system: 4 Second door station can be added;... - Page 10 4.2 Doorbell B single monitor connection Brown Brown/white Blue Blue/white Green Green/white Orange Orange/white - 7 -...
- Page 11 4.3 Doorbell A multiple monitors connection - 8 -...
- Page 12 4.4 Doorbell B Multiple monitors connection Brown Brown/white Blue Blue/white Green Green/white Orange Orange/white - 9 -...
- Page 13 4.5 Two Doorbell A multiple monitors connection link Down link Power -10-...
- Page 14 4.6 Two Doorbell B Multiple monitors connection link Down link Power Brown Brown Brown/white Brown/white Blue Blue Blue/white Blue/white Green Green Green/white Green/white Orange Orange Orange/white Orange/white -11-...
-
Page 15: Lock Connections
4.7 Audio phone connection Audio phone Audio phone Power 1# Monitor 2# Monitor Doorbell Supply Distributor 4230 12345678 Note: Connect 1 to 4th, 2 to 5th. No polarity 4. Green 5. Blue/white 12345678 5. Lock connections 5.1 Doorbell A lock connection Normal open connection Doorbell Model A Note 1... - Page 16 5.2 Doorbell B lock connection Magnetic lock Note 1 Electric lock Note 2 Note 2 Note 2 Note 2 Electric lock Electric lock Electric lock Note 2 Note 1: Short COM and 12V OUT if lock doesn't have it's own power supply. Note 2: Reverse diode not used only for electric gate system.
-
Page 17: Basic Video Door Phone Operation
6. Basic Video Door Phone Operation When a visitor presses the 'Call' button, the monitor rings and screen shows the visitor. Press Button to talk. If you choose not to answer, the system will automatically reset to standby after 60 seconds. Press Button again to end the conversation;... -
Page 18: Mute Function
7. Mute function When you do not want to be disturbed by any calling, you can turn on the mute Mute function. indicator A d j u s t t h e [ R i n g V o l u m e Adjustment] to the lowest, the ring will be completely turned off, and the indicator will be turned on. -
Page 19: Remote Control Programming(Doorbell Model B)
9. Remote Control programming(Doorbell Model B) 9.1 Key panel discriptions Requires 2 x 1.5V AAA Batteries (not supplied) Working distance for programming < 1m -16-... -
Page 20: Change Password
9.2 Programming To be able to do programming, first get into the programming mode. 9.2.1 Get into the system Press (FN) + password (4 digits) + (ENTER). Note: default password is 1234 The door station will sound a long beep and DOOROPEN LED will flash slowly. You have 7s to enter the password, otherwise system will exit automatically. -
Page 21: Date And Time
9.2.3 Date and time Note: When you program the date and time please pay attention that door station confirms every digit by voice annunciation. If you hear no confirmation press last digit again. Failing to get voice confirmation will affect success of programming -18-... - Page 22 9.2.4 SERVICE Button Note: When you program date and time please pay attention that door station confirms every digit by voice annunciation. If you hear no confirmation press last digit again. Failing to get voice confirmation will affect success of programming. -19-...
- Page 23 9.2.5 Proximity Card/Token Register Single Card Press[REG-]+card number + [ENTER] The door station will sound a long beep and DOOROPEN LED will flash quickly. You can register a card by entering the card number (last 8 digits only) or by swiping the card. If the door station says"Sorry, wrong number.
-
Page 24: Delete All Cards
Delete all cards Press DEL+EXTRA+password+ENTER Door station will sound a long beep and DOOROPEN LED will flash slowly. Press EXIT button to exit programming mode. 9.2.6 Unlock time Press[UNLOCK] +Number(1~10) + [ENTER] The door station will sound a long beep and the DOOROPEN LED will flash slowly. If you hear “Sorry, wrong number. - Page 25 4. Attempting to force the device to perform functions for which it is not intended 5. Attaching the device to power supplies other than thoserecommended by the manufacturer Distributor for Warranty purposes: Intelligent Home Online Ltd 34a High Street, Hornsey, London, N87NX +44 (0)20 83482040 www.intelligenthomeonline.com...
- Page 26 CAT5-series-V2 2012-08-30 The design and specifications can be changed without notice to the user. Right to interpret and copyright of this manual are preserved. www.intelligenthomeonline.com...
Need help?
Do you have a question about the CAT-5 Series and is the answer not in the manual?
Questions and answers