Intermec PC23 User Manual
Desktop printer
Hide thumbs
Also See for PC23:
- User manual (182 pages) ,
- User manual (184 pages) ,
- User manual (164 pages)
Table of Contents
Advertisement
Quick Links
Advertisement
Table of Contents

Related Manuals for Intermec PC23


Summary of Contents for Intermec PC23
- Page 1 PC 23 | PC 43 Desktop Printer PC23d, PC43d, PC43t User Manual...
- Page 2 Intermec by Honeywell. Information and specifications contained in this document are subject to change without prior notice and do not represent a commitment on the part of Intermec by Honeywell. © 2012–2014 Intermec by Honeywell. All rights reserved.
- Page 3 • New illustrations of the label dispenser accessory. • ENERGY STAR logo and description. • Information on using tag media and linerless media. • Information on the optional thick media springs. PC23 and PC43 Desktop Printer User Manual...
- Page 4 PC23 and PC43 Desktop Printer User Manual...
-
Page 5: Table Of Contents
About the PC23 and PC43 ........ - Page 6 PC23 Wall-Mounting Template ........
- Page 7 How to Configure the Printer with SmartSystems ......93 PC23 and PC43 Desktop Printer User Manual...
- Page 8 Upgrade Firmware from the USB Menu ........120 viii PC23 and PC43 Desktop Printer User Manual...
- Page 9 Wireless 802.11 Security Settings .........164 PC23 and PC43 Desktop Printer User Manual...
- Page 10 Predefined INPrint Label Formats ..........170 PC23 and PC43 Desktop Printer User Manual...
-
Page 11: Before You Begin
Safety Information Your safety is extremely important. Read and follow all warnings and cautions in this document before handling and operating Intermec equipment. You can be seriously injured, and equipment and data can be damaged if you do not follow the safety warnings and cautions. -
Page 12: Global Services And Support
Dispose of any used batteries according to the instructions. Note: This equipment may be used on an IT power system. Global Services and Support Warranty Information To understand the warranty for your Intermec product, visit the Intermec web site at www.intermec.com and click Support >... -
Page 13: Web Support
Who Should Read This Manual This user manual is for the person who is responsible for installing, configuring, operating, and maintaining the PC23 and PC43 printers. This document provides you with information about the features of the printer, and how to install, configure, operate, maintain, and troubleshoot it. -
Page 14: Related Documents
> PC43. 4 Click the Manuals tab. If your product does not have its own product page, click Support > Manuals. Use the Product Category, the Product Family, and Product to find your documentation. PC23 and PC43 Desktop Printer User Manual... -
Page 15: About The Printers
About the Printers This chapter introduces the PC23 and PC43 printers, and includes descriptions of printer features and basic operation. -
Page 16: About The Pc23 And Pc43
Chapter 1 — About the Printers About the PC23 and PC43 The PC23 and PC43 printers are compact, easy-to-use bar code label printers that fit easily on a desktop. The printers can be connected to a single desktop PC for stand-alone operation or to a wired or wireless network for ease of connectivity. -
Page 17: Printer Features
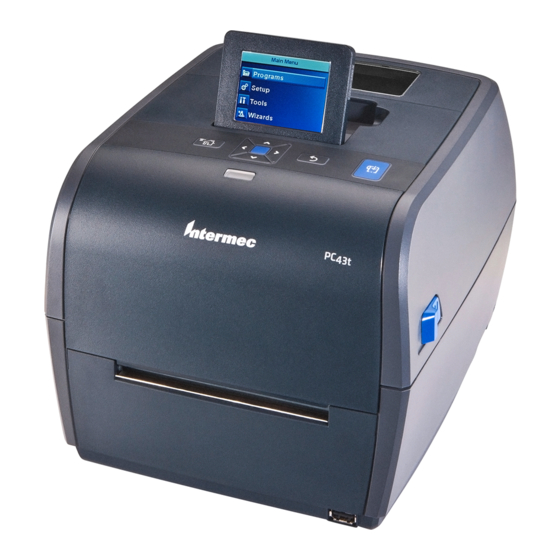
Chapter 1 — About the Printers Printer Features Use the next illustrations to locate printer features. PC23d Front Panel (LCD Model) PC23d Rear Panel PC23 and PC43 Desktop Printer User Manual... - Page 18 Chapter 1 — About the Printers PC43d Front Panel (Icon Model) PC43d Rear Panel PC23 and PC43 Desktop Printer User Manual...
- Page 19 Chapter 1 — About the Printers PC43t Front Panel (LCD Model) PC43t Rear Panel PC23 and PC43 Desktop Printer User Manual...
-
Page 20: About The Front Panel
• Icon (no display) Both versions of the front panel include the Print button and the Ready-to-Work™ indicator. The PC23 and PC43 with the LCD also have a USB host port on the front panel. About the Ready-to-Work Indicator The Ready-to-Work indicator on the front of the printer turns on when the printer is ready to print. -
Page 21: About The Icon Front Panel
Steady: No data in motion through the network connection Off: No connection On: Wi-Fi is enabled With Wi-Fi/Bluetooth Off: Wi-Fi is not enabled, or module Wi-Fi/Bluetooth module is not installed On: Printer is paused Off: Printer is not paused PC23 and PC43 Desktop Printer User Manual... -
Page 22: About The Lcd Front Panel
About the LCD Front Panel The printer LCD interface includes a screen, navigation buttons, and a Print button. PC43t Printer with LCD Interface On the PC43t, you can adjust the screen for the best viewing angle. PC23 and PC43 Desktop Printer User Manual... -
Page 23: About The Ready Screen
Print button. Press to begin printing, or to feed a single label. About the Ready Screen After you turn the printer on, the Ready screen appears when the printer finishes starting up. Ready Fingerprint 01/04/2014 10.200.27.89 12:00 Ready Screen PC23 and PC43 Desktop Printer User Manual... - Page 24 Connectivity icon. Blinks when data is moving through a wired or wireless connection to the printer. Bluetooth icon. This icon appears when the Wi-Fi/Bluetooth module is installed: - Bluetooth is enabled. - Bluetooth is disabled. PC23 and PC43 Desktop Printer User Manual...
-
Page 25: View Basic Printer And Connection Information
S0000000411 Product Name: PC43t Firmware Version: 3 Press to scroll through the list. (Optional) Press or to view information for one of the other icons. 4 Press to return to the Ready screen. PC23 and PC43 Desktop Printer User Manual... -
Page 26: About The Main Menu
Note: The printer cannot print while the Main Menu is on the screen. You need to exit the Main Menu and return to the Ready screen to begin printing. PC23 and PC43 Desktop Printer User Manual... -
Page 27: Navigate In The Main Menu
Select Yes to save your changes and return to the previous screen. • Select No to abandon your changes and return to the previous screen. • Select Cancel to abandon your changes and remain on the current screen. PC23 and PC43 Desktop Printer User Manual... -
Page 28: About The Onscreen Keypads
When you are changing settings, you may need to use the alphanumeric or numeric keypads on the screen. Password v w x Alphanumeric Keypad - Alphabetic Characters Password & < “ > Alphanumeric Keypad - Numeric Characters and Punctuation Password Numeric Keypad PC23 and PC43 Desktop Printer User Manual... -
Page 29: About The Printer Wizards
Select media and printing type (DT or TTR), media width, length, and X-margin, Start and Stop Adjust values, and print speed. Print Quality Prints a series of labels to test print quality. Loading Media Shows how to load media. PC23 and PC43 Desktop Printer User Manual... - Page 30 RFID module is installed in the printer. Label Taken Sensor Calibrates the label taken sensor. This item appears in the Calibration wizards list when the label dispenser or cutter accessory is installed. PC23 and PC43 Desktop Printer User Manual...
-
Page 31: Use A Wizard
Fingerprint • • Direct Protocol (DP) • IPL (Intermec Printer Language) • ESim (EPL command language simulator) • ZSim (ZPL command language simulator) DSim (DPL command language simulator) • • Smart Printing PC23 and PC43 Desktop Printer User Manual... -
Page 32: About Fingerprint
BarTender, select Direct Protocol as your printer command language. About IPL IPL (Intermec Printer Language) is a host-based printer command language. Use IPL to design, modify, and download label formats; write printer application software; and configure the printer. If you are sending IPL label files to the printer, select IPL as your printer command language. -
Page 33: About Zsim
If you are running printer-based applications written in C#, select Smart Printing as your printer command language. For help creating Smart Print applications, go to the Intermec Developer Center at www.intermec.com/developer. About ESim/ZSim Auto-Configuration Use the ESim/ZSim auto-configuration feature when you are replacing another printer whose command language is unknown. -
Page 34: How To Set The Printer Command Language
8 Select a different printer command language from the Command Language list, and then click Save. 9 Click the Services tab. 10 Click Reboot Printer, and then click Reboot. The printer restarts in the command language you selected. PC23 and PC43 Desktop Printer User Manual... -
Page 35: Set The Command Language From The Main Menu
. The printer feeds a few labels as it automatically adjusts the media feed, and then the test labels start to print. 5 Continue to hold . The available printer command languages start to print. PC23 and PC43 Desktop Printer User Manual... -
Page 36: Mount The Printer On A Wall
The screw head width should be 6 to 8 mm (0.24 to 0.33 in). • Intermec recommends that you use pan-head or flathead screws with appropriate anchors for drywall, or for cement, concrete block, or plasterboard walls. Use wood screws only for wooden surfaces, and ensure the screw is long enough to be sunk to a depth of at least 12.5 mm (0.5 in). - Page 37 2 Install the mounting hardware. If you need to use anchors, install them first. 3 Place the printer mounting holes on the mounting hardware and slide the printer down to lock it in place. PC23 and PC43 Desktop Printer User Manual...
-
Page 38: Pc23 Wall-Mounting Template
Chapter 1 — About the Printers PC23 Wall-Mounting Template Use this template to correctly locate wall-mounting hardware for the PC23d printer. PC23 Wall-Mounting Template PC23 and PC43 Desktop Printer User Manual... -
Page 39: Pc43 Wall-Mounting Template
Chapter 1 — About the Printers PC43 Wall-Mounting Template Use this template to correctly locate wall-mounting hardware for the PC43d and PC43t printers. PC43 Wall-Mounting Template PC23 and PC43 Desktop Printer User Manual... -
Page 40: Printer Options And Accessories
Label Taken Sensor. Cutter Module Provides automatic cutting as labels are printed. Includes Label Taken Sensor. For PC43. Cutter Tray Holds up to 20 labels as they are cut. Installs on Cutter Module. For PC43. PC23 and PC43 Desktop Printer User Manual... -
Page 41: About The Battery Base
AC power adapter. For PC43d. Thick Media Springs Heavier-gauge springs increase printhead pressure for best results when printing on tag media. These replacement parts are also available for the PC23 and PC43: • 203-dpi printhead • Standard platen roller •... - Page 42 Note: Printing speed depends on the actual battery charge level. The maximum print speed for a PC43d running on battery power is 6 ips for 203 dpi and 4 ips for 300 dpi. PC23 and PC43 Desktop Printer User Manual...
-
Page 43: Battery Base Leds
LEDs: Battery Base Not Connected to AC Power LEDs Battery Charge Level Battery is 76% to 100% charged. Battery is 51% to 75% charged. Battery is 26% to 50% charged. Battery is 11% to 25% charged. PC23 and PC43 Desktop Printer User Manual... -
Page 44: Battery Precautions
Follow these precautions when using the printer with the Battery Base: • Use only the battery supplied by Intermec. Risk of explosion if battery is replaced by an incorrect type. Use of another battery may present a risk of fire or explosion. -
Page 45: Charge The Battery
LEDs and see the current charge level. 1 Charge the battery in the battery base. 2 Disconnect the power cable from AC power. 3 Turn on the printer. The LEDs on the battery base turn off. PC23 and PC43 Desktop Printer User Manual... - Page 46 4 To see the current battery charge level, press the Charge Level button on the front of the base. The battery base LEDs briefly turn on to indicate the current charge level. The LEDs turn off to save power. PC23 and PC43 Desktop Printer User Manual...
-
Page 47: Set Up The Printer
Set Up the Printer This chapter explains how to load media and ribbon, print test labels, and adjust the print quality. -
Page 48: About Media
After you install the thick media springs, adjust the Media Sensitivity and Darkness settings for best print quality. • To extend the life of the printhead, Intermec recommends that you install the original springs when printing on other types of media. Adjust the Media Holders The first time you load media in the printer, or when you use different sizes of media, you must adjust the media holders. - Page 49 Chapter 2 — Set Up the Printer 1 Pull one or both of the printer latches toward the front of the printer and lift the printer lid. 2 Pull the locking tab up. PC23 and PC43 Desktop Printer User Manual...
- Page 50 4 Make sure the holders are snug against the sides of the media roll, and then press the locking tab down to lock the media holders in place. PC23 and PC43 Desktop Printer User Manual...
-
Page 51: About Tear-Off Printing
Load Media for Tear-Off Printing Depending on the type of media you use, you may also need to install a printer accessory. If you need to print on tag media, Intermec recommends installing the optional thick media springs before printing. If you need to print on linerless media, you must install the linerless media roller accessory before printing. - Page 52 3 If you are going to load the same size media, continue with the next step. If you are using large rolls of media stored outside the printer, such as in an external media holder, feed the media through the external media feed slot. PC23 and PC43 Desktop Printer User Manual...
- Page 53 To adjust the media holders for a different media size: a Pull the locking tab up. b Slide the media holders to adjust the distance between them, and place the media roll between the holders. PC23 and PC43 Desktop Printer User Manual...
- Page 54 4 If you are using notched or black mark stock, slide the label stop sensor so the notches or marks pass over the sensor. PC23 and PC43 Desktop Printer User Manual...
- Page 55 To adjust the width of the media guides, slide the guides as needed to fit your media. 6 Close the printer lid until it snaps shut. 7 Turn the printer on and configure the feed adjust settings. PC23 and PC43 Desktop Printer User Manual...
-
Page 56: About Cut-Off Printing
300 dpi Distance PC43d Start Adjust -294 -434 -36.80 mm (-1.45 in) Stop Adjust 21.3 mm (0.84 in) PC43t Start Adjust -372 -550 -46.60 mm (-1.45 in) Stop Adjust 33 mm (0.84 in) PC23 and PC43 Desktop Printer User Manual... -
Page 57: Load Media For Cut-Off Printing
3 If you are going to load the same size media, continue with the next step. If you are using large rolls of media stored outside the printer, such as in an external media holder, feed the media through the external media feed slot. PC23 and PC43 Desktop Printer User Manual... - Page 58 To adjust the media holders for a different media size: a Pull the locking tab up. b Slide the media holders to adjust the distance between them, and place the media roll between the holders. PC23 and PC43 Desktop Printer User Manual...
- Page 59 Make sure the media holders are snug against the sides of the media roll, and press the tab down to lock the holders in place. 4 For the PC43d, thread the media under the tip guides on the media holders. PC23 and PC43 Desktop Printer User Manual...
- Page 60 5 Thread the media into the slot in the cutter accessory and out through the front of the cutter. 6 Close the printer lid until it snaps shut. PC23 and PC43 Desktop Printer User Manual...
-
Page 61: About The Label Dispenser
-0.46 mm (0.02 in) PC43d Start Adjust -126 -186 -15.8 mm (-0.62 in) Stop Adjust 0.3 mm (0.01 in) PC43t Start Adjust -125 -185 -15.7 mm (-0.62 in) Stop Adjust 2.1 mm (0.08 in) PC23 and PC43 Desktop Printer User Manual... -
Page 62: Load Media For The Label Dispenser
3 If you are going to load the same size media, continue with the next step. If you are using large rolls of media stored outside the printer, such as in an external media holder, feed the media through the external media feed slot. PC23 and PC43 Desktop Printer User Manual... - Page 63 To adjust the media holders for a different media size: a Pull the locking tab up. b Slide the media holders to adjust the distance between them, and place the media roll between the holders. PC23 and PC43 Desktop Printer User Manual...
- Page 64 4 If you are using notched or black mark stock, slide the gap sensor so the notches or marks pass over the sensor. PC23 and PC43 Desktop Printer User Manual...
- Page 65 6 Open the label dispenser front door. 7 Remove the label closest to the end of the liner. PC23 and PC43 Desktop Printer User Manual...
- Page 66 9 Close the front door. 10 Close the printer lid until it snaps shut. 11 Turn the printer on and configure the feed adjust settings. PC23 and PC43 Desktop Printer User Manual...
-
Page 67: Load External Media
2 Feed the media into the printer through the external media feed slot. 3 Thread the media through the media holders or media guides as you would for media installed inside the printer. PC23 and PC43 Desktop Printer User Manual... -
Page 68: Load Ribbon
1 Press the printer latches toward the front of the printer and open the printer lid. 2 If there is an empty ribbon core in the media compartment, remove the core and set it aside. 3 Remove and discard the full ribbon takeup core. PC23 and PC43 Desktop Printer User Manual... - Page 69 4 Place the new ribbon roll between the rear ribbon holders. The ribbon should come off the roll as shown in the illustration. 5 Place the takeup core between the front takeup core holders. PC23 and PC43 Desktop Printer User Manual...
- Page 70 Chapter 2 — Set Up the Printer 6 Attach the end of the ribbon to the takeup core. 7 Turn the slack-wheel to take up slack in the ribbon. PC23 and PC43 Desktop Printer User Manual...
- Page 71 Otherwise, from the printer Main Menu, select Settings > Printing > Media > Print Method > Ribbon (TTR). For an icon printer, you must use the printer web page or Intermec PrintSet 5 to configure thermal transfer printing. 10 Save your changes.
-
Page 72: Use The Notchless Ribbon Core Adapter
1 Insert one adapter into the media core and one adapter into the takeup core. 2 Center the media roll and takeup core on the adapter. 3 Press the release button and raise the print mechanism. PC23 and PC43 Desktop Printer User Manual... - Page 73 For “ink out” operation (default), the ribbon should come off the back of the roll. 5 Place the takeup core and adapter between the front media holders. 6 Route the ribbon under the print mechanism and up to the takeup core. PC23 and PC43 Desktop Printer User Manual...
-
Page 74: Connect The Printer To Power
Connect the Printer to Power Caution: Use only the AC power adapter supplied with the printer. The use of a power adapter not approved by Intermec voids the product warranty and may damage the printer. 1 Connect the power adapter to the power port on the rear of the printer. -
Page 75: Use The Setup Wizard
If the item you selected requires you to select an option from a preset list, press or to scroll through the list items. • Press to select a highlighted item. Select and press to continue to the next screen. • PC23 and PC43 Desktop Printer User Manual... -
Page 76: How To Set Up An Icon Printer
3 In the Printers and Faxes section, right-click the printer and select Printing preferences. You can change printer settings in the Printing Preferences dialog box. For more information on the Windows print driver settings, click Help. PC23 and PC43 Desktop Printer User Manual... -
Page 77: Set Up An Icon Printer With Ethernet
For help, see the PrintSet online help. 3 Open a web browser and browse to the IP address. The printer web page appears. You can configure printer settings using the web page interface. PC23 and PC43 Desktop Printer User Manual... -
Page 78: Calibrate The Media Feed And Print Test Labels On The Icon Printer
. The available printer command languages start to print. 6 When you see the language you want to use, release 7 The printer automatically reboots and starts in the command language you selected. PC23 and PC43 Desktop Printer User Manual... -
Page 79: About Test Labels
Print a Test Label in Idle Mode You can print a test label when the printer is in Idle mode. 1 Make sure that the printer has media and ribbon (if necessary) installed. PC23 and PC43 Desktop Printer User Manual... -
Page 80: Print A Test Label From The Main Menu
RFID media. Media containing RFID tags is slightly thicker where the RFID tag is located. The slight thickness of this part of the label may affect print quality. For thermal transfer labels, Intermec recommends using high-quality ink ribbon. PC23 and PC43 Desktop Printer User Manual... -
Page 81: About Rfid Tag Position
Tag Position, also referred to as TAGADJUST, specifies the distance (in dots/mm/in) to move the label to align the tag with the RFID antenna. Positive values move the label forward, and negative values move the label back. RFID Tag Position PC23 and PC43 Desktop Printer User Manual... -
Page 82: Run The Rfid Calibration Wizard
3 To enable the RFID module, select Enable. 4 Load the RFID media. 5 Select OK. When the calibration is complete, the printer displays the RFID Tag Position and Output Power (UHF inlays, only). PC23 and PC43 Desktop Printer User Manual... -
Page 83: Calculate Rfid Tag Position
PC23d: 280 dots, 35 mm, 1.378 in • PC43d: 260 dots, 33 mm, 1.299 in • PC43t: 256 dots, 32 mm, 1.260 in 4 Use this formula to calculate the estimated Tag Position: TagPosition=yChip - yAntDist PC23 and PC43 Desktop Printer User Manual... - Page 84 Chapter 2 — Set Up the Printer PC23 and PC43 Desktop Printer User Manual...
-
Page 85: Connect The Printer
Connect the Printer This chapter explains how to connect the PC23 and PC43 printers to a PC and to an Ethernet or wireless network. -
Page 86: About Printer Drivers
In the Product list, select PC23d, PC43d, PC43t Desktop Printer and then click Submit. 4 In the downloads page, click Intermec InterDriver X.X.X M-X ver. X.XX. If a Security Warning dialog box appears, click Run. 5 When asked if you want the program to make changes to your computer, click Yes. -
Page 87: How To Connect The Printer To Your Pc
Tasks. 13 When the Installation Complete! page appears, click Finish. The installer unpacks and installs the InterDriver files in the Intermec\InterDriver folder in your program files directory and creates two shortcuts in the Windows Start menu: • Intermec > InterDriver > InterDriver Wizard •... -
Page 88: Connect The Printer Using A Usb Cable
2 Connect one end of the USB cable to the USB device port on the back of the printer, and connect the other end to your PC. A “USB Host Connected” message appears on the printer screen. PC23 and PC43 Desktop Printer User Manual... -
Page 89: Connect The Printer Using A Serial Or Parallel Cable
3 If you are using an LCD printer, from the printer Main Menu select Settings > Communications > Serial and change settings as necessary. If you are using an icon printer, you need to configure settings through an application such as PrintSet 5. PC23 and PC43 Desktop Printer User Manual... -
Page 90: How To Connect The Printer To Your Network
By default, the printer supports DHCP networks. If you are not using a DHCP network, you need to configure wired Ethernet settings by using Intermec PrintSet 5 through a USB connection to the printer. 1 Connect an Ethernet cable to the Ethernet port on the rear of the printer and to your network. -
Page 91: About Wi-Fi Communications
Before you begin, you should be familiar with the settings you need for your network. If you are using a DHCP network, turn the printer on. The printer automatically connects to the wireless network. PC23 and PC43 Desktop Printer User Manual... - Page 92 IP address, you need to use PrintSet 5 with a USB connection to a PC to configure wireless network settings for a non-DHCP network. 1 From the printer Ready screen, press . The Main Menu appears. Main Menu Programs Settings Tools Wizards PC23 and PC43 Desktop Printer User Manual...
- Page 93 Select Security to configure all wireless network security settings. 4 Change settings as needed for your network. 5 When you are finished, save your changes. The printer immediately attempts to connect to your network. PC23 and PC43 Desktop Printer User Manual...
-
Page 94: Configure Wi-Fi Communications From The Printer Web Page
6 Click Communications > Wireless 802.11. The Wireless 802.11 page appears. 7 Change settings as needed, or click Default Settings to restore all default Wireless 802.11 settings. 8 Click Save when you are done. PC23 and PC43 Desktop Printer User Manual... -
Page 95: About Bluetooth Communications
Bluetooth icon appears in the status bar on the LCD printer screen. • the Bluetooth icon turns on in the icon printer interface. Ready Fingerprint 01/04/2014 10.200.27.89 12:00 Bluetooth Icon in LCD Interface Bluetooth Icon in Icon Interface PC23 and PC43 Desktop Printer User Manual... -
Page 96: Connect To A Bluetooth Device By Reading A Bar Code
4 Follow the instructions to discover and connect to your Bluetooth device. If you are unable to connect to the Bluetooth device, change the printer Bluetooth settings or move the Bluetooth device closer to the printer. PC23 and PC43 Desktop Printer User Manual... -
Page 97: Configure Bluetooth Communications From The Main Menu
2 In the Location or Address bar, type the printer IP address, and then press Enter. The printer web page appears. 3 Click Login in the upper right corner of the screen. The Login page appears. PC23 and PC43 Desktop Printer User Manual... - Page 98 Save As Profile to create a configuration profile including your changes that you can load at any time. To reset all values and options on the page to the default settings, click Default Settings. PC23 and PC43 Desktop Printer User Manual...
-
Page 99: About The Usb Host Port
Smart Printing application. Bar code scanner Use Intermec USB bar code scanners for data input with a Smart Printing application. The printer also supports other USB scanners that use a generic keyboard driver. - Page 100 Chapter 3 — Connect the Printer 2 Connect the device to one of the USB host ports. 3 If you connected a USB storage device to an LCD printer, select Tools > USB Menu for more options. PC23 and PC43 Desktop Printer User Manual...
-
Page 101: Configure The Printer
Configure the Printer This chapter explains how to view and change printer settings by using the Main Menu or the printer web pages. -
Page 102: About Printer Configuration Settings
SmartSystems, FTP, Telnet, and others. Set maintenance alert values for the printer odometer and other alerts. Network Services Enable or disable network services including Intermec SmartSystems, the web or email servers, and others. PC23 and PC43 Desktop Printer User Manual... -
Page 103: How To Configure The Printer
1 Open a web browser on your PC. 2 In the Location or Address bar, type the printer IP address, and then press Enter. The printer web page appears. 3 Click the Configure tab. PC23 and PC43 Desktop Printer User Manual... -
Page 104: Configure The Printer From The Web Page
IP address. 1 Open a web browser on your PC. 2 In the Location or Address bar, type the printer IP address, and then press Enter. The printer web page appears. PC23 and PC43 Desktop Printer User Manual... - Page 105 Save As Profile to create a configuration profile including your changes that you can load at any time. To reset all values and options on the page to the default settings, click Default Settings. PC23 and PC43 Desktop Printer User Manual...
-
Page 106: Configure The Printer From The Main Menu
You can also use the setup wizards in PrintSet 5 to guide you through common configuration tasks. 1 Make sure that you have Windows XP or later running on your PC. 2 Download PrintSet 5 from the Downloads page of the Intermec website at www.intermec.com/products/printers_media/software/ index.aspx. -
Page 107: How To Configure The Printer With Programming Commands
You can use SmartSystems to change configuration settings on your printer. The printer ships with the SmartSystems client loaded on it. The console is part of SmartSystems and is available from the Intermec website. To download SmartSystems, go to www.intermec.com/products/smrtsysfoundation/index.aspx. -
Page 108: Save A Printer Profile From The Main Menu
To load a saved profile, select Load. In the Load Profile menu, select the profile to load. 4 Select the profile you want to load on the printer and press 5 When Complete appears on the screen, press to return to the Main Menu. PC23 and PC43 Desktop Printer User Manual... -
Page 109: How To Load A Printer Profile With Programming Commands
USB storage device so that the printer can properly install them. USB Storage Device File Directories File Type Place in This Directory Application /apps Font /fonts Form/layout /forms Web form /webforms Image /images Display images /display Configuration profile /profiles Configuration /config PC23 and PC43 Desktop Printer User Manual... -
Page 110: Print A File From A Usb Storage Device
1 Copy the files to the appropriate directory on the USB storage device. 2 Insert the storage device into the USB host port on the printer. The USB Device menu appears. 3 Select Install Resources and then press PC23 and PC43 Desktop Printer User Manual... -
Page 111: Export Applications And Files To A Usb Storage Device
1 Make sure the USB storage device has a single partition and is formatted as FAT16 or FAT32. 2 Insert the storage device into the printer USB host port. 3 From the Ready screen, press . The Main Menu appears. PC23 and PC43 Desktop Printer User Manual... -
Page 112: Install A Configuration File From A Usb Storage Device
For most printer languages, the configuration file is imported directly into the working configuration and is not copied to the /config directory. • An IPL configuration file is copied to /home/user/config/ipl. • An ESim configuration file is copied to /home/user/config/esim. PC23 and PC43 Desktop Printer User Manual... -
Page 113: Upload Or Delete Applications And Resources From The Printer Web Page
Applications, Fonts, Images, Label Formats, or Web Forms. The page for that type of file appears, including a list of Resident (Intermec-supplied) files of that type and a list of Customer Downloaded files of that type (if any). PC23 and PC43 Desktop Printer User Manual... - Page 114 Click Upload. The application or file uploads to the printer. To delete an application or file, click the file name in the Customer Downloaded list and then click Delete. The file is deleted. PC23 and PC43 Desktop Printer User Manual...
-
Page 115: Troubleshoot The Printer
Troubleshoot the Printer This section explains how to troubleshoot the PC23 and PC43 printers. -
Page 116: Call Product Support
If you still need help after visiting Knowledge Central, call Product Support. To talk to an Intermec Product Support representative in the U.S.A. or Canada, call: 1-800-755-5505 Outside the U.S.A. and Canada, go to www.intermec.com... -
Page 117: Locate The Printer Configuration And Serial Numbers
Look in the System Information tab in the printer web pages for useful information and statistics on the printer hardware and firmware. This information can be useful when you contact Intermec Product Support for assistance or troubleshooting. Note: The printer must be connected to an Ethernet or wireless network to view system information in the printer web page. -
Page 118: View Printer Statistics
1 On your PC, open a browser. 2 In the Location or Address bar, type the printer IP address and press Enter. The printer web page appears. 3 Click the System Information tab. 4 Click Statistics. PC23 and PC43 Desktop Printer User Manual... -
Page 119: Check The Printer Odometer
1 On your desktop PC, start a browser. 2 In the Location or Address bar, type the printer IP address and press Enter. The web page for the printer appears. 3 Click the System Information tab. PC23 and PC43 Desktop Printer User Manual... -
Page 120: About Alerts
PC23 and PC43 Desktop Printer User Manual... -
Page 121: Configure Alerts
4 Type your Username and Password in the entry fields, and then click Login. 5 Click the Configure tab > Alerts. 6 Click Error to configure error alerts. Click Warning to configure warning alerts. Click Information to configure information alerts. PC23 and PC43 Desktop Printer User Manual... -
Page 122: Maintenance And Error Alert Messages
Printhead Too Hot The printhead is overheated and needs to cool down. Wait for printing to resume automatically. Printhead Not The printer is not detecting the printhead. Check the Detected printhead cable. PC23 and PC43 Desktop Printer User Manual... - Page 123 Do not try to send anything to the printer. Printer is Rebooting The printer is going to restart. Wait until the printer is ready before attempting to communicate with it. Started The printer is in the process of starting up. PC23 and PC43 Desktop Printer User Manual...
-
Page 124: Problems And Possible Solutions
Clean or replace the media. • Make sure that your media and ribbon are compatible. • Make sure that you are using high quality media and ribbon. • The contrast may be too low. Increase the contrast. PC23 and PC43 Desktop Printer User Manual... - Page 125 The print speed may be too high. Lower compressed. the print speed. Nothing shows up on my thermal The ink-coated side of the ribbon may not transfer printout. be facing the media. Reload the ribbon. PC23 and PC43 Desktop Printer User Manual...
- Page 126 The printer has RFID media After you load RFID media, restart the loaded, but it is not writing to the printer to let the printer identify the tags. RFID media type or run the RFID calibration wizard. PC23 and PC43 Desktop Printer User Manual...
- Page 127 TAGFORMAT. For help, see Intermec Fingerprint Command Reference Manual or the IPL Command Reference Manual. For more information, see the EPC Tag Data Standard (v1.1, revision 1.27) available from the EPCglobal website at www.epcglobalinc.org PC23 and PC43 Desktop Printer User Manual...
-
Page 128: Restore Defaults By Using A Hardware-Based Reset
You can restore the printer defaults by performing a hardware-based reset. 1 Turn the printer off. 2 Pull one or both of the printer latches forward and lift the printer lid. 3 Turn the printer on. PC23 and PC43 Desktop Printer User Manual... -
Page 129: Restore Defaults From The Printer Web Page
3 Click Login in the upper right corner of the screen. The Login page appears. 4 Type your Username and Password in the entry fields and then click Login. The default username is itadmin and the default password is pass. PC23 and PC43 Desktop Printer User Manual... - Page 130 Check the System Settings check box to restore defaults for system settings, such as media width or maintenance alerts. 7 Click Restore Defaults. 8 Click Yes to continue. The printer restarts and the settings you selected are restored to default values. PC23 and PC43 Desktop Printer User Manual...
-
Page 131: Restore Defaults From The Main Menu
Wizard begins. Follow the instructions to complete the Wizard. To return to the Main Menu without restoring any defaults, select No. To return to the Restore Defaults list without restoring any defaults, select Cancel. PC23 and PC43 Desktop Printer User Manual... -
Page 132: How To Upgrade The Printer Firmware
Updated firmware can include bug fixes or additional features that you might find useful. The latest version of the firmware is available from the PC23 or PC43 printer Downloads page on www.intermec.com. You can upgrade the printer firmware using: •... -
Page 133: Upgrade Firmware From A Usb Storage Device
Upgrade Firmware from a USB Storage Device You can upgrade the printer firmware from a USB storage device. Note: For best results, Intermec recommends using a USB storage device that contains no other files. 1 Make sure the USB storage device has a single partition and is formatted as FAT16 or FAT32. -
Page 134: Upgrade Firmware From The Usb Menu
1 Make sure the USB storage device has a single partition and is formatted as FAT16 or FAT32. 2 Download the printer firmware from the Intermec website. 3 On your USB storage device, create a /firmware directory. 4 Copy the firmware upgrade file (typically .bin format) to the /firmware directory on the USB storage device. -
Page 135: Maintain The Printer
Maintain the Printer This section explains how to perform basic maintenance on the PC23 and PC43 printers. -
Page 136: Clean The Printhead
7 If necessary, clean residue from the platen roller or tear bar with a cotton swab moistened with isopropyl alcohol. 8 Once the parts are dry, replace the media (and ribbon) in the printer. 9 Close the printer, reconnect power, and turn on the printer. PC23 and PC43 Desktop Printer User Manual... -
Page 137: Replace The Printhead
2 Pull one or both of the printer latches toward the front of the printer and lift the printer lid. For a thermal transfer printer, remove the ribbon. 3 Press the printhead latches apart until the printhead slides forward. PC23 and PC43 Desktop Printer User Manual... - Page 138 4 Carefully slide the printhead out of the mechanism. The printhead is still attached to the mechanism by a ribbon cable. 5 Disconnect the cable from the printhead and remove the printhead from the printer. PC23 and PC43 Desktop Printer User Manual...
-
Page 139: Clean The Platen Roller
Clean the Platen Roller Follow this procedure to remove, clean, and replace the platen roller as part of standard maintenance for the printer. Intermec recommends that you check the platen roller for debris and clean it each time you replace media. - Page 140 5 Pull the latches up to remove the platen roller from the printer. 6 Remove any adhesive residue from the roller with a cotton swab moistened with isopropyl alcohol. 7 Reverse Steps 4 and 5 to install the roller. PC23 and PC43 Desktop Printer User Manual...
-
Page 141: Clean The Exterior Of The Printer
Make sure to keep the surface surrounding the printer clean as well. Recommended Cleaners Intermec has tested and recommends these cleaning products for compatibility with the exterior surfaces of the PC23 and PC43 printers. Note: Do not use products containing ethylene glycol to clean the exterior of the PC43t. - Page 142 Chapter 6 — Maintain the Printer Recommended Cleaners (Continued) Manufacturer Product Use On These Printers Quest Chemical Grime Buster Corporation Spartan Super HDQL 10 Surgipath Cloro-Wipe Towelette Techspray Renewal Eco-Shower Veridien Viraguard® Vernacare Tuffiewipes PC23 and PC43 Desktop Printer User Manual...
-
Page 143: Specifications
Specifications This appendix contains specifications for the PC23 and PC43 printers. -
Page 144: Printer Specifications
60 to 181 g/m Liner Opacity (maximum): 76% (TAPPI T425) Label Stop Sensor Adjustable from left media edge to 4.5 mm right of center on LCD printers (fixed at center on Icon printers) PC23 and PC43 Desktop Printer User Manual... - Page 145 60 to 181 g/m Liner Opacity (maximum): 76% (TAPPI T425) Label Stop Sensor Adjustable from left media edge to 4.5 mm right of center on LCD printers (fixed at center on Icon printers) PC23 and PC43 Desktop Printer User Manual...
- Page 146 110 mm (4.33 in) notched Ribbon Wound Ink Side Out, only Label Stop Sensor Adjustable from left media edge to 4.5 mm right of center on LCD printers (fixed at center on Icon printers) PC23 and PC43 Desktop Printer User Manual...
- Page 147 Label taken (on cutter and label dispenser accessories) Network Services • • HTTP Server • SNMP • Line Printer Remote Protocol (lpr) • Telnet • DHCP • Ping • IPSEC/IKEv2 over IPv6 • PC23 and PC43 Desktop Printer User Manual...
- Page 148 Localization Fonts • Simplified Chinese (optional) • Traditional Chinese (optional) • Cyrillic • Korean (Optional) • Latin • Greek • Turkish • Hebrew • Arabic • Baltic • Baltic Rim • Vietnamese • Thai PC23 and PC43 Desktop Printer User Manual...
-
Page 149: Supported Bar Code Symbologies
• Code 128: • Code 128 Subset A • Code 128 Subset B • Code 128 Subset C • Code 128 UCC • DUN-14/16 EAN: • • EAN-8 • EAN-13 • EAN 128 PC23 and PC43 Desktop Printer User Manual... - Page 150 UPC-E • UPC Shipping container Code Add-on bar code symbologies: • Add-on 2 • Add-on 5 • UPC-5 digits Add-on code 2D bar code symbologies: • Aztec Code 16K • • Code 49 PC23 and PC43 Desktop Printer User Manual...
- Page 151 USPS 4-State Customer Bar Code Composite bar code symbologies: • EAN-8 Composite (CC-A, CC-B) • EAN-13 Composite (CC-A, CC-B) • GS1 Composite (previously called EAN.UCC Composite) UPC-A Composite (CC-A, CC-B) • • UPC-E Composite (CC-A, CC-B) PC23 and PC43 Desktop Printer User Manual...
-
Page 152: Test Labels
Resource Labels Label Description Applications All Intermec utility programs and user-installed applications. Fonts Resident and user-installed fonts. Bar Codes(Barcodes) Resident bar codes (partial label shown). Images All images, including resident and user-installed files. PC23 and PC43 Desktop Printer User Manual... - Page 153 • Product name, configuration number, serial number, system name, and command language • Printhead resolution • Mean printhead resistance • Total flash memory and available flash memory • Total RAM and free RAM PC23 and PC43 Desktop Printer User Manual...
- Page 154 XON/XOFF To, XON/XOFF From • New Line character • Bluetooth Settings Bluetooth MAC address (human-readable and bar code formats) • Security status • Device name and discovery state • Passkey • Reserve • ScanNGo bar code PC23 and PC43 Desktop Printer User Manual...
- Page 155 • Inner Authentication • CA Certificate • Client Certificate • Client Key • Server Common Name 1 and 2 • Validate Certificate • • Acquire PAC • Fast Roaming (CCKM) • Supplicant State PC23 and PC43 Desktop Printer User Manual...
-
Page 156: Print Quality Labels
Note: Although you can print test labels on any size media, the labels are designed to be printed on 10.16 cm x 15.24 cm (4 in x 6 in) media. Print Quality Labels Label Description Chess Diamond PC23 and PC43 Desktop Printer User Manual... - Page 157 Appendix A — Specifications Print Quality Labels (Continued) Label Description Pitch Pyramid Ruler PC23 and PC43 Desktop Printer User Manual...
- Page 158 Appendix A — Specifications Print Quality Labels (Continued) Label Description Bar Code (Barcode) Wrinkle PC23 and PC43 Desktop Printer User Manual...
-
Page 159: Default Settings
Default Settings This appendix contains all of the default settings for the printer. -
Page 160: Default Configuration
Discover Determines if other Bluetooth devices Enable can detect the printer. Passkey Sets the passkey that is used when 1234 pairing Bluetooth devices to the printer. Range is 1 to 16 characters (case-sensitive). PC23 and PC43 Desktop Printer User Manual... -
Page 161: Display And Audio Settings
Screen Timeout Selects how long the printer screen stays on Disable before the screen saver starts. Feed Key Access Determines if the Feed button on the Enable printer keypad is enabled or disabled. Volume Sets the printer volume. PC23 and PC43 Desktop Printer User Manual... -
Page 162: Error, Information, And Warning Alert Settings
Printer in pause mode Pause Mode Printer in Disable Occurrences Printer in menu mode Menu Mode Application Disable Occurrences Error - Application Break Break RFID Not Disable Occurrences Error -RFID not Installed installed PC23 and PC43 Desktop Printer User Manual... - Page 163 (Printer) has reached a preset value. Replace Disable 1 Occurrences Warning - Replace Printhead printhead Clean Disable 1 Occurrences Warning - Clean printhead Printhead Faulty Dot Disable 1 Occurrences Warning - Faulty dot is detected PC23 and PC43 Desktop Printer User Manual...
-
Page 164: Error Alerts
Ribbon Installed (Sent when the printer is set for direct thermal printing but has ribbon installed for thermal transfer printing) • Ribbon Low • Upgrading Firmware • Odometer (User Resettable) • Odometer (Printer) • Replace Printhead • Clean Printhead PC23 and PC43 Desktop Printer User Manual... -
Page 165: Ethernet Settings
Specifies how the printer obtains an IP Automatic Assignment address (for IPv6 networks). Method (IPv6) IP Address Specifies the unique network-level Automatic address that is assigned to each device in a TCP/IP network (IPv6). PC23 and PC43 Desktop Printer User Manual... -
Page 166: General System Settings
Sets the current date. System date Sleep Timer Selects the amount of time the Disable printer waits before it goes to Sleep mode. Command Language Sets the printer command language. Fingerprint If changed, requires restart. PC23 and PC43 Desktop Printer User Manual... -
Page 167: Media Settings
Selects the type of media that is loaded in Media With the printer. Gaps Print Method Selects the method of printing that the Ribbon (TTR) printer is using. for thermal transfer printers, or No Ribbon (DT) for direct thermal printers PC23 and PC43 Desktop Printer User Manual... - Page 168 Sets the width of the printable area Variable measured from the media margin (X) across the printhead. Unit of measurement is defined in the Unit of Measure parameter. *935-044-001* INTERMEC 6001 36th Ave W Everett WA 98203 PC23 and PC43 Desktop Printer User Manual...
- Page 169 Unit of Measure parameter. Range is -9999 to +9999. Media Selects the mode the printer uses to Fast Calibration calibrate media. Use Slow if the printer has Mode trouble identifying gaps or marks in media. PC23 and PC43 Desktop Printer User Manual...
- Page 170 Sets the action when you close the print No Action Action mechanism after opening it: • No Action • Formfeed - The printer feeds one label. • Testfeed - The printer prints a configuration label. PC23 and PC43 Desktop Printer User Manual...
-
Page 171: Print Quality Settings
Sets the image darkness for media and ribbon. Variable Adjust this parameter with the Media Sensitivity parameter. Range is 1 to 100. Contrast Adjusts the blackness of the printing on the label in 2% increments from -10% to +10%. PC23 and PC43 Desktop Printer User Manual... -
Page 172: Serial Port Settings
(XON/XOFF) is used to manage the rate of data transmission to the host. XON/XOFF From Specifies if software flow control Disable (XON/XOFF) is used to manage the rate of data transmission from the host. PC23 and PC43 Desktop Printer User Manual... -
Page 173: System I/O Settings
Virtual COM Determines if you can enable the USB port to Disable be used as a virtual serial port. When you change this setting, you must restart the printer to enable the new setting. PC23 and PC43 Desktop Printer User Manual... -
Page 174: System Network Services
Determines if the printer can use IKEv2. Disable Determines if the printer can use Secure Socket Enable Handling (SSH). Telnet Determines if the printer can use Telnet. Enable Determines if the printer can use XML printing. Enable PC23 and PC43 Desktop Printer User Manual... -
Page 175: System Maintenance Alert Settings
Measure parameter. Range is 0 to 4294967295. Faulty Dot Sets the number of faulty dots on the printhead before the Faulty Dot alert is sent, if this alert is configured. Range is 0 to 4294967295. PC23 and PC43 Desktop Printer User Manual... -
Page 176: Wireless 802.11 General Settings
13 (1 to 11 for FCC only). Hidden Determines if the radio is allowed to look for Disable SSID SSIDs that have been hidden to prevent unauthorized devices from connecting to the wireless network. PC23 and PC43 Desktop Printer User Manual... -
Page 177: Wireless 802.11 Network Settings
Sets how the printer obtains an IP Automatic Assignment address (for IPv6 networks). Method (IPv6) IP Address Sets the unique network-level address Automatic that is assigned to each device in an IPv6 network. PC23 and PC43 Desktop Printer User Manual... -
Page 178: Wireless 802.11 Security Settings
Range is 1 to 96 characters. Anonymous Sets the outer EAP user name that Empty string Name the printer uses for logging in to the network. Maximum length is 96 characters. PC23 and PC43 Desktop Printer User Manual... - Page 179 Sets the name of the Protected Access eap-fast.pac Credential (PAC) that is used for EAP-FAST authentication. The printer uses this file if Acquire PAC is on and the current installed PAC fails to authenticate the printer to the network. PC23 and PC43 Desktop Printer User Manual...
- Page 180 EAP-FAST authentication. Fast Roaming Determines if the printer can roam Disable (CCKM) from one access point to another without reauthenticating with the server. CCKM only works in wireless networks using LEAP. PC23 and PC43 Desktop Printer User Manual...
-
Page 181: Print Labels With Inprint
Print Labels with INPrint This section explains how to use the INPrint feature to print labels. -
Page 182: About The Inprint Page
1 On your desktop PC, start a browser. 2 In the Location or Address bar, type the printer IP address and press Enter. The printer web page appears. 3 Click the INPrint tab. PC23 and PC43 Desktop Printer User Manual... - Page 183 Downloaded and then select the web form in the list. • To use one of the Resident (Intermec-supplied) web forms, click Resident and then select the web form in the list. 5 Type information in the web form as needed.
-
Page 184: Predefined Inprint Label Formats
Appendix C — Print Labels with INPrint Predefined INPrint Label Formats Predefined INPrint Label Formats and Sample Illustrations Format Name Sample 203_returnadd_3x1.lbx 203_demo_4x6.lbx 203_shipaddr_4x6.lbx PC23 and PC43 Desktop Printer User Manual... - Page 185 Appendix C — Print Labels with INPrint Predefined INPrint Label Formats and Sample Illustrations (Continued) Format Name Sample 203_packslip_4x6.lbx PC23 and PC43 Desktop Printer User Manual...
- Page 186 Appendix C — Print Labels with INPrint PC23 and PC43 Desktop Printer User Manual...
- Page 187 Copyright (C) 2003 WIDE Project. https://fedorahosted.org/dhcpv6/ Copyright (c) 2002-2008 Matt Johnston https://matt.ucc.asn.au/dropbear/dropbear.html Portions copyright (c) 2004 Mihnea Stoenescu Copyright (c) 2004, Jan Kneschke, http://www.lighttpd.org/ incremental Copyright (C) 1994-2008 Lua.org, PUC- http://www.lua.org/ Rio. PC23 and PC43 Desktop Printer User Manual...
- Page 188 Protocol_, Digital Press, 1986. Copyright (c) 1997 Eric S. Raymond http://giflib.sourceforge.net/ Copyright (C) 1991-1998, Thomas G. http://www.ijg.org/ Lane. Copyright 2006 Richard Wilson http://www.netsurf-browser.org/projects/libnsbmp/ <richard.wilson@netsurf-browser.org> Copyright 2008 Sean Fox <dyntryx@gmail.com> Copyright (c) 1998-2009 Glenn Randers- http://www.libpng.org/pub/png/libpng.html Pehrson PC23 and PC43 Desktop Printer User Manual...
- Page 189 (including negligence or otherwise) arising in any way out of the use of this software, even if advised of the possibility of such damage. PC23 and PC43 Desktop Printer User Manual...
- Page 190 Honeywell 6001 36th Avenue West Everett, Washington 98203 U.S.A. tel 425.348.2600 fax 425.355.9551 www.intermec.com © 2014 Intermec by Honeywell All rights reserved. PC23 and PC43 Desktop Printer User Manual *935-044-005* P/N 935-044-005...
Need help?
Do you have a question about the PC23 and is the answer not in the manual?
Questions and answers