Table of Contents
Advertisement
Advertisement
Table of Contents

Related Manuals for ADJ DMX OPERATOR 384


Summary of Contents for ADJ DMX OPERATOR 384
-
Page 1: User Manual
DMX OPERATOR 384 User Manual... -
Page 2: Table Of Contents
Table of Contents Features ..................1 General Instruction..............2 Warnings..................2 Cautions..................3 Control and Functions.............4 Front Panel Overview..............4 Rear Panel Overview..............6 Operation Guide..............7 Joystick Set Up................7 Scene Operation...............10 Chase Operation...............13 Bank copy & Fixture copy............17 Fade Time Set Up..............17 MIDI Set Up & Chart..............18 ULink Operation...............19 USB MEM Stick Data Send............21 MIDI Control................25... -
Page 3: Features
DMX OPERATOR 384 Features DMX Operator 384 is a multifunction controller, which works as a DMX controller and as a simple MIDI controller. When operating as a stage controller, this unit features; - 384 total DMX channels - 12 fixtures x 32 channels each - 8 channel faders x 4 channel banks - Individual Speed &... -
Page 4: General Instruction
DMX OPERATOR 384 Every effort has been made to design dependable, reliable and user friendly products. New products are being designed constantly to meet the needs of both entertainment and special effects lighting industries. We welcome your comments about our product and services and are open to suggestions on how we can improve to better serve you. -
Page 5: Cautions
DMX OPERATOR 384 Cautions When unpacking, please ensure that the unit is not damaged. Should something be wrong, please contact us immediately. All rights reserved. No part of this manual may be reproduced, transmitted, transcribed or translated into any language, in any form, by any means, without authorized permission from Botex. -
Page 6: Control And Functions
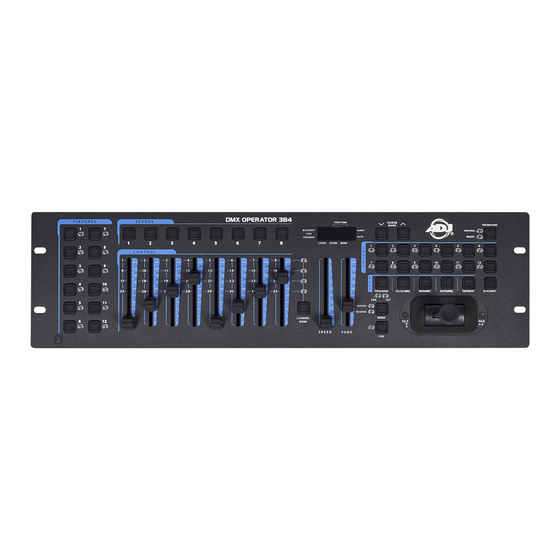
DMX OPERATOR 384 Control and Functions Front Panel Overview 14~19 1. Fixture buttons(1~12): Used to select relevant fixtures for control. 2. Channel faders(1~8): Used to control the output of each corresponding fixture channel. 3. Channel Bank button: Used to switch between channels 1-8, 9-16, 17~24 and 25~32. - Page 7 DMX OPERATOR 384 9. Scene buttons (1-8): Used when storing or playing back programmed scenes. Also used when backing up data to a USB MEM Stick or through a ULink Cable. 10. LED-display: The LED-display shows you relevant information depending on current operation.
-
Page 8: Rear Panel Overview
DMX OPERATOR 384 Rear Panel Overview DC input: Serial Number: Midi In Midi Out DMX Out 9V-12VDC, 500mA Min DC input: Midi Midi In Midi Out 1=NC; 2=NC 1=NC; 2=NC 1=NC; 2=GND 1=NC; 2=GND 9V-12VDC, 500mA Min 1 = Ground 1 = Ground 3=NC;... -
Page 9: Operation Guide
DMX OPERATOR 384 Operation Guide Joystick Set Up "Assign Joystick" (1) Press and hold down the Program button for approximately 2 seconds or until the PROG indicator in the LED-display flashes. Once the indicator is flashing, record mode is engaged and you may release the Program button. - Page 10 DMX OPERATOR 384 "Assign Joystick Reverse" (Pan/Tilt Invert) (1) Press and hold down the Program button for approximately 2 seconds or until the PROG indicator in the LED-display ashes. Once the indicator is ashing, record mode is engaged and you may release the Program button.
-
Page 11: Manual Control
DMX OPERATOR 384 Delete Joystick Pan/Tilt Assignment "Delete Pan/Tilt Joystick settings for selected fixtures" (1) Press and hold down the Program button for approximately 2 seconds or until the PROG indicator in the LED-display flashes. Once the indicator is flashing, record mode is engaged and you may release the Program button. -
Page 12: Scene Operation
DMX OPERATOR 384 Recording Scenes Press and hold down the Program button for approximately 2 seconds or until the PROG indicator in the LED-display flashes. Once the indicator is flashing, record mode is engaged and you may release the Program button. -
Page 13: Delete All Scenes
DMX OPERATOR 384 Copy a Scene Press and hold down the Program button for approximately 2 seconds or until the PROG indicator in the LED-display flashes. Once the indicator is flashing, record mode is engaged and you may release the Program button. -
Page 14: Scene Playback
DMX OPERATOR 384 Scene Playback 1. Manual trigger: When powered ON, this console defaults to Manual/Blackout mode. All output will be in a black-out state until the Blackout button is deselected.To determine blackout status, there is an indicator light in the display that flashes when engaged and OFF when disengaged. -
Page 15: Chase Operation
DMX OPERATOR 384 Recording Chases This product has 12 programmable chases.Each of which can store up to 240 scenes/ steps. Please see the below instructions for chase setting. Press and hold down the Program button for approximately 2 seconds or until the PROG indicator in the LED-display flashes. -
Page 16: Editing Chases
DMX OPERATOR 384 Editing Chases Add a Chase Step Press and hold down the Program button for approximately 2 seconds or until the PROG indicator in the LED-display flashes. Once the indicator is flashing, record mode is engaged and you may release the Program button. -
Page 17: Delete A Chase
DMX OPERATOR 384 Delete a Chase Press and hold down the Program button for approximately 2 seconds or until the PROG indicator in the LED-display flashes. Once the indicator is flashing, record mode is engaged and you may release the Program button. - Page 18 DMX OPERATOR 384 2. Auto trigger: Press the AUTO/Del button, the Auto Trigger indicator light will illuminate in the LED-display. This indicates you that you are now in the Auto trigger mode. Press the Chase # button, 1-12, that you wish to playback. The selected Chase LED should illuminate and begin to play.
-
Page 19: Bank Copy & Fixture Copy
DMX OPERATOR 384 Bank copy & Fixture copy Bank copy (1) Enter the Program mode. (2) Use the Bank UP/DOWN buttons to select the bank to be copied. (3) Tap the Midi/Rec button, and then use the Bank UP/DOWN buttons to select the bank that you want to copy to. -
Page 20: Midi Set Up & Chart
DMX OPERATOR 384 MIDI Set MIDI channel (1) Press and hold down the Midi button for 2 seconds or until the LED-display displays " In:XX". "":XX" represents the current set midi channel. Use UP/DOWN BANK buttons to set your desired Midi channel from 01 to 16. -
Page 21: Ulink Operation
DMX OPERATOR 384 MIDI controller By fixture 1-13,Scene 1-13,Chase 1-13 and joystick, the DMX OPERATOR 384 can function as a simple MIDI controller. The MIDI control function are falls into 10 pages. The following diagram is the details: PAGE SCENE 1-12... -
Page 22: Technical Specifications
DMX OPERATOR 384 Technical Specifications Power Input ...............DC9~15V, 500mA Internal Fuse..............500mA 250V, 5x20mm MIDI IN................5Pin MIDI connector DMX OUT............3Pin XLR (female) DMX connector SOUND INPUT................RCA connector EXT STEP CONTROL..............DB-9 connector Dimensions ................483x135x82mm Weight(approx.) ..................2.2 kg...
Need help?
Do you have a question about the DMX OPERATOR 384 and is the answer not in the manual?
Questions and answers