Table of Contents
Advertisement
Quick Links
EX16916
www.etherwan.com
Introduction
General Description
Easily boost your networking throughput, the rack-mountable
switch provides you 16 * 10/100/1000Mbps Gigabit ports that
lead you to a real Gigabit connection. Users are now able to
transfer large and high bandwidth-needed files faster and
hence get a real efficiency improvement.
The switch offers users with fast and reliable network. The
store-and-forward architecture filters errors and forwards
packets in a non-blocking environment. Flow control ensures
the correctness of data transmitting. The 802.3x and
backpressure flow control mechanisms work respectively for
full and half duplex modes.
The switch features with easy installation and maintenance. It
supports N-Way auto-negotiation protocol, which detects the
networking speed (either 10/100/1000 Mbps) and the duplex
modes (Full or Half duplex mode) automatically and do an
immediately adjustment to advance the capability and
performance. Auto-MDI/MDI-X function alleviates the effort to
use crossover cables. Users need not to prepare crossover
cables for equipment connectivity. Also, rich diagnostic LEDs
are provided for users to get real-time information of the
connection status that helps to do quick response and
correction.
1
Advertisement
Table of Contents

Related Manuals for EtherWAN EX16916


Summary of Contents for EtherWAN EX16916
- Page 1 EX16916 www.etherwan.com Introduction General Description Easily boost your networking throughput, the rack-mountable switch provides you 16 * 10/100/1000Mbps Gigabit ports that lead you to a real Gigabit connection. Users are now able to transfer large and high bandwidth-needed files faster and hence get a real efficiency improvement.
- Page 2 EX16916 www.etherwan.com Table of Contents NTRODUCTION ENERAL ESCRIPTION ABLE OF ONTENTS NPACKING NFORMATION EATURE RONT ANEL LED D EFINITION ANEL OWER ECEPTACLE NSTALLATION ESKTOP NSTALLATION MOUNT NSTALLATION TATION ONNECTION WITCHES ONNECTION ETWORK ABLES NSTALLATION...
-
Page 3: Unpacking Information
EX16916 www.etherwan.com Unpacking Information Thank you for purchasing this product. Before installation, please verify that your package contains the following items. One 16-Port Gigabit Ethernet Switch One AC power cord Wall mount kit Rack mount kit ... -
Page 4: Key Feature
EX16916 www.etherwan.com Key Feature Complies with 10BASE-T specifications of the IEEE802.3 standard Complies with 100BASE-TX specifications of the IEEE802.3u standard Complies with 1000BASE-T specifications of the IEEE802.3ab standard 16 * 10/100/1000Mbps RJ-45 N-Way ports Supports N-Way protocol for speed (10/100/1000Mbps) and duplex mode (Half/Full) auto-detection ... -
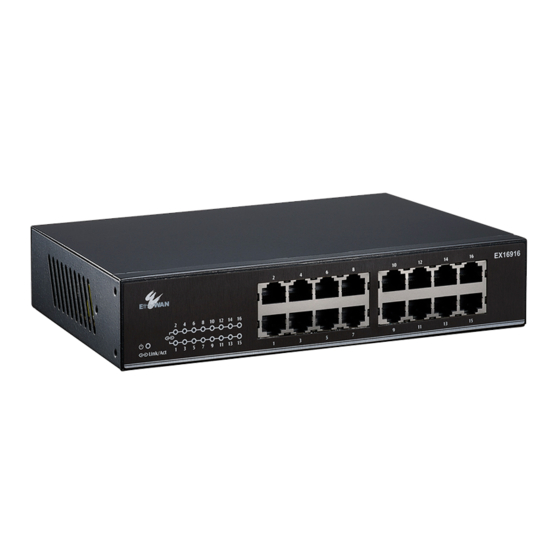
Page 5: Front Panel
EX16916 www.etherwan.com Front Panel The front panel consists of LED indicators and the ports. For detailed LED definition, please refer to the next paragraph. The front panel of the switch is shown as below: LED Definition The 16 port switches contain one power LED for the device, Link/Act LEDs for each port that shows the activities and information of the ports. -
Page 6: Rear Panel
EX16916 www.etherwan.com Rear Panel The power receptacle and power on/off switch is located on the rear panel of the switch: Power Receptacle To be compatible with the electric service standards around the world, the switch is designed to afford the power supply in the range from 100 to 240VAC, 50/60Hz. -
Page 7: Desktop Installation
EX16916 www.etherwan.com Installation This switch can be placed on your desktop directly, or mounted on the wall. The installation is a snap. Users can use all the features of the switch with simply attaching the cables and turning the power on. -
Page 8: Wall Mount Installation
EX16916 www.etherwan.com Wall-mount Installation Screw the two provided screws into the wall 150 mm apart horizontally. Leave a small gap between the head of the screw and the wall. The gap should be big enough for the screw heads to slide into the screw slots and the connection cables to run down the back of the switch. -
Page 9: Station Connection
EX16916 www.etherwan.com Station Connection Connect each station to the switch by twisted-pair cable. Plug one RJ-45 connector into a RJ-45 port of the switch, and plug the other RJ-45 connector into the station’s network adapter. Power on the switch and then system is ready.
Need help?
Do you have a question about the EX16916 and is the answer not in the manual?
Questions and answers