Table of Contents
Advertisement
Quick Links
34-255
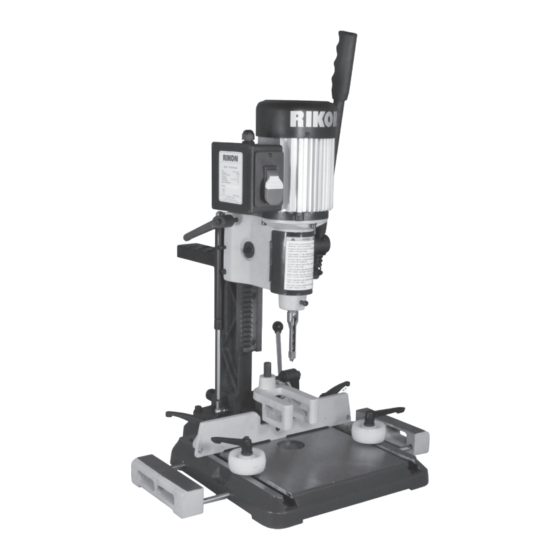
Benchtop Mortising Machine
with Table Extensions
Operator's Manual
Record the serial number and date of purchase in your manual for future reference.
Serial Number: _________________________
Date of purchase: _________________________
For technical support or parts questions, email techsupport@rikontools.com or call toll free at (877)884-5167
www.rikontools.com
34-255M1
Advertisement
Table of Contents

Related Manuals for Rikon Power Tools 34-255


Summary of Contents for Rikon Power Tools 34-255
- Page 1 34-255 Benchtop Mortising Machine with Table Extensions Operator’s Manual Record the serial number and date of purchase in your manual for future reference. Serial Number: _________________________ Date of purchase: _________________________ For technical support or parts questions, email techsupport@rikontools.com or call toll free at (877)884-5167 www.rikontools.com...
-
Page 2: Table Of Contents
Changes and improvements may be made at any time, with no obligation on the part of Rikon Power Tools, Inc. to modify previously delivered units. Reasonable care has been taken to ensure that the information in this manual is correct, to provide you with the guidelines for the proper safety,... -
Page 3: Safety Instructions
SAFETY INSTRUCTIONS IMPORTANT! Safety is the single most important consideration in the operation of this equipment. The following instructions must be followed at all times. Failure to follow all instructions listed below may result in electric shock, fire, and/or serious personal injury. There are certain applications for which this tool was designed. - Page 4 SAFETY INSTRUCTIONS 12. KEEP PROTECTIVE GUARDS IN PLACE AND IN 25. ALWAYS WEAR A DUST MASK TO PREVENT WORKING ORDER. INHALING DANGEROUS DUST OR AIRBORNE PARTICLES, including wood dust, crystalline silica dust 13. AVOID ACCIDENTAL STARTING. Make sure that and asbestos dust. Direct particles away from face and the power switch is in the “OFF”...
-
Page 5: Electricals & Wiring Diagram
SAFETY INSTRUCTIONS EXTENSION CORDS ELECTRICAL SAFETY THE USE OF AN EXTENSION CORD THIS TOOL MUST BE GROUNDED WITH THIS MACHINE IS NOT RECOMMENDED. For WHILE IN USE TO PROTECT THE OPERATOR FROM best power and safety, plug the machine directly into a ELECTRIC SHOCK. - Page 6 SAFETY INSTRUCTIONS SPECIFIC SAFETY INSTRUCTIONS FOR MORTISING MACHINES This machine is intended for the drilling of square mortise holes in hard or softwoods. Any other use not as specified, including modification of the machine or use of parts not tested and approved by the equipment manufacturer, can cause unforeseen damage to the machine or operator.
-
Page 7: Getting To Know Your Machine
Fence Adjustment Knob Feed Handle CONTENTS OF PACKAGE Model 34-255 Benchtop Mortising Machine is shipped complete in one box. Unpacking and Clean-up 1. Carefully remove all contents from the shipping carton. Compare the contents with the list of contents to make sure that all of the items are accounted for, before discarding any packing material. -
Page 8: Assembly
CONTENTS OF PACKAGE 34-255 Benchtop Mortising Machine with Table Extensions Operator’s Manual Record the serial number and date of purchase in your manual for future reference. Serial Number: _________________________ Date of purchase: _________________________ For technical support or parts questions, email techsupport@rikontools.com or call toll free at (877)884-5167 www.rikontools.com... - Page 9 ASSEMBLY Install the Table Extensions (Part #60) onto the Base (#1) of the Mortiser. 1. Carefully tip the mortiser to back, or forward, and slide two of the Table Extension Shafts (#61) through the two holes in the side of the base. The ends of the shafts with the retaining C-Clips should be remaining under the base.
- Page 10 ASSEMBLY THE MACHINE MUST NOT BE PLUGGED IN AND THE POWER SWITCH MUST BE Install the Roller Clamps (#65) onto the table 'OFF' UNTIL ASSEMBLY IS COMPLETE. base of the Mortiser. FIG. 5. 1. The Roller Clamps have special Screw Plates that slide into the ‘T’...
- Page 11 ASSEMBLY Installing the Mortising Chisel and Drill Bit The 34-255 Mortising Machine uses 1”, 3/4” or 5/8” diameter shank chisels with a 3” cutting depth. 1. Open the chuck access Cover (#40) (A) and loosen the front bushing set Screw (#41)(B).
-
Page 12: Operation
OPERATION THE MACHINE MUST NOT BE PLUGGED IN AND THE POWER SWITCH MUST BE IN THE 'OFF' POSITION UNTIL ASSEMBLY AND ALL SET UPS ARE COMPLETE. Fence Adjustments The fence should travel square to the adjustment ‘T’ slots in the base casting. It will also adjust back and forth on a rack gear with the use of the fence adjustment handle. - Page 13 OPERATION This manual is not a training aid. There should be some basic understanding regarding operation prior to using a mortising machine. Tips on usage can be found in books, magazines, researching the internet and other resources. Before turning on the machine, review the safety precautions listed on pages 3 to 6.
-
Page 14: Maintenance
OPERATION Rotating the Column 180 Degrees PHOTO SHOWS THE The column can be rotated 180 degrees, if it ROTATED COLUMN is desired, to cut mortises in large or awkward POSITION ONLY. shaped workpieces that do not fit under the chisel CLAMPS FOR SECURING in normal conditions. -
Page 15: Troubleshooting
TROUBLESHOOTING PROBLEM REMEDY PROBABLE CAUSE 1. Machine is not plugged in. Motor will not start. 1. Plug power cord in electrical outlet. 2. Fuse or circuit breaker are open. Fuses or circuit break- 2. Replace fuse or circuit breaker. ers trip or blow. 3. -
Page 16: Parts Diagram
PARTS DIAGRAM NOTE: Please reference the Manufacturer’s Part Number when calling for Replacement Parts. For Parts under Warranty, the Serial Number of your machine is required. -
Page 17: Parts List
PARTS LIST MFG. MFG. DESCRIPTION PART NO. DESCRIPTION PART NO. Base P34-255-1 Screw P34-255-38 Screw Plate P34-255-2 Screw P34-255-39 Handle P34-255-3 Cover P34-255-40 C-Ring P34-255-4 Screw P34-255-41 Gear Shaft P34-255-5 Chuck P34-255-42 Handle Hub P34-255-6 5/8” Chisel Bushing P34-255-43 Roll Pin P34-255-7 3/4”... -
Page 18: Accessories
ACCESSORIES MORTISING CHISELS AND BITS Machined steel chisels have 5/8” shanks. Drill bits have brad points, single cutting edge and up-spiral flutes for rapid chip removal. Both chisel and bits require final sharpening before use. 29-914 1/4” Mortising Chisel & Bit 29-915 5/16”... - Page 20 34-255 For more information: 16 Progress Rd Billerica, MA 01821 877-884-5167 / 978-528-5380 techsupport@rikontools.com www.rikontools.com 34-255M1...
Need help?
Do you have a question about the 34-255 and is the answer not in the manual?
Questions and answers