
Related Manuals for WaterLogic WL Cube


Summary of Contents for WaterLogic WL Cube
- Page 1 WL Cube Firewall OPERATING, INSTALLATION, AND SERVICE MANUAL Waterlogic Commercial Products, LLC 11710 Stonegate Circle Omaha, NE 68164 (800) 288-1891 www.waterlogic.us...
-
Page 2: Table Of Contents
CUBE OPERATING, INSTALLATION, AND SERVICE MANUAL Congratulations on your choice of the Waterlogic CUBE water treatment system. The CUBE is a fully programmable self-contained model that dispenses ambient cold, hot, and extra-hot water. Every CUBE includes: High Performance Multi-Stage Filtration... -
Page 3: Features And Benefits
CUBE FEATURES AND BENEFITS Ambient, Cold, Hot, and Extra Hot Water Pressure Fed Ambient, Cold, Hot, and Extra Hot Selections to meet a wide range of customer demands. Volume Storage and Water Capacity 1.4 liters of Cold, 1.3 liters of Hot Water Storage. BioCote®Anti-Microbial Protection Plastic surfaces surrounding dispensing areas and drip tray are infused with an exclusive silver additive called BioCote®. -
Page 4: Certifications
UL399 – Certified Drinking Water Cooler Intertek Labs (ETL) Certified the CUBE to ANSI/UL 399 Standard for Drinking Water Coolers. BPA Free - Waterlogic tests for BPA and declares that all of its products are Bisphenol-A FREE and contain no harmful BPA plastics. -
Page 5: Introduction And Safety Alert Symbols
Waterlogic and Authorized Waterlogic Dealers employ trained service personnel who are experienced in the installation, function and repair of Waterlogic equipment. This publication is written for use by these qualified individuals. Waterlogic encourages users to learn about products, however, we believe that product knowledge and service is best obtained by consulting Waterlogic or an Authorized Waterlogic Dealer. -
Page 6: Safety Precautions
SAFETY PRECAUTIONS Basic safety precautions should be followed, including the following: DANGER! If incorrectly installed, operated or maintained, this product can cause death or severe injury. Those who install, operate, or maintain this product should be trained in its proper use, warned of its dangers, and should read the entire manual before attempting to install, operate, or maintain this product. -
Page 7: Model And Part Designations
MODEL/PART DESIGNATIONS BRAND NAME DESCRIPTION Waterlogic CUBE – Ambient, Cold, Hot, and Extra Hot CUBE F-FWCU1-M-HCA-TT-SB-IN1 SPECIFICATIONS ITEM Water ¼” Quick Connect Cold Water Temperature – Factory Set Point 41°F - 5°C Cold Water Temperature (Adjustable) 34° - 54° F. (1.1° - 12.2°C) Hot Water Temperature 158°... -
Page 8: Operating Instructions
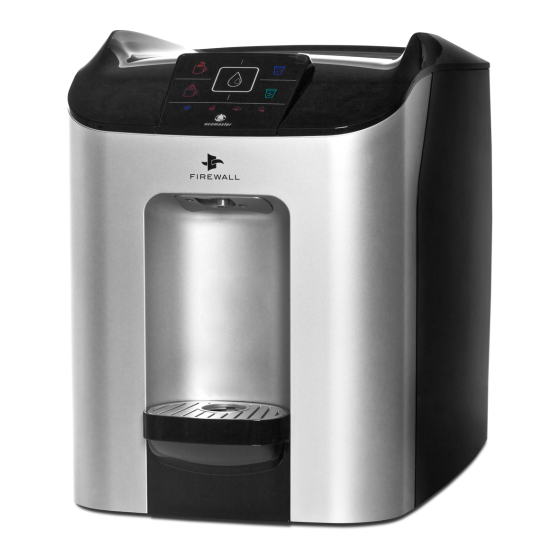
OPERATING INSTRUCTIONS The above picture shows front LCD display and control panel for the Waterlogic CUBE . Button Operational Use Select Cold Water Selection + Dispensing Button to start dispensing until desired fill. Select Ambient Water Selection + Dispensing Button to start dispensing until desired fill. - Page 9 Dispensing your choice of water is very simple. 1. Place your cup centrally in the dispensing area. Always use a cup suitable for use with hot water. Never hold cup or place hands in dispensing area while dispensing hot water. Never try to fill more than one cup at a time.
-
Page 10: Hot Tank Principles Of Operation
HOT TANK PRINCIPLES OF OPERATION All Waterlogic Hot Tanks have a built in Vent or Expansion Chamber in the top of the tank except for WL270 (GF) units. The Vent Chamber allows for expansion of the water when it is heated. -
Page 11: Water Flow Diagram
CUBE FLOW DIAGRAM CUBE Operating, Installation, and Service Manual Page 11 - Revision: 6-23-2015... -
Page 12: Programming Menu And Instructions
PROGRAMMING MENU AND INSTRUCTIONS PROGRAMMING: ENERGY SAVING SLEEP MODE The Cube has an energy saving / sleep mode feature that minimizes power consumption by shutting down the heater circuit if the machine has not been operated for either 3 or 72 hours depending on the program setting. - Page 13 PROGRAMMING: DIP SET-UP COLD WATER TEMPERATURE CUBE Main PCB - DIP Switch 2 Cold Water Temp Range 41° F - 5°C 50° F - 10°C 59°F - 15° PROGRAMMING: DIP SET-UP HOT WATER TEMPERATURE CUBE Main PCB - DIP Switch 2 Hot Water Temp Range 176°F - 80°C 189°F - 87°...
- Page 14 PROGRAMMING: DIP SET-UP FILTER REPLACEMENT TIMING Filters should be configured to optimize your system. Filters need to be configured and specified to do the job given the local water conditions, usage, maintenance schedule, and placement restrictions. In order for our filters to perform as represented and to provide the best quality water possible, it is essential that filters be replaced periodically.
- Page 15 PROGRAMMING: DIP SET-UP FOR UV SETTINGS CUBE Main PCB - DIP Switch 1 CS = CDS Sensor (used in Europe) US = UV Sensor CUBE Operating, Installation, and Service Manual Page 15 - Revision: 6-23-2015...
-
Page 16: Pcb Led Codes
PCB LED CODES CUBE Operating, Installation, and Service Manual Page 16 - Revision: 6-23-2015... -
Page 17: Pre-Installation Procedures
• TDS Meter and Test Strips for measuring chlorine. - Optional • 1/8 NPT Female Thread to ¼” Compression Fitting (Used to connect hose to drain fittings) 1. Unpack the Waterlogic CUBE and check exterior for damage. WARNING! CUBE IS HEAVY. - Page 18 10. Select the Cold Button and the Dispense Button to allow water to flow until water is clear. 11. Turn on the Green Heater / Compressor switch for approximately an hour for the Cube to heat and chill. I=ON 12. Test water temperatures and ensure the water tastes acceptable. 13.
- Page 19 Visually inspect all electrical and water connections for signs of wear or damage. DANGER! HIGH VOLTAGE ELECTRICAL HAZARD. Unplug before inspection and service. Waterlogic recommends changing the UV Lamp every 12 months. ULTRAVIOLET RADIATION. Protect your skin and eyes against ultraviolet WARNING! rays.
- Page 20 Use a Phillips-head screwdriver to remove the two screws at the rear of the machine that hold the top panel in place. Remove the Top Panel by placing your hands on the top as shown in the picture and push it backwards and then lift it up to remove.
- Page 21 13. Securely tighten the filter body to the filter head. 14. Fit the filter assembly with the sanitation fluid into the machine: Insert the filter assembly back into its cradle, aligning the two male spigots with the female holes in the cradle Push it firmly until the filter sits snugly and is flush with the cradle top surface Lock the filter by closing the locking lever until it ‘clicks’...
- Page 22 19. Leave the sanitation fluid to stand in the cold tank for 10 minutes. Once this time has passed select the cold water icon and then select the dispense button and flush 10 liters of cold water and 4 liters of ambient water through the machine. Use the same method as before and check all the sanitation fluid has left the tank by using a chlorine test strip Turn off the water supply at the isolation point 21.
- Page 23 27. Unscrew the filter body from the filter head by turning the base in an anti-clockwise direction. 28. Pour away the excess water. 29. Remove the new filter cartridge from the packaging and fit it by firmly pushing it into the filter head, making sure it is firmly and securely fitted. 30.
-
Page 24: Draining Procedure
CUBE DRAINING INSTRUCTIONS WARNING! CUBE IS A HEAVY OBJECT. Use proper lifting aids and handling techniques to avoid injury. Use assistance as single person lift could cause injury. Always drain before handling to reduce weight. Draining Notes There are 2 tanks and a booster pump circuit that must be drained in the CUBE. The booster pump will have some water in the circuit that must be purged. -
Page 25: Installation Procedures
Pre-installation and sanitization procedures as prescribed in this manual must be performed before installing the CUBE. Always install indoors and place the Waterlogic CUBE on a firm, flat and stable surface. CUBE Operating, Installation, and Service Manual Page 25 - Revision: 6-23-2015... - Page 26 40-60 psi. Turn on the water supply and check all of the connections for leaks. 2. Connect the power cord to the back of the Waterlogic CUBE and to a 120 Volt supply. 3. Turn the Red Power Switch to I=ON position.
- Page 27 Never look directly at an operating UV light. Always disconnect before removal. 15. Move the Waterlogic CUBE into its final operating position. Be sure that a minimum of 2” clearance is maintained around both the sides and the back of the unit. This is important to allow proper airflow and heat exchange of refrigeration system.
-
Page 28: Hot Tank Enabling Procedure
HOT TANK ENABLING PROCEDURE During Initial Installation or anytime the unit loses power, you must follow the Hot Tank Enabling Procedure. 1. Plug in power cord to 15 amp 120VAC / 60Hz supply (GFCI recommended). 2. Turn the Red Power Switch on back of Cube. I=ON 3. -
Page 29: Service Requirements
HIGH VOLTAGE ELECTRICAL HAZARD. Unplug before inspection and DANGER! service. Waterlogic recommends changing the UV Lamp every 12 months. ULTRAVIOLET RADIATION. Protect your skin and eyes against ultraviolet WARNING! rays. Never look directly at an operating UV light. Disconnect before removing UV Lamp. - Page 30 Use a Phillips-head screwdriver to remove the two screws at the rear of the machine that hold the top panel in place Remove the top panel by placing your hands on the top as shown in the picture and push it backwards and then lift it up to remove.
- Page 31 14. Fit the filter assembly with the sanitation fluid into the machine: Insert the filter assembly back into its cradle, aligning the two male spigots with the female holes in the cradle Push it firmly until the filter sits snugly and is flush with the cradle top surface Lock the filter by closing the locking lever until it ‘clicks’...
- Page 32 21. Select the cold water icon and then the dispense button until no more water is being dispensed. 22. Switch off the Red Power Switch O=OFF at the rear of the machine and remove the power lead from the unit. 23.
- Page 33 Reconnect and replace the UV lamp assembly. Take care to not touch the new UV lamp with bare hands, as this will shorten the life of the lamp. Replace the UV lamp protective cover. UV SYSTEM IS FRAGILE. Never handle the UV lamp or Quartz Sleeve with CAUTION! bare hands.
- Page 34 36. Replace UV Lamp – See separate section in this manual for directions on how to Replace the UV Lamp. 37. Re-fit the top cover and insert the two screws at the rear of the machine that secure it 38. Turn on the water supply at the isolation point 39.
-
Page 35: Filter Replacement
Read and understand the contents of this manual before attempting to service CUBE. Failure to follow the instructions in this manual could result in death, serious personal injury, or severe property damage. Only trained and qualified technicians should attempt to install, maintain, or service Waterlogic Equipment. Materials Needed: • Phillips Screwdriver. - Page 36 Remove the top panel by placing your hands on the top as shown in the picture and push it backwards and then lift it up to remove. Replace the carbon block filter. Insert your finger into the top of the carbon block filter (the filter that is closer to the front of the machine) and pull the lever up to the vertical position.
- Page 37 A. Insert the filter assembly back into its cradle, aligning the two male spigots with the female holes in the cradle B. Push it firmly until the filter sits snugly and is flush with the cradle top surface C. Lock the filter by closing the locking lever until it ‘clicks’...
-
Page 38: Replacement Components
WLUSA# NA Replacement parts can be obtained from Waterlogic or an Authorized Waterlogic Dealer. See Parts Layouts, Drawings, and Lists for additional repair parts. Hot Tank HT-0001-I00 Service Hot Tank (with controls) must be replaced at least every 5 years. -
Page 39: Uv Lamp Replacement
UV LAMP REPLACEMENT Remove the UV Lamp protective cover from the front right hand side of the machine by removing the fixing screw and lifting the cover up Disconnect the UV Lamp Connector by pressing in the clip on the side of the machine as shown (#1) Pull the connector towards the front of the machine (#2) Firmly pull the old UV Lamp up and out of the Cube. - Page 40 Reconnect the power lead into the back of the machine and plug in to power source. Visually verify that the UV Lamp is working correctly by checking the PCB LED. There should be no warning icons flashing. Turn on Red Power Switch to the On Position I = On Visually verify that the UV Lamp is working correctly by checking the PCB LED.
-
Page 41: Quartz Sleeve Replacement
REPLACING QUARTZ SPIRAL Turn off both the Green Heater/Compressor Switch and the Red Power Switches located on back of unit I = ON, O= Off Unplug power to unit. With a Phillips Head Screwdriver, remove the two screws at back of the Top Cover – as shown. Remove top panel by placing your hands on the top and pushing the top panel towards the rear. - Page 42 With a Phillips Head Screwdriver, remove the five screws on the electrical cover plate. Remove the electrical cover plate. With a Phillips Head Screwdriver, remove the four screws that attach the Selection - Dispense PCB to the Mainframe. Remove the Selection - Dispense PCB. With a Phillips Head Screwdriver, remove the two screws from the faucet plate.
- Page 43 With a Phillips Head Screwdriver, remove one screw from the UV Lamp Cover Plate. Remove UV Lamp Cover Plate. Disconnect the UV Lamp Connector by holding it and pressing in the clip. Pull the connector towards rear of the Cube as shown. Firmly pull up the UV Lamp while only holding the lamp by the white end caps.
- Page 44 Remove Front Frame. Front Frame is attached using 6 Phillip Screws. 2 screws are located on the top of the frame. 2 screws are located at the bottom of the frame. 2 screws are located on both sides, underneath the upper part of the frame. Disconnect elbow from tubing on the UV Lamp Assembly.
- Page 45 Insert quartz spiral into FIREWALL Housing. Reassembly unit by using these steps in reverse order. CUBE Operating, Installation, and Service Manual Page 45 - Revision: 6-23-2015...
-
Page 46: Descaling The Hot Tank
The hot tank is made from stainless steel. Ensure descaling solution is compatible with stainless and always flush the unit completely. Dispose in an environmentally safe manner. See Hot Tank Descaling Video and training procedure located on the Partner Area of the Waterlogic Website for more detailed instructions. - Page 47 Switch off the Red Power and the Green Heater/Compressor Switches O=OFF at the rear of the machine and remove the power lead from the unit. Use a Phillips-head screwdriver to remove the two screws at the rear of the machine that secure the top panel. Remove the top panel by placing your hands on the top as shown, and push it towards the rear of the Cube then lift to remove.
- Page 48 Screw the filter body to the filter head, making sure it’s securely tightened. Fit the filter assembly into the machine as follows: Insert the filter assembly back into its cradle, aligning the two male spigots with the female holes in the cradle Push it firmly until the filter sits snugly and is flush with the cradle top surface Lock the filter by closing the locking lever until it ‘clicks’...
- Page 49 Leave the descale solution fluid to stand in the cold tank for 20 minutes. After 20 minutes, select the Hot Water Icon, select the Dispense button and flush 3 gallons of Hot water through the Cube. Turn off the water supply at the isolation point. Select the Cold Water Icon, then the dispense button until no more water is dispensing from the Cube.
- Page 50 Unscrew the filter body from the filter head by turning the base in a counter-clockwise direction. Pour away the excess water. Replace the filter cartridge into the filter head as shown. Screw the filter body to the filter head, making sure it’s securely tightened.
- Page 51 Use a Phillips-head screwdriver to reinstall the two screws at the rear of the machine that secure the top panel. Turn on the water supply at the isolation point. Reconnect the power lead and insert it into the rear of the machine.
-
Page 52: Bypassing Cover Pin
BYPASSING COVER PIN If pin on back of the cover breaks off, the unit will be disabled. To bypass in the event this occurs: Remove top cover Remove 5 screws from inner top cover to access electronics: Locate interlock switch at rear of unit two brown wires with white quick connects: Bypass the interlock by looping the two brown wires that go to the interlock together and leave the switch unplugged:... -
Page 53: Parts Drawing And Part Numbers
CUBE MAIN DRAWING AND PARTS LIST CUBE Operating, Installation, and Service Manual Page 53 - Revision: 6-23-2015... - Page 54 Part No. Description WLUSA Part No. PL-1389 Left Side Panel FW-0005-L00-00 Spout, Mirror, No Gauze – 18 mm FU-0012 UVC Sensor Fixing Metal Bracket PL-1391 Front Frame Panel PL-1390 Front Cover PL-1395 Spout Assembly Bracket with BioCote® PL-1392 Drip Tray Body with BioCote® PL-1393 Drip Tray Grill with BioCote®...
- Page 55 Equal Tee Connector ¼” ST EN-0008-L01-00 Electronic Ballast 15W 120V/60 Hz EL-0016-L00-00 Power Transformer 120v / 2A PL-1384 Electronics Cover LP-7326 UI Label with Waterlogic Logo EN-6140-L00-00 PCB – UVC EN-6140-L00-00 PL-1394 PCB Fixing Frame EN-6141 Key and Display PCB...
- Page 56 CUBE PARTS DRAWING AND PARTS LIST CUBE Operating, Installation, and Service Manual Page 56 - Revision: 6-23-2015...
- Page 57 CUBE PARTS LIST Part No Description WLUSA Part No. PU-4028 Bulkhead Connector Union ¼” * ¼” JG (PI1208S) 10-3067 PU-4031 Tube - Blue O.D. ¼” JG (PE-08-BI-1000F-B) PU-4066 Stem Elbow Connector ¼” * ¼” JG (PI220808S) PU-4008 Equal Elbow Connector ¼” JG (PI0308S) PU-4164 Solenoid Valve 24 DC (Single Spring Load) PU-4066...
- Page 58 PU-4008 Equal Elbow Connector ¼” JG (PI0308S) PU-4014 Tube - Blue 8mm - 5/16” JG (PE-0806-100M-B) 10-3062 PU-4031 Tube - Blue O.D. ¼” JG (PE-08-BI-1000F-B) Hot and Cold Tank Drain Valve (consists of P/N’s CT-2031 Drain Body 38, 39 14-5011 Valve 5/16”...
-
Page 59: Wetted Parts Drawing And Part Numbers
CUBE WETTED PARTS DRAWING AND PARTS LIST CUBE Operating, Installation, and Service Manual Page 59 - Revision: 6-23-2015... - Page 60 CUBE WETTED PARTS LIST Part No. Description WLUSA Part No. PU-4028 Bulkhead Connector Union ¼” * ¼” JG (PI1208S) 10-3067 PU-4031 Tube - Blue O.D. ¼” JG (PE-08-BI-1000F-B) PU-4031 Tube - Blue O.D. ¼” JG (PE-08-BI-1000F-B) PU-4066 Stem Elbow Connector ¼” * ¼” JG (PI220808S) PU-4164 Solenoid Valve 24 DC (Single Spring Load) Equal Tee Connector ¼”...
- Page 61 PU-4031 Tube - Blue O.D. ¼” JG (PE-08-BI-1000F-B) PU-4164 Solenoid Valve 24 DC (Single Spring Load) Equal Tee Connector ¼” JG PU-4066 Stem Elbow Connector ¼” * ¼” JG (PI220808S) Equal Tee Connector ¼” JG PU-4031 Tube - Blue O.D. ¼” JG (PE-08-BI-1000F-B) FT-0004-L00-WLT CICO CBC 1 Micron 10”...
-
Page 62: Electrical Diagram
CUBE ELECTRICAL DIAGRAM DANGER! HIGH VOLTAGE ELECTRICAL HAZARD. PCB (Printed Circuit Board) contains High Voltage. Only trained and qualified technicians should attempt live testing. CUBE Operating, Installation, and Service Manual Page 62 - Revision: 6-23-2015... -
Page 63: Fault Codes And Troubleshooting
FAULT CODES All Icons Flashing and Audible Alarm Solution An overheat fault has been detected. Switch the Cube off immediately and start fault finding procedures. CUBE Operating, Installation, and Service Manual Page 63 - Revision: 6-23-2015... - Page 64 FAULT CODES UV Purification Icon Flashing UV Purification Icon Replace UV Light The Cube will not dispense cold or ambient water without properly functioning FIREWALL. UV Purification ensures the safety of the water. UV LAMP REPLACEMENT Remove the UV Lamp protective cover from the front right hand side of the machine by removing the fixing screw and lifting the cover up Disconnect the UV Lamp Connector by pressing in the...
- Page 65 Insert the new UV Lamp while holding the white end caps only. Insert the UV Lamp, ensuring you have pushed it all the way down until it cannot go any further. Reconnect the UV lamp connector, making sure the connectors are lined up correctly as they will only fit when correctly aligned.
- Page 66 FAULT CODES Filter Service Icon Flashing Filter Timer is enabled and has reached the designated service schedule (3, 6, or 12 months). Audible alarm will sound for 15 seconds and Filter Service Light will flash until reset. Water will continue to dispense unless filter is completely fouled and restricts output.
- Page 67 Leak Detection Indicator Most leaks will be detected by either the internal leak detection system that will trigger an alarm, or will trip the Waterlogic block located in the installation kit Solution 1. Turn off green heater/compressor switch and red power switch.
- Page 68 FAULT CODES No Flow of Water Action Ensure that there is a water supply to the Cube from the building. If an anti-leak has been installed in the Cube, verify that it has not tripped. Verify the water filters are not blocked and that they are in date and are screwed home securely into the filter head.
- Page 69 TROUBLESHOOTING Hot Water is Not Hot and the Cold Water is Not Cold Action Verify Green Heater Compressor Switch is turned on. I=ON CUBE Operating, Installation, and Service Manual Page 69 - Revision: 6-23-2015...
- Page 70 TROUBLESHOOTING Hot Water Flow but Cold Water is Not Flowing. Action Cold Water Tank Frozen. Disconnect power supply for one hour to allow the tank to defrost. Flush the cold water system. Verify the temperature settings are correct. If the cold tank is not frozen – verify the solenoid valve is operating correctly and being turned on and off when you select the cold option.
- Page 71 Compressor problem needed. Note: The Waterlogic Firewall reduces 7-log of waterborne bacteria, 5-log of viruses, and 4-log of parasites potentially found in the drinking water. A small amount (about 2-ounces) of water remains in the Firewall device after dispensing. This water does not remain permanently chilled, and will eventually become room temperature after several hours.
- Page 72 TROUBLESHOOTING Cold Water Flow but No Hot Water is Flowing Possible Reason Solution Calcium Build Up in the hot Descale the hot tank. tank or the hot water outlet. Verify the hot water solenoid valve functions correctly and Hot Solenoid Valve turns on and off when you select the hot option.
- Page 73 TROUBLESHOOTING Low Flow of Cold Water or Hot Water or Both Possible Reason Solution Verify the building water pressure is 40-60. Water Pressure Check with Pressure regulator. Filters blocked Verify the filters are not partially blocked. Solenoid Valve Verify the valves function correctly. Calcium Build Up in the hot tank or the hot Descale the hot tank.
- Page 74 TROUBLESHOOTING Bad or Plastic Taste Possible Reason Solution Not Flushed Properly If the Cube is new, it may need flushing for a longer period. CUBE Operating, Installation, and Service Manual Page 74 - Revision: 6-23-2015...
- Page 75 TROUBLESHOOTING No Power Solution Verify the building electrical supply to the Cube is on and that the power cord is plugged in. Verify the Red Power switch at the rear of the Cube is on. O=ON Test the Cube’s fuse. Verify the top cover isolation switch is being activated by the top cover being locked in place correctly.
-
Page 76: Warranty
Waterlogic will approve of return in writing and will issue a Return Authorization which you must obtain prior to shipping the product. You are responsible for the cost of freight in to Waterlogic. Waterlogic and its affiliated companies hereby limit the duration of any and all implied warranties to a maximum period of three (3) years from the date of purchase including, but not limited to, the implied warranties of merchantability and fitness for a particular purpose.
Need help?
Do you have a question about the WL Cube and is the answer not in the manual?
Questions and answers