Table of Contents
Advertisement
Quick Links
ASSEMBLY AND OPERATION MANUAL
AquaCraft
will warrant this kit for 90 days after the date of purchase from defects in materials or workmanship. AquaCraft
™
will either repair or replace, at no charge, the incorrectly made part.
Make sure you save the receipt or invoice you were given when you bought your model! It is your proof of purchase and we
must see it before we can honor the warranty.
To return your Kings Ransom for repairs covered under warranty you should send it to the below address.
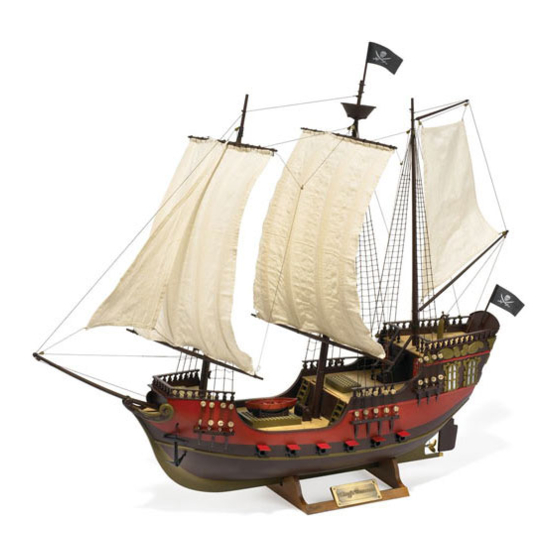
Thank you for purchasing Aquacraft's Kings Ransom Pirate Ship. This manual contains the instructions
you need to safely prepare, operate, and maintain your R/C boat. Read over this manual thoroughly
before operating your ship.
If for any reason you feel this model is not for you, return it to your local dealer immediately.
PLEASE NOTE: Your hobby dealer can not accept a return on any model boat after the assembly
sequence has begun.
Entire Contents © Copyright 2006
Hobby Services
3002 N. Apollo Drive, Suite 1
Champaign, Illinois 61822
Attn: Service Department
Phone: (217) 398-0007 9:00 am – 5:00 pm Central Time M-F
E-mail: hobbyservices@hobbico.com
Warranty
™
™
by
AQUZ1002 for AQUB58**
Advertisement
Table of Contents

Related Manuals for Hobbico King's Ransom


Summary of Contents for Hobbico King's Ransom
- Page 1 Attn: Service Department Phone: (217) 398-0007 9:00 am – 5:00 pm Central Time M-F E-mail: hobbyservices@hobbico.com Thank you for purchasing Aquacraft’s Kings Ransom Pirate Ship. This manual contains the instructions you need to safely prepare, operate, and maintain your R/C boat. Read over this manual thoroughly before operating your ship.
-
Page 2: Table Of Contents
Adding flags & other accessories ........9 Paper towels ❏ Installing the sail strips ..........10 Sandpaper ❏ Attaching the keel ............10 Epoxy ❏ Preparing your King's Ransom for sailing ....10 Household cleaner ❏ Maintenance ..............11 Sunglasses ❏ Adding extra details ............11 Sun Block ❏... -
Page 3: Removing The Ship From The Carton
❏ 2. Cut down the sides of the inner box on two (2) of the four corners. KING'S RANSOM FINAL ASSEMBLY TRANSMITTER ASSEMBLY NOTE: The transmitter is not water resistant and should never come in contact with water. -
Page 4: Attaching The Masts & Rigging The Sails
Let’s start from the front (Bow) of the ship and work our way to the back (Stern). ❏ 2. Slide the battery door open on the bottom of the Remove the sail bags and other parts from the sail box. transmitter and install eight (8) fresh “AA”... - Page 5 the front of the bowsprit. We suggest you go through the pulley with another loop to help stabilize it. You will end up tying the string to the opposite rigging mount eyelet on the other side of the ship. If you like, place a small amount of glue on the knots to help secure them.
-
Page 6: Main Mast & Center Sail
❏ 1. Slide the main (center) mast into the hole located in the center of the lower deck. Again using the numbering system and the proper screws, attach the rigging to the sides of the hull. Use the spacer washers to adjust the tension of the rigging as needed. -
Page 7: Rear Mast & Rear Sail
REAR MAST AND REAR SAIL (BAG 3) ❏ 1. Slide the rear mast into the hole in the back upper deck of the ship. Again using the numbering system attach the rigging to the sides of the hull. Use the spacer washers to adjust the tension of the rigging as needed. -
Page 8: Finishing The Rigging
FINISHING THE RIGGING ❏ 1. Cut a length of rigging string approx. 150cm (5 feet) long. ❏ 5. Loop the string through the hole in the top mast stand off a second time and continue on to the center mast. ❏... -
Page 9: Adding Flags & Other Accessories
❏ ❏ 8. To review, the route of the string should be from the base 2. If you choose to attach the lifeboat we suggest you glue of the aft mast, continuing up to the top of the aft mast, across it on the top of the center hatch. -
Page 10: Installing The Sail Strips
INSTALLING THE SAIL STRIPS You can install the sail strips by sliding them into the openings in the top of the sails. Keep in mind the sail strips are for static display only and must be removed for operation. The two small strings with hooks are used to secure the sail when in the rolled position. -
Page 11: Maintenance
AQUB6419 ..Rudder w/mounting block,Ransom evaporate. It’s also a good idea to let the sails down so that AQUB6200 ..Pirate Figures (4) King's Ransom they have a chance to completely dry. AQUZ1002 ..King's Ransom Instruction Manual...
Need help?
Do you have a question about the King's Ransom and is the answer not in the manual?
Questions and answers