Table of Contents
Advertisement
Quick Links
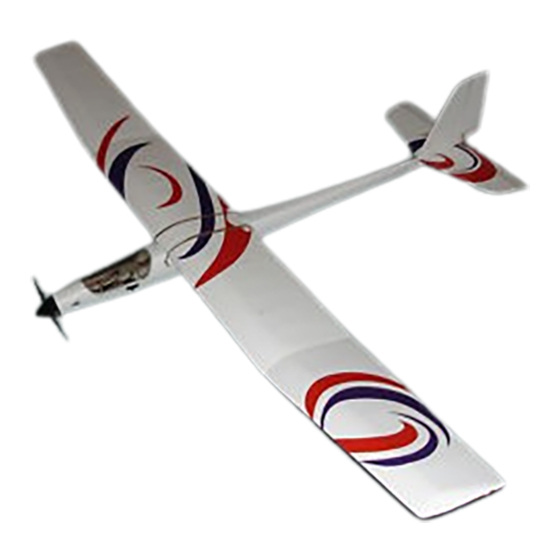
Wingspan: 68 in [1725mm]
Wing Area: 462 sq in [29.8 dm
Weight: 42–46 oz [1190–1305 g]
Wing Loading: 13.1–14.3 oz/sq ft [40–44 g/dm
Length: 45 in [1130mm]
Radio: 3-channel with 2 standard servos
Hobbico
, Inc. guarantees this kit to be free from defects in both material and workmanship at the date of
®
purchase. This warranty does not cover any component parts damaged by use or modification. In no case shall
Hobbico's liability exceed the original cost of the purchased model. Further, Hobbico reserves the right to change
or modify this warranty without notice. In that Hobbico has no control over the final assembly, no liability shall
be assumed nor accepted for any damage resulting from the use by the user of the final user-assembled product.
By the act of using the user-assembled product, the user accepts all resulting liability. If the buyers are not
prepared to accept the liability associated with the use of this product, they are advised to return this kit
immediately in new and unused condition to the place of purchase.
To make a warranty claim send the defective part or item to Hobby Services at the address below:
Hobby Services
3002 N. Apollo Dr. Suite 1
Champaign IL 61822
USA
READ THROUGH THIS MANUAL BEFORE STARTING
CONSTRUCTION. IT CONTAINS IMPORTANT
INSTRUCTIONS AND WARNINGS CONCERNING
THE ASSEMBLY AND USE OF THIS MODEL.
Entire Contents © Copyright 2006
2
]
2
]
WARRANTY
Include a letter stating your name, return shipping address, as much contact
information as possible (daytime telephone number, fax number, e-mail address),
a detailed description of the problem and a photocopy of the purchase receipt.
Upon receipt of the package the problem will be evaluated as quickly as possible.
™
Champaign, Illinois
(217) 398-8970 ext. 5
airsupport@hobbico.com
HCAZ2210 for HCAA2210 V1.0
Advertisement
Table of Contents

Related Manuals for Hobbico UPSTAR


Summary of Contents for Hobbico UPSTAR
- Page 1 Hobbico’s liability exceed the original cost of the purchased model. Further, Hobbico reserves the right to change or modify this warranty without notice. In that Hobbico has no control over the final assembly, no liability shall be assumed nor accepted for any damage resulting from the use by the user of the final user-assembled product.
-
Page 2: Table Of Contents
TABLE OF CONTENTS INTRODUCTION The Upstar ARF is a very predictable and stable aircraft, INTRODUCTION............2 allowing pilots of different skill levels to enjoy it. It is AMA ................2 easy to build, flies great, and is a great selection as your SAFETY PRECAUTIONS..........3... -
Page 3: Safety Precautions
1. Your Upstar ARF should not be considered a toy, but expressed or implied as to the performance or safety rather a sophisticated, working model that functions of your completed model. -
Page 4: Adhesives And Building Supplies
This is the list of hardware and accessories required to • When you see the term test fit in the instructions, it finish the Upstar ARF. Order numbers are provided means that you should first position the part on the in parentheses. -
Page 5: Kit Inspection
If any parts are missing or are not of acceptable quality, or if you need assistance with assembly, contact Product Support. When reporting defective or missing parts, use the part names exactly as they are written in the Kit Contents list. Hobbico Product Support: 3002 N Apollo Drive, Suite 1 Champaign, IL 61822 Telephone: (217) 398-8970, ext. -
Page 6: Ordering Replacement Parts
ORDERING REPLACEMENT PARTS Replacement parts for the Hobbico Upstar are available using the order numbers in the Replacement Parts List that follows. The fastest, most economical service can be provided by your hobby dealer or mail-order company. To locate a hobby dealer, visit the Hobbico web site at www.hobbico.com. Choose “Where to Buy” at the bottom of the menu on the left side of the page. -
Page 7: Assemble The Wing
ASSEMBLE THE WING MAKE THE JOINERS ❏ 4. Place the reinforcement plate on the top of the center wing section and line up the trailing edges and the two marks that you made. Trace around the reinforcement plate. ❏ 1. Locate the two thick and four thin plywood wing joiner pieces. -
Page 8: Join The Wing
JOIN THE WING ASSEMBLE THE FUSELAGE INSTALL THE TAIL SECTION ❏ 1. Test fit the wing together using the wing joiners. Be ❏ sure that the joiners fit into each joiner pocket properly. Trim 1. Use a hobby knife or drill to open the upper right or sand the joiners lightly as necessary so that the joiners and lower left pushrod exit holes on the fuselage to can slide halfway into their mating pockets. -
Page 9: Install The Servos
INSTALL THE SERVOS Correct Incorrect ❏ 1. Cut the servo tray and servo tray supports from the 1/8" [3mm] plywood sheet. ❏ 4. Position the rudder control horn on the right side of the rudder so that it is 3/8" [9.5mm] from the bottom of the vertical fin and at a slight angle downward. -
Page 10: Connect The Control Linkages
❏ ❏ 4. Overlap two sets of hook and loop material by 7. Position the tray so that the front tips of the tray are approximately 3" [76mm]. 3/8" [9.5mm] forward of the front mounting holes. Using a 1/16" [1.6mm] bit, drill out the six mounting holes and secure the radio tray with (6) #2 x 1/4"... - Page 11 ❏ 4. Adjust the rudder and elevator so they are in the neutral position. Mark the location on each pushrod where they cross the enlarged holes in the servo horns. ❏ 2. Center the servos by temporarily turning on your radio ❏...
-
Page 12: Install The Motor And Radio System
INSTALL THE ELECTRONICS INSTALL THE MOTOR & RADIO SYSTEM INSTALL THE MOTOR ❏ ❏ 1. Using two 3 x 8mm machine screws and two #4 1. Loosen the hook and loop straps you installed flat washers, secure the motor to the fuselage with the earlier and slide the battery pack into position. -
Page 13: Install The Canopy
INSTALL THE CANOPY ❏ 3. When satisfied with the fit, position it onto the fuselage and drill two 1/16" [1.6mm] holes at the front ❏ 1. Connect the included electronic speed controller and back and secure it to the fuselage using (2) #2 x 1/4" to the motor leads and to the receiver. -
Page 14: Get The Model Ready To Fly
If, after necessary, adjust the clevises on the pushrods to center you have become accustomed to the way the Upstar the control surfaces. ARF flies, you would like to change the throws to suit your taste, that is fine. -
Page 15: Balance The Model Laterally
PREFLIGHT IDENTIFY YOUR MODEL No matter if you fly at an AMA sanctioned R/C club site or if you fly somewhere on your own, you should always have your name, address, telephone number and AMA number on or inside your model. It is required at all AMA R/C club flying sites and AMA sanctioned flying events. -
Page 16: Motor Safety Precautions
hand signals to show you what is happening. If the control 7) I will not operate models with pyrotechnics (any surfaces do not respond correctly, do not fly! Find and device that explodes, burns, or propels a projectile of correct the problem first. Look for loose servo connections any kind). -
Page 17: Flying
Turn on the transmitter first and then the receiver. Hold the internal structural damage may result. Even worse, Upstar ARF under the wing with the nose pointed slightly the wing could actually detach from the fuselage down and directly into the wind. Do not run the motor for resulting in a crash. -
Page 18: First Flights
If the Upstar ARF is launched Don’t worry about accomplishing very much on your first with the nose up or launched too hard it will climb a few flights. Use these flights to get the “feel” of the controls and feet, stall and fall nose first straight down. -
Page 19: Thermal Soaring
2000 and 5000 feet high. beginner does not need. The Upstar ARF will climb to altitude several times on a THERMAL SOARING single charge allowing you to have flights well over ten minutes without finding any “lift”. -
Page 20: Pointers For Contest Soaring
you are low. If you see the plane falling off on one side of the POINTERS FOR CONTEST SOARING turn, move your circle over into the stronger lift. Thermals move along with the wind so as you circle you will be swept Pay Attention! –...
Need help?
Do you have a question about the UPSTAR and is the answer not in the manual?
Questions and answers