Table of Contents
Advertisement
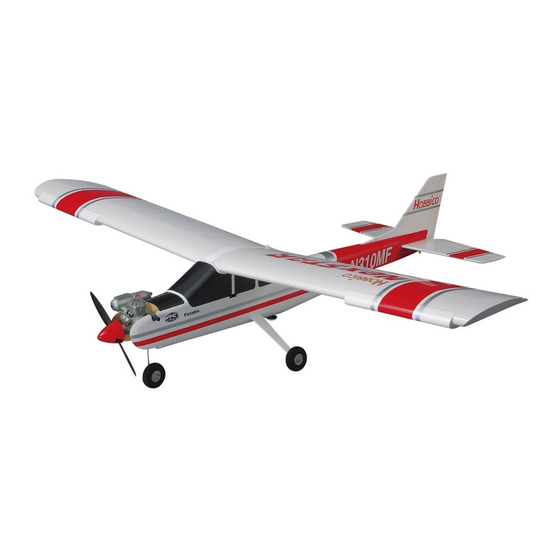
READY-TO-FLY RADIO CONTROLLED MODEL AIRPLANE
Hobbico
®
guarantees this kit to be free from defects in both
material and workmanship at the date of purchase. This warranty
does not cover any component parts damaged by use or
modification. In no case shall Hobbico's liability exceed the
original cost of the purchased kit. Further, Hobbico reserves
the right to change or modify this warranty without notice.
In that Hobbico has no control over the final assembly or material
used for final assembly, no liability shall be assumed nor accepted
for any damage resulting from the use by the user of the final
user-assembled product. By the act of using the user-assembled
product, the user accepts all resulting liability.
READ THROUGH THIS INSTRUCTION MANUAL
FIRST. IT CONTAINS IMPORTANT INSTRUCTIONS
AND WARNINGS CONCERNING THE ASSEMBLY
AND USE OF THIS MODEL.
Entire Contents © Copyright 2004
INSTRUCTION MANUAL
WARRANTY
If the buyer is not prepared to accept the liability associated
with the use of this product, the buyer is advised to return
this kit immediately in new and unused condition to the place
of purchase.
To make a warranty claim, send
the defective part or item to
Hobby Services at this address.
Include a letter stating your name, return shipping address, as
much contact information as possible (daytime telephone number,
fax number, e-mail address), a detailed description of the problem
and a photocopy of the purchase receipt. Upon receipt of the
package the problem will be evaluated as quickly as possible.
Wingspan: 68-3/4 in [1745mm]
Length: 56 in [1420mm]
Wing Area: 722 sq in [46.6 dm2]
RTF Weight: 6.5lb [2950g]
Wing Loading: 21 oz/ft
Engine: .46 cu in [7.5 cc]
Hobby Services
3002 N. Apollo Dr. Suite 1
Champaign IL 61822
USA
Champaign, Illinois
(217) 398-8970
E-mail: airsupport@hobbico.com
HCAZ3079 for HCAC17** V1.1
2
[63 g/dm
2
]
Advertisement
Table of Contents

Subscribe to Our Youtube Channel
Related Manuals for Hobbico Nexstar select


Summary of Contents for Hobbico Nexstar select
-
Page 1: Instruction Manual
Champaign IL 61822 Hobby Services at this address. In that Hobbico has no control over the final assembly or material used for final assembly, no liability shall be assumed nor accepted Include a letter stating your name, return shipping address, as... -
Page 2: Table Of Contents
However, it cannot Fueling Your NexSTAR Select ....20 be stated strongly enough that, if you do not already Starting your O.S. -
Page 3: An Introduction To The Nexstar Select Features
PROTECT YOUR MODEL,YOURSELF & OTHERS...FOLLOW THESE IMPORTANT SAFETY PRECAUTIONS 1. Your NexSTAR Select should not be considered a toy, but rather a sophisticated, working model that functions very much like a full-size airplane. Because of its performance capabilities, the NexSTAR Select, if not assembled and... -
Page 4: Isosmooth Engine Mount
Administration) to help light airplanes prevent stalls and spins during landing approaches. That is exactly what they do for your NexSTAR Select. They slow down the airplane, increase its stall resistance and prevent it from spinning, all desired characteristics of a trainer airplane. The wing... -
Page 5: Speedbrakes Training Flaps
The SpeedBrakes Training Flaps were designed to allow your with the fuselage and fin while tightening the tail bolts. The NexSTAR Select to fly slower, reduce top speed and shorten tail bolts slide into blocks in the fuselage under the the landing approach. -
Page 6: Active Flight Stabilization (Afs) Module
RC airplane simulator in the market, and it is a great learning tool. Once installed in your computer, RealFlight will allow you to use your own NexSTAR Select radio transmitter to fly your NexSTAR Select on your computer. Simulators are a great learning tool because they allow you... -
Page 7: Assembly
1 Right Wing 2 SpeedBrakes Training 1 Steel Wing Rod Flaps The NexSTAR Select comes with a receiver battery in the 2 #4 x 20mm Screws 1 Phillips Screwdriver airplane and a transmitter battery. Both of them can be charged at the same time or independently with the Futaba ®... -
Page 8: Install The Landing Gear
3. Use two #4 x 3/4" [19mm] screws to hold the two wing 6. Install the other flap onto the other wing using three halves together. more #4 x 1/4" [6mm] screws. The wing is now complete. Install the Landing Gear For this section you will need: 1 Fuselage 2 Landing Gear Legs... -
Page 9: Install The Tail Surfaces
Install the Tail Surfaces For this section you will need: 1 Fuselage 1 Vertical Stabilizer 1 Horizontal Stabilizer (or fin) (or stab) 2 Nylon Tail Bolts. 2. Install the other landing gear leg on the other side of the fuselage the same way. Once they are both installed, apply a light force to pull them out. - Page 10 4. Tighten the bolts until they fit snug against the bottom of the fuselage. Note: Over tightening these bolts will damage the nylon threads and it may cause in flight failure. Do not over tighten these bolts. 2. Insert the vertical stabilizer into the fin slot as shown above.
-
Page 11: Setup
SETUP Charge the Batteries Now the plane is assembled, but there are a few things that must be done before it will be ready to fly. You must carefully perform all of the following Setup procedures. If possible, have your flight instructor assist. If you have not yet charged the batteries, you may still proceed. - Page 12 4. The pushrods should also be installed correctly into the control horn. Remember that in step 5, page 10, the rudder and elevator control rods were installed on the rudder and elevator control horns using the second hole from the servo arm center.
-
Page 13: Check Control Surface Direction
Check Control Surface Direction The Second thing that has to be done is to make sure all the control surfaces move in the correct direction. 2. Move the right stick down and observe the direction the elevator moves. Moving the right stick down should make the elevator move up. -
Page 14: Check The Control Throws
Check the Control Throws The final thing that has to be done is to make sure the controls move the correct amount. The control throws were setup at the factory, so use the following as a guide to make sure they work correctly. The control throws are a measure of how far the flight controls (ailerons, elevator and rudder) move. -
Page 15: Identify Your Model
Those mark the forward and aft CG limit for the 4. Move the throttle stick on the transmitter all the way up. NexSTAR Select. The forward CG limit is 3-3/16" [81mm]. The carburetor should be fully open. -
Page 16: Setting Up The Active Flight Stabilization Module
4. If the fuselage is level when lifting the model with your fingers anywhere between the lines, the C.G. is correct. Proceed to the checklist in the following section. If you cannot find a spot between the two lines where the airplane balances, then either one of the following will happen: If the tail drops when lifting the model, the plane is tail heavy and will require nose weight to balance. -
Page 17: Indoor Test
Your NexSTAR Select with AFS wants to fly straight and level, so in order to keep the airplane in a bank or in a pitch attitude the stick needs to be held in a given position. -
Page 18: Outdoor Test
Outdoor test: 1. Turn on the transmitter and then the receiver. RIGHT AILERON UP 2. Point the nose of the airplane up. The elevator should move down. 4. Point the flashlight beam toward the right side of the AFS sensor. The right aileron should move up and left aileron down. -
Page 19: Final Preparations
If necessary, replace the propeller. Note: Because of the sensing characteristics of the AFS The Hobbico NexSTAR Select was designed around an sensor, in bright light days the unit may have a slight 11x5 propeller for best performance. The 11x5 propeller tendency to trim the airplane to fly towards the sun. -
Page 20: At-The-Shop Checklist
Flight preparation is to be done at the flying field. Check the Frequency Fueling the NexStar Select The NexSTAR Select comes with a three-line fuel line system. IMPORTANT: Your radio control system transmits a To fuel the airplane, remove the fuel line plug from the filling line signal on a certain frequency. -
Page 21: Starting Your O.s. Max .46 Fxi
[1.6mm] open) NexSTAR Select. Generally, if you run the engine on the richer side, it will last longer. Also, you need to run it this way To hand start the engine, use a chicken stick or thick gloves while breaking in the engine. -
Page 22: Flying
FLYING Do not attempt to fly by yourself. The Hobbico NexSTAR Select has many features that make learning to fly R/C an easier experience, but the help from an instructor is invaluable. An instructor is going to be able to inspect your... -
Page 23: Flight
Should repairs ever be react. The Hobbico NexSTAR Select should fly well at half or required, the covering can be patched with new pieces of slightly less than half throttle. -
Page 24: Change The Propeller
SpeedBrakes Training Flaps, the airplane will fly much faster at any throttle setting and longer landing approaches will be needed. Also, the NexSTAR Select will not slow down as quickly when the nose is pointed down and stall speed will increase slightly. - Page 25 Use the strings pre-installed inside the wings to pull the Follow your radio manufacturer's instructions to setup the servo leads. Install the aileron servos into the trays. flaperon mixing in your Hobbico NexSTAR Select.
-
Page 26: Dual Aileron Servos & Flaps
Dual Aileron Servos & Flaps The Hobbico NexSTAR Select can also be equipped with dual aileron servos and flaps. To set up the airplane this way, you need to follow the above instructions for the dual servo installation and then install the flaps as indicated below. -
Page 27: Ordering Replacement Parts
Hobbico NexSTAR or we will replace it with your choice of any Hobbico trainer of up to equal value. All we ask is that To locate a hobby dealer, visit the Hobbico web site at you learn to fly under the supervision of a qualified, club- www.hobbico.com.
Need help?
Do you have a question about the Nexstar select and is the answer not in the manual?
Questions and answers