Table of Contents
Advertisement
Quick Links
Installation Guide
and Users Manual
IMPORTANT:
Read and save these instructions.
NOTICE:
Installer: Leave this guide with the homeowner
Homeowner: Keep this guide for future reference
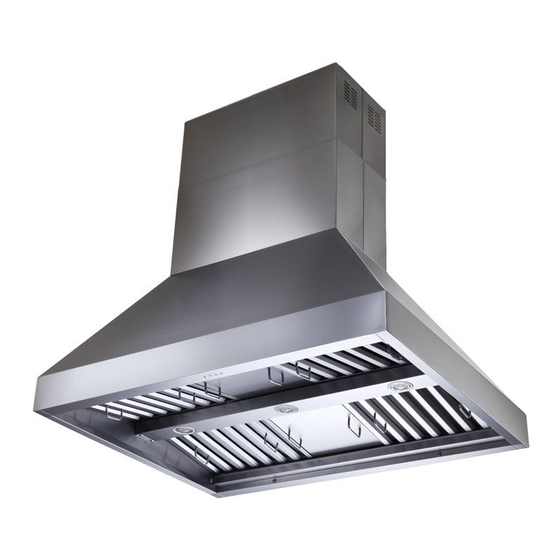
Island Mount Range Hood
VICTORY
Professional Range Hood
Model number:
available sizes: 36", 42", 48", 54", 60"
Tornado
Rev. 3067u.4a
Advertisement
Table of Contents

Related Manuals for Victory Tornado


Summary of Contents for Victory Tornado
- Page 1 Installation Guide and Users Manual VICTORY Professional Range Hood IMPORTANT: Read and save these instructions. Tornado NOTICE: Model number: Installer: Leave this guide with the homeowner available sizes: 36”, 42”, 48”, 54”, 60” Homeowner: Keep this guide for future reference Island Mount Range Hood Rev.
- Page 2 Important Safety Notice Read all Instructions before Installing and operating this appliance • The installation in this manual is intended for qualified installers, service technicians or persons with similar qualified background. Installation and electrical wiring must be done by qualified profession- als and in accordance with all applicable codes and standards, including fire-rated construction. • DO NOT attempt to install this appliance yourself. Injury could result from installing the unit due to lack of appropriate electrical and technical background. • Range hood may have very sharp edges; please wear protective gloves if it is necessary to remove any parts for installing, cleaning or servicing. • Activating any switch ON before completing installation may cause ignition or an explosion. • Due to the size and weight of this range hood, two people installation is recommended. To reduce the risk of fire, electric shock, or injury to persons: • For general ventilating use only. DO NOT use to exhaust hazardous or explosive materials and va- pors.
- Page 3 Important Safety Notice Read all Instructions before Installing and operating this appliance • Clean ventilating fan frequently. • Always use appropriate cookware and utensils size. • Always use cookware appropriate for the size of the surface element. To reduce the risk of injury to persons in the event of a stove top grease fire: • SMOTHER FLAMES with a close-fitting lid, cookie sheet, or metal tray, then turn OFF the burner. BECAREFUL TO PREVENT BURNS. NEVER PICK UP A FLAMING PAN—you may be burned. KEEP FLAMMABLE OR COMBUSTIBLE MATERIAL AWAY FROM FLAMES. If the flames DO NOT go out immediately, EVACUATE AND CALL THE FIRE DEPARTMENT or dial your local emergency service immediately.
-
Page 4: Table Of Contents
Table of Contents INSTALLATION USE AND CARE Tools needed............3 Troubleshooting...........14 Parts supplied...........4 Use and care information.......15 Venting requirements........5 Specifications..........15 Mount heights & clearance......5-6 Measurements & Diagrams......16-22 MAINTENANCE Calculating vent system length.......6 Venting methods..........7 Cleaning..........23 Electrical requirements........8 Replacing the filter & light bulb....23-24 WARRANTY Preparation............9 Installation..........10-11 Coverage & exceptions........25 Range hood operations......12-13 Disclaimer & Contact Us.......26 Tools needed: Measuring Marker or tape Utility knife pencil... -
Page 5: Parts Supplied
Parts supplied: Number of filters vary, depending on the size of your range hood, same for the nu Blower Assembly: Description Description 4.1 Air Chamber 4.5 120 v Motor 4.2 Air Flow Grill 4.6 Right Squirrel Cage 4.3 Left Locknut 4.7 Right Locknut 4.4 Left Squirrel Cage 4.8 Air Chamber Page 4... -
Page 6: Venting Requirements
Venting Requirements Height & Clearance umber of light • Vent system must terminate to the outside (roof or side wall). • DO NOT terminate the vent system in an at- tic or other enclosed area. • DO NOT use smaller than 8” wall caps. Adjustable • Use metal/aluminum vent only. Rigid metal/ chimney aluminum vent is recommended. covers • DO NOT use plastic vent. -
Page 7: Calculating Vent System Length
IMPORTANT: • A minimum of 8” round (standard for this range hood) rectangular duct 6”x10” (purchased separately) must be used to maintain maximum airflow efficiency. • Always use rigid type metal/aluminum ducts if available to maximize airflow when connecting to provided duct. • Please use Duct Run Calculation below to compute total available duct run when using elbows, transitions and caps. • ALWAYS, when possible, reduce the number or transitions and turns. If long duct run is required, increase duct size from 8” to 9” or 10”. If a reducer is used, install a long reducer instead of a pancake reducer. Re- ducing duct size will restrict airflow and decrease airflow, thus reduce duct size as far away from opening as possible. • If turns or transitions are required: Install as far away from opening and as far apart, between 2, as possible. • Minimum mount height between stove top to hood bottom should be no less than 28-inch*. • Maximum mount height between stove top to hood bottom should be no higher than 36-inch*. -
Page 8: Venting Methods
Venting Methods • This range hood is factory set for venting through the roof or wall. • Vent work can terminate either through the roof or wall. To vent through a wall, a 90° elbow is needed. IMPORTANT: • NEVER exhaust air or terminate duct work into spaces between walls, crawl spaces, ceiling, attics or garages. All exhaust must be ducted to the outside. • Use metal/aluminum duct work only. • Fasten all connections with sheet metal screws and tape all joints with certified Silver Tape or Duct Tape. • Use caulking to seal exterior wall or roof opening around the cap. Page 7... -
Page 9: Electrical Requirements
Electrical Requirements IMPORTANT: Observe all governing codes and ordinances. It is the customer’s responsibility: • To contact a qualified electrical installer. • To assure that the electrical installation is adequate and in conformance with National Electrical Code, ANSI/ NFPA 70 — latest edition*, or CSA Standards C22. 1-94, Canadian Electrical Code, Part 1 and C22. 2 No. 0-M91 - latest edition** and all local codes and ordinances. If codes permit and a separate ground wire is used, it is recommended that a qualified electrician determine that the ground path is adequate. A 120-Volt, 60 Hz, AC-only, fused electrical supply is required on a separate 15-amp circuit, DO NOT ground to a gas pipe. Check with a qualified electrician if you are not sure that the range hood is properly grounded. DO NOT have a fuse in the neutral or ground circuit. IMPORTANT: Save this Installation Guide for electrical inspector’s use. -
Page 10: Preparation
Preparation WARNING Advanced Preparations: • Be familiar with the controls of the range hood by reading through Range Hood Operations, Page 12. Excessive Weight • Place the range hood on a flat, stable surface. Connect the Require three or more person to move and range hood to a designated standard outlet 120v and turn on install this range hood. Spinal or other bodi- the range hood. Verify all operations of the range hood by WARNING referring to Range Hood Operations, Page 13. -
Page 11: Installation
Installation 1. This hood need to be supported from a solid structural box made of 2x4 or 2x6. ( Fig 6) 2. The wood frame needs to be above the drywall ceiling, the metal frame - below. 3. You need to attach the hood frame to the wooden box above it using wood screws in the 4 corners. SAFETY WARNING: Risk of electrical shock. this range hood must be properly grounded. Make sure this is done by qualified electrician in accordance with all applicable national and local electrical codes. Before connecting wires, switch power off at service panel and lock service panel to prevent power from being switched on accidentally. -
Page 12: Installation
Installation (Continued) 5. Store excess wires in the wiring box. 6. Drop oil tunnel into recess support near rear of hood. Refer to Figure 9. 7. To install baffle filters and stainless spacer(s), refer to Baffle Filters and Stainless Steel Spacers on Page 18 for baffle filter and stainless spacer placement. Refer to Figure 10 for the following five steps: Angle baffle filter toward back of hood. Push baffle filter up until almost level. Slide forward into recess behind the front of hood. Lower baffle filter. Slide back until it fits into resting positions. 9. Repeat Step 8 to install all baffle filters and stainless spacers (if any). 10. OPTIONAL: Install heating lamps (not included) last. 120-Volt, 250-Watt maximum per lamp. 11. Turn powe ON in control panel. Check all lights and fan operations. 12. Make sure to leave this Installation Guide for the homeowner. Figure 10 Figure 7 Figure 8 Figure 9 Page 11... -
Page 13: Range Hood Operations
Range Hood Operations Controls for touch sensitive models: Page 12... -
Page 14: Range Hood Operations
Range Hood Operations (Continued) Page 13... -
Page 15: Troubleshooting
• Reduce the number of elbows and length of duct work. Check if all joints are properly connected, sealed, and taped. • Make sure the power is on high speed for heavy cooking. NOTE: For all other inquiries, please contact your VICTORY local reseller. Page 14... -
Page 16: Use And Care Information
Use and Care Information Operations: • Read and understand all instructions and warnings in this manual before operating the appliance. Save these instructions for future reference. • Always leave safety grills and filters in place. Without these components, operating blowers could catch on to hair, fingers and loose clothing. • NEVER dispose cigarette ashes, ignitable substances, or any foreign objects into blowers. • NEVER leave cooking unattended. When frying, oil in the pan can easily overheat and catch fire. The risk of self combustion is higher when the oil has been used several times. • NEVER cook on “open” flames under the range hood. Check deep-fryers during use: Superheated oil may be flammable. Cleaning: • The saturation of greasy residue in the blower and filters may cause increased inflammability. Keep unit clean and free of grease and residue build-up at all times to prevent possible fires. • Filters must be cleaned periodically and free from accumulation of cooking residue (see cleaning instructions on Page 23). Old and worn filters must be replaced immediately. -
Page 17: Measurements & Diagrams
Measurements and Diagrams Victory Tornado Island Hood Page 16... - Page 18 Frame assembly: 1. Range hood body 2. Lower frame 3. Upper frame bolted to the lower frame 4. Main ceiling frame ( secured to structural trusses) Page 17...
- Page 19 Circuit Diagram: Page 18...
- Page 20 Range Hood Assembly: Description Quantity Hood Body GU10 Lights (depending on the size of the hood) 2, 3 or 4 Control Switch Oil Tunnel Blower Assembly (Motor, Fan Blade, Protective Grill and Squirrel Cage) 1 Electrical Assembly Spacers ( If any) 1, 2 or 3 Stainless Steel Filters (depending on the size of the hood) 2, 3 or 4 Power Cord Ducting Transition 8” Page 19...
- Page 21 Maintenance SAFETY WARNING: Never put your hand into area housing the fan while the fan is operating! For optimal operation, clean range hood and all baffle/spacer/filter/grease tunnel/oil container regularly. Regular care will help preserve the appearance of the range hood. Cleaning Exterior surfaces: • Clean periodically with hot soapy water and clean cotton cloth. Do not use corrosive or abrasive detergent (e.g. Comet Power Scruv , EZ-Off oven cleaner), or steel wool/scoring pads, which will scratch and damage the stainless steel ® ® surface. For heavier soil use liquid degrease such as “Forumla 409 ” or “Fantastic ” brand cleaner. ®...
- Page 22 Maintenance (Continued) Replacing the Light Bulb Using the Inner Ring Opener: • Make sure the range hood is unplugged or turn OFF breaker. • Make sure the lights are cool to touch, carefully align the arrow on the inner ring with the arrow on the outer ring where it says OPEN with the Inner Ring Opener as shown in Figure 1. Figure 1. • The inner ring will loosen and the light bulb will be available for removal as shown in Figure 2. Figure 2. • Install a new light bulb and reverse the steps. • Turn ON breaker and range hood to test for operation.
- Page 23 What is Not Covered: Consumable parts such as light bulbs, metal and charcoal filters. The natural wear of finish, and wear due to improper maintenance, use of corrosive and abrasive cleaning products, pads, and oven cleaner products. Chips, dents or cracks due to abuse, misuse, freight damage, or improper installation. Damage of product caused by accident, fire, floods or act of God. The manufacturer and/or distributor/reseller is not liable for, and does not cover under warranty, any loss of properties or any costs associated with removing, servicing, installing, or determining the source of problems with this product. This warranty is valid in the country of the original purchase at retail. It is non-transferable and applies only to the original purchaser and does not extend to subsequent owners of this product. Any applicable implied warranties, including the war- ranty of merchantability, are limited in duration to a period of express warranty as provided herein beginning with the date of original purchase at retail and, no warranties, whether express or implied, shall apply to this product thereafter. To obtain warranty service, you may contact your local VICTORY reseller from which you purchased this product. Please confirm the terms of your local reseller’s policies prior to contacting. Typically, you must include product identification in- formation, including model number and serial number with a detailed description of the problem you are experiencing. You must also include proof of the date of original retail purchase as evidence that the product is within the applicable warranty period. Page 22 The information in this document is subject to change without notice, please contact your local reseller for updated details.
-
Page 24: Cleaning
Damages caused during transit are not covered under our warranty. Please contact us to file an insurance claim. Please inspect contents of package(s) carefully upon receiving! We must be notified of any damages and/or missing parts within seven (7) days upon your receipt of package(s). Claims will not be accepted after seven (7) days. NOTE: Items were thoroughly tested and carefully packed in our factory before shipping. Products must be returned in good working condition with ALL original parts and documentation packed in ALL original cartons, fillers and shipping cartons. A restocking fee of 15% will be charged for all approved return(s). Exchanges or returns may not be accepted if any packaging is missing. Make sure to inspect the hood for damages and defects before installation. Appearance flaws of the hood found after installation and not affecting hood performance is not covered under our warranty for returns or exchang- es. Service visits not covered under warranty will carry a service charge. Before Installation: Return for exchange or refund (please see above for acceptable returns). After Installation: NO exchange or refund. Contact Us If you need any assistance, please contact your VICTORY range hoods local reseller. Please have your order number and model of the range hood ready. This information will help them better respond to your request. If you need replacement parts, we recommend that you only use genuine parts. Our accessories and parts are engineered and designed specifically for this series of range hood, each is rigorously tested assuring the utmost in durability and reliability, providing a factory match, factory-installed appearance and functionality tailored to each individual range hood model. VICTORY range hoods for professionals 7272 Buller Ave Burnaby BC V5J4S3 Canada Page 23 The information in this document is subject to change without notice, please contact your local reseller for updated details.
Need help?
Do you have a question about the Tornado and is the answer not in the manual?
Questions and answers