Table of Contents
Advertisement
Quick Links
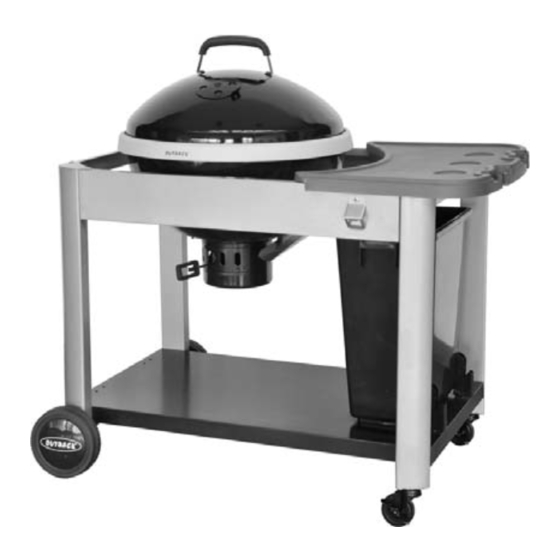
Assembly and Operating Instructions for Outback®
Photographs are not to scale.
Specifications subject to change
without prior notice.
•
•
•
•
•
•
WARNING
•
•
Cook Dome 703 Charcoal
CK571T
For outdoor use only. Not for commercial use.
Read instructions before using the appliance. Failure to follow instructions could
result in death, serious bodily injury, and/or property loss.
Warning: accessible parts may be very hot. Keep young children and pets away.
CAUTION: Do not use spirit or petrol for lighting or re-lighting! Use only
firelighters complying to EN1860-3!
Do not move the appliance during use.
Any modification of the appliance, misuse, or failure to follow the instructions
may be dangerous and will invalidate your warranty. This does not affect your
statutory rights.
Retain these instructions for future reference.
For Flare-up control please refer to the 'OPERATION' section of this manual.
Advertisement
Table of Contents

Related Manuals for Outback Cook Dome 703 Charcoal


Summary of Contents for Outback Cook Dome 703 Charcoal
- Page 1 Assembly and Operating Instructions for Outback® Cook Dome 703 Charcoal CK571T Photographs are not to scale. Specifications subject to change without prior notice. • For outdoor use only. Not for commercial use. • Read instructions before using the appliance. Failure to follow instructions could result in death, serious bodily injury, and/or property loss.
-
Page 2: Parts List
1. Parts List Quantity varies according to model purchased. Specifications subject to change without prior notice. For more details on hardware, please see the corresponding ‘Hardware Reference Diagram’. Outback Charcoal Kettle CODE PART BBQ on Trolley 57cm Hood HOOD Hood Handle... -
Page 3: Parts Diagrams
2. Parts Diagrams Quantity varies according to model purchased. Specifications subject to change without prior notice. For more details on hardware, please see the corresponding ‘Hardware Reference Diagram.’... - Page 4 3. Hardware Reference Diagram Specifications subject to change without prior notice. CODE PART ILLUSTRATION CODE PART ILLUSTRATION ST4.0x10 M6x10 Screw Bolt M4x10 M6 Nut Bolt M5x30 Locknut Bolt...
- Page 5 4. Assembly IMPORTANT! • TOOLS NEEDED FOR ASSEMBLY: Medium size flat blade or Phillips/Crosspoint screwdriver, adjustable spanner or metric spanner set. • Remove any internal components or packaging from the barbecue body. • Whilst every care is taken in the manufacture of this product, care must be taken during assembly in case sharp edges are present.
- Page 6 Carefully turn the trolley assembly over, right side up. Assemble the Rear Support (C11) onto the Left and Right Rear Legs (C4, C6) by inserting M6x10 Bolts (D4) through the rear support from the inside, and screwing into the legs. Attach the Side Supports (C12) onto Left and Right Legs (C3, C4, C5, C6) using M6x10 Bolts (D4) as shown.
- Page 7 Left Side Right Side Attach the Front Panel (C9) onto Left and Right Front Legs (C3, C5) using M6x10 Bolts (D4) as shown. Lay the Side Shelf (C1) on its back, then carefully turn the trolley assembly upside-down. Place the trolley assembly into position. Fix the side shelf onto the rear side of trolley assembly using M6x10 Bolts (D4) as shown.
- Page 8 Assemble the Corner Brackets (C8) onto the trolley assembly using ST4.0x10 Screws (D1) as shown. Attach the Body Brackets (C2) onto Front Panel (C9) and Rear Support (C11) using M6x10 Bolts (D4) as shown.
- Page 9 Attach the Body Ring (B2) onto barbecue body using three M5x30 Bolts (D3). Carefully lay the Barbecue Body (B1) in position on the trolley assembly. Align the guide holes in barbecue body and fixing holes in body brackets, insert M6x10 Bolts (D4) through the guide holes in barbecue body and screw them into the fixing hole in body brackets.
- Page 10 Place the Charcoal Grill (B4) onto the lower brackets in barbecue body. Ensure the charcoal grill lies level within the body. Place the Cooking Grill (B3) onto the upper brackets in barbecue body. Ensure the cooking grill lies level within the body. Carefully place the Hood (A1) onto the barbecue body.
- Page 11 Insert the Ash Tray / Vent Tool (B6) into the Ash Tray (B5) as shown. Slide the ash tray into position underneath the barbecue body. Caution: The ash tray may become very hot, please use the ash tray / vent tool to insert or remove Attach the Hinges (C15) onto trolley base by inserting M6x10 Bolts (D4) through the hinges, trolley base and secure with M6 Nuts (D5).
- Page 12 Remove the Hinge Pins (C16) and R shaped Clips (C17) from the Charcoal Bin (C14). Place the charcoal bin in position on trolley base, make sure that the upper hinges on the charcoal bin are located between the lower hinges on the trolley base. Secure the charcoal bin with the hinge pins and R shaped clips.
-
Page 13: Installation
5. Important Information Ensure the ash tray is in place before use. Do not move the cooking grill and charcoal Please read these instructions carefully grill until after the appliance has completely before assembly and use of your barbecue. cooled down. Never remove the ash tray whilst the Retain these... - Page 14 to be closer than 5cm to the surrounding circulate and the charcoal will burn faster than sides of the barbecue body. with the vents closed. Caution—the appliance may become very hot. Oven gloves and the grill lifting handles, or ash tray / vent tool should 7.2.
-
Page 15: Care And Maintenance
Heavy-duty Outback® barbecue covers and other accessories are In the event of a fat fire: available from your local Outback® stockist. • Keep everyone at a safe distance from the barbecue and wait until the fire has burnt Even when your barbecue is covered for its out. - Page 16 Failure to keep it clean, and excessive build up Notes: can result in a fat fire. This can be hazardous and severely damage the barbecue. This is not a fault in the barbecue and is therefore not covered by the terms of the warranty. If required, the tray can be washed in hot soapy water.
- Page 17 OUTBACK barbecues are warranted to the original purchaser against defects in materials and workmanship for a period of one (1) year from the date of purchase. OUTBACK will, within this period, supply replacements for defective parts free of charge provided that: ♦...
Need help?
Do you have a question about the Cook Dome 703 Charcoal and is the answer not in the manual?
Questions and answers