Table of Contents
Advertisement
Quick Links
WIRELESS 433 MHz TEMPERATURE STATION
Instruction Manual
Cat. No. 30.3015
Thank you for choosing this wireless temperature station from TFA.
BEFORE YOU USE IT
Please be sure to read the instruction manual carefully.
This information will help you to familiarise yourself with your new device, learn all of its functions and
parts, find out important details about its first use and how to operate it, and get advice in the event of
faults.
Following the instruction manual for use will prevent damage to the device and loss of your statutory rights
arising from defects due to incorrect use.
We shall not be liable for any damage occurring as a result of not following these instructions.
Likewise, we take no responsibility for any incorrect readings and for any consequences which
may result from them.
Please take particular note of the safety advice!
Please look after this manual for future reference.
SCOPE OF SUPPLY:
Temperature station (basic unit)
•
•
Instruction manual
FIELD OF OPERATION AND ALL OF THE BENEFITS OF YOUR NEW TEMPERATURE
STATION AT A GLANCE
DCF radio controlled time with manual setting option
•
48
Advertisement
Table of Contents

Related Manuals for TFA WIRELESS 433 MHz TEMPERATURE STATION


Summary of Contents for TFA WIRELESS 433 MHz TEMPERATURE STATION
- Page 1 WIRELESS 433 MHz TEMPERATURE STATION Instruction Manual Cat. No. 30.3015 Thank you for choosing this wireless temperature station from TFA. BEFORE YOU USE IT Please be sure to read the instruction manual carefully. This information will help you to familiarise yourself with your new device, learn all of its functions and parts, find out important details about its first use and how to operate it, and get advice in the event of faults.
-
Page 2: For Your Safety
• Time zone option ±12 hours Indoor and outdoor temperature display with MIN/MAX records and time of reception • • Indoor and outdoor humidity display as RH% with MIN/MAX records Data logging function – with adjustable recording intervals, can store up to 3000 sets of •... - Page 3 Caution! Risk of injury: Keep this instrument and the batteries out of reach of children. • • Batteries must not be thrown into the fire, short-circuited, taken apart or recharged. Risk of explosion! • Batteries contain harmful acids. Low batteries should be changed as soon as possible to prevent damage caused by a leaking battery.
- Page 4 ELEMENTS: The temperature station Hanging Hole LCD screen Battery Compartment Function keys Foldout stand Cable socket (to PC) The outdoor transmitter (purchased separately) Remote transmission of outdoor temperature and humidity to • temperature station by 433 MHz Shower proof casing •...
- Page 5 HOW TO INSTALL AND REPLACE BATTERIES IN THE TEMPERATURE STATION The temperature station uses 3 x AA, IEC LR6, 1.5V batteries. To install and replace the batteries, please follow the steps below: Insert finger or other solid object in the space at the bottom center of the battery compartment and lift up to remove the SIZE AA LR6 cover.
-
Page 6: Battery Change
BATTERY CHANGE: User shall replace batteries of the temperature station when the battery low indicator is displayed at the LCD. If user does not replace batteries, working error may be resulted. Note: After changing batteries in temperature station, there is no need for user to reset the temperature •... - Page 7 Insert batteries to the first transmitter. The temperature station will start learning the transmitter. The outdoor Channel 1 (out 1) temperature and humidity readings will then be displayed. User may observe the outdoor channel icon appear. (If this does not happen after 3 minutes, the batteries will need to be removed from both units and reset from step 1.) After the readings from the first transmitter (Channel 1) are successfully shown by the temperature station, insert batteries to the second transmitter.
- Page 8 DCF-77 RADIO CONTROLLED TIME The time base for the radio controlled time is a Cesium Atomic Clock operated by the Physikalisch Technische Bundesanstalt Braunschweig which has a time deviation of less than one second in one million years. The time is coded and transmitted from Mainflingen near Frankfurt via frequency signal DCF-77 (77.5 kHz) and has a transmitting range of approximately 1,500 km.
-
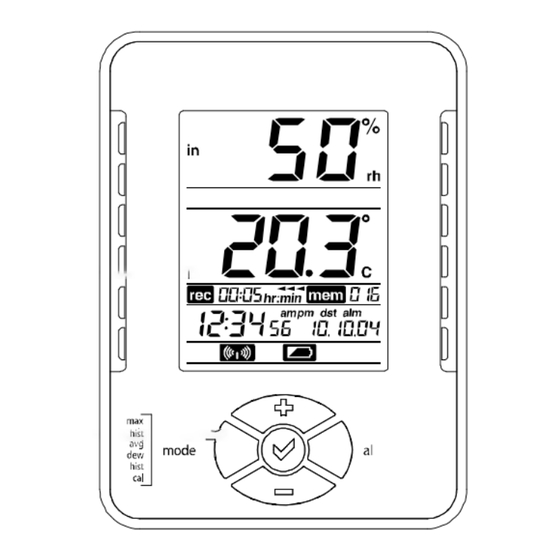
Page 9: Function Keys
FUNCTION KEYS: Temperature Station: There are 5 function keys in the Temperature Station: Plus key OK key Mode Alarm key Minus key OK key ( • In normal display mode, press and hold for 3 seconds to enter the manual setting mode for the following: LCD contrast level Time zone... - Page 10 Recording intervals to memory (hr:min) Re-learning/ Removing channels Number of channels to be saved to memory • In view mode or alarm mode, press to go back to normal display mode Plus (+) and Minus (–) key • In normal display mode, press to select a channel (the indoor sensor or one of the outdoor transmitters) Press to make adjustment (increase or decrease) in different manual settings and alarm setting •...
- Page 11 • In alarm setting mode, press to toggle between the following settings: high humidity alarm low humidity alarm high temperature alarm low temperature alarm • In manual setting mode, press to go back to normal display mode LCD Screen: The LCD screen is split into 4 sections displaying the relatively humidity, temperature, EPROM status and Time/ Date.
-
Page 12: Manual Settings
MANUAL SETTINGS: In normal display mode, press and hold the OK key for 3 seconds to enter the manual setting mode for the following: LCD contrast setting Time zone setting Daylight saving time On/ Off setting Radio-controlled time reception On/ Off setting 12/ 24 hour format setting Time setting (Hour and Minute) Calendar setting (Year, Month and Day) -
Page 13: Time Zone Setting
The LCD contrast can be set within 8 levels, from LCD 0 to LCD7 (Default setting is “LCD 5”): In normal display, press and hold the OK ( ) key until the digits “Lcd” starts flashing. Use the Plus (+) and Minus (–) key to view all levels of contrast. Select the desired LCD contrast. -
Page 14: Daylight Saving Time Setting
DAYLIGHT SAVING TIME SETTING Digits flashing Press and hold the OK key until the digits “Lcd” starts flashing. Press shortly the OK key two times to enter the daylight saving time setting. The digit “dS” will be flashing. Use the Plus and Minus key to set the daylight saving time function to “On” or “Off” mode. Press the Mode or Alarm key to confirm and go back to the normal display mode. - Page 15 TIME RECEPTION ON/OFF SETTING: Digits flashing In area where reception of the DCF time is not possible, the DCF time reception function can be turned OFF. The clock will then work as a normal Quartz clock. (Default setting is ON). Press and hold the OK key until the digits “Lcd”...
-
Page 16: Manual Time Setting
12/24-HOUR FORMAT SETTING: Digits flashing The time display can be selected to show hours in 12-hour or 24-hour settings. (Default 24-Hour) Press and hold the OK key until the digits “Lcd” starts flashing. Press and release the OK key four times to enter the time format setting. The digit “24h” will be flashing. - Page 17 Hour flashing Minutes flashing Press and hold the OK key until the digits “Lcd” starts flashing. Press and release the OK key five times to enter the hour setting. The hour digit in the time LCD will be flashing. Use the Plus and Minus key to set the hour. Press the OK key one more time to confirm the hour and advance to the minute setting.
-
Page 18: Calendar Setting
CALENDAR SETTING: Year Date Month The date default of the temperature station is 1. 1. in the year 2004. Once the radio-controlled time signals are received, the date is automatically updated. However, if the signals are not received, the date can also be set manually. - Page 19 Use the Plus and Minus key to set the day. Press the Mode or Alarm key to confirm and go back to the normal display mode. TEMPERATURE UNIT SETTING (°C/ °F): Digit flashing The temperature display can be selected to show temperature data in °C or °F (Default °C). Press and hold the OK key until the digits “Lcd”...
- Page 20 RECORDING INTERVAL (hr:min) SETTING Digits flashing The time intervals at which the temperature and humidity data saved to memory can be set to one of the following: 1-minute; 5-minute; 10-minute; 15-minute; 20-minute; 30-minute; 1-hour; 2-hour; 4-hour; 6-hour; 8-hour; 12-hour or 24-hour. Your appliance has been developed and produced to the very latest technical standards.
- Page 21 Press and hold the OK key until the digits “Lcd” starts flashing. Press and release the OK key eleven times to enter minute setting of the recoding interval. The min in the record LCD will be flashing. Use the Plus and Minus key to set the desired recording interval. Press the Mode or Alarm key to confirm and go back to the normal display mode.
- Page 22 Press Plus to get in Learn/ Remove setting of channels. The channel icon “1” will be flashing. Press OK key ( ) to select another channel, if necessary (1-5). Press Plus to set the selected channel to “Re-learn” state (The channel icon will flash in two places on the display), or press Minus to remove the channel (The channel icon will disappear).
- Page 23 Up to 5 outdoor transmitters can be received by the temperature station. User may decide the number of transmitter data to be save to the permanent memory of the temperature station. For instant, user may apply 5 transmitters but set to save the data only from particular 3 transmitters. To set the number of transmitters whose data are to be saved in the system memory: Press and hold the OK key until the digits “Lcd”...
- Page 24 TOGGLING BETWEEN DIFFERENT CHANNELS (INDOOR AND OUTDOOR CHANNELS): Press the Plus or Minus key to toggle between the Temperature and humidity readings of the indoor channel and the outdoor transmitter channel(s). The channel identification icon (“in”, “out 1”, “out 2”, “out 3”...
- Page 25 The Max temperature and Max humidity Max icon flashing In normal display mode, press the Mode key once. The maximum temperature and maximum humidity measured by the channel, and the date and time of the maximum temperature recorded will be displayed. The “max”...
- Page 26 The Min temperature and Min humidity Min icon flashing In normal display mode, press the Mode key two times. The minimum temperature and humidity measured by the channel, and the date and time of the minimum temperature recorded will be displayed. The “min” icon will be flashing.
- Page 27 The average value of the last 100 sets reading Average icon flashing In normal display mode, press the Mode key three times. The average temperature and humidity value of the data which have been saved in the system memory will be displayed. The “avg” icon will be flashing. If the channel is not set to be saved in the system memory, no average value will be estimated and “--.-“...
- Page 28 The dew point temperature Dew point temperature icon In normal display mode, press the Mode key four times. The dew point temperature will be displayed next to the flashing “td” icon.
- Page 29 The history data sets of temperature and humidity History data icon flashing In normal display mode, press the Mode key five times. The “hist” icon will be flashing and the last recorded temperature and humidity reading with the time of record will be displayed. By pressing the Minus key, the previous sets of readings which were measured at the user-selected recording intervals may be viewed.
- Page 30 To calibrate the humidity reading: Press the Plus or Minus key to select a channel (the sensor at the temperature station or one of the outdoor transmitters) Press shortly the mode key for six times. The calibration icon will be flashing. Press the OK key once.
- Page 31 Temperature correction flashing Calibration icon flashing Press the Plus or Minus key to set the desired correction for the humidity reading. Then press the Alarm key to exit. ALARM PROGRAMMING FOR INDOOR/OUTDOOR TEMPERATURE AND HUMIDITY The temperature station will allow users to set a range of specific alarms to meet specific temperature and humidity conditions set by the user.
- Page 32 Press and hold the Alarm key for about 3 second to enter high humidity alarm setting. The humidity digits, high limit icon and the alarm icon will start flashing. Press the Mode key to select to “activate” or “deactivate” the high humidity alarm. (“Alarm On” or “Alarm Off”...
- Page 33 Press the Mode key to select to “activate” or “deactivate” the low humidity alarm. (“Alarm On” or “Alarm Off” icon will be displayed) Press the Plus or Minus key to set the desired value of the low humidity alarm point. Press OK key to return to the normal display or press the Alarm to enter the high temperature alarm setting.
- Page 34 Press OK key to return to the normal display. Note: • The alarm allow user to set individually the high or low threshold upon his requirements. For example, the user can set the thresholds for temperature to 35°C (high) and 25°C (low), while only activating high temp alarm and deactivating low temp alarm.
- Page 35 CLEAR DATA IN THE TEMPERATURE STATION CLEARING THE MAX/MIN TEMPERATURE AND HUMIDITY DATA OF A PARTICULAR CHANNEL To clear the max/min data of a channel: Press the Plus or Minus key to select a channel. Press and hold the Mode key for 3 second. The maximum and minimum temperature/ humidity data and the time of record will be reset to the current value.
- Page 36 CLEARING ALL DATA AND SETTINGS OF THE TEMPERATURE STATION FROM THE PERMANENT MEMORY (FACTORY RESET) The factory reset needs to be launched if malfunction on the temperature station occurs. To reset the temperature station: Ensure that the unit is in normal display, not displaying max, min, or history. And the unit is not making any DCF or HF reception.
- Page 37 Note: All data in temperature station will be cleared after the factory reset. The permanent memory of the temperature station will be reset and all the data (of all channels) stored. Also, all the previous settings of the station including the date and time, alarm, calibration settings will be cleared. The display will show some running digits when the temperature...
- Page 38 After batteries are re-inserted, the station will automatically launch the learn mode. The signal receipt indicator will be displayed. User needs to set again the temperature station for the desired application. (See ”SETTING UP” in previous clause) Note: If the battery level is low, the digits “No EPr” may be displayed on LCD after resetting, indicating that •...
- Page 39 CHECKING FOR 433MHz RECEPTION If the outdoor temperature data is not being received within three minutes after setting up (or outdoor display show “- -. -” in the outdoor section of the temperature station after 3 failed attempts during normal operation), please check the following points: The distance of the temperature station or transmitters should be at least 2 meters away from any interfering sources such as computer monitors or TV sets.
- Page 40 Fix a screw (not supplied) into the desired wall, leaving the head extended out by about 5mm. Away from the base and hang the station onto the screw. Remember to ensure that it locks into place before releasing. POSITIONING THE OUTDOOR TRANSMITTER The outdoor transmitter is supplied with a holder that may be attached to a wall with the screws supplied.
-
Page 41: Care And Maintenance
CARE AND MAINTENANCE Clean the instrument and the transmitter with a soft damp cloth. Do not use solvents or scouring • agents. • Remove the batteries if you do not use the product for a lengthy period. TROUBLESHOOTING Problems Solution No indication on the •... -
Page 42: Specifications
Never throw flat batteries and rechargeable batteries in household waste. As a consumer, you are legally required to take them to your retail store or to appropriate collection sites according to national or local regulations in order to protect the environment. - Page 43 TFA Dostmann GmbH & Co. KG, Zum Ottersberg 12, D - 97877 Wertheim No part of this manual may be reproduced without written consent of TFA Dostmann. The technical data are correct at the time of going to print and may change without prior notice.
Need help?
Do you have a question about the WIRELESS 433 MHz TEMPERATURE STATION and is the answer not in the manual?
Questions and answers