
Related Manuals for Gastroback Vital Juicer Pro


Summary of Contents for Gastroback Vital Juicer Pro
-
Page 1: Operating Instructions
Operating Instructions Vital Juicer Pro Art.-Nr. 40117 Vital Juicer Pro Read all provided instructions before first use! Model and attachments are subject to change! For domestic use only! -
Page 2: Table Of Contents
Carefully read all provided instructions before you start running the appliance and pay attention to the warnings mentioned in these instructions. Table of Contents Important safeguards....................27 Safeguards for daily operation ................... 27 Important safeguards for all electrical appliances ............28 Moving parts –... -
Page 3: Dear Customer
Dear CusTomer! Congratulations! A series of new possibilities comes with your new Gastroback Vital Juicer Pro. With the current focus on fresh and natural foods, freshly made vegetable and fruit drinks are becoming a favourite part of our daily diet. -
Page 4: Important Safeguards For All Electrical Appliances
any other utensils to push down the food. Do not push down the food too fast and vigo- rously. Do not allow the pulp container to overfill, as this may prevent correct operation or damage the appliance. When juicing hard fruits and vegetables and/or pushing down the food with firm pressure, the motor could stall or stick during operation. -
Page 5: Moving Parts - Risks Of Injuries To Persons
moving parts – risks of injuries to persons • Extra wide feed chute! Never insert your fingers or any other objects (hair, clothes, brushes, cooking utensils) in the feed chute with the appliance connected to the power supply. Always switch off (power switch position '0') the appliance, wait for the motor to stop completely and unplug the appliance, before removing the juicer cover. -
Page 6: Get To Know Your Juicer
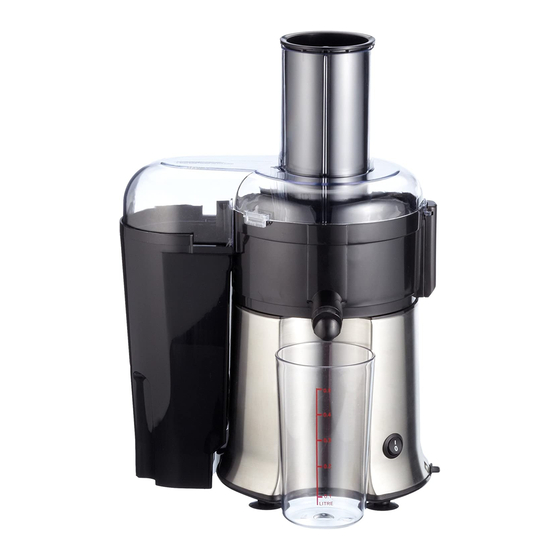
geT To know your JuICer Food pusher for pushing fruit and vegetables down the feed chute Juicer cover with feed chute, pulp outlet and safety cover lock Juice collector with spout and locking slot Pulp container Motor base Power switch Juice container Stainless steel filter basket... -
Page 7: Assembling The Juicer
assemblIng The JuICer Before first use, clean all removable parts of the juicer in warm soapy water (see ›Care and Cleaning‹). For assembling please refer to the figures above (see ›Get know your Juicer‹). warnIng: Please handle with care. There are extremely sharp cutting blades in the base of the filter basket and a sharp protrusion in the feed chute. Before you plug in the juicer, always ensure that the appliance is assembled correctly. 1. - Page 8 6. Place the pulp container into position on the left side of the motor base (see figure XX). Tip: To minimize washing up we recommend to place a plastic freezer bag into the pulp container to collect the pulp. 7. Rotate the juicer cover counter-clockwise as far as possible without violation to lock the juicer cover on the juice collector.
-
Page 9: Operating Your Juicer
oPeraTIng your JuICer warnIng: Before connecting to the mains power supply and switching on, always ensu- re, that the appliance is assembled properly and that there are no utensils in the feed chute other than the food pusher. Do not insert your hands, cooking utensils or other objects (i.e. hair, clothes, brushes, tissue) in the feed chute, when the appliance is connected to the power supply. Before removing the juicer cover always switch off the appliance, wait until the motor completely stops, and unplug from the power outlet. -
Page 10: Care And Cleaning
CauTIon: Do not operate the unit continuously for longer than 7 minutes. About 10 kg apples or carrots can be extracted within this time. If you want to extract a larger amount of fruit or vegetables, interrupt juicing after 7 minutes to let the motor cool down. Do not allow the pulp container to overfill, because this may prevent proper operation of the juicer or cause damage. - Page 11 3. To unlock the juicer cover, rotate the juicer cover clockwise as far as possible without violation. Remove the pulp container and juicer cover. warnIng: Beware of the sharp cutting blades in the filter basket and feed chute. Do noT touch the inner side of the filter basket with your hands. Only grasp the filter basket on the rim.
-
Page 12: Cleaning The Juicer
Cleaning the Juicer warnIng: Do noT immerse the motor base or power cord in any liquids. Do not spill any liquids on the motor base or power cord. Do noT place the motor base or power cord in an automatic dishwasher! Beware of the sharp cutting blades in the filter basket and feed chute. Do not touch the blades when handling the filter basket. -
Page 13: Storage
Trouble shooTIng guIDe On any problems occurring that are not mentioned here, please contact your authorised service centre. To get more information about the appliance, contact Gastroback GmbH, Gewerbestr. 20, D-21279 Hollenstedt (Germany), Phone: +49 (0) 4165 / 22 25-0. -
Page 14: Remove Blockage
To avoid further blockage: • Remove any hard and fibrous parts of the food (i.e. stalks and seeds). • Push the food pusher down slower. • Do not allow the pulp container to overfill. • Possibly use another variety of fruits and vegetables. TeChnICal sPeCIfICaTIons Model: Art. No. 40117 Vital Juicer Pro Power supply: 230 V / 50 Hz Rotations: with load 12.000 per minute without load 17.000 bis 18.500 per minute Maximum power consumption:... -
Page 15: Information And Service
InformaTIon anD serVICe Please check www.gastroback.de for further information. For technical support, please contact Gastroback Customer Care Center by phone: +49 (0)4165/22 25-0 or e-mail info@gastro- back.de. warranTy We guarantee that all our products are free of defects at the time of purchase. Any demon- strable manufacturing or material defects will be to the exclusion of any further claim and within warranty limits of the law free of charge repaired or substituted. -
Page 16: Recipe Ideas
reCIPe IDeas... -
Page 17: Fresh Starts
fresh starts Pineapple-Peach-Pear-Juice Makes 3 cups apple-Carrot-Celery-Juice ½ small pineapple, peeled and halved 2 peaches, halved and seeds removed You may alter the amounts of either the car- 2 small ripe pears rots or apple to make the juice sweeter or savoury to suit your taste buds: Process pineapple, peaches and pears through the Smart Health Juicer Pro. -
Page 18: Liquid Lunches
kumera-Celery-ginger-orange- beetroot-apple-Celery-Juice Juice Makes 2 cups: 4 medium sized beetroot, trimmed Makes 3 cups: 2 medium Granny Smith apples 4 sticks celery, trimmed 4 sticks celery 1 small kumera (sweet potato), peeled and halved Process beetroot, apples and celery through 2.5 cm piece fresh ginger the Smart Health Juicer Pro. -
Page 19: Icy Coolers
fresh vegetable soup with noodles Pasta with provencal style sauce Serves 4 Serves 4: 1 small tomato 4 tomatoes 1 small onion, peeled and trimmed 2 sprigs fresh parsley 2 carrots 1 stick celery 1 green capsicum, base removed and 2 large cloves garlic seeded 1 small onion, peeled and trimmed... -
Page 20: Spirited Juices
Pear, radish and celery crush Process rockmelon and strawberries through the Smart Health Juicer Pro. Stir in passion Makes 4 cups: fruit pulp. Scoop ice into 4 glasses, pour 3 medium pears over juice, mix well to combine. Serve 4 radishes, trimmed immediately. -
Page 21: Fibre Favourites
honeydew dream beetroot, carrot and orange quencher Makes 4 cups: 1 honeydew melon, peeled, seeded 8 carrots and quartered 2 small beetroot, trimmed 3 tablespoons Midori liqueur 1/4 cup fresh mint leaves 500 ml soda water 4 oranges, peeled 1 cup crushed ice Process carrots, beetroot, mint leaves and Process honeydew melon through the Smart oranges through the Smart Health Juicer... -
Page 22: Chocolate Mousse
rind and parsley. Pour into pastry case and celery pulp, cottage cheese, mint and egg bake at 180 °C for 25 - 30 minutes or until in a bowl. Mix well. Cut filo sheets in half, golden and set. place 3 sheets on bench, cover remain- ing pastry with greaseproof paper, then a Vegetable and bacon soup damp cloth to prevent drying. Brush 1 sheet... - Page 23 ½ cup peanuts, chopped ½ cup sultana ½ cup brown sugar, firmly packed 1½ cups carrot pulp ½ cup oil 2 eggs, lightly beaten ¼ cup sour cream Grease and line a 25 cm x 15 cm loaf pan. Sift flour and baking powder into a large mixing bowl, add nutmeg, cinnamon, cardamom, peanuts, sultana, brown sugar and carrot pulp, stir to combine.
- Page 24 Gewerbestraße 20 . 21279 Hollenstedt / Germany Telefon +49 (0)41 65/22 25-0 . Telefax +49 (0)41 65/22 25-29 info@gastroback.de . www.gastroback.de...
Need help?
Do you have a question about the Vital Juicer Pro and is the answer not in the manual?
Questions and answers